
Related Manuals for Ness pro-lx


Summary of Contents for Ness pro-lx
- Page 1 PRO-LX CONTROL PANEL USER MANU USER MANU USER MANUAL USER MANU USER MANU A$12.00 INC GST...
- Page 2 REV2 Oct 1993 Electronic version, June 2002 NESS SECURITY PRODUCTS Australian Communications Authority TELECOMMUNICATIONS COMPLIANCE Document Part Number: 890–034 For product: PRO-LX dialler control panel © 2002 Ness Security Products Pty Ltd ABN 28 069 984 372 Specifications may change without notice.
- Page 3 CONTENTS Glossary ......................... 1 INTRODUCTION Getting Started ....................... 3 Your Security System ..................... 3 Output Devices ....................... 3 Input Devices ......................3 The Control Panel ......................4 Keypad ........................5 Audible indications (sounds) ..................6 Visual Indications ......................7 Zone and status Indicators ..................7 Operating the Panel ......................
-
Page 4: Glossary
Glossary Access Code - A 3 to 6 digit number needed to disarm the Panel or silence the siren when an alarm is occurring. It may be used to arm the Panel or exclude zones as well. In a system split into areas, the access code may operate only one area. - Page 5 Congratulations on selecting the PRO-LX Control Panel which combines advanced security features with ease of operation. This manual is in tended to help you operate the PRO-LX and become familiar with its significant security features. You may also find it a handy reference to remember little-used features or understand incidental warnings or alarms.
-
Page 6: Your Security System
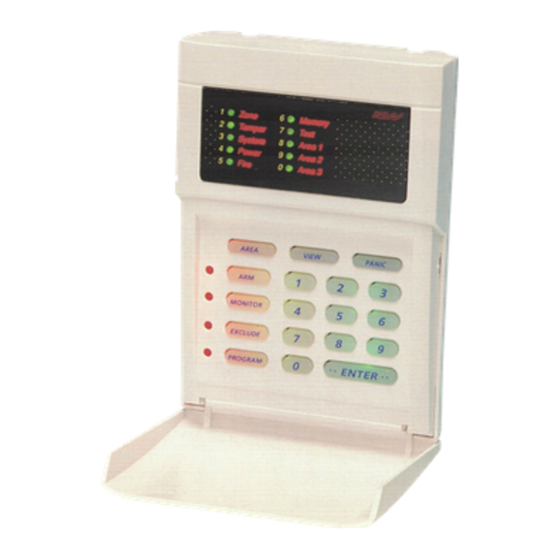
Your Security System At the hub of your security system is a gray box with lots of wires running into it. This is the PRO-LX Control Panel and it uses computer technology to constantly monitor your property and provide advanced security fea- tures. -
Page 7: The Control Panel
The 3 most import ant questions about operating the PRO-LX Control Panel are: How do I arm the Panel? How do I disarm the Panel? What do I do when the siren sounds? You may operate the Panel once you know the answer to these 3 questions. - Page 8 Put only part of system in security mode MONITOR Exclude alarm (temporarilydisable it) EXCLUDE commence exclude selection Change the way system is set up PROGRAM Commence area selection AREA Commence view selection VIEW progress to next memory event PANIC Emergency PRO-LX User Manual...
-
Page 9: Audible Indications (Sounds)
You may also hear warnings: 1 bip every half second entry onto property when Panel is armed intrusion into Monitor area low level alarm 1 bip every second Medical Alarm warning tone Continuous Bips Power Problems eg. mains fail, low battery NESS Security Products... -
Page 10: Visual Indications
Panel and, in association with the zone indicators, the status of the inputs. Summarized below are the various indications that are a unique feature of the PRO-LX. You find them explained in greater detail in the following chapters. Generally, there are degrees of urgency conveyed by these indicators... - Page 11 Area 2 armed AREA2 (slow) Area 2 monitor AREA3 Area 3 armed AREA3 (slow) Area 3 monitor The following status indicators turn on when the operation identified by the adjacent key is active: Panel disarmed Panel armed NESS Security Products...
-
Page 12: Operating The Panel
PROGRAM (fast) Panel in Program Mode 2 (Installation mode) Operating the Panel The most often-used features of the PRO-LX are provided with a variety of ways to operate them to suit different situations. The possible altema- tives are: > one button >... -
Page 13: Area Operation
ENTER eg. 5463 An access code is needed to disarm the Panel. You may select to arm the PRO-LX with this codes as well. You may also select to enter exclude mode by code only. Keyswitch If your system is not split into areas, you may elect to arm and disarm the Panel by keyswitch. -
Page 14: Detecting Intruders Zones
Panel, attend to the problem, and then arm again. Note that the exit delay may be changed. Refer to the chapter titled PROGRAMMING. PRO-LX User Manual... - Page 15 AREA2 ENTER ARM code ENTER -or- AREA3 ENTER ARM code ENTER To arm more than one area., enter a list of areas. For example, to arm all three areas: AREA1 ENTER 2 ENTER 2 ENTER ARM code ENTER AREA1 AREA2 AREA3 NESS Security Products...
-
Page 16: Disarming
AREA 3 ENTER code ENTER To disarm two areas, add another area entry. For example to disarm areas 1 and 2: AREA 1 ENTER 2 ENTER code ENTER AREA2 AREA3 To disarm all areas with administrator code: code ENTER PRO-LX User Manual... -
Page 17: Alarms
MEMORY reminder. See chapter for more details. FEATURES Note that the siren will sound for no longer than a set time (the Siren Reset Time which is shown in the chapter). CONFIGURATION NESS Security Products... -
Page 18: Monitor Mode
This will continue for a time equal to the entry delay. If the alarm is not reset within this time, then the siren will sound for a 2 second burst. (These details depend on how your PRO-LX User Manual... - Page 19 To put more than one area into monitor mode, enter a list of areas. For example, to put all three areas into monitor mode: AREA 1 ENTER 2 ENTER 3 ENTER MONITOR code ENTER AREA1 (slow) AREA2 (slow) AREA3 (slow) NESS Security Products...
-
Page 20: Warnings Given While Armed
2 seconds. 3. Battery Low The battery in the Panel is tested when ARM key pressed. This may, if the battery is low, result in POWER indicator lighting up. See FEATURES chapter on how to view this alarm. PRO-LX User Manual... - Page 21 REPORTING EMERGENCIES Emergency Alarms The PRO-LX Control Panel handles a variety of emergencies which need to be reported and dealt with urgently. In most cases, these emergencies may happen at any time, not just when the Panel is armed. Some emergency alarms are associated with threats to your security equipment, such as tampering (ie, trying to prevent the system from working) or trying to find access codes by trial and error.
-
Page 22: Operation
This report will sound the siren and bring up the label on the keypad. SYSTEM The number of wrong code entries allowed before there is an alarm is normally set to 3. This may be increased to or made unlimited if you PRO-LX User Manual... - Page 23 PROGRAMMING chapter. Tamper Various means are built into your PRO-LX Control Panel and accessories for detecting attempts to penetrate and disable the system. Any such incident is reported as a tamper alarm and the part of the system under attack is identified by number. For example, opening the lid of the Control Panel box generates Tamper 2.
- Page 24 Fire If there are sensors in the building which detect the presence of smoke and heat, then they will be connected to a special 24 hour zone which gives an additional indication as shown. FIRE (fast) PRO-LX User Manual...
-
Page 25: View Alarms
Panel. HOW?: The PRO-LX Keypad normally views zones while idle. When you are in some other mode you enter view mode and immediately view zones. You may then select another alarm group. -
Page 26: View Power
Stand-by battery in Satellite requires charging. This may be the result of power loss back at the Panel (see Power 2). If the cause of the problem is unknown, then get a service person to check the Satellite Battery. PRO-LX User Manual... -
Page 27: View Memory
You will see one of the following types of events: Arming There are a number of indications depending on the particular operation: Panel armed MONITOR (slow) Panel in monitor mode AREA1 (slow) Area monitor AREA2 (slow) Area 2 monitor NESS Security Products... - Page 28 What you see is . . . EXCLUDE + one or more zone indicators on + label indicator ZONE TAMPER SYSTEM POWER The alarm(s) being excluded are described above (see View Alarms). PRO-LX User Manual...
-
Page 29: Exclude
Enter Exclude Mode: EXCLUDE (one button) EXCLUDE ENTER (two button) EXCLUDE code ENTER (code) EXCLUDE Zone indicators reveal excluded zones. Exclude zones: zone ENTER zone ENTER . . . Selected zone indicator lights (zone 1 shown as example). NESS Security Products... -
Page 30: Include
To cancel a previous exclusion. HOW?: Enter exclude mode as if to exclude. Include alarms by following the same procedure as used for excluding them in the first place. Zone indicators switch from on to off to show inclusion. PRO-LX User Manual... -
Page 31: Automatic Zone Test
Test Mode WHEN?: While the system is disarmed and idle - no alarms WHY?: To test outputs and devices connected to them - or - control equipment - or - reset fire sensors after they have “latched”. NESS Security Products... - Page 32 - see table below. The zone light for the output turns on along with the output. Press the same digit key to turn the output off, or exit by pressing ENTER. Press any other key to cancel and commence new operation. PRO-LX User Manual...
-
Page 33: Area Codes And Administrator Codes
If you have an area code, you may then check if your area is secure prior to arming. You will also be able to decide if an alarm is in your area. NESS Security Products... -
Page 34: Extra Instructions For Administrators
To arm this area for high security: ARM code ENTER Medium security: MONITOR code ENTER MONITOR Note that there is no shortcut to arming all areas with an administrator code. You must go through the procedure of selecting each area to do this. PRO-LX User Manual... -
Page 35: Overlapping Areas
Minimum security approach: one area in monitor mode, the rest in monitor mode or armed. Maximum security approach: one area in monitor mode, the rest in monitor mode or disarmed. NESS Security Products... -
Page 36: Program Mode 1 Entry
PROGRAMMING Programming is changing the way your PRO-LX Control Panel is set up to operate. You may also go into programming mode to discover or remember this information. Who may program? Normally programming is restricted to those who really need to do it and are familiar with the procedures. -
Page 37: Programming Codes
(or possibly matches a duress code). If you enter a different code the second time, you will also get an error indication. You may try again to enter a valid code or hit ENTER key to cancel. NESS Security Products... - Page 38 To program an ordinary code with code number in the range of 2 to 15: P code number E code E code E PRO-LX User Manual...
- Page 39 This permits access to Program Mode 1 plus allowing the entire system to be armed. The first access code is always a master code and if it is somehow disabled you will not be permitted to exit out of program mode. NESS Security Products...
-
Page 40: Viewing And Changing Codes
Unlike viewing codes, this may be done regardless of which master code was used to enter programming mode 1. If you start to get the code flashed out, you may proceed without waiting for this to complete and the display will clear immediately. PRO-LX User Manual... - Page 41 To change a master or administrator code to area code or re-assign an area code (code number from 2 to 15): P code number E area E Master code To change any code to a master code with code number from 2 to P code number E 0 E NESS Security Products...
-
Page 42: Entry Delay Time
Exit delay may be programmed individually for each area. To change the exit delay time for particular area: Area1 - P 181 E delay E Area2 - P 182 E delay E Area3 - P 183 E delay E PRO-LX User Manual... -
Page 43: Dialler Operation Dialler Activity
DIALLER OPERATION DIALLER OPERATION The PRO-LX Dialler option allows alarms to be transmitted over a telephone line to a Central Station where appropriate responses can be made on the basis of information received. If you choose to take advan- tage of this option then the dialler operations will happen automatically. -
Page 44: Call Duration
Should your telephone become inoperative, first check that yourdialler is not attempting to dial and if it is not, disconnect the dialler lead. If your phone now operates,leave your dialler disconnected and call your installer for service PRO-LX User Manual... - Page 45 CONFIGURATION Recorded below are all of the PRO-LX program options that can be accessed by a Master Code. These are limited to the 16 Access Codes and Entry and Exit times. All other options relevant to your system are recorded in the Installation Manual Configurationsection.
Need help?
Do you have a question about the pro-lx and is the answer not in the manual?
Questions and answers