Table of Contents

Related Manuals for Strobel 3200D series


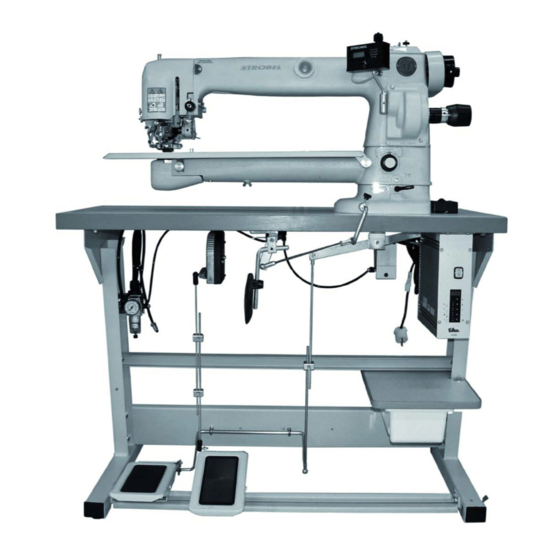
Summary of Contents for Strobel 3200D series
-
Page 1: Operating Instructions
For the professional user Operating Instructions Für den professionellen Anwender Betriebsanleitung Class: 3200D Klasse: Model: Ausführung: Machine number: Maschinen-Nr.: Dated: Stand: S p e z i a l m a s c h i n e n G m b H... - Page 2 The sign of quality ou find the Strobel trademark on every Strobel machine leaving our works. And with good reason. This symbol is a guaranteen of the high quality of our products. Quality which creates trust – trust in our technology, our service and, not least of all, in our good name.
- Page 3 Justify your trust. If you wish to profit from the performance and efficiency of your Strobel machine as long as possible, exact handling and thorough care is necessary. For this reason we kindly request that you read the operating instructions closely.
- Page 5 BA_3200D_A1_140203_en...
- Page 6 BA_3200D_A1_140203_en...
- Page 7 Operating Instructions STROBEL Class 3200D Contents General notes on safety .................... 5 General ........................7 Operating instructions ..................7 Class description, machine number and reference position left/right ..... 7 Machine applications ..................7 Technical data ....................8 Set-up and commissioning ..................9 Unpacking of the machine ................
- Page 8 Operating the sewing machine ................25 Switch-on ...................... 25 Inserting and removing the sewing material – work sequence ..... 26 Sewing ......................27 5.3.1 Hemming with blind stitch ..............28 Problems during sewing and troubleshooting ..........29 Incorrect stitches (Fig. 17) ................32 Machine maintenance .....................
-
Page 9: General Notes On Safety
General notes on safety The non-compliance with the following notes on safety can lead to bodily injuries or to damages of the machine. The machine must only be operated by persons familiar with the relevant operating instructions and who have been instructed accordingly. Before commissioning also read the notes on safety and the operating instructions of the sewing drive manufacturer. - Page 10 13. Warning notes in the operating instructions of the machine, which point out special points of danger, are marked at the appropriate positions with the safety symbol. Warning notes in the operating instructions of the machine which point out special dangers of injury for operating or qualified staff, are marked at the appropriate positions with the symbol It is essential that you observe and follow these notes as well as the generally valid safety regulations.
-
Page 11: General
General Operating instructions Any person involved in the installation, operation, maintenance and repair of the machine must have read and understood the operating instructions and mainly the safety instructions before starting the machine. Class description, machine number and reference position left/right For side-referenced descriptions (right, left), the operating side of the machine is the starting base. -
Page 12: Technical Data
HTD 5M-9 Stitch length-upper feed 2 - 6 mm Kind of stitch: two thread blind stitch lock stitch Stitch type Needle system STROBEL 1828 E Needle size 70, 80, 90 Recommended thread twisted polyester filament Recommended thread size 120/2, 200/2... -
Page 13: Set-Up And Commissioning
Set-up and commissioning Unpacking of the machine Strobel machines are supplied either complete as upper part with motor or as upper part only. With complete delivery the machines are subdivided in smaller packing units due to the great weight and to prevent transport damages. - Page 14 Fig. 1 Class 3200D BA_3200D_A1_140203_en...
- Page 15 Fig. 2 BA_3200D_A1_140203_en...
-
Page 16: Sense Of Rotation (Fig. 3)
Sense of rotation (Fig. 3) The correct sense of rotation of the hand wheel is clockwise when looking at it from the front. Fig. 3 3.3.1 Tension of the toothed belt (Fig. 4) C A U T I O N ! Danger of injury! To check the tension of the toothed belt, switch off the machine electrically, pull the mains plug and ensure the machine has actually stopped by pressing the motor pedal. -
Page 17: Positions Of The Machine
Fig. 4 3.3.2 Positions of the machine C A U T I O N ! Danger of injury! Danger of pulling in parts of clothing and of hair and danger of crushing fingers and stitching fingers with needles! When checking positions with switched-on machine keep fingers and hands away from moving parts. -
Page 18: Intermediate Venting (Fig. 5)
Intermediate venting (Fig. 5) If an intermediate venting with the knee lever should become necessary with attached pneumatic venting, it can be mounted on the screw 130.0041 in its usual position. Fig. 5 BA_3200D_A1_140203_en... -
Page 19: Notes On Usage
By selecting the most suitable needles and threads for the relevant sewing material one can influence the sewing quality decisively. Only tested STROBEL needle system 1828 E should be used. The machine is supplied with needles of thickness 90. Needle thicknesses 70 and 80 are also available. -
Page 20: Threading And Thread Run (Fig. 7)
Fig. 6 Threading and thread run (Fig. 7) C A U T I O N ! Danger of injury! Switch off the machine prior to threading and ensure the machine is off by pressing the pedal for switching the motor. Fig. -
Page 21: Threading The Reel Thread (Fig. 8)
Fig. 7 4.3.1 Threading the reel thread (Fig. 8) By turning the needle lever to its highest position with the hand wheel, the reel 187.0013 can be taken out and reinserted. Fold the reel holder flap away from the reel capsule with a short jerk, the reel then jumps by spring pressure out of the reel capsule so that it can be easily removed. -
Page 22: Thread Tensioning (Fig. 6)
Fig. 8 Thread tensioning (Fig. 6) Dependent on grade, characteristic and thickness of the thread as well as the sewing material, the thread tensioning is adjusted to the required seam diagram with the tensioning nut 279.0624. 4.4.1 Thread tightening spring – needle thread (Fig. 9) The tension of the rotary spring 163.0008 can be modified after releasing the grub screw 176.0406 and by turning at the headed bolt 136.0010. -
Page 23: Winding Up The Thread (Fig. 11)
Fig. 10 Winding up the thread (Fig. 11) The course of the thread during winding up is shown in Fig. 11. Care must be taken that not too much of the thread is wound onto the reel and that the reel walls are not pushed apart, faulty reels must immediately be replaced with new ones. -
Page 24: Adjusting The Stitch Length (Fig. 11 And Fig. 12)
Adjusting the stitch length (Fig. 11 and Fig. 12) C A U T I O N ! Danger of injury! Switch off the machine and ensure it is switched off by pressing the pedal for switching the motor. Otherwise there is a danger of injury through crushing and needle stitches. -
Page 25: Stitch Depth
Stitch depth By stitch depth one understand the distance of the highest plunger position to the outside radius of the needle, the plunger presses the sewing material from underneath in the stitch plate opening, so that the needle stitches into the fabric layers at the required depth. -
Page 26: Changing The Battery (Fig. 13)
Fig. 13 4.7.3 Changing the battery (fig. 13) Switch the toggle switch to position 0 Release 4 cheese-head screws with cross-slot at the back of the housing Remove front part of the housing Change battery. CAUTION! Take note of polarity. Reassemble in reverse order. -
Page 27: Plunger Stop
Plunger stop Frequently it is necessary when trimming fabric to sew over different fabric thicknesses at the same work piece, whereby the penetration depth of the needle, viewed from the upper side of the sewing material, must always remain the same. The plunger built- into our machines carries out this work automatically in cooperation with an adjustable plunger stop mounted on the stitch plate. -
Page 28: Interval Gear
Fig. 14 Interval gear The interval 1:2 guarantees an elastic seam almost free of marking with extremely difficult to work fabric qualities. The principle of the interval is based on the repeat of a different plunger height, which always remains the same with the individual penetrations of the needle. We use it with two different machine types: Needle lever with radial movement. -
Page 29: Operating The Sewing Machine
Operating the sewing machine C A U T I O N ! Danger of injury! Take sufficient care during sewing and observe the sewing area! Otherwise there is a danger of injury through crushing and needle through-stitches. The number of stitches depends on the setting of the pedal to the motor control. -
Page 30: Inserting And Removing The Sewing Material – Work Sequence
Inserting and removing the sewing material – work sequence When during standstill of the machine the needle is approx. 15 mm after its upper dead point in front of the penetration, the presser plate and the plunger can be moved downwards by activating the knee lever. At the same time the needle thread tension is vented. -
Page 31: Sewing
Sewing The piped edge will be inserted into the left side of the stitch plate in vertical position. The garment is at the right side of the needle. Fig. 15 Fig. 16 BA_3200D_A1_140203_en... -
Page 32: Hemming With Blind Stitch
5.3.1 Hemming with blind stitch If there are no experience values available, the best thing to do is to carry out the following settings in sequence: Adjust required stitch length Adjust stitch depth Check plunger stop and if necessary adjust Adjust material guide (if available) Check presser plate lift. -
Page 33: Problems During Sewing And Troubleshooting
Problems during sewing and troubleshooting C A U T I O N ! Danger of injury! Switch off the machine and ensure it is switched off by pressing the pedal for switching the motor. Otherwise there is a danger of injury through crushing and needle stitches. - Page 34 • Inaccurate initial stitch Possible causes: Frequently worn or damaged needle Stitch plate or needle slide plate incorrect adjusted in height Unsuitable needle thickness Remedy: replace damaged needle, check settings, if necessary correct, correct needle thickness • Missing loops Most frequent causes: Incorrect adjusted or displaced hook Loop stroke too small Remedy:...
- Page 35 • The sewing result is not according to your expectations Possible causes: Damaged sewing tools or wear due to improper use or natural wear after longer use of the machine. Machine has displaced itself mechanically Unsuitable needle thickness (see point “4.1 Needles and threads”) Unsuitable sewing thread (see point “4.1 Needles and threads”) Remedy: Exchange damaged parts, service...
-
Page 36: Incorrect Stitches (Fig. 17)
Incorrect stitches (Fig. 17) The correct two-thread blind stitch is shown in Fig. 17. Incorrect stitches can occur if the needle does not take up the sewing material or does not carry out initial stitch or the hook does not take up the thread loop. Fig. -
Page 37: Machine Maintenance
Machine maintenance C A U T I O N ! Danger of injury! Disconnect the machine from the mains and ensure that it is off by pressing the pedal for switching the motor. Otherwise there is a danger of injury through crushing and needle stitches. - Page 39 Und wir können noch mehr für Sie tun! Unser Lieferprogramm bietet für jede Branche und jegliche Anforderung genau die richtige Problemlösung. And we can do a lot more for you! Our range offers the correct problem solution for every branch and for all requirements. Für die Bekleidungs- Für die Schuh- Für die Polster-...
- Page 40 Then phone, write or simply come and see us. You can have further information about our products at any time, or experience the Strobel machines live in our show room. We’re looking forward to meeting you! S p e z i a l m a s c h i n e n G m b H...
Need help?
Do you have a question about the 3200D series and is the answer not in the manual?
Questions and answers