Table of Contents
Advertisement
Advertisement
Table of Contents

Related Manuals for Hanna Instruments Edge HI 2020


Summary of Contents for Hanna Instruments Edge HI 2020
- Page 1 ® pH • EC • DO 00.561.8187 information@itm.co www. .com...
- Page 2 Dear Thank you for choosing a Hanna Instruments product. Customer Please read this instruction manual carefully before using this instrument. This manual will provide you with the necessary information for correct use of this instrument, as well as a precise idea of its versatility.
- Page 3 Included Remove the instrument and accessories from the packaging and verify damage has not occurred during shipping. Remove protective film from meter. Notify your nearest Hanna Customer Service Center if damage is observed. Each instrument is supplied with: edge® Bench cradle Wall cradle Electrode holder USB cable...
-
Page 4: Description
Description edge® enables the user to make fast, accurate measurements of commonly measured laboratory parameters using one of the Hanna edge® digital sensors for pH, Conductivity or Dissolved Oxygen. Each digital sensors has a unique serial number and the parameter that is measures is automatically identified by the meter. - Page 5 Product Diagram Liquid Crystal Display (LCD) Micro USB device connection for Capacitive Touch Keypad power or PC interface 3 mm jack input for edge® digital Standard USB host connection probes for data transfer to a USB Top mounted ON/OFF button thumb-drive Diagram 00.561.8187...
-
Page 6: Probe Diagram
Probe Diagram Probes pH Electrode EC Electrode DO Electrode • Probes process signal directly for noise free measurements • Auto sensor recognition • Store calibration specific data from the last calibration • Are built with materials suitable for use in chemical analysis •... -
Page 7: Keypad Function
Keypad Function CAL/MODIFY - Used to enter - Used to scroll through exit calibration mode. SETUP menu. Used change SETUP, used to initiate changes of a selection when modifying configuration setting. parameter in SETUP. GLP/CFM - Used to display GLP RCL (Recall) - Used to view calibration information. -
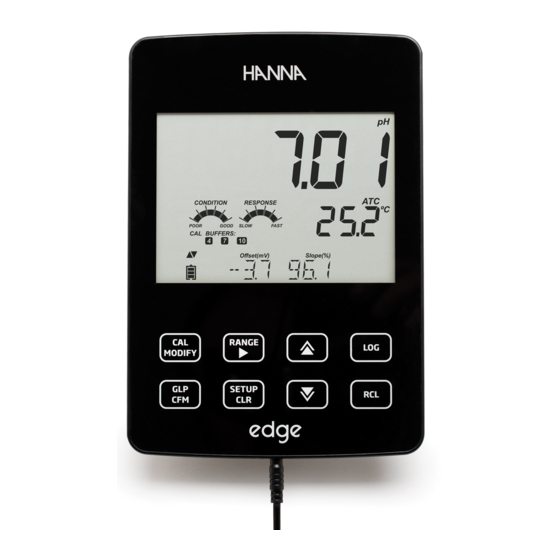
Page 8: Diagram
Guide to Indicators Mode tags Third LCD line, message area Confirm tag 10. Labels USB connection status 11. Second LCD line, temperature pH electrode diagnostics measurement Probes symbol 12. Temperature units Battery symbol 13. Temp. Compensation status Arrow tags, displayed when they 14. -
Page 9: Setup/Installation
Setting Up The main operating modes of edge® are setup, calibration, measurement, data logging, and data export. Follow this general outline of steps to get you edge® started. The following topics are expanded upon in the sections that follow in this manual. -
Page 10: Electrode & Probe Connections
Setting Up Connect the power adapter cable to the bottom socket of the wall cradle. Connect edge® the other end to the power adapter and plug into line power. Connect the 3 mm probe jack to the socket located at the bottom of edge®. Slide edge®... -
Page 11: General Setup
General The following General Setup options are displayed regardless of the sensor being used. These settings remain when switching to another probe type or Setup when no probe is attached. Options are tabulated in the table below with choices and default values. Options are accessed by pressing SETUP. Loop through the options by using the pq arrows. -
Page 12: General Setup
General Basic mode Setup Option Description Choices Default (pH and EC) If enabled, a short audible tone is produced for key Sound stroke or calibration On or Off Available confirmation and a longer tone for wrong key. Select degree Celsius or Fahrenheit Temperature scale for displayed ºC or ºF... -
Page 13: Basic Mode
Basic edge® offers a basic operation mode that streamlines measurement configuration for pH and EC measurements and is useful for many routine Mode applications. Basic pH SETUP reduces parameter selection to the basic set. The meter limits calibration to 5 standard pH buffers; 6.86, 7.01, 4.01, 9.18 and 10.01 buffers. - Page 14 Logging In Setup mode, choose log parameter, press MODIFY then use the u arrow to select between Interval, Manual, or Stability. When Interval is displayed, use the Function p and q arrows to select the setting for the timed interval. When Stability is displayed, use the p and q to select the measurement stability setting.
-
Page 15: Logging Function
Logging Stability Logging Select Stability and choose measurement stability Function criteria in the SETUP menu. Only Stability Medium is available in Basic mode. To initiate the Stability log, press the LOG key while the instrument is in measurement. The “PLEASE WAIT” screen will be displayed briefly followed by a screen showing the stability tag, “LOG”... - Page 16 Viewing If no data was logged for the selected measurement range, the instrument displays the following Logged messages (ex. for pH range): Data “NO MANUAL LOGS” “NO STABILITY LOGS” Press CFM to enter inside lot information to view recorded data. Use the ARROW keys to toggle between different records.
-
Page 17: Viewing Logged Data
Viewing To delete all records of the MANUAL (STABILITY) log, proceed as described on page 16 for LOTS. Logged Data Select the Manual (Stability) lot and press CLR. The ”CLEAR” message will be displayed along with ”MANUAL” or “STABILITY” and CFM tag blinking on the LCD. - Page 18 PC & Storage Logged data on edge® can be transferred from the meter to a USB flash drive by using the log recall function. The minimum requirement for the drive is USB Interface 2.0. Select the pH, EC or DO record you wish to export and follow the simple steps below.
-
Page 19: Setup/Installation
PC & Storage Logged data on the edge® can be transferred from the meter to a PC by following these simple directions. Suitable operating systems include Windows Interface (Xp minimum), OS X or Linux. Connect edge® to the PC using the supplied micro USB cable. Turn on edge®. -
Page 20: Operational Guide
Basic vs For optimum pH measurements, follow these steps: Understand the benefits and features of Standard and Basic Operation. Standard Set up edge® meter by configuring preferences. pH Mode Calibration Measurement The “Standard” pH operation includes up to a 5-point buffer calibration, use of custom buffers, choice of displaying 0.001 pH resolution, use of the full diagnostic features of Calibration Check™... -
Page 21: Ph Meter Configurations
pH Meter edge’s pH meter operation is configured by using the SETUP key with a pH probe connected to the meter. The parameter-specific options will be seen inserted Configurations into the menu. If Basic mode is “On”, the pH parameter list will not be displayed. See Basic mode for a description of this operation before choosing how to SETUP the meter. - Page 22 Preparation Pour small quantities of the buffer solutions into clean beakers. If possible, Calibration use plastic to minimize any EMC interferences. For accurate calibration and to minimize cross-contamination, use two beakers for each buffer solution; one for rinsing the electrode and one for calibration. If you are measuring in the acidic range, use pH 7.01 or 6.86 as the first buffer and pH 4.01 (or 3.00*) as the second buffer.
- Page 23 Rinse and submerse the pH electrode approximately 3 cm (1¼”) into the second buffer solution and stir gently. If necessary, press the ARROW keys to select a Calibration different buffer value. The “ ” along with “STIR” tag will be displayed and “WAIT” will blink on the LCD until the reading is stable.
- Page 24 Note: Custom buffer values can be adjusted ±1.00 pH around the set value during calibration. When a custom buffer is displayed, the “C1” or “C2” Calibration tag is displayed. First Calibration Point When performing a new calibration, or adding to an existing one, the user has a choice of how the first new calibration point will be treated in reference to the existing calibration point.
- Page 25 Calibration If the instrument is not calibrated the calibration history has been deleted, or it has been calibrated only at one point, the electrode condition and the electrode response gauges will be empty. For a continuous display of the electrode’s condition and response, daily calibration is necessary.
- Page 26 When the reading is stable and close to the selected buffer, the “CFM” tag will blink. Press CFM to confirm Calibration calibration. After confirming the first calibration point, the calibrated value will be displayed on the first LCD line and the second expected buffer value on the third LCD line.
-
Page 27: Calibration Messages
• If the buffer temperature exceeds the temperature limits of the buffer, “WRONG BUFFER TEMPERATURE” will be displayed. Calibration • Press CLR after entering calibration to clear previous calibrations stored on probe. “CLEAR CALIBRATION” message will be displayed. Press CFM. The instrument will return to measurement mode displaying the “CAL DUE”... - Page 28 Calibration Wrong Old Points Inconsistency “WRONG OLD POINTS INCONSISTENCY” is displayed if Messages the new calibration differs significantly from the last value of that probe in that buffer. In this case it may be best to clear the previous calibration and attempt a new calibration with fresh buffers.
-
Page 29: Calibration Messages
Calibration Contaminated Buffer Messages “CONTAMINATED BUFFER” appears in order to alert that the buffer could be contaminated. Refresh your buffer and continue the calibration procedure. Broken Temperature Sensor If the temperature sensor should malfunction or break at any time, a temperature of “25.0 ºC”... - Page 30 pH GLP Note: If a custom buffer was used in calibration, the “C1” and “C2” tags will be Information displayed. If only the one custom buffer is used in calibration, the tag will be “C1” and the value will be displayed. If disabled, “EXPIRATION WARNING DISABLED”...
-
Page 31: Ph Measurement
When an edge® pH probe is connected, the instrument Measurement will recognize it and a the cap removal message will be displayed along with “PH”. Press any key to skip the message. The instrument will enter measurement mode. Make sure the electrode has been calibrated before taking measurements. - Page 32 Third Line Messages Displayed During Measurement Measurement All the messages described in General Setup (page 11) are displayed in pH range. Temperature Sensor Problem (if there is one) Cal Due or Offset and Slope Value Time Date Battery or Charge Status Logging Messages Out of Calibration Range Operational Guide...
-
Page 33: Basic Vs Standard Ec Mode
Basic vs Steps To Optimize EC Measurement Follow these steps to optimize measurement using an EC probe: Standard Determine what measurement you wish to make with the EC probe. (See EC Mode below) Determine if Standard or Basic mode is best for your measurement. Connect the Probe and configure your measurement using the SETUP menu. -
Page 34: Ec Meter Configuration
EC Meter Option Description Choices Default Basic mode Configuration Basic Mode Off or On Available Temperature The user No TC or ATC Not available. Compensation may select ATC is Automatic automatically Temperature used. Compensation or No TC to configure absolute conductivity. - Page 35 EC Meter Option Description Choices Default Basic mode Configuration EC Range If AUTO is used, AUTO, AUTO Not available but edge® will 29.99 μS/cm, measurement automatically 299.9 μS/cm, autoranges as find the correct 2999 μS/cm, needed. conductivity 29.99 mS/cm, range and 200.0 mS/cm, unit.
- Page 36 EC Meter Press CFM. The message “MANUAL CALIBRATION CLEARS PREVIOUS CALIBRATIONS” will be displayed on the third line LCD. “CAL” and “CFM” tags Configuration will blink. Press CFM to confirm the manual calibration. Note: GLP will display “Manual” for a standard. Using this calibration technique will erase any previous calibrations done in CAL.
-
Page 37: Ec/Tds Calibration
EC/TDS Press CAL to enter calibration. The “CAL” tag and the recognized standard value will appear on the third LCD Calibration line. If necessary, press the ARROW keys to select a different standard value. The “ “ along with “STIR” tag will be displayed and “WAIT”... -
Page 38: Nacl % Calibration
NaCl % Preparation Pour a small quantity of the calibration solution into a beaker. If possible, use a Calibration plastic beaker to minimize any EMC interferences. Before pressing CAL verify in SETUP: • Basic mode is off. • Salinity Scale is set to NaCl%. In measurement mode use the RANGE key to select the Salinity measurement. -
Page 39: Calibration Messages
Calibration Wrong Standard Temperature If the temperature is out of the 0.0 to 60.0 ºC range, Messages “WRONG STANDARD TEMPERATURE” message will be displayed and the temperature value will blink. EC/TDS GLP GLP is a set of functions that allows storage and retrieval of data regarding the Information maintenance and status of the electrode. - Page 40 EC/TDS GLP The reference temperature together with the current reading. Information The time (hh:mm:ss) of the last calibration together with the current reading. The date (yyyy.mm.dd) of the last calibration together with the current reading. Calibration Expiration status together with the current reading: If disabled, “EXPIRATION WARNING DISABLED”...
-
Page 41: Nacl % Glp Information
NaCl % GLP NaCl % Calibration Data in GLP To view the NaCl% calibration data, press GLP when the instrument is in NaCl% Information measurement mode. Use the ARROW keys to scroll through the calibration data. The instrument will display the calibration temperature and solution. The cell factor in cm determined from the calibration with the current reading. -
Page 42: Nacl % Glp Information
NaCl % GLP If enabled, the number of days since the calibration expired. (I.E. “CAL EXPIRED 2 DAYS AGO”). Information The serial number of the probe. Note: Press GLP at any moment and the instrument will return to measurement mode. EC/TDS The RANGE key will change measurement from conductivity to TDS to Salinity. -
Page 43: Ec/Tds Measurements
EC/TDS No Temperature Compensation (No TC): The temperature value is displayed, but not taken into account. When this option is selected, the “NoTC” tag will be Measurements displayed. The reading displayed on the primary LCD is the uncompensated EC or TDS value. Note: •... - Page 44 Salinity Note: Measurements • These are for determining salinity as they relate to general oceanographic use. • Practical salinity and the Natural Seawater require a conductivity calibration. • NaCl % requires a calibration in HI 70371 standard. PSU - Practical Salinity Units The practical salinity (S) of seawater relates the ratio of electrical conductivity of a normal seawater sample at 15 ºC and 1 atmosphere to a potassium chloride solution (KCl) with a mass of 32.4356 g/Kg water at the same temperature and...
-
Page 45: Salinity Measurements
Salinity If the reading is out of range, the full-scale value (400.0%) will be displayed blinking. Measurements If this occurs during a log, a “!“ will be placed next to the measurement unit. Data found in the CSV files with a “!“ should not be considered reliable. Natural Sea Water Scale The Natural Sea Water Scale extends from 0 - 80.0 g/L. - Page 46 CAUTION: Use care during servicing and use. The HI 764080 contains a glass insulator. Do not drop or handle carelessly. Probes from Hanna Instruments are shipped dry. 1. Carefully remove the cardboard shipping tube used to protect the probe during shipping. Save the tube, should the probe be stored dry again.
-
Page 47: Dissolved Oxygen Setup
Dissolved The probe is polarized with a fixed voltage of approximately 800 mV between the cathode and anode. Probe polarization is essential for stable measurements. Oxygen With the probe properly polarized, oxygen is continually consumed as it passes Setup through gas permeable PTFE membrane. If polarization is interrupted, the electrolyte solution continues to be enriched with oxygen until it reaches an equilibrium with the surrounding solution. - Page 48 Dissolved DO (Dissolved Oxygen) meter operation is configured using the SETUP key with a DO probe connected to the meter. The parameter-specific options will Oxygen be seen inserted into the menu. There is no Basic mode for Dissolved Oxygen Meter measurements.
-
Page 49: Dissolved Oxygen Meter Configuration
Dissolved Salinity and Altitude Compensation Temperature, altitude and salinity compensation are used for DO concentration Oxygen measurements (ppm or mg/L). When the water is colder, it can hold more Meter dissolved oxygen, when it is warmer it holds less oxygen. Compensation Configuration for temperature-related solubility is done automatically using the built-in temperature sensor within the DO probe and algorithms in edge®. - Page 50 Dissolved 100% Saturated Calibration It is suggested to perform the slope calibration in water-saturated air. Oxygen Pour water into a small beaker. Calibration Rinse the polarized probe with clean water. Dry the probe tip and allow a few seconds for the LCD reading to stabilize (probe in air).
-
Page 51: Dissolved Oxygen Calibration
Dissolved If the reading is outside limits, “WRONG STANDARD“ message will be displayed. Oxygen Calibration Messages If the temperature is out of range (0.0 - 50.0 ºC) during calibration, then the message “WRONG STANDARD TEMPERATURE” will be displayed and temperature value will blink. -
Page 52: Dissolved Oxygen Glp Information
Dissolved The date of the calibration together with the current reading. Oxygen Information Calibration Expiration status together with the current reading: If disabled, “EXPIRATION WARNING DISABLED” is displayed. If enabled, the number of days until the calibration alarm “CAL DUE” will be displayed. (i.e. “CAL EXPIRES IN 2 DAYS”) If enabled, the number of days the calibration has expired (i.e. -
Page 53: Operational Guide
Dissolved Oxygen is consumed during the measurement. For accurate DO measurements, water movement of 0.3 m/s is suggested. This is to ensure that the oxygen- Oxygen depleted membrane surface is constantly measuring a representative sample. Measurements The use of a magnetic stirrer is recommended. The probe has a built-in temperature sensor. -
Page 54: Maintenance
pH Probe Maintenance Remove the protective cap of the pH electrode. DO NOT BE ALARMED IF SALT DEPOSITS ARE PRESENT. This is normal with electrodes. They will disappear when rinsed with water. During transport, tiny bubbles of air may form inside the glass bulb affecting proper functioning of the electrode. - Page 55 pH Probe Replace the solution in the protective cap with a few drops of HI 70300 or HI 80300 Storage Solution or, in its absence, Filling Solution (HI 7082 or Maintenance HI 8082 for double junction electrodes). Follow the preparation procedure before taking measurements. Note: NEVER STORE THE ELECTRODE IN DISTILLED OR DEIONIZED WATER.
- Page 56 EC Probe Rinse the probe with clean water after measurements. If a more thorough cleaning is required, remove the probe sleeve and clean the probe with a cloth Maintenance or a nonabrasive detergent. Make sure to reinsert the sleeve onto the probe properly and in the right direction.
-
Page 57: Dissolved Oxygen Probe Maintenance
Dissolved The DO probe body is made of PEI. A temperature sensor provides temperature measurements of the sample. Use Oxygen the protective cap when the probe is not in use. To replace the membrane or Probe refill with electrolyte, proceed as follows: Maintenance For a new probe, remove the protective shipping tube by gently twisting and pulling it off the body of the probe (see fig. -
Page 58: Troubleshooting Guide
Troubleshooting Symptoms Problems Solution Guide Clean the electrode and then soak Slow response/excessive Dirty pH electrode. the tip in HI 7061 or HI 8061 for 30 drift. minutes. pH: Clogged/dirty Clean the electrode. Refill with fresh junction. Low electrolyte solution (for refillable electrodes only). level (refillable Check cable and connectors. -
Page 59: Maintenance
Troubleshooting Symptoms Problems Solution Guide A) Verify the shipping cap has been removed. B) Make sure the sample pH is within If the display shows: Out of range in the mV specified range. “mV” and “-1000” or scale. C) Verify electrolyte level in pH sensor “1000”... -
Page 60: Specifications
Specifications Temperature -2.00 to 16.00 pH Range -2.000 to 16.000 pH* -20.0 to 120.0 ºC (-4.0 to 248.0 °F)** Specifications ±1000.0 mV 0.01 pH Resolution 0.001 pH* 0.1 ºC 0.1 mV ±0.01pH Accuracy ±0.002 pH* ±0.5 ºC @ 25 °C / 77 °F ±0.2 mV Automatic, up to 3 points (5 points*) calibration, 5 standard (7 pH Calibration... -
Page 61: Specifications
Specifications Salinity Automatic -5 to 100 ºC (23 to 212 ºF) Temperature NoTC - can be selected to measure compensation absolute conductivity. Conductivity temperature 0.00 to 6.00% / ºC (for EC and TDS only). Default value is 1.90% / ºC coefficient TDS factor 0.40 to 0.80 (default value is 0.50) -
Page 62: Accessories
Accessories Electrodes/Probes Triple ceramic, single junction, low temperature glass, refillable pH HI 10530 electrode with conical tip and temperature sensor Single ceramic,double junction, high temperature glass, refillable pH HI 10430 electrode with temperature sensor HI 11310 Glass body, double junction, refillable pH/temperature electrode Glass body, double junction, refillable pH/temperature electrode with HI 11311 enhanced diagnostics... -
Page 63: Accessories
Accessories Conductivity Solutions HI 70030P 12880 μS/cm, 20 mL sachets (25 pcs.) HI 70031P 1413 μS/cm, 20 mL sachets (25 pcs.) HI 70039P 5000 μS/cm, 20 mL sachets (25 pcs.) HI 7030M 12880 μS/cm, 230 mL bottle HI 7031M 1413 μS/cm, 230 mL bottle HI 7033M 84 μS/cm, 230 mL bottle HI 7034M... -
Page 64: Warranty
If the repair is not covered by the warranty, you will be notified of the charges incurred. If the instrument is to be returned to Hanna Instruments, first obtain a Returned Goods Authorization number from the Technical Service department and then send it with shipping costs prepaid.
Need help?
Do you have a question about the Edge HI 2020 and is the answer not in the manual?
Questions and answers