
Related Manuals for Hanna Instruments HI 2300


Summary of Contents for Hanna Instruments HI 2300
- Page 1 Instruction Manual HI 2300 Auto-ranging Microprocessor EC/TDS/NaCl/ºC Bench Meter w w w. h a n n a i n s t . c o m...
-
Page 2: Table Of Contents
If the repair is not covered by the warranty, you will be notified of the charges incurred. If the instrument is to be returned to Hanna Instruments, first obtain a Returned Goods Authorization number from the Technical Service department and then send it with shipping costs prepaid. -
Page 3: Preliminary Examination
HI 2300 includes also GLP capability and data transfer to a computer through a RS232 port. In addition, the meter allows the user to enter an ID code to uniquely identify the instrument. Hanna Instruments reserves the right to modify the design, construction and appearance of its products without advance notice. -
Page 4: Functional Description
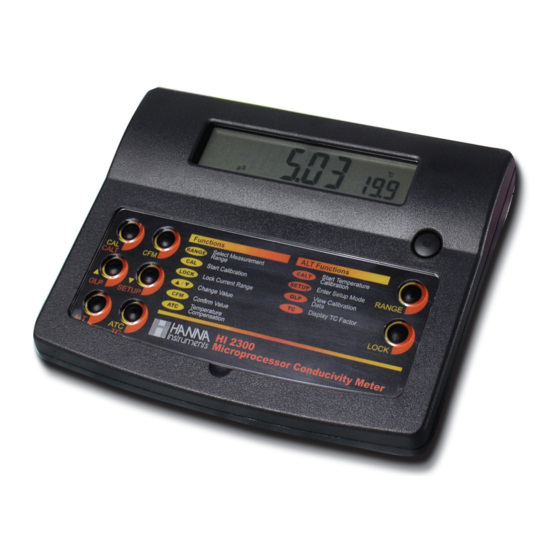
FUNCTIONAL DESCRIPTION Primary LCD Front Panel Secondary LCD g / l NaCl Functions ALT Functions Select Measurement Start Temperature RANGE CALT Range Calibration Enter Setup Mode Start Calibration SETUP RANGE CALT View Calibration LOCK Lock Current Range Data Display TC Factor Change Value Confirm Value SETUP... -
Page 5: Specifications
SPECIFICATIONS 0 0 . 9 9 . µ 0 . 0 9 . 9 µ µ 0 0 . 9 9 . 0 . 0 0 . 0 0 . 0 c a ( a u t * ) C 0 0 . - Page 6 SPECIFICATIONS (cont.) t a r e r u o t u c i t l a u C º t a s n o i ) F º e l e a t c e l b 0 0 . 0 0 .
-
Page 7: Operational Guide
OPERATIONAL GUIDE CONNECTIONS Plug the 12 VDC adapter into the power supply socket. Note: This instrument use non volatile memory to retain the calibration parameters and all the other settings even when unplugged. Connect the EC/TDS probe to the 7-pin connector. Tighten the threaded ring. Make sure the probe sleeve is properly inserted, as shown below: POWER PROBE... -
Page 8: Autoranging
Notes: If the meter displays “----”, the reading is out of range. • If the stability indicator “~” blinks, the reading is unstable. • Make sure the meter is calibrated before taking measurements. • If measurements are taken successively in different samples, for accu- •... -
Page 9: Ec/Tds Calibration
To select the desired option press ATC until the option is displayed on the LCD. If temperature compensation is active, measurements are compensated using the temperature coefficient (default value 1.90 %/°C). To change the temperature coefficient, enter the setup mode and select the “tc” item (See SETUP for details, page 14). -
Page 10: Nacl Calibration
Select the desired value with the ARROW keys, if necessary. When the reading is stable, “CFM” tag starts blinking on the LCD, asking for confirmation. Press CFM to confirm calibration. The instrument displays the “Stor Good” message and returns to measurement mode. Notes: If the uncalibrated reading is too far from the expected value or the •... - Page 11 The “BUF” and “CAL” tags are displayed. The primary LCD displays the uncalibrated NaCl reading in percentage. The secondary LCD displays “100”. NaCl When the reading is stable, “CFM” tag starts blinking on the LCD, asking for confirmation. Press CFM to confirm calibration. NaCl The instrument displays the “Stor Good”...
-
Page 12: Temperature Calibration (For Technical Personnel Only)
TEMPERATURE CALIBRATION (for technical personnel only) The calibration is a 2-point procedure at 0.0 and 50.0 ºC. • Immerse the probe in a 0 ºC temperature bath. • Press ALT+CALT keys to enter temperature calibration mode. • The lower LCD displays “0.0 ºC”, “BUF” and “CAL” tags blinking. •... -
Page 13: Conductivity Versus Temperature Chart
C O N D U C T I V I T Y V E R S U S TEMPERATURE CHART The conductivity of an aqueous solution is the measure of its ability to carry an electrical current by means of ionic motion. The conductivity invariably increases with increasing temperature. -
Page 14: Setup
S E T U P Setup mode allows viewing and modifying the instrument parameters. To enter setup press ALT+SETUP keys when the meter is in measurement mode. “Set” is displayed on the primary LCD. SETUP The secondary LCD displays the code of the current setup item. Select the desired setup item using the ARROW keys. -
Page 15: Good Laboratory Practice
Note: Press ALT+SETUP keys before confirmation to escape without changing the previously set value. The following table lists the setup items, their valid range of values and the factory settings (default): Item Description Valid values Default Temp.compensation coeff. 0.00 to 6.00 %/ºC 1.90 Temp.compensation mode Atc, Mtc, notc Reference temperature... - Page 16 By repeatedly pressing RANGE, GLP data is displayed in the following order: Last calibration date: RANGE Last calibration year: Last calibration time: Cell constant value (K): Offset value: This information is displayed only if the last calibration was performed at 0.00 µS. Calibration solution used: If the cell constant was changed after calibration (through the “CEL”...
-
Page 17: Data Transfer To Pc
If RANGE is pressed when the last parameter is displayed, the meter returns to measurement mode. Notes: To exit GLP mode at any time press ALT+GLP keys. • • If the calibration procedure was never performed, after displaying the ID code the LCD will show the “no CAL” message blinking. Press RANGE or ALT+GLP keys to return to measurement mode. -
Page 18: Probe Maintenance
PROBE MAINTENANCE Rinse the probe with clean water after measurements. If more cleaning is required, remove the probe sleeve and clean the probe with a cloth or a nonabrasive detergent. Make sure to reinsert the sleeve onto the probe properly and in the right direction. After cleaning the probe, recalibrate the instrument. - Page 19 PROBE CLEANING SOLUTIONS HI 7061M General Cleaning Solution, 230 mL bottle HI 7061L General Cleaning Solution, 460 mL bottle HI 8061M General Cleaning Solution, 230 mL FDA approved bottle HI 8061L General Cleaning Solution, 460 mL FDA approved bottle OTHER ACCESSORIES HI 76310 Platinum 4-ring Conductivity/TDS probe with temperature sensor and 1 m (3.3') cable.
- Page 20 SALES AND TECHNICAL SERVICE CONTACTS Australia: Tel. (03) 9769.0666 • Fax (03) 9769.0699 China: Tel. (10) 88570068 • Fax (10) 88570060 Egypt: Tel. & Fax (02) 2758.683 Germany: Tel. (07851) 9129-0 • Fax (07851) 9129-99 Greece: Tel. (210) 823.5192 • Fax (210) 884.0210 Indonesia: Tel.
Need help?
Do you have a question about the HI 2300 and is the answer not in the manual?
Questions and answers