
Related Manuals for Parmco HO-4-2NF-INDUCT


Summary of Contents for Parmco HO-4-2NF-INDUCT
- Page 1 Installation and Operating Instructions Model: HO-4-2NF-INDUCT For your convenience, we recommend to attach the serial number label HERE. 727626032017...
- Page 2 • Normal or scheduled maintenance including blocked filters or ducting. Please retain this Warranty card together with receipt or other proof of purchase date when seeking service during the warranty period • Consumable items such as light bulbs. • Any damage to hobs caused by spills when cooking. • Any breakage or damage of glass items. • Any damage caused by non recommended product used for cleaning, Please contact Parmco at 09 573 5678 if your maintaining, lubricating or similar. appliance needs servicing under warranty. Please • Any aspect relating to the installation of the product, or damage caused have your model number and proof of purchase ready. during installation including blocked access for repair. Warranty repairs must be authorized by Parmco. • Any third party (including reseller) or consequential loss or damage (direct or indirect) however arising. Subject to updates without prior notice, please visit www.parmco.co.nz for E & O.E. 727626032017 the latest version.
- Page 4 Dear Valued Customer, Thank you and congratulations on purchasing your new Parmco appliance. All Parmco products are made to the highest quality and design standards. We are sure you will enjoy your new appliance. As a note, please read through these instructions carefully. These will assist you in gaining a complete understanding of the functions and features o ered by your appliance.
-
Page 5: Table Of Contents
INDEX Important Safety Warnings Product overview 1.1 Top view 1.2 Control panel What is Induction Cooking Using the right cookware Using your Induction Hob 5.1 To start cooking 5.2 When you have finished cooking Using the Timer Cooking guidelines Heat settings Care and cleaning Hints and Tips Troubleshooting... -
Page 6: Important Safety Warnings
11. Metallic objects such as knives, forks, spoons and lids should not be placed on the hotplate since they will get hot. 12. If the surface is cracked, switch off the appliance and contact Parmco Appliances. To avoid the possibility of electric shock do not continue to use a damaged hob. - Page 7 Installation Electrical Shock Hazard • Disconnect the appliance from the mains electricity supply before carrying out any work or maintenance on it. • Connection to a good earth wiring system is essential and mandatory. • Alterations to the domestic wiring system must only be made by a qualified electrician. •...
-
Page 8: Product Overview
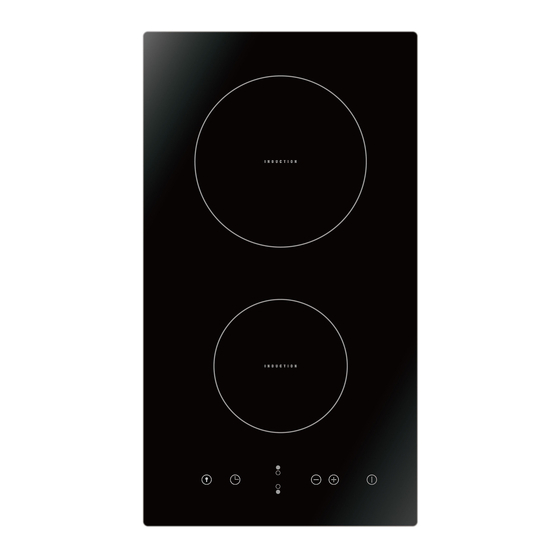
Product Overview Top View 1. max. 2000 W zone 2. max. 1500 W zone 3. Glass plate 4. ON/OFF control 5. Control panel Control Panel 1. ON/OFF control 2. Power / Timer regulating controls 3. Heating zone selection controls 4. Timer control 5. -
Page 9: What Is Induction Cooking
About Induction Cooking Induction cooking is a safe, advanced, efficient, and economical cooking technology. It works by electromagnetic vibrations generating heat directly in the pan, rather than indirectly through heating the glass surface. The glass becomes hot only because the pan eventually warms it up. -
Page 10: Using The Right Cookware
Choosing the Right Cookware • Only use cookware with a base suitable for induction cooking. Look for the induction symbol on the packaging or on the bottom of the pan. • You can check whether your cookware is suitable by carrying out a magnet test. -
Page 11: Using Your Induction Hob
Using your Induction Hob To start cooking 1. Touch the ON/OFF control. After power on, the buzzer beeps once, all displays show “ – “ or “ – – “, indicating that the induction hob has entered the state of standby mode. 2. - Page 12 2. Turn the cooking zone off by scrolling down to” 0” or touching”-“ and”+” control together. Make sure the display shows”0” 3. Turn the whole cooktop off by touching the ON/OFF control. 4. Beware of hot surfaces An H will show which cooking zone is hot to touch. It will disappear when the surface has cooled down to a safe temperature.
- Page 13 Auto Shutdown Protection Auto shut down is a safety protection function for your induction hob. It shut down automatically if ever you forget to turn off your cooking. The default working times for various power levels are shown in the below table: Power level Default working timer (hour) 8 When the pot is removed, the induction hob can stop heating immediately and the hob...
-
Page 14: Using The Timer
Using the Timer You can use the timer in two different ways: • You can use it as a minute minder. In this case, the timer will not turn any cooking zone off when the set time is up. • You can set it to turn one cooking zone off after the set time is up. •... - Page 15 Cooking zones set for this feature will: 1. Touching the heating zone selection control that you want to set the timer for. 2. Touch timer control , The minder indicator will start flashing and “10” will show in the timer display. 3.
-
Page 16: Cooking Guidelines
Cooking Guidelines Take care when frying as the oil and fat heat up very quickly, particularly if you’re using PowerBoost. At extremely high temperatures oil and fat will ignite spontaneously and this presents a serious fire risk. Cooking Tips • When food comes to the boil, reduce the temperature setting. •... -
Page 17: Heat Settings
Heat Settings The settings below are guidelines only. The exact setting will depend on several factors, including your cookware and the amount you are cooking. Experiment with the induction hob to find the settings that best suit you. Heat setting Suitability •... -
Page 18: Care And Cleaning
Care and Cleaning What? How? Important! Everyday soiling on 1. Switch the power to the • When the power to the cooktop is glass (fingerprints, cooktop off. switched off, there will be no ‘hot marks, stains left 2. Apply a cooktop cleaner surface’... -
Page 19: Hints And Tips
Hints and Tips Problem Possible causes What to do The induction No power. Make sure the induction hob is hob cannot be connected to the power supply and that turned on. it is switched on. Check whether there is a power outage in your home or area. - Page 20 Pans do not The induction hob cannot Use cookware suitable for induction become hot and detect the pan because it is cooking. See section ‘Choosing the right appears in not suitable for induction cookware’. the display. cooking. The induction hob cannot Centre the pan and make sure that its detect the pan because it is base matches the size of the cooking...
-
Page 21: Troubleshooting
Failure Display and Inspection If an abnormality comes up, the induction hob will enter the protective state automatically and display corresponding protective codes: Problem Possible causes What to do F3-F8 Temperature sensor failure Please contact the supplier. F9-FE Temperature sensor of the Please contact the supplier. -
Page 22: Technical Specifications
Technical Specifications Cooking Hob HO-4-2NF-INDUCT Cooking Zones 2 Zones Supply Voltage 220-240V~ 50/60Hz Installed Electric Power 3500 W Product Size L×W×H(mm) 288X520X56 Building-in Dimensions A×B (mm) 268X500 Weight and Dimensions are approximate. Because we continually strive to improve our products we may change specifications and designs without prior notice. -
Page 23: Installation
9. Installation 9.1 Selection of installation equipment Cut out the work surface according to the sizes shown in the drawing. For the purpose of installation and use, a minimum of 50mm space shall be preserved around the hole. Be sure the thickness of the work surface is at least 30mmbut not greater than 50mm. Please select heat-resistant and insulated work surface material (Wood and similar fibrous or hygroscopic material shall not be used as work surface material unless impregnated) to avoid an electrical shock and larger deformation caused by the heat radiation from the hotplate. - Page 24 WARNING: Ensuring Adequate Ventilation Make sure the induction hob is well ventilated and that air inlet and outlet are not blocked. If drawers are fitted below the hob sometimes the underneath of the hob may get hot. To prevent items accidently touching the base of the hob (which may result in an electric shock) it is necessary to put a wooden insert, fixed by screws, at a minimum distance of 50mm from the bottom of the hob.
- Page 25 9.3 After installing the hob, make sure that • The power supply cable is not accessible through cupboard doors or drawers. • There is adequate flow of fresh air from outside the cabinetry to the base of the hob. • If the hob is installed above a drawer or cupboard space, a thermal protection barrier is installed below the base of the hob.
- Page 26 9.6 Cautions 1. The induction hotplate must be installed by qualified personnel or technicians. We have professionals at your service. Please never conduct the operation by yourself. 2. The hob will not be installed directly above a dishwasher, fridge, freezer, washing machine or clothes dryer, as the humidity may damage the hob electronics 3.
- Page 27 The bottom surface and the power cord of the hob are not accessible after installation. This appliance is labeled in compliance with European directive 2012/19/EU for Waste Electrical and Electronic Equipment (WEEE). By ensuring that this appliance is disposed of correctly, you will help prevent any possible damage to the environment and to human health, which might otherwise be caused if it were disposed of in the wrong way.
Need help?
Do you have a question about the HO-4-2NF-INDUCT and is the answer not in the manual?
Questions and answers