Table of Contents
Advertisement
Quick Links
Advertisement
Table of Contents

Related Manuals for advidia A-28-Z


Summary of Contents for advidia A-28-Z
- Page 1 A-28-Z Network Bullet Camera Quick Start Guide...
-
Page 2: Regulatory Information
Network Bullet Camera·Quick Start Guide About this Manual This Manual is applicable to A-28-Z Network Camera. The Manual includes instructions for using and managing the product. Pictures, charts, images and all other information hereinafter are for description and explanation only. The information contained in the Manual is subject to change, without notice, due to firmware updates or other reasons. - Page 3 Network Bullet Camera·Quick Start Guide FCC compliance: This equipment has been tested and found to comply with the limits for a Class A digital device, pursuant to part 15 of the FCC Rules. These limits are designed to provide reasonable protection against harmful interference when the equipment is operated in a commercial environment.
-
Page 4: Safety Instruction
Network Bullet Camera·Quick Start Guide 2012/19/EU (WEEE directive): Products marked with this symbol cannot be disposed of as unsorted municipal waste in the European Union. For proper recycling, return this product to your local supplier upon the purchase of equivalent new equipment, or dispose of it at designated collection points. - Page 5 Network Bullet Camera·Quick Start Guide Warnings Follow these Cautions Follow these safeguards to prevent precautions to prevent serious injury or death. potential injury or material damage. Warnings ● Proper configuration of all passwords and other security settings is the responsibility of the installer and/or end-user. ●...
- Page 6 Network Bullet Camera·Quick Start Guide ● If smoke, odor or noise rise from the device, turn off the power at once and unplug the power cable, and then please contact the service center. Cautions ● Make sure the power supply voltage is correct before using the camera.
- Page 7 Network Bullet Camera·Quick Start Guide ● While in delivery, the camera shall be packed in its original packing, or packing of the same texture. ● Regular part replacement: a few parts (e.g. electrolytic capacitor) of the equipment shall be replaced regularly according to their average enduring time.
-
Page 8: Table Of Contents
Wall Mounting with a Gang Box ........18 3 Setting the Network Camera over the LAN ........19 Wiring ................19 Activating the Camera ........... 20 Activation via Web Browser ........ 20 Activation via Advidia Camera Finder Utility ..21 4 Accessing via Web Browser ............24... -
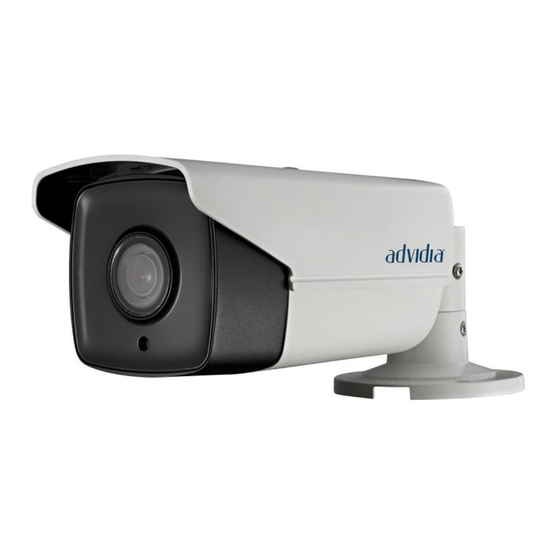
Page 9: Appearance Description
Network Bullet Camera·Quick Start Guide 1 Appearance Description Overview The overview of the network bullet camera is shown below. Overview Description Description Photoresistor Lens Sun Shield 3-axis Bracket Network Cable Interface... -
Page 10: Micro Sd Card Installation
Network Bullet Camera·Quick Start Guide Description Power Cable Interface Alarm Cable Interface Video Cable Interface Audio Out Audio In Reset Button Micro SD Card Slot Serial Port The standard power supply is 12V DC, please make sure your power supply matches with your camera. Press RESET about 10s when the camera is powering on or ... - Page 11 Network Bullet Camera·Quick Start Guide Figure 1-2 Remove Card Cover 2. Insert the SD card into the SD card slot. Figure 1-3 Insert the Card 3. (Optional) Push the inserted micro SD card inside to remove the micro SD card. 4.
-
Page 12: Installation
Network Bullet Camera·Quick Start Guide 2 Installation Before you start: ● Make sure the device in the package is in good condition and all the assembly parts are included. ● The standard power supply is 12V DC, please make sure your power supply matches with your camera. - Page 13 Network Bullet Camera·Quick Start Guide 1. Drill the screw holes and the cable hole in the ceiling according to the supplied drill template. Drill Template 2. Fix the camera to the wall with the supplied screws.
- Page 14 Network Bullet Camera·Quick Start Guide Please insert the expansion screws first if the camera is mounted to the cement ceiling. And you can use the self-tapping screws directly if camera is mounted to the wooden ceiling. Install the Camera 3. Adjust the surveillance angle. 1).
- Page 15 Network Bullet Camera·Quick Start Guide Adjust the Surveillance Angle Supplied Wrench 4. (Optional) Install the water-proof jacket for network interface. It is recommended to adopt the water-proof jacket (supplied) for the network interface when the camera is installed outdoor. 1). If the network cable has been settled down, cut off the plug of the network cable first.
- Page 16 Network Bullet Camera·Quick Start Guide 3). Insert the water-proof ring into the main body of the water- proof jacket, to increase the sealing ability of the components. 4). Wire the plug and network cables up. 5). Fix the O-ring to the network interface of the camera, and then connect the network cables.
-
Page 17: Wall Mounting With A Junction Box
Network Bullet Camera·Quick Start Guide Wall Mounting with a Junction Box Steps: 1. Drill the screw hole and cable hole according to the supplied drill template (shown as Figure 2-1). 2. Align the screw holes of the junction box to the drill template, and fix the junction box to the wall with screws. -
Page 18: Wall Mounting With A Gang Box
Network Bullet Camera·Quick Start Guide Wall Mounting with a Gang Box An adapter plate should be purchased separately if you mount the camera to a gang box. Steps: 1. Install the adapter plate to the gang box. 2. Route the cables. 3. -
Page 19: Setting The Network Camera Over The Lan
Network Bullet Camera·Quick Start Guide 3 Setting the Network Camera over the Note: You shall acknowledge that the use of the product with Internet access might be under network security risks. For avoidance of any network attacks and information leakage, please strengthen your own protection. -
Page 20: Activating The Camera
You are required to activate the camera first by setting a strong password for it before you can use the camera. Activation via Web Browser and via Advidia Camera Finder Utility are both supported. We will take activation via Advidia Camera Finder Utility and Activation via Web Browser as examples to introduce the camera activation. -
Page 21: Activation Via Advidia Camera Finder Utility
Advidia Camera Finder Utility is used for detecting the online device, activating the camera, and resetting the password. Get the Advidia Camera Finder Utility from the supplied disk or the official website, and install the software according to the prompts. - Page 22 Network Bullet Camera·Quick Start Guide Advidia Camera Finder Utility Interface Note: The Advidia Camera Finder Utility supports activating the camera in batch. 3. Create a password and input the password in the password field, and confirm the password. 4. Click OK to save the password.
- Page 23 Network Bullet Camera·Quick Start Guide Notes: For additional instruction on using the Advidia Camera Finder reference the Advidia Camera Finder user guide: http://advidia.com/documentation/AdvidiaCameraFinder.pdf...
-
Page 24: Accessing Via Web Browser
Network Bullet Camera·Quick Start Guide 4 Accessing via Web Browser System Requirement: Operating System: Microsoft Windows XP SP1 and above version CPU: 2.0 GHz or higher RAM: 1G or higher Display: 1024×768 resolution or higher Web Browser: Internet Explorer 8.0 and above version, Apple Safari 5.0.2 and above version, Mozilla Firefox 5.0 and above version and Google Chrome 18 and above version Steps:... - Page 25 Network Bullet Camera·Quick Start Guide Click Login. Login Interface 5. Install the plug-in before viewing the live video and managing the camera. Please follow the installation prompts to install the plug- You may have to close the web browser to finish the installation of the plug-in.
- Page 26 Network Bullet Camera·Quick Start Guide Download Plug-in Install Plug-in (1)
- Page 27 Network Bullet Camera·Quick Start Guide Install Plug-in (2) 6. Reopen the web browser after the installation of the plug-in and repeat steps 2~4 to login. For detailed instructions of further configuration, please refer to the user manual of network camera.
Need help?
Do you have a question about the A-28-Z and is the answer not in the manual?
Questions and answers