Table of Contents
Advertisement
Advertisement
Table of Contents

Related Manuals for Techne Prime


Summary of Contents for Techne Prime
- Page 1 Prime and PrimeG OPERATOR’S MANUAL Version 1.3 11/2012...
-
Page 2: Table Of Contents
PAGE INTRODUCTION BEFORE USE Unpacking SAFETY INFORMATION English Français Deutsch Italiano Español CONTACT INFORMATION PRIME SPECIFICATION INSTALLATION GENERAL SOFTWARE FEATURES Introduction Template programs Incremented/decremented time and temperature Gradient (PrimeG only) Oligonucleotide T calculator PROGRAMMING TEXT, TEMPERATURE AND TIME Text entry... - Page 3 VIEW FILES File searching Viewing a program file Viewing a temperature log file Copying files Deleting files UPDATING THE PRIME SOFTWARE UPGRADING FROM PRIME TO PRIMEG REMOVING AND EXCHANGING BLOCKS FAQs TECHNICAL SUPPORT AND SERVICING ADDITIONAL INFORMATION User Maintenance Fault Finding...
-
Page 4: Introduction
A USB port on the front of the unit allows transfer of files to and from a USB memory stick for viewing in the Techne Workbench PC software and for the easy update of instrument software. -
Page 5: Before Use
BEFORE USE Before using the Prime please ensure you have read this manual carefully. If there is any doubt relating to the proper use of this equipment, the staff at Bibby Scientific Ltd. or your supplier will be happy to assist you. -
Page 6: Safety Information
The instrument should be carried using both hands. Never move or carry the instrument when in use or connected to the mains electricity supply. 1. All Techne instruments are supplied with a power cable; this may be integral or plug-in. Before connecting the instrument to the mains electricity supply, check the voltage against the rating plate (located on the back of the unit). - Page 7 Notwithstanding the description and specification(s) of the instruments contained in the operator’s manual, Techne reserves the right to make such changes as it sees fit to the instruments or to any of the components.
-
Page 8: Français
Porter l'appareil à deux mains. Ne jamais déplacer ou transporter l’appareil lorsqu’il est en fonctionnement ou branché à l’alimentation électrique. 1. Tous les appareils Techne sont livrés avec un câble d'alimentation, qui peut être intégré à l'appareil ou à raccorder. - Page 9 Cette garantie s'ajoute à vos droits légaux et n'affecte en rien ces derniers. Le présent manuel a été exclusivement rédigé à l’attention des clients de la marque Techne et rien dans son contenu ne doit être pris comme une garantie, une condition ou une affirmation concernant la description, la commercialisation, l’adéquation à...
-
Page 10: Deutsch
• SICHERHEIT DES BEDIENPERSONALS Alle Benutzer von Techne Geräten müssen Zugang zu der entsprechenden Literatur haben, um ihre Sicherheit zu gewähren. Es ist wichtig, daß diese Geräte nur von entsprechend geschultem Personal betrieben werden, das die in dieser Gebrauchsanweisung enthaltenen Maßnahmen und allgemeine Sicherheitsbestimmungen und - vorkehrungen beachtet. - Page 11 Sie sich bitte an den Vertriebspartner des Geräts. Diese Garantie gilt zusätzlich zu und nicht anstelle von geltendem Recht. Diese Anleitung wurde zur Information der Kunden von Techne erstellt und stellt in keinster Weise eine Gewährleistung, Bedingung oder Darstellung bezüglich der Beschreibung, Marktgängigkeit oder Zweckdienlichkeit dieser Geräte oder Bauteile dar.
-
Page 12: Italiano
Bibby Scientific Ltd., la protezione fornita dall’apparecchiatura all’utilizzatore potrebbe essere a rischio. Tutte le unità Techne sono state progettate in conformità ai requisiti internazionali di sicurezza e sono equipaggiate con un interruttore anti surriscaldamento. Se si dovesse verificare qualche problema di sicurezza, disconnettere l’apparecchio dalla rete. - Page 13 è in aggiunta ai diritti di legge e non ha alcun effetto su di essi. Il presente manuale è stato preparato ad uso dei clienti di Techne e niente di quanto in esso contenuto costituisce garanzia, condizione o rappresentanza riguardo la descrizione, la commerciabilità, l'idoneità...
-
Page 14: Español
• SEGURIDAD DEL OPERARIO Todos los usuarios de equipos Techne deben disponer de la información necesaria para asegurar su seguridad. De acuerdo con las instrucciones contenidas en este manual y con las normas y procedimientos generales de seguridad, es muy importante que sólo personal debidamente capacitado opere estos aparatos. - Page 15 Esta garantía complementa y no afecta a sus derechos legales. Este manual se ha preparado con una finalidad informativa para los clientes de Techne y ninguna parte del manual se deberá considerar como una garantía, condición o reflejo con respecto a la descripción, comerciabilidad, idoneidad para un fin determinado o de otro tipo de la unidad o sus...
-
Page 16: Contact Information
CONTACT INFORMATION For technical, sales or servicing information, contact your local Techne dealer or: North and South America Bibby Scientific Ltd. Bibby Scientific US Inc. t/a Techne Inc. Beacon Road 3 Terri Lane, Suite 10 Stone Burlington, N.J. 08016 Staffordshire... -
Page 17: Prime Specification
PRIME SPECIFICATION TEMPERATURE Block temperature range 4ºC (10° C during cycling) to 100ºC Block uniformity (at 55ºC) <±0.3ºC Temperature accuracy (at 55ºC) <±0.25ºC Gradient availability (PrimeG only) Between 30ºC and 80ºC Maximum gradient (PrimeG only) 29ºC (19ºC with the 384-well block) Minimum gradient (PrimeG only) 1ºC... - Page 18 COMMUNICATION PORTS USB port on front of unit Connection for USB memory stick USB port on rear of unit Connection for servicing and calibration only DIMENSIONS Height (mm) Width (mm) Length (mm) Weight (kg) POWER Voltage 100-240V, 50/60Hz Power 425W...
-
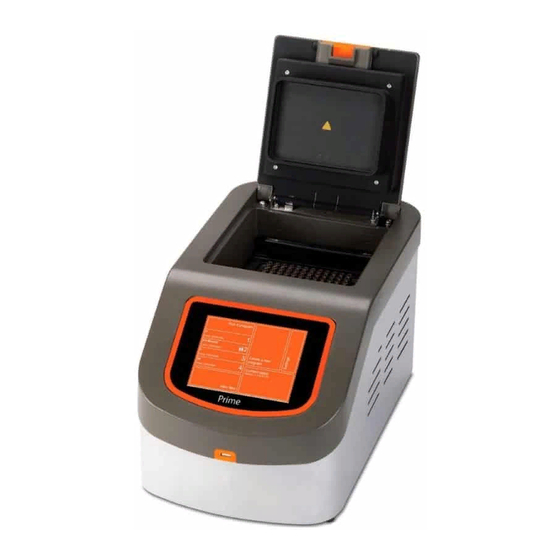
Page 19: Installation
INSTALLATION See also the Safety Information sections on pages 5 to 14. Front view Lid adjustment knob. Lid release latch. 5.7” colour VGA LCD touch screen display. USB port for memory stick. Rear view Mains cable inlet. On/Off rocker switch USB port for service and calibration only. - Page 20 Release the heated lid by lifting the latch forward and use it to lift the lid. To close the lid, lower the lid onto the block and press the latch to secure in place. Place the samples in the block. If individual tubes or strip tubes are being used, space these out evenly across the block to equalise the pressure from the heated lid.
-
Page 21: General Software Features
GENERAL SOFTWARE FEATURES INTRODUCTION The Prime software allows the user to quickly and easily create thermal cycling programs using a simple and clear touch screen format. The software is structured into five modules which are accessed from the Home Screen. These allow the user to: •... -
Page 22: Incremented/Decremented Time And Temperature
The Ice Bucket and Ligation programs are simple temperature holds, with the former having an infinite hold at 10ºC and the latter at 15ºC. In both of these programs the heated lid is switched off and the initial denaturation, hot start and final extension functions disabled. INCREMENTED/DECREMENTED TIME AND TEMPERATURE The software allows the user to either increment or decrement the time and/or temperature of a step within a cycling stage. -
Page 23: Oligonucleotide T M Calculator
Annealing temperatures that are significantly higher than the primer T may result in reduced priming or prevent priming altogether. The Prime uses the Nearest-Neighbour method for calculating the T of an oligonucleotide The T is calculated using the following equation: {( H º... -
Page 24: Programming Text, Temperature And Time
PROGRAMMING TEXT, TEMPERATURE AND TIME This section gives instructions for the basic programming of text, temperature and time which are required in later sections. TEXT ENTRY When giving a name to a program or stage, or when entering a keyword or a password, a text entry screen will be opened. - Page 25 Advanced temperature entry • First ensure the number of cycles for the stage has been set then enter the required hold temperature as described above. Note : Increase/Decrease Per Cycle will be inactive unless the number of cycles set is greater than 1. To increase the step temperature per cycle: •...
- Page 26 The temperature value will now appear orange in the programming screen indicating that it contains a modified function. To decrease the step temperature per cycle: • For a decrease in temperature per cycle, touch the button below Decrease Per Cycle to turn this function on.
- Page 27 The temperature value will now appear orange in the programming screen indicating that it contains a modified function. Note: It is not possible to both increase and decrease the temperature of the same step. To enter a temperature gradient on a step (PrimeG only): On the PrimeG an additional Temperature Gradient button is available.
-
Page 28: Time Entry
The temperature value will now appear orange in the programming screen indicating that it contains a modified function. TIME ENTRY When touching a time parameter a time entry screen will open. There are two forms of time entry screen: • A simple form for adjusting the time of the program parameters such as initial denaturation and final extension. - Page 29 To increase the step hold time per cycle: • For an increase in hold time per cycle, touch the button below Increase Per Cycle to turn this function on. Next touch the time entry button below this. A new screen will open which is similar to the simple time entry screen.
- Page 30 To decrease the step hold time per cycle: • For a decrease in hold time per cycle, touch the button below Decrease Per Cycle to turn this function on. Next touch the time entry button below this. A new screen will open which is similar to the simple time entry screen.
-
Page 31: Instrument Settings And Defaults
INSTRUMENT SETTINGS AND DEFAULTS Touch the Settings button to access the instrument Settings menu. • Touch any of the buttons to view and edit the settings. • Touch More Settings to access further options. • Once all the settings and defaults have been set as required, touch Save to save the changes and return to the Home Screen. -
Page 32: Instrument Settings
INSTRUMENT SETTINGS Temperature Log Recording To record the temperature logs (block temperature profile) of each run, touch the button to set this to Always. If temperature logs are not required, set to Never. Auto Resume On Power Loss This determines whether the unit will restart after a power failure. - Page 33 Date Format Touch the date button to set the required date format. The options are dd/mm/yy or mm/dd/yy. • Touch More Settings for further date and time settings or Back to return to the Settings menu. Administrator Settings This allows an administrator to remove passwords from password-protected programs, change the Administrator password and restore the unit to its factory settings.
-
Page 34: Program Defaults
• Touch Cancel to return to the Settings menu without making any changes. PROGRAM DEFAULTS The program default settings will apply to every new program created on the Prime. However individual programs can be edited as required. Heated Lid Use this to set the heated lid temperature to approximately 10ºC higher than the hottest block... -
Page 35: Service Settings
Initial Denaturation Use this to denature the sample and/or activate the enzyme before the thermal cycling program begins. • Touch On/Off to toggle between settings. • Touch the time button to set the required hold time. • Touch the temperature button to set the required temperature. -
Page 36: Gradient Calculator
GRADIENT CALCULATOR (PRIMEG ONLY) The Gradient Calculator can be used to calculate the temperature for each column of the block for a user-specified temperature and gradient range. • Touch the Target Temperature button and enter the required temperature. • Touch OK . •... - Page 37 • Enter the primer concentration in the PCR mix. • Enter the monovalent salt concentration of the PCR mix. • Touch Calculate to calculate the T of the primer. • To check the T of another primer with the same primer and salt concentrations, touch Back and enter the new primer sequence.
-
Page 38: Create A New Program
CREATE A NEW PROGRAM From the Home Screen, touch the Create A New Program button. This will open a screen where you can build a program by adding stages and steps and define the temperatures and hold times. The function of each of the buttons on this screen is described below. -
Page 39: Insert/Delete A Stage
INSERT/DELETE A STAGE A stage is a section of a program that consists of a number of individual steps that can be cycled (repeated) a defined number of times. Insert a new stage • To insert a stage in a program, touch Insert a new stage . -
Page 40: Insert/Delete A Step
INSERT/DELETE A STEP Insert a new step • Touch Insert a new step to insert the next step in the current stage. • Edit the new step temperature, hold time and ramp rate as required. Delete a step • To delete a step, touch the step area to highlight it and then touch Delete . - Page 41 User User names can be entered and linked to the program to help in searching and identifying programs. • To enter a user name, touch the None selected button next to User. • User names that have already been created will then be listed.
- Page 42 Keywords Keywords can be entered and linked to the program to help in searching for related programs. • To enter a keyword, touch the None selected button next to Keywords. • Other keywords that have already been created will then be listed. •...
- Page 43 Passwords A password can be created to protect the program from being edited and deleted by other users. The password will be requested if a user attempts to edit or delete the program. • To create a password, touch the None button next to Password.
-
Page 44: Settings
SETTINGS • Touch the Settings button to view the instrument defaults as set up in the instrument Settings module. Any of these parameters can be edited by touching the appropriate button and will be saved for the current program only. •... -
Page 45: Delete
DELETE This is used to delete an entry. First touch the required segment followed by Delete . UP AND DOWN ARROWS Use these buttons to scroll through a program. SAVE Touch this button to save the program. CANCEL Touch this button to cancel changes to the program and return to the Home Screen. -
Page 46: Run A Program
RUN A PROGRAM From the Home Screen, touch one of the shortcuts to run one of the listed programs, or touch Run a program to search and select from other programs and templates saved on the unit. Selected programs can be run directly or edited before running. RUNNING A PROGRAM FROM THE SHORTCUT LIST On the Home Screen, the Run a program area displays shortcuts to four programs. -
Page 47: The Run Screen
THE RUN SCREEN The Run Screen will be displayed after a program has been started. It shows the instrument status and the progress of a run. Once the program has been started, the timers in the top right hand corner of the screen will indicate how long the program has been running and the total run time. -
Page 48: Searching For A Program Not In The Shortcut List
Viewing a running program From the Home Screen: • Touch Current status . • Touch the area for the instrument. • Touch View . SEARCHING FOR A PROGRAM NOT IN THE SHORTCUT LIST There are four ways to search for a program if it is not in the shortcut list: •... - Page 49 Search the programs by user • Touch Search by User and this will open the list of user names stored on the unit. • Select the required user name by touching the appropriate button to highlight it. Touch again to de-select.
-
Page 50: Running A Program Not On The Shortcut List
RUNNING A PROGRAM NOT ON THE SHORTCUT LIST • Once the required program has been identified, touch it to highlight it. The Program Selector Screen will show a summary of the program, the instrument settings and a graphical representation of the thermal cycling program. •... -
Page 51: Editing A Program
EDITING A PROGRAM EDITING SAVED PROGRAMS First select the required program by searching the Run a program module. • To edit a selected program, touch the Edit button. Any of the Program Options, Settings or thermal cycling parameters can be edited. •... -
Page 52: Editing Password-Protected Programs
EDITING PASSWORD PROTECTED PROGRAMS If the edited program is password protected, touching Save will open the message box shown opposite. To save the changes either: • Touch the None button next to Password and enter the correct password followed by Save . Note: this will overwrite the existing program. -
Page 53: Current Status
CURRENT STATUS The Current Status area of the Home Screen provides status information on the Prime and is used to access the Run Screen. On the Home Screen, the Current status area shows the versions of software and firmware loaded on the unit. -
Page 54: View Files
VIEW FILES The View files module opens the File Manager and allows access to all the program and temperature log files. From here it is possible to copy program files to the unit for editing. Files can also be deleted or copied to a USB memory stick for transfer to a PC or storage. - Page 55 Search the files by user • Touch Search By User and this will open the list of user names stored on the unit. • Select the required user name by touching the appropriate button to highlight it. Touch again to de-select.
-
Page 56: Viewing A Program File
VIEWING A TEMPERATURE LOG FILE It is not possible to view a temperature log file on the Prime. It must first be copied to a USB memory stick then viewed on a PC using the Techne Workbench software, which can be downloaded free of charge from www.techne.com... -
Page 57: Copying Files
Clicking on the Program View button of this screen will display the program that generated the temperature log. For further information on using the Techne Workbench software, see the separate user manual which can be downloaded from www.techne.com... - Page 58 A message screen will appear giving the option of saving the files to the unit or to the USB memory stick. • Touch the upper button to save the file(s) to the Prime unit. • Touch Cancel to return to the File Manager screen.
-
Page 59: Deleting Files
DELETING FILES Unused or old files can be permanently deleted from the unit or a USB memory stick. • Select one or more files for deleting by touching the appropriate file button. Note : Multiple file selection is optional and can be set up in the User Preferences section of the Settings Module. -
Page 60: Updating The Prime Software
UPDATING THE PRIME SOFTWARE The Prime software can be updated by downloading the latest version from the Techne website www.techne.com. You will need a USB memory stick on which to save the update. Note that the update tool requires at least Windows XP SP2 and the Microsoft .Net Framework 3.5 SP1, which, if needed, can be downloaded from: http://www.microsoft.com/downloads/details.aspx?familyid=AB99342F-5D1A-413D-8319-... -
Page 61: Upgrading From Prime To Primeg
RIME RIME The standard Prime thermal cycler can be easily and quickly upgraded to the gradient PrimeG version by purchasing the PrimeX/USB upgrade. The upgrade consists of a license certificate printed with a unique upgrade code which allows gradient functionality to be installed on any non-gradient Techne Prime thermal cycler. -
Page 62: Removing And Exchanging Blocks
REMOVING AND EXCHANGING BLOCKS The thermal cycling block can be removed and exchanged for one of a different format or for detailed cleaning. 1. Before removing the block, disconnect from the power supply and allow it to cool to below 50°C. 2. -
Page 63: Faqs
FAQs How do I adjust the pressure of the heated lid for my tubes or plates? For thermal cyclers with lid adjustment knobs, rotate the knob anticlockwise until there is no pressure on the consumable, then close the lid and latch it. To obtain the correct pressure gently rotate the knob clockwise until it is possible to just feel the pressure being applied. -
Page 64: Technical Support And Servicing
In the USA please contact service@techneusa.com or call +1 609 589 2560. We are continually striving to improve our products and software. If you have any comments and suggestions on how we can do things better please send them to us at: techne@bibby-scientific.com. -
Page 65: Additional Information
ADDITIONAL INFORMATION USER MAINTENANCE Before cleaning your unit, disconnect it from the power supply. The outer case of the Prime may be cleaned with a cloth dipped in water or ethanol (hexane or 50% methanol can also be used). No part of the case or cover should be immersed in the solvents. -
Page 66: Accessories
ACCESSORIES The following accessories can be obtained from Bibby Scientific Ltd. or your Techne distributor: Product code Description Prime/02/B Prime block, 96 x 0.2ml Prime/05/B Prime block, 60 x 0.5ml Prime/384/B Prime block, 384 well plates PrimeX/USB Prime base gradient upgrade REPLACEMENT PARTS The following replacement parts can be obtained from Bibby Scientific Ltd.
Need help?
Do you have a question about the Prime and is the answer not in the manual?
Questions and answers