
Subscribe to Our Youtube Channel
Related Manuals for Stryker visionpro 0240-031-020


Summary of Contents for Stryker visionpro 0240-031-020
- Page 1 VisionPro 26" LED Display VisionPro 26" LED Display: 0240-031-020 VisionPro SYNK 26" Wireless LED Display: 0240-031-000...
-
Page 3: Table Of Contents
Table of Contents Warnings and Cautions ....................1 About Your Device .....................3 Intended Use and Indications for Use �������������������������������������������������������������������������4 Contraindications ����������������������������������������������������������������������������������������������������������������4 Package Contents ���������������������������������������������������������������������������������������������������������������5 Device Features��������������������������������������������������������������������������������������������������������������������6 Setup ......................... 11 Connections ����������������������������������������������������������������������������������������������������������������������� 11 Basic Video Setup ������������������������������������������������������������������������������������������������������������� 13 Operation ......................... 14 On-Screen Display (OSD) ����������������������������������������������������������������������������������������������� 14 OSD Menus �������������������������������������������������������������������������������������������������������������������������... -
Page 5: Warnings And Cautions
Do not attempt internal repairs or adjustments not specifically detailed in this manual� Ensure that readjustments, modifications, and/or repairs are carried out by persons authorized by Stryker Endoscopy� 10� Do not put any object into the panel� If this occurs, unplug the device and have it checked by qualified personnel before operating it any further�... - Page 6 5� To connect to an international power supply, use an attachment plug appropriate for the power outlet, as outlined in the "Technical Specifications" section of this manual� 6� Unplug the device if it is not to be used for an extended period of time� To disconnect the cord, unscrew the plug first, then pull the cord out by the plug�...
-
Page 7: About Your Device
About Your Device VisionPro 26” LED Display REF: 0240-031-020 The VisionPro 26” LED Display is a wide screen LED surgical display that can support a maximum resolution of WUXGA (1920x1200)� The display supports the following video inputs: digital RGB, analog RGB, serial digital interface (SDI), component video (YPbPr/RGBS), S-video, and C-video/ SOG�... -
Page 8: Intended Use And Indications For Use
Intended Use and Indications for Use The VisionPro SYNK 26” Wireless LED Display and the VisionPro 26” LED Display are intended for video display during surgical procedures including arthroscopy (orthopedic surgery), laparoscopy (general and gynecological surgery), thoracoscopy, endoscopy (general, gastroenterological, and ENT surgery) and general surgery�... -
Page 9: Package Contents
Package Contents Reference Part Number Package Contents 0240-031-020 VisionPro 26” LED Display or 0240-031-000 VisionPro SYNK 26” Wireless LED Display – (4) M4 × 16 mm VESA screws – Hospital-grade AC power cord 0240-031-004 Medical Power Supply – Cable Cover Part Number Optional Accessories 0240-031-002... -
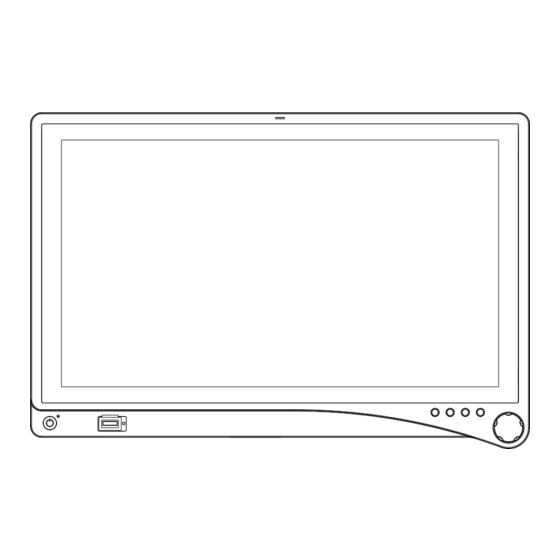
Page 10: Device Features
Device Features Front panel Operate the display using the rotary control located on the front panel� A list of the display controls and their functions is provided below� Display Screen Shows video image� Power switch (soft) Powers the display ON and OFF� Power LED Indicates current status: Green - Display is powered on or is in screen saver mode... - Page 11 Audio/PIP VisionPro 26” LED Display: Accesses the Picture in Picture adjustment menu� VisionPro SYNK 26” Wireless LED Display: Press twice for Picture in Picture adjustment menu� Note: Audio functionality is not enabled at this time. Bright Accesses the Brightness adjustment menu Specialty Accesses the Specialty adjustment menu 10.
-
Page 12: Rear Panel
Rear panel Accessory mounts (3) Provide an access point for mounting optional accessories� VESA mounting holes Provide access points for mounting the display� Power switch (hard) Powers the input DC power ON and OFF� Power connector Connects to the 24V DC power supply� Handles Aid in display positioning�... - Page 13 Cable Cover Installing the Cable Cover 1� Align the left and right hinges of the cable cover onto the bottom rear of the display� 2� Snap on the top section of the cable cover to the aligning clips� 3� With your fingers, turn the thumbscrews clockwise to tighten and lock the cable cover onto the display�...
- Page 14 Display Handles Caution: The handles are intended to aid in positioning the display, not for transporting the display. The handles should not bear the full weight of the display. Removing the Display Handles 1� Using a 3mm hex key, loosen the two M4 x 30mm screws and gently pull the handle away from the display�...
-
Page 15: Setup
Stryker Endoscopy considers instructional training, or inservice, an integral part of this device� Your local Stryker Endoscopy sales representative will perform at least one inservice at your convenience to help set up your device and instruct you and your staff on its operation and maintenance�... -
Page 16: Connecting The Power Supply
VisionPro SYNK 26” Wireless LED Display Connection Ports 6 6 6 5 6 6 6 6 Auxillary Connector S-Video C-Video/SOG RS232 Connecting the Power Supply 1� Connect the power supply to the 24V input on the display� 2� Connect the AC power cord to the power supply*� 3�... -
Page 17: Basic Video Setup
Route the video output 1 from the camera to the SDC DVI input� 2� Route the video output 1 from the SDC DVI output to the DVI input on the display� Note: Stryker recommends a backup connection to the camera. -
Page 18: Operation
Operation Operate the display using the rotary control and the four buttons located on the front panel� A list of the display controls and their functions is provided below� On-Screen Display (OSD) Accessing the On-Screen Display To use the four front-panel buttons: Audio/PIP (VisionPro SYNK 26”... - Page 19 Operating On-Screen Display The device OSD helps navigate through various device menus� Press the Rotary Control to activate the OSD menu� 1� 2� Rotate the Rotary Control to move up or down through the menu� The parameter is highlighted when selected� Press the Rotary Control to enter the next level OSD�...
-
Page 20: Osd Menus
OSD Menus Speciality Menu Item Description Range Color Temperature* Chooses between color temperatures for Lap A, Lap B, — Arthro A, Arthro B, Standard, PACS, NORM, ENT, GYN� Red balance -128 – 127 Green Green balance -128 – 127 Blue Blue balance -128 – 127 Gamma Gamma value 0�1 – 2�5, S0, S1, S2... - Page 21 Advanced Settings Menu Item Description Key Lock Key lock on: Disables all key functions Press and hold the rotary knob to turn off key lock� Auto Source Select Scans inputs until an active video source is detected� Auto Source Select is disabled during PIP/POP/PBP mode� Sleep Timer On: The display enters sleep mode if no active video source is detected�...
-
Page 22: Troubleshooting
Troubleshooting Before returning your display for service, consult the troubleshooting list below: Problem Current Status Remedy No picture Power LED on Using the OSD Menu, adjust the brightness and contrast to maximum, or reset them to their default settings� Power LED off Ensure the power switch at the front and rear of the display are set to ON�... -
Page 23: Cleaning And Maintenance
Cleaning and Maintenance Warning To avoid electric shock and potentially fatal injury, unplug the display and power supply from the electrical outlet before cleaning� Caution • Do not spray cleaning liquid directly onto the display or the power supply as product damage may result�... -
Page 24: Technical Specifications
Technical Specifications Display LCD Display Panel 26” (661 mm) Diagonal (a-Si TFT active matrix LCD) Synchronization 2�5 – 5�0 Vpp separated sync Pixel Pitch 0�300 (H) x 0�300 (V) mm Response Time < 18 ms Typ Viewing Angle Right/Left/Up/Down 89 Degrees Display Colors 1 billion colors (10 bit) Native Resolution 1920 (H) dots × 1080 (V) lines VisionPro 26”... -
Page 25: Operating Conditions
FCC Identifier: SSH-SYNKRX (Receiver Board) FCC Identifier: SSH-SDMAN (Accessory Board) VisionPro SYNK 26” Wireless LED Display: IC Regulations IC: 4919C-SYNKRX (Receiver Board) IC: 4919C-SDMAN (Accessory Board) Note: Please contact your local Stryker Endoscopy sales representative for information on changes and new products. -
Page 26: Electromagnetic Compatibility
Electromagnetic Compatibility Like other electrical medical equipment, the VisionPro 26” LED Display, and the VisionPro SYNK 26” Wireless LED Display require special precautions to ensure electromagnetic compatibility with other electrical medical devices� To ensure electromagnetic compatibility (EMC), the display must be installed and operated according to the EMC information provided in this manual� The display has been designed and tested to comply with IEC 60601-1-2 requirements for EMC with other devices�... - Page 27 Electrical fast ± 2kV for power supply lines ± 2kV line to ground Mains power quality should be that transient/burst of a typical commercial or hospital environment� IEC61000-4-4 ± 1kV for input/output lines ± 1kV line to line Surge ± 1kV differential mode ±...
- Page 28 Hereby, Stryker declares that the VisionPro SYNK 26” Wireless LED Display is in compliance with the essential requirements and other relevant provisions of Directive 1999/5/EC� A copy of the declaration of conformity may be obtained from Stryker Endoscopy, 5900 Optical Court, San Jose, CA, 95138, USA�...
-
Page 29: Symbols And Definitions
Symbols and Definitions The following symbols appear on the product, its labeling, or the product packaging� Each symbol carries a special definition, as defined below: Attention: Consult Instructions for Use See Instructions for Use Serial Number Quantity Temperature range Humidity range Authorized European Made in Country of Origin... - Page 32 Produced for: Stryker Endoscopy 5900 Optical Court San Jose, CA 95138 USA 1-800-624-4422 U.S. Patents: www.stryker.com/patents Products referenced with ™ designation are trademarks of Stryker. 2016/05 Products referenced with ® designation WCR: None are registered trademarks of Stryker.
Need help?
Do you have a question about the visionpro 0240-031-020 and is the answer not in the manual?
Questions and answers