Table of Contents
Advertisement
Quick Links
Advertisement
Table of Contents

Related Manuals for Telex Airman 7


Summary of Contents for Telex Airman 7
-
Page 1: Operating Instructions
Airman 7 Operating Instructions F.01U.307.689 Rev. 02 MAY/2017... - Page 2 Bosch is prohibited. *All other trademarks are property of their respective owners. ARRANTY AND ERVICE NFORMATION For warranty and service information........... www.telex.com/warranty USTOMER UPPORT Technical questions should be directed to: Customer Service Department Bosch Security Systems, Inc.
-
Page 3: Important! Read Before Use
• Never attempt to repair a headset which is not operating correctly. Contact the Telex dealer you purchased the headset through or authorized repair facility. • Only replace parts of the headset whose replacement is described within this manual. - Page 4 4 Important! Read Before Use Airman 8 Rev. 02 F.01U.307.689 Bosch Security Systems, Inc. Operating Instructions...
-
Page 5: Table Of Contents
Table Contents IMPORTANT! READ BEFORE USE ....... 3 INTRODUCTION ..............7 General Description .............. 7 Features ................7 FAA ..................8 Reference View ..............10 Connections ................ 11 INSTALLATION .............13 Installation ................13 Headset Adjustment ............16 Mic Placement ..............18 Microphone Gain Adjustment .......... - Page 6 Airman 7 SPECIFICATIONS ............33 Specifications ..............33 Part Number Information ............. 35 Operating Instructions Rev. 02 Bosch Security Systems, Inc. F.01U.307.689...
-
Page 7: Introduction
The Telex Airman 7 is a lightweight aviation headset designed specifically for optimizing pilot communications in commercial and business turbine aircraft. Building on the tradition of the Airman 750, the Airman 7 has improved durability, intelligibility, and comfort. Soft pliable ear cushions and headband pads combine with dual-direction ear cup pivots to provide long flight wearing comfort. -
Page 8: Faa
8 Introduction Airman 7 The Telex Airman 7 Headset (with or without microphone) is approved for aircraft use under FAA TSO-C139A. The conditions and tests required for the TSO approval of this article are minimum performance standards. It is the responsibility of those installing this article, either on or within a specific type or class of aircraft, to determine that the aircraft installation conditions are within the TSO standards. - Page 9 Airman 7 Introduction 9 DO-160G DESCRIPTION OF TESTS CONDITIONS SECTION CONDUCTED Fungus 13.0 Equipment identified as Category X, N/A Salt Fog Test 14.0 Equipment identified as Category X, N/A Magnetic Effect 15.0 Equipment is Category Z Power Input 16.0 Equipment tested to Category A Voltage Spike 17.0...
-
Page 10: Reference View
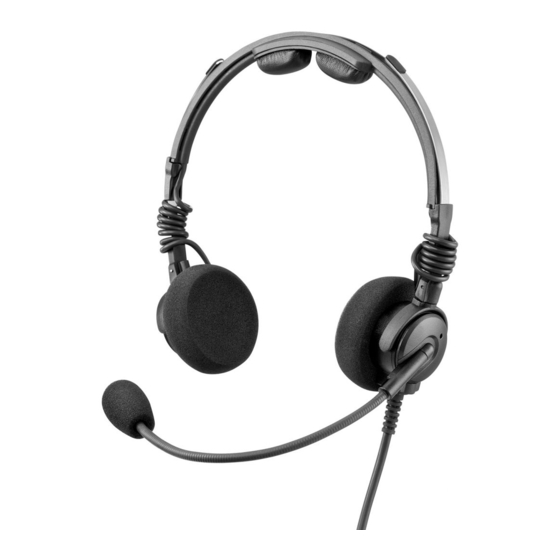
10 Introduction Airman 7 Reference View Airman 7 Reference view FIGURE 1. Headband Pad Boom Rotator Headset Slider Strain Relief Ear Cushion Boom Ear Cup Rotator Microphone/Windscreen Yoke Temple Pad F.01U.307.689 Rev. 02 Bosch Security Systems, Inc. Operating Instructions... -
Page 11: Connections
Airman 7 Introduction 11 Connections Airman 7 Series headsets are available with multiple connector styles depending on the application of use. All models utilize custom cables developed specifically for in-cockpit use. All connection points implement strain and bend relief features to provide long-term durability. Shielded wires throughout the headset protect against RFI (Radio Frequency Interference) and EMI (Electromagnetic Interference). - Page 12 12 Introduction Airman 7 Single Plug PJ Connector PJ-068 (equivalent) Description Headphone Signal Sleeve Headphone GND 5-Pin XLR Aircraft Cable Description Color Headphone Signal Yellow Headphone GND Black/Outer Shield Mic Signal White Mic GND and ANR Return Blue/Inner Shield ANR IN F.01U.307.689...
-
Page 13: Installation
CHAPTER 2 Installation Installation To install the headset for use, do the following: Step 1 Inspect the headset for signs of damage. Do not use the headset if signs of damage are evident. Step 2 Plug the headset into the aircraft console, see “Install the Sin- gle Plug Headphone in an Aircraft (Listen Only)”... - Page 14 14 Installation Airman 7 Install the Single Plug Headphone in an Aircraft (Listen Only) To install the single plug headphone in an aircraft, do the following: Insert the plug into the headset jack on the aircraft console. Single Plug Installation FIGURE 1.
- Page 15 Airman 7 Installation 15 Install the XLR Plug Headset in an Aircraft To install the XLR plug headset in an aircraft, do the following: Insert the XLR plug into the XLR jack on the aircraft audio panel. > XLR Plug Installation FIGURE 3.
-
Page 16: Headset Adjustment
Airman 7 Headset Adjustment The Airman 7 headset is designed to rest evenly on top of the head with each ear cup sitting centered and flush on each ear. The headset/headphone should fit over the head without pinching or gapping. - Page 17 Airman 7 Installation 17 Ear Cup Adjustment To adjust the ear cup to fit correctly, do the following: Swivel the ear cup left or right to position the ear cup straight on > the ear. NOTE: Over time, repositioning the headset may be necessary for comfort.
-
Page 18: Mic Placement
18 Installation Airman 7 Mic Placement The headset ships with the boom positioned at the top of the headband. Rotate the entire boom overhead to wear the microphone on either the right or left side of the head. CAUTION: There are two(2) stops below the boom housing. Rotating the boom past these stops will cause damage to the unit. -
Page 19: Microphone Gain Adjustment
Airman 7 Installation 19 To properly place the mic, do the following: Rotate the boom to the side you want to use (left or right). Bend the boom to position the mic in front of the mouth. NOTE: For best noise-cancelling quality, place the boom mic as close to the mouth as possible and speak into the mic. -
Page 20: Clothing Clip Assembly And Attachment
20 Installation Airman 7 Clothing Clip Assembly and Attachment Using the clothing clip reduces the cord weight from the headset. The clothing clip comes attached to the cord and only needs to be adjusted up or down for best use. -
Page 21: Care & Maintenance
CHAPTER 3 Care & Maintenance Recommended Maintenance Schedule NOTE: Ear cushions, headband pads, and microphone wind screens are considered wear items. For proper headset performance these items need to be inspected and replaced at regular intervals. See maintenance schedule (below) for more information. Headset performance diminishes if not replaced when deterioration or damage is apparent. -
Page 22: Cleaning The Headset And Connectors
22 Care & Maintenance Airman 7 Cleaning the Headset and Connectors Do not allow any liquid to puddle on the unit or touch the IMPORTANT: speaker or microphone element directly. To clean the headset, do the following: Using a mild detergent with water and a soft towel, or isopropyl >... - Page 23 Airman 7 Care & Maintenance 23 Verify the cushion is seated properly before use. To remove the headband pads, do the following: Grasp the edge of the headband pad. Gently pull the headband pad away from the headband. To replace the headband pad, do the following: Remove the paper from the sticky side of the headband cushion.
-
Page 24: Installing Or Replacing The Hygienic Covers
24 Care & Maintenance Airman 7 Installing or Replacing the Hygienic Covers NOTE: Two hygienic covers are included with the headset. However, extra hygienic covers can be purchased separately. To replace the hygienic covers, do the following: Grasp the edge of the hygienic cover where it folds into the slot on the ear cup. -
Page 25: Headset Storage
Airman 7 Care & Maintenance 25 Headset Storage To store the headset, do the following: Move the boom mic above the headband. Fold the ear cups flat. F.01U.307.689 Rev. 02 Bosch Security Systems, Inc. Operating Instructions... - Page 26 26 Care & Maintenance Airman 7 Coil the cord into a loop. Place the coiled cord and headset in a box or protective case. Place the coiled cord and headset in the optional carrying case (see “Part Number Information” on page 35).
-
Page 27: Troubleshooting
CHAPTER 4 Troubleshooting Troubleshooting “No one can hear me when I talk” on page 28. • “Others only hear me sporadically or my voice is distorted and • unintelligible” on page 29. “I cannot hear anyone who is trying to speak to me” on page 30. •... - Page 28 28 Troubleshooting Airman 7 Issue Possible Cause Solution No one can hear me Microphone not Verify microphone • • when I talk connected is plugged in correctly. correctly. Verify no breaks • or damage to cord (If damaged, headset needs to be serviced).
- Page 29 Airman 7 Troubleshooting 29 Issue Possible Cause Solution Others only hear me Microphone is not Reposition • • sporadically or my located correctly. microphone to voice is distorted and correct location unintelligible closely to front of month. For more information, see “Mic Placement”...
- Page 30 30 Troubleshooting Airman 7 Issue Possible Cause Solution I cannot hear anyone Headphones not Verify headphone • • who is trying to speak connected is plugged in to me correctly. correctly. Verify no breaks • or damage to cord. Headphones are Reposition •...
- Page 31 Airman 7 Troubleshooting 31 Issue Possible Cause Solution I hear others only Headphones have Check and clean • • sporadically or what I poor connection connectors and hear is distorted and to the aircraft. re-connect to unintelligible aircraft. Headphones are Reposition •...
-
Page 32: Label Information
32 Troubleshooting Airman 7 Label Information Box Label Information FIGURE 1. The Datamatrix ECC200 holds the following information: CTN Number • Serial Number • SAP Part Number • Datamatrix ECC200 • Example Headband FIGURE 2. F.01U.307.689 Rev. 02 Bosch Security Systems, Inc. -
Page 33: Specifications
Frequency Response < 10dB max. to min. over the range of 350 to (Per RTCA DO-214a) 3500Hz Sensitivity For models AIRMAN 7-0220, AIRMAN 7-0211 (Per RTCA DO-214a) 92 dB +/- 5 dBSPL For model AIRMAN 7-0110 95 dB +/- 5 dBSPL... - Page 34 -28dB +/- 2 dB re 1V/Pa @ 1kHz, 12V (Per RTCA DO-214a) Operating Voltage 8-28 VDC (470 Ohm TSO load circuit) (Per RTCA DO-214a) Connector Type For models AIRMAN 7-0210, AIRMAN 7-0211, AIRMAN 7-0110 Microphone PJ-068 (equivalent) Headphones PJ-055 (equivalent) For models AIRMAN 7-0220...
-
Page 35: Part Number Information
Double Side Headphone, PJ, 150 Ohm AIRMAN8-0900 Windscreen for Airman 7 or 8, 2 pcs AIRMAN7-0901 Foam Cushion for Airman 7 or 8, 2 pcs AIRMAN7-0902 Supple Cushion for Airman 7 or 8, 2 pcs AIRMAN7-0904 Clothing Clip for Airman 7 or 8... - Page 36 Bosch Security Systems, Inc. 12000 Portland Avenue South Burnsville, MN 55337 U.S.A. www.boschcommunications.com...
Need help?
Do you have a question about the Airman 7 and is the answer not in the manual?
Questions and answers