
Subscribe to Our Youtube Channel
Related Manuals for Telex Stratus Heli-XT


Summary of Contents for Telex Stratus Heli-XT
- Page 1 User Instructions Stratus Heli-XT Active Noise Reduction Headset LIT000293000 Rev B 12/2008...
- Page 2 Uniform Limited Warranty Limitation of Remedies; Certain Damages Excluded Telex branded products are warranted by Telex Communications, Inc. against REPAIR OR REPLACEMENT OF malfunction due to defects in materials and DEFECTIVE PRODUCTS ARE THE workmanship for a specified period, as noted...
- Page 3 Department listed below: Equipment that is not under warranty must be USA, Canada, & Latin America sent postage prepaid to Telex. If requested, an estimate of repair costs will be issued prior to 1720 E, 14th Street service. Once you approve repair, and repair of...
- Page 4 Ordering Information Stratus Heli-XT Headset...............PRD000220000 Stratus Heli-XT 1” Replacement Foam-Filled Ear Cushions (package of 2)................ 800456021 Stratus Heli-XT Premium Replacement Headband Pad......800456017 Replacement Electret Microphone .............. 800136100 Microphone Windscreen................800456000 Clothing Clip ....................590637000 Stratus Heli-XT Replacement Carrying Case........CME000009000 Cell Phone Accessory Cable ...............
-
Page 5: Table Of Contents
Table Contents Design Features ................4 Auto Shut-Off .................6 Battery/User Interface Module ............6 Electrical Requirements ..............6 Microphone Bias Voltage ...............6 Headset Power ................6 Wiring Diagram ................7 Specifications ..................8 Headset Operation ................9 Headband Size Adjustment .............9 Headband Pressure Adjustment ............10 Microphone Boom Rotation ............12 Microphone Placement ..............12 Battery Installation ................13 Accessory Connections ..............13... - Page 7 CHAPTER 1 Introduction Introduction...
-
Page 8: Design Features
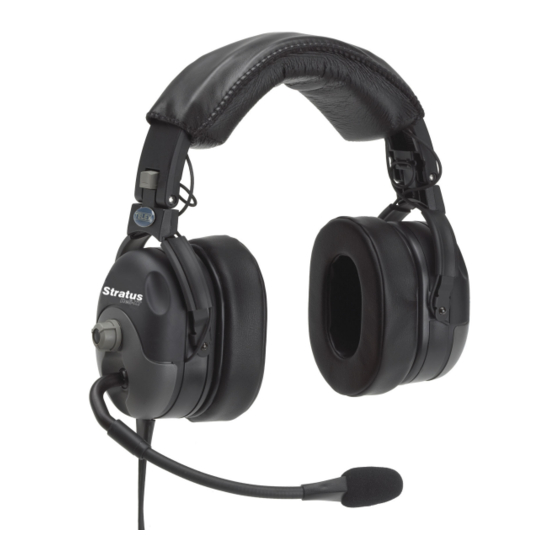
This device complies with part 15 of the FCC Rules. Operation is subject to the following two(2) conditions: This device may not cause harmful interference. This device must accept any interference received, including interference that may cause undesired operation. Stratus Heli-XT Reference View FIGURE 1. 4 Introduction... - Page 9 Noise Reduction Passive noise reduction: >29dB Active noise reduction: up to 16dB Fit and Comfort Detented slide adjustment on the headband allows the ear cup to be easily raised or lowered for proper fit. Yoke design allows the ear cup to pivot in two planes assuring proper seal to the head and distributing ear cushion pressure evenly over its entire surface.
-
Page 10: Auto Shut-Off
Auto Shut-Off Headset will shut off automatically after 15 minutes in low-noise environments. When Auto Shut-off is enabled, audio signals that keeps the headset active are: communication over the aircraft radio/intercom system • cellular phone conversations • listening to music •... -
Page 11: Wiring Diagram
Wiring Diagram Wiring Diagram FIGURE 2. Introduction... -
Page 12: Specifications
Specifications Receivers Type: Dynamic Frequency Response: 50Hz - 10kHz Sensitivity: 95±5dB SPL (1kHz, 1mW input) Impedance (Max. Volume): Monaural, 150 Ohms Headset Power: 2 - AA batteries or panel power from 8-32 Vdc Microphone Element Type: Amplified noise-canceling electret Frequency Response: 100Hz - 3.5kHz Sensitivity: -50 ±6dB (ref: 1V/μbar at 1kHz with 12Vdc supply voltage and 470 Ohm DC, 150... -
Page 13: Headset Operation
CHAPTER 2 Operation Headset Operation Headband Size Adjustment To adjust the headband size, do the following: With the headband resting securely on the top of the head, verify the ear cups are centered over the ears. Operation... -
Page 14: Headband Pressure Adjustment
Reposition the ear cups, if necessary, by moving the headband sliders up or down. Headband Size Adjustment FIGURE 1. Headband Pressure Adjustment There are three(3) pressure settings. Increasing the pressure improves the seal between the ear cup and the head for greater noise reduction. To change the pressure setting, do the following: Remove the headset and fold the ear cup inward. - Page 15 COMFORT CAM™ ADJUSTMENT SETTINGS Side View Top View Headband Pressure Adjustment FIGURE 2. Operation...
-
Page 16: Microphone Boom Rotation
Microphone Boom Rotation To rotate the boom microphone, do the following: Rotate the entire boom overhead to wear the microphone on either the right > or left side of the head. Microphone Boom Rotation FIGURE 3. Microphone Placement To accurately place the microphone, do the following: Reshape the boom so the microphone is in front of the mouth. -
Page 17: Battery Installation
Accessory Connections Connect cellular telephone and/or audio input devices, as desired. The Telex Stratus Heli-XT cell phone/audio interface has been designed to function with the widest array of cellular telephones and portable audio devices. There are cell phones and audio devices on the market not designed to industry physical and electrical standards. -
Page 18: Speaker Volume Adjustment
Speaker Volume Adjustment When the microphone is worn on the left side, volume is increased by rotating the top of the volume controls toward the front of the head. Control operation is reversed when the microphone is worn on the right side. Volume control affects communications, as well as cell phone and auxiliary audio inputs. -
Page 19: Accessory Muting
To turn the headset OFF, hold down the ON/OFF button until the LED > blinks rapidly, and then let go. The blinking LED stops when the unit is OFF. Accessory Muting To mute accessories, do the following: To either enable or mute the accessories, press the accessory mute button. >... -
Page 20: Reading The Led Indicator
Reading the LED Indicator LED Indicator Descriptions TABLE 1. Battery Battery Low Battery Charging Normal Power OFF LED OFF LED OFF LED Solid Red Blinks Power ON/ Blinks Red Green every Blinks OFF every two (2) Accessories every two (2) two (2) seconds Enabled... -
Page 21: Microphone Replacement
Microphone Gain Adjustment FIGURE 6. Microphone Replacement To replace the microphone, do the following: On the boom assembly, press the release catch and carefully pull the microphone from the mic mount. Be sure not to pull the connecting wires from the mic mount. Detach the microphone from the connector. -
Page 22: Ear Cushion Replacement
Re-attach the new microphone to the connector. Carefully rejoin the microphone and microphone mount, taking care not to fold the connecting wires. Ear Cushion Replacement To remove an old ear cushion, do the following: Grasp the ear cushion and pull it off the ear cup. >... -
Page 23: Notes
Notes Operation... - Page 24 TELEX COMMUNICATIONS, INC. • 12000 PORTLAND AVE S., BURNSVILLE, MN 55337 U.S.A...
Need help?
Do you have a question about the Stratus Heli-XT and is the answer not in the manual?
Questions and answers