Table of Contents
Advertisement
Available languages
Available languages
Quick Links
Overview [en]
This Quick Installation Guide provides
a description of the installation of the
PS03a. It contains the following
information:
Safety Regulations
General Information
Hardware Installation
Finding the Print Server in the
Network
Printing via the Print Server
Configuring the Print Server
Please note the table of contents on
page 6. Should you have any further
questions, please contact our support
hotline.
Monday - Thursday
Friday
+49 (0)521 94226-44
@
support@seh.de
Quick Installation Guide
Printserver
PS03a
Quick Installation Guide
Überblick [de]
Dieser
beinhaltet eine Beschreibung der
Installation des PS03a. Sie erhalten die
folgenden Informationen:
Sicherheitsvorschriften
Allgemeine Information
Hardware-Installation
Printserver im Netzwerk finden
Drucken mit dem Printserver
Printserver konfigurieren
Beachten Sie das Inhaltsverzeichnis
auf Seite 19. Falls Sie noch Fragen
haben,
Support-Hotline.
8:00 a.m. to 4:45 p.m. and
8:00 a.m. to 3:15 p.m. (CET)
Quick
Installation
kontaktieren
Guide
Sie
unsere
1
Advertisement
Chapters
Table of Contents

Related Manuals for SEH PS03a


Summary of Contents for SEH PS03a
-
Page 1: Quick Installation Guide
This Quick Installation Guide provides Dieser Quick Installation Guide a description of the installation of the beinhaltet eine Beschreibung der PS03a. It contains the following Installation des PS03a. Sie erhalten die information: folgenden Informationen: Safety Regulations Sicherheitsvorschriften ... - Page 2 Date of Manufacture The serial number includes the date of manufacture. The serial number can be found on the type plate. Quick Installation Guide...
- Page 3 Safety Regulations English [en] Print servers are active network components for printers in office environments and are designed for the direct integration of printers into networks. Before starting the initial setup procedure and during the operation of the print server, please note the following safety regulations.
- Page 4 Lesen Sie die Dokumentation und stellen Sie sicher, dass Ihr System den aufgeführten Anforderungen entspricht. Das Gerät darf nicht mit Feuchtigkeit oder Flüssigkeit in Berührung kommen. Das Gerät darf nur in unversehrtem Zustand angeschlossen und betrieben werden. ...
- Page 5 Ne branchez aucune ligne téléphonique au connecteur RJ-45. Les connecteurs RJ-45 ne doivent être connectés qu'aux tensions SELV. Pour la connexion au connecteur RJ-45, seuls les câbles STP (catégorie 5 ou supérieur) peuvent être utilisés. Le blindage doit être fixé au connecteur de manière plane. ...
-
Page 6: Table Of Contents
2 General Information ......7 Purpose ..........7 Scope of Supply . -
Page 7: General Information
General Information Purpose The print server 'PS03a' is an active network component which directly integrates printers or multifunction printers (MFP) into networks. The print server receives print jobs and forwards them to the printer or MFP. The administration of the PS03a is done via the 'Printserver Homepage'. -
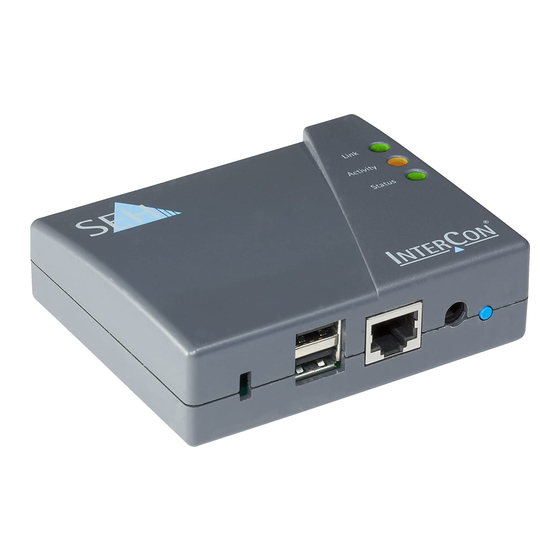
Page 8: Technical Data
Technical Data 1) Link LED (green) 2) Activity LED (yellow) 3) Status LED (green) 4) Button (status/reset) 5) Connector for the included power pack 6) Network connector (RJ-45) for 1000BaseT, 100BaseTX and 10BaseT 7) USB port 1 8) USB port 2 9) Kensington security slot Properties Values... -
Page 9: Led Display
LED Display The LEDs of the print server provide information about its status. Action Color Description Link permanently on green There is a connection to the network. permanently off There is no connection to the network. Activity blinks at yellow Indicates the exchange of network data irregular packets. -
Page 10: Hardware Installation
Hardware Installation Up to 2 USB printers can be connected to the print server (PS03a) via the USB interfaces. network printer printer print server printer Connecting the Print Server to the Printer Proceed as follows: 1. Turn the printer off. -
Page 11: Connecting The Print Server To The Network
Connecting the Print Server to the Network Proceed as follows: 1. Connect the network cable (RJ-45) to the print server. 2. Connect the power cord to the print server. 3. Connect the power cord to the printer. 4. Turn the printer on. In order to verify the installation you can print a status page. -
Page 12: Finding The Print Server In The Network
The 'InterCon-NetTool' has been developed by SEH Computertechnik GmbH for the administration of SEH print servers. By means of this tool you can find the print server's IP address and, if necessary, assign a suitable IP address to the print server, as described below. -
Page 13: Finding The Print Server (Determining The Ip Address)
Finding the Print Server (Determining the IP Address) All SEH print servers found in the network are displayed in the device list. If the print server has received an IP address via the boot protocols BOOTP or DHCP, you can identify it with the help of it's type designation. If you are using several print servers of the same type, identify the print server using it's hardware address. -
Page 14: Printing Via The Print Server
Printing via the Print Server The print server embeds non-network-ready printers into the network. In order to print via the print server, the printers connected to the print server must be set up as printers on the client system. The printers can be set up in different operating systems. -
Page 15: Printing In Os X Yosemite (10.10)
8. Tick Create a new port. 9. From the list Type of port, select Standard TCP/IP Port. 10. Click Next. 11. In the Hostname or IP address box, enter the IP address of the print server. Omit leading zeros from the IP address! 12. - Page 16 Proceed as follows: 1. Open the System preferences. 2. Click Printers and Scanners. 3. Click the icon. The Add dialog appears. 4. Click IP. 5. Into the IP Address box, enter the IP address of the print server. 6. From the Protocol list, select Select Internet Printing Protocol - IPP. 7.
-
Page 17: Print Server Configuration
Print Server Configuration The print server has a user interface, the Printserver Homepage, which can be opened in an Internet browser (Internet Explorer, Mozilla Firefox, Safari). The print server can be configured and monitored via the Printserver Homepage. Proceed as follows: 1. - Page 18 [en] Quick Installation Guide...
- Page 19 2 Allgemeine Information ......20 Verwendungszweck ........20 Lieferumfang .
-
Page 20: Allgemeine Information
Allgemeine Information Verwendungszweck Der Printserver 'PS03a' ist eine aktive Netzwerkkomponente, die das direkte Einbinden eines Druckers oder Multifunktionsgerätes (MFG) in ein Netzwerk ermöglicht. Der Printserver empfängt Druckaufträge und leitet diese an den Drucker oder das MFG weiter. Die Verwaltung des PS03a erfolgt über die 'Printserver Homepage'. -
Page 21: Technische Daten
Technische Daten 1) Link-LED (grün) 2) Activity-LED (gelb) 3) Status-LED (grün) 4) Taster (Status/Reset) 5) Anschluss für die Stromversorgung über das mitgelieferte Netzteil 6) Netzwerkanschluss (RJ-45) für 1000BaseT, 100BaseTX und 10BaseT 7) USB-Port 1 8) USB-Port 2 9) Schlitz für Kensington-Schloss Eigenschaften Werte Netzwerkanschluss... -
Page 22: Led-Anzeige
LED-Anzeige Durch die Interpretation des LED-Leuchtverhaltens kann der Zustand des Printservers ermittelt werden. Aktion Farbe Beschreibung Link Dauer-An grün Eine Verbindung zum Netzwerk ist vorhanden. Dauer-Aus Es besteht keine Verbindung zum Netzwerk. Activity unregelmäßiges gelb Signalisiert den Austausch von Netzwerk- Blinken Datenpaketen. -
Page 23: Hardware-Installation
Hardware-Installation Am Printserver (PS03a) können bis zu 2 USB-Drucker über die USB-Schnittstellen angeschlossen werden. Netzwerk Drucker Drucker Printserver Drucker Printserver an den Drucker anschließen Gehen Sie wie folgt vor: 1. Schalten Sie den Drucker aus. 2. Entfernen Sie das Netzkabel vom Drucker. (Stromversorgung unterbrechen) 3. -
Page 24: Printserver An Das Netzwerk Anschließen
Printserver an das Netzwerk anschließen Gehen Sie wie folgt vor: 1. Verbinden Sie das Netzwerkkabel (RJ-45) mit dem Printserver. 2. Verbinden Sie das Netzkabel mit dem Printserver. 3. Verbinden Sie das Netzkabel mit dem Drucker. 4. Schalten Sie den Drucker ein. Zur Überprüfung der Installation können Sie eine Statusseite drucken. -
Page 25: Printserver Im Netzwerk Finden
Adresse aus dem für ZeroConf reservierten Adressbereich (169.254.0.0/16). Das 'InterCon-NetTool' ist eine von der SEH Computertechnik GmbH entwickelte Software zur Administration von SEH Printservern. Mit diesem Tool können Sie, wie nachfolgend beschrieben, die IP-Adresse des Printservers ermitteln und bei Bedarf eine frei definierbare IP-Adresse im Printserver speichern. -
Page 26: Printserver Finden (Ip-Adresse Ermitteln)
Online Hilfe. Um die Online Hilfe zu starten, wählen Sie im Menü Hilfe den Befehl Online Hilfe. Printserver finden (IP-Adresse ermitteln) Alle im Netzwerk gefundenen SEH Printserver werden in der Geräteliste angezeigt. Hat der Printserver eine IP-Adresse über die Bootprotokolle BOOTP oder DHCP erhalten, können Sie ihn anhand seiner Typenbezeichnung identifizieren. -
Page 27: Drucken Mit Dem Printserver
Drucken mit dem Printserver Der Printserver bindet nicht-netzwerkfähige Drucker in das Netzwerk ein. Damit über den Printserver gedruckt werden kann, müssen die an den Printserver angeschlossenen Drucker auf dem Client-System als Drucker angelegt werden. Die Drucker können in verschiedenen Betriebssystemen angelegt werden: ... - Page 28 7. Wählen Sie die Schaltfläche Weiter an. 8. Aktivieren Sie die Option Neuen Anschluss erstellen. 9. Wählen Sie aus der Liste Anschlusstyp den Eintrag Standard TCP/IP Port. 10. Wählen Sie die Schaltfläche Weiter an. 11. Geben Sie im Feld Hostname oder IP-Adresse die IP-Adresse des Printservers ein.
-
Page 29: Drucken In Os X Yosemite (10.10)
Drucken in OS X Yosemite (10.10) Drucker werden über die Systemeinstellungen auf dem Client angelegt. Stellen Sie folgende Punkte sicher: Die Hardware-Installation wurde ausgeführt; siehe: Der Printserver und der Drucker sind eingeschaltet. Der Printserver ist mit einer IP-Adresse im Netzwerk bekannt; siehe: Gehen Sie wie folgt vor: 1. -
Page 30: Printserver Konfigurieren
Printserver konfigurieren Der Printserver verfügt über eine Benutzeroberfläche, die Printserver Homepage, welche Sie in einem Internet-Browser (Internet Explorer, Mozilla Firefox, Safari) aufrufen. Über die Printserver Homepage kann der Printserver konfiguriert und überwacht werden. Gehen Sie wie folgt vor: 1. Öffnen Sie Ihren Browser. 2. - Page 31 The latest version of the EC declaration of conformity can be downloaded from the homepage of SEH Computertechnik GmbH: http://www.seh-technology.com/services/ce-notifications.html Quick Installation Guide...
- Page 32 All trademarks, registered trademarks, logos and product names are property of their respective owners. The contents of this document are subject to change without notification. This product uses ’Open Source Software’ . For further information, please contact http://www.seh.de. The product documentation gives you valuable information about your product. Keep the documentation for further reference during the life cycle of the product.
Need help?
Do you have a question about the PS03a and is the answer not in the manual?
Questions and answers