Moog Videolarm SDW12T Installation And Operation Instructions Manual
Outdoor fixed dome housing
Hide thumbs
Also See for SDW12T:
- Installation and operation instructions manual (12 pages) ,
- Manual (12 pages)
Table of Contents
Advertisement
Quick Links
www.videolarm.com
S D W 1 2 C H B
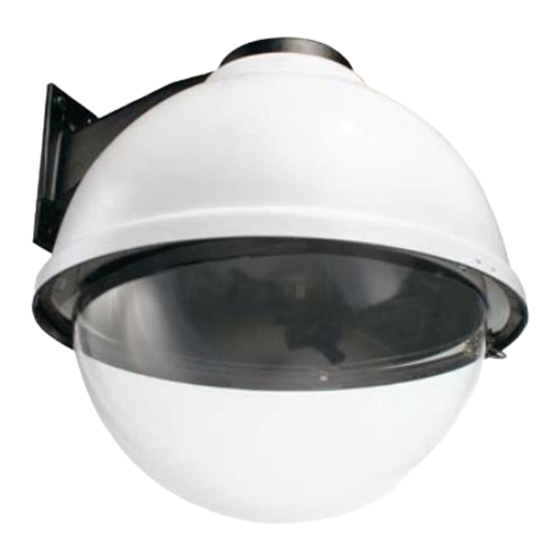
Outdoor Fixed Dome Housing
Installation and Operation Instructions for the following models:
SDW12C
camera bracket
SDW12T
camera bracket
SDW12CHB
12" Outdoor dome housing with wall mount, clear dom, 24Vac input, heater/
B e fo r e a t t e m p t i n g t o c o n n e c t o r o p e r a t e t h i s p r o d u c t ,
p l e a s e r e a d t h e s e i n s t r u c t i o n s c o m p l e t e l y.
81-IN5383R0
Advertisement
Table of Contents

Subscribe to Our Youtube Channel
Related Manuals for Moog Videolarm SDW12T


Summary of Contents for Moog Videolarm SDW12T
- Page 1 Outdoor Fixed Dome Housing Installation and Operation Instructions for the following models: SDW12C camera bracket SDW12T camera bracket SDW12CHB 12” Outdoor dome housing with wall mount, clear dom, 24Vac input, heater/ B e fo r e a t t e m p t i n g t o c o n n e c t o r o p e r a t e t h i s p r o d u c t , p l e a s e r e a d t h e s e i n s t r u c t i o n s c o m p l e t e l y.
- Page 2 IMPORTANT SAFEGUARDS SAFETY PRECAUTIONS 1 Read Instructions - All the safety and operating instructions should be read before the unit is CAUTION operated. RISK OF ELECTRIC SHOCK 2 Retain Instructions - The safety and operating DO NOT OPEN instructions should be retained for future reference.
- Page 3 LIMITED WARRANTY FOR VIDEOLARM INC. PRODUCTS VIDEOLARM INC. warrants this Product to be free from defects in material or workmanship, as follows: PRODUCT CATEGORY PARTS LABOR All Enclosures and Electronics Three (3) Years Three (3) Years Pan/Tilts Three (3) Years **6 months if used in autoscan Three (3) Years **6 months if used in autoscan Poles/PoleEvators Three (3) Years...
-
Page 4: Electrical Specifications
Electrical Specifications Contents of Box Power 24VAC SDW12 Class 2 Only 24 VAC 3.33Amps Total Power: 52 Watts Accessories: Heater: 50 Watts/Blower: 2 Watts Camera Power: Not Supplied Tools Required: Housing Security Tool (provided) English Molex Crimper 11-01-0197 (18-24 gauge wire) 24 VAC 3.33 amperios Energía Total: 52 vatios... - Page 5 If using conduit connect, connect to Securely mount unit to wall or to appropriate incoming conduit fitting. adapter bracket. • Si usa el conducto conecte, conecte con la guar- • Monte con seguridad la unidad a la pared o al nición entrante del conducto.
- Page 6 Wrap Teflon tape around the pipe threads Securely mount bracket to wall. Pull wiring to ensure a tight seal. through bracket and position grommet as shown. • Con seguridad soporte del montaje a emparedar. Tire del cableado • La cinta del Teflon del abrigo alrededor de la pipa rosca a través del soporte y del ojal de la posición según lo demostrado.
- Page 7 Loop the lanyard over the set screw to Make the appropriate wiring connections temporarily hold housing. from the dome to the gooseneck. • Coloque el acollador sobre el tornillo de presión para • Haga las conexiones apropiadas del cableado de la bóveda celebrar temporalmente la cubierta.
- Page 8 Wiring Color Code 24k VAC Wiring Distances Power and Control Inputs The following are the recommended maximum distances for 24 VAC (Outside of housing) with a 10% voltage drop (10% is generally the maximum allowable voltage drop for AC powered devices). POWER Wire Gauge Camera Power (24 VAC)
-
Page 9: Camera Side
Housing Side Camera Side Attach fixed bracket to one of the (2) square holes. Assemble fixed camera bracket. • Una el soporte fijo a una (2) de las perforaciones rectangula- res. • Monte el soporte fijo de la cámara fotográfica. •... -
Page 10: Replacement Parts List
Replacement Parts List SDW12 Part Number Description WM10 WALL MOUNT KIT SD0190 SDW HOUSING GASKET SDH012 HOUSING TOP FOR 12” HOUSING SDH016 HOUSING TOP FOR 16” HOUSING RPFD040 UPPER BRACKET ASSEMBLY RP46PKH3063 SPACER KIT RPFD050 PCBOARD RPFD060 CAMERA BRACKET RPFD072 25 WATT, 24 VAC HEATER RPFD080 BLOWER... -
Page 11: Product Registration/Warranty
Product Registration/Warranty Thank you for choosing Videolarm. We value your patronage and are solely committed to providing you with only the highest quality products available with unmatched customer service levels that are second-to-none in the security industry. Should a problem arise, rest assure that Videolarm stands behind its products by offering some of the most impressive warranty plans available: 3 Years on all Housings, Poles, Power Supplies, and Accessories and 5 Years on all camera systems (SView, QView, Warriors), and InfraRed Illuminators.
Need help?
Do you have a question about the SDW12T and is the answer not in the manual?
Questions and answers