Advertisement
Quick Links
EN Instruction manual
EN Instruction manual
SAFETY INSTRUCTIONS
• By ignoring the safety instructions the
NL Gebruiksaanwijzing
manufacturer can not be hold responsible for
the damage.
FR Mode d'emploi
• If the supply cord is damaged, it must be
DE Bedieningsanleitung
replaced by the manufacturer, its service
agent or similarly qualified persons in order to
ES Manual de usuario
avoid a hazard.
PT Manual de utilizador
• Caution! Danger of explosion if the battery is
incorrectly replaced. Replace only with the
IT Manuele utente
same or equivalent type.
SV Bruksanvisning
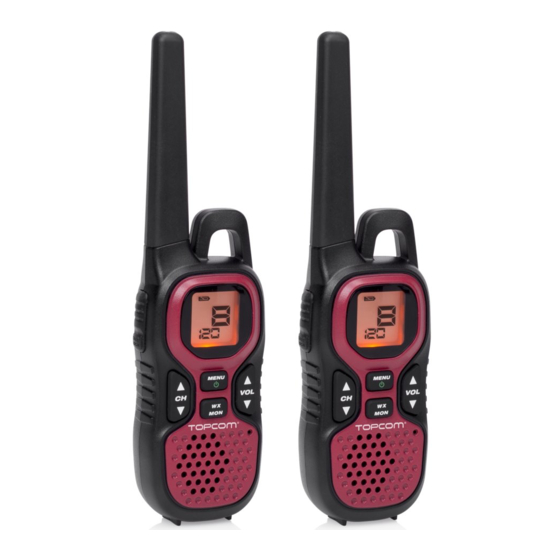
PARTS DESCRIPTION
1. Antenna
PL Instrukcja obsługi
2. PTT (Push-To-Talk) Button
3. Call/Lock Button
CS Návod na použití
4. Menu/Power Key
5. Channel Up/Down Key
SK Návod na použitie
6. Monitor Key
7. Speaker
8. Headset Jack
9. Volume Up/Down Key
10. Microphone
11. Battery Level Meter
12. Receive Indicator
13. Call Indicator
14. Scan Indicator
15. Channel Indicator
16. Hi Power Indicator
17. Low Power Indicator
18. Transmit Indicator
19. Volume Setting Indicator
20. Keypad Lock Indicator
21. VOX Indicator
22. Sub Code Indicator
23. Charging Contacts
RC 6412
BEFORE THE FIRST USE
• Each radio uses a supplied NiMH battery pack or 3 AAA alkaline
PARTS DESCRIPTION / ONDERDELENBESCHRIJVING / DESCRIPTION DES PIÈCES /
batteries (not included).
• To install the NiMH battery pack:
TEILEBESCHREIBUNG / DESCRIPCIÓN DE LAS PIEZAS / DESCRIÇÃO DOS
– Make sure your radio is OFF.
COMPONENTES / DESCRIZIONE DELLE PARTI / BESKRIVNING AV DELAR / OPIS
CZĘŚCI / POPIS SOUČÁSTÍ / POPIS SÚČASTÍ
– Press the tab at the bottom of the battery compartment door to
remove the cover.
– Install the NiMH battery pack into the battery compartment. Be certain
to follow the instructions written on the label on the battery pack.
Installing the battery pack incorrectly will prevent the unit from
23
operating.
– Replace the battery compartment door
1
• This unit has a battery level meter on the display to indicate the status
of the batteries. When the battery in the unit is low, the battery level
meter icon flashes. Recharge the NiMH battery pack immediately or if
you are using alkaline batteries, you must replace the alkaline
batteries in order to continue using the radio.
• Warning! To avoid the risk of personal injury or property damage from
fire or electrical shock, only use the accessories specifically
designated for this product.
• If you use the rechargeable NiMH battery pack, two radios can be
charged directly or by using the supplied charging cradle.
• Charging using the DC adapter:
– Connect the optional DC adapter to the DC jack of the radio and to a
2
8
cigarette lighter port.
3
13
12
11
18
19
– Charge the battery pack for 16 hours until the battery indicator stops
4
flashing.
20
• Charging using the cradle:
9
21
5
– Connect the AC adapter to the DC jack and to a standard AC wall
14
6
outlet.
10
15
– Set the charging cradle on the desk or tabletop, and place the radio in
7
the charging cradle with the keypad facing forward.
16
– Make sure that the LED illuminates. Charge the battery pack for 16
17
22
hours and remove the radio from the charging cradle after charging.
• The DC jack of the radio is for charging only. Be sure to install the
battery before charging.
• Use only the supplied battery and AC adapter or approved
accessories.
• Charge time may vary depending on the battery life remaining.
• Do not recharge alkaline batteries. Doing so can create a safety
hazard or damage the radio.
• For fastest charging, turn off the radio before charging.
• The battery must be installed for the unit to operate, even if the unit is
also connected to external power.
• If battery power is low, you cannot operate the radio even using
external power. Allow the batteries to charge before using. If you try to
transmit while power is low, the radio will automatically turn off.
• You can use a headset for more private communications. To use a
headset, lift the rubber cover from over the headset jack, then plug in
the headset.
• Important: Your radio is not weather resistant when using a headset
jack. When you remove the headset, be sure to fully press the jack
cover into place to restore its weather resistant capability.
USE
Turning the Radio On and Adjusting the Volume
• Press and hold the Power key to turn the radio ON, and increase the
speaker volume by pressing VOL ▲ . To decrease the volume, press
VOL ▼.
• Press and hold the Power key again to turn the radio OFF.
Adjusting the Sound (Key Beeps)
• Your radio emits a beep each time one of the keys (except for the PTT
and CALL/LOCK) is pressed. To turn this sound OFF, press and hold
CALL/ LOCK while turning ON the radio. Repeat this step to turn the
sound ON.
Choosing a Channel
• Your radio has 8 channels and 121 Sub codes you can use to talk to
others. In order to speak to someone, each of you must be set to the
same channel and Sub code.
• To choose a channel: With the radio in "Normal" operating mode,
press the CH ▲ / CH ▼ key to increase or decrease the channel
number displayed.
Talking on your radio
• To talk to others using the radio, press and hold the PTT button and
speak in a clear, normal voice about 2-3 inches away from the
microphone. While you are transmitting, the tx icon appears on the
display. To avoid cutting off the first part of your transmission, pause
slightly after pressing the PTT button before you start talking.
• When you have finished speaking, release the PTT button. You can
now receive incoming calls. While receiving, the rx icon appears on
the display.
Monitor Mode Feature
• Your radio allows you to listen for weak signals on the current channel
at the press of a key. To turn ON Monitor mode: Press and hold the
Monitor key for 2 seconds until two beeps sound. The receiver circuit
stays open, and both noise and weak signals can be heard.
• To turn OFF Monitor mode, press and hold the Monitor key for 2 seconds
9. Volume omhoog/omlaag-toets
to return to "Normal" mode; the rx icon stops blinking and disappears.
10. Microfoon
Advanced Functions (Menus)
11. Batterijniveaumeter
• Press the MENU key to enter the menus.
12. Indicator Ontvangen
• Additional presses of the MENU key advance you through the menus
13. Indicator Oproepen
until exiting to "Normal" operating mode. You will also exit the menu
14. Indicator Scannen
when not pressing any keys for 10 seconds.
15. Indicator Kanaal
Subcode
16. Indicator Hoog vermogen
• Each of the 8 channels may have any one of the codes, OFF, or 1-121
17. Indicator Laag vermogen
selected. Code oF (OFF) indicates no Sub code selected and your radio
18. Indicator Zenden
can receive a signal regardless of the code settings of the transmitting
19. Indicator Volume regelen
radio.
20. Indicator Toetsenbord vergrendelen
• Press the MENU key to enter Menu mode. The subcode indicator
21. Indicator VOX
flashes.
22. Indicator Subcode
• Press CH ▲ / CH ▼ key to increase or decrease the code number
23. Laadcontacten
displayed. You can also select oF (OFF) at this stage.
Scan
VOOR HET EERSTE GEBRUIK
• Your radio has a channel scan feature that allows you to easily scan all 8
• Elke radio werkt op de meegeleverde NiMH-accu of 3 AAA alkaline
batterijen (niet meegeleverd).
channels. When an active channel is detected, the radio pauses on that
• De NiMH-accu installeren:
channel until the channel is clear. Then, after a 2 second delay, the radio
continues scanning. Pressing the PTT button while the scan is paused
– Zorg dat uw radio is uitgeschakeld.
on a channel allows you to transmit on that channel.
– Druk op het lipje aan de onderkant van het accudeksel om het deksel
• To turn ON channel scan, Press MENU repeatedly until the scan... icon
and oF blink. Press CH ▲ / CH ▼ to select Scan mode and press MENU
af te halen.
to start it.
– Installeer de NiMH-accu in het accuvak. Volg de instructies die op het
• To turn OFF channel scan, Press MENU when the scan setting is oF.
Voice Operated Transmission
etiket van de accu zijn vermeld. Het toestel zal niet werken wanneer
• Your radio is equipped with a user selectable Voice Operated
de accu verkeerd wordt geïnstalleerd.
Transmitter (VOX) that can be used for automatic voice transmissions.
The VOX feature is designed to be used with or without a headset with a
– Plaats het accudeksel terug.
microphone. Transmission is initiated by speaking into the microphone
• Dit toestel is voorzien van een batterijniveaumeter op het display om de
instead of pressing PTT.
status van de batterijen aan te geven. Als de batterijen in het toestel leeg
• To select VOX level, press MENU repeatedly until the vox icon and the
zijn, knippert het pictogram van de batterijniveaumeter. Laad de NiMH-
VOX sensitivity level (OFF, 1-5) blink.
accu onmiddellijk op of, wanneer u alkaline batterijen gebruikt, vervang
• Press CH ▲ / CH ▼ to change the VOX sensitivity levels. Use level 1 for
de alkaline batterijen om de radio verder te kunnen gebruiken.
increased sensitivity to voice in normally quiet environments, and use a
• Waarschuwing! Om het risico op persoonlijk letsel of schade aan
higher level to reduce undesired activation in very noisy environments.
eigendommen door brand of een elektrische schok te vermijden, gebruik
Call Tone
alleen accessoires die specifiek voor dit product zijn bestemd.
• Your radio is equipped with 10 selectable call tones that are transmitted
• Als u de oplaadbare NiMH-accu gebruikt, kunnen twee radio's
when CALL/LOCK is pressed.
rechtstreeks of met behulp van het meegeleverde laadstation worden
• To select a call tone, press MENU repeatedly until the CALL icon and
opgeladen.
Call Tone start to blink on the display.
• Met behulp van de DC-adapter opladen:
• Press CH ▲ / CH ▼ to move through the available call tones. Each tone
– Verbind de optionele DC-adapter met de DC-adapter van de radio en
will be heard through the speaker but will not be transmitted. Cycle
through these tones and stay on the tone you want to select. Exit Call
een sigarettenaanstekeraansluiting.
Tone to set the selected tone.
– Laat de accu 16 uur op totdat de accu-indicator stopt met knipperen.
Key Lock
• To lock the keypad. press and hold CALL/LOCK;The keypad lock
• Met behulp van het laadstation opladen:
indicator is displayed. These functions are not affected by Key Lock:
– Verbind de AC-adapter met de DC-adapter en een standaard AC-
– Volume adjust
stopcontact.
– Call tone transmission
– Plaats het laadstation op een bureau of tafel en plaats de radio in het
– Enter monitor mode
laadstation met het toetsenbord naar voren gericht.
– PTT transmission
– Zorg dat de LED brandt. Laad de accu 16 uur op en verwijder de radio
– Power off To unlock the keypad
na het opladen uit het laadstation.
• To unlock the keypad. press and hold CALL/LOCK;The keypad lock
• De DC-aansluiting van de radio dient alleen voor het opladen. Installeer
indicator will disappear.
de accu alvorens op te laden.
Automatic power save
• Gebruik alleen de meegeleverde accu en AC-adapter of goedgekeurde
• Your radio has a circuit designed to dramatically extend the life of the
accessoires.
batteries. If there is no transmission or an incoming call within 3 seconds,
• De oplaadtijd kan verschillen naargelang de resterende levensduur van
your radio switches to Power Save mode. The radio is still able to
de accu.
receive transmissions in this mode.
• Laad alkaline batterijen niet op. De veiligheid kan in gevaar komen of de
LCD Backlight
radio kan worden beschadigd.
• The LCD Backlight automatically turns ON when any key (except the
• Om de radio snel op te laden, zet deze voor het opladen uit.
PTT button) is pressed. The LCD display illuminates for 10 seconds
• De accu moet in het apparaat worden geplaatst om het toestel te kunnen
before turning OFF.
gebruiken, zelfs al is het tevens op een externe voeding aangesloten.
Roger Beep
• Als het batterijvermogen laag is, kunt u de radio niet gebruiken, zelfs
• Roger Beep is a BEEP that is sent to notify the end of transmission (both
wanneer het op een externe voeding aangesloten is. Laad de accu op
PTT and VOX transmission). Roger Beep can be heard through the
voordat u de radio gebruikt. Als u probeert door te seinen wanneer het
speaker when both Roger Beep and Key Beep are set to ON. When
vermogen laag is, wordt de radio automatisch uitgeschakeld.
Roger Beep is set to ON and Key Beep is set to OFF, Roger Beep will
• U kunt een headset gebruiken om op een persoonlijkere manier te
not be heard from the speaker but it will be transmitted to your party.
communiceren. Om een headset te gebruiken, haal het rubber kapje uit
When Roger Beep is set to OFF, Roger Beep will neither be heard nor
de headsetaansluiting en sluit de headset vervolgens aan.
transmitted. To change Roger Beep setting, press and hold VOL ▲ while
• Belangrijk: Uw radio is niet weerbestendig wanneer een headset wordt
turning the radio on and off. If Roger Beep is ON, it will be turned off; if it
gebruikt. Als u de headset verwijdert, duw het kapje volledig in de
is OFF, it will be turned on.
aansluiting zodat het toestel opnieuw weerbestendig is.
CLEANING AND MAINTENANCE
GEBRUIK
• Clean the appliance with a damp cloth. Never use harsh and abrasive
De radio aanzetten en het volume regelen
cleaners, scouring pad or steel wool, which damages the device.
• Houd de Aan/uit-toets ingedrukt om de radio aan te zetten en druk op
• Never immerse the electrical device in water or any other liquid. The
VOL ▲ om het volume van de luidspreker te verhogen. Druk op VOL ▼
device is not dishwasher proof.
om het volume te verlagen.
• Druk nogmaals op de Aan/uit-toets om de radio uit te zetten.
GUARANTEE
Het geluid (toetstonen) regelen
• This product is guaranteed for 24 months granted. Your warranty is valid
• Uw radio produceert een pieptoon telkens op een knop (uitgezonderd
if the product is used in accordance to the instructions and for the
PTT en OPROEPEN/VERGRENDELEN) wordt gedrukt. Om dit geluid uit
purpose for which it was created. In addition, the original purchase
te schakelen, houd OPROEPEN/VERGRENDELEN ingedrukt terwijl u de
(invoice, sales slip or receipt) is to be submitted with the date of
radio aanzet. Herhaal deze stap om het geluid opnieuw in te schakelen.
purchase, the name of the retailer and the item number of the product.
Een kanaal kiezen
• For the detailed warranty conditions, please refer to our service website:
• Uw radio heeft 8 kanalen en 121 subcodes die u kunt gebruiken om een
www.service.tristar.eu
gesprek met anderen te voeren. Om een gesprek te voeren, zorg dat
beide toestellen op hetzelfde kanaal en subcode zijn ingesteld.
ENVIRONMENT
• Een kanaal kiezen: Met de radio in de "Normale" werkingsmodus, druk
op de toets CH ▲ / CH ▼ om het weergegeven kanaalnummer te
verhogen of te verlagen.
This appliance should not be put into the domestic garbage at the
Een gesprek via de radio voeren
end of its durability, but must be offered at a central point for the recycling
• Om via de radio een gesprek met een andere te voeren, houd de PTT-
of electric and electronic domestic appliances. This symbol on the
knop ingedrukt en spreek in een duidelijke en normale stem op een
appliance, instruction manual and packaging puts your attention to this
afstand van circa 5-7,5 cm van de microfoon. Tijdens het zenden wordt
important issue. The materials used in this appliance can be recycled. By
het tx pictogram op het display weergegeven. Om te vermijden dat het
recycling of used domestic appliances you contribute an important push to
eerste deel van uw transmissie wordt onderbroken, wacht na het
the protection of our environment. Ask your local authorities for information
indrukken van de PTT-knop enkele seconden voordat u begint met
regarding the point of recollection.
spreken.
• Na uw gesprek, laat de PTT-knop los. U kunt nu inkomende oproepen
Support
ontvangen. Tijdens het ontvangen wordt het rx pictogram op het display
You can find all available information and spare parts at service.tristar.eu!
weergegeven.
De functie monitormodus
NL Gebruiksaanwijzing
• Uw radio stelt u in staat om op het huidige kanaal naar zwakke signalen
te luisteren door op een toets te drukken. De monitormodus inschakelen:
Druk op de Monitor toets en houd 2 seconden ingedrukt, totdat u twee
VEILIGHEIDSINSTRUCTIES
pieptonen hoort. Het ontvangerscircuit blijft open en zowel ruis als
• De fabrikant is niet aansprakelijk voor schade
zwakke signalen kunnen worden gehoord.
voortvloeiend uit het niet opvolgen van de
• Om de monitormodus uit te schakelen, druk op de Monitor toets en houd
2 seconden ingedrukt om naar de "Normale" modus terug te keren. Het
veiligheidsinstructies.
rx pictogram stopt met knipperen en verdwijnt.
• Als het netsnoer beschadigd is, moet het
Geavanceerde functies (Menu's)
• Druk op de MENU toets om de menu's te openen.
worden vervangen door de fabrikant, de
• Druk herhaaldelijk op de MENU toets om de menu's te doorlopen totdat
onderhoudsmonteur van de fabrikant of door
u de "Normale" werkingsmodus bereikt. Het menu wordt tevens
afgesloten wanneer er gedurende 10 seconden geen enkele knop wordt
personen met een soortgelijke kwalificatie om
ingedrukt.
gevaar te voorkomen.
Subcode
• Elk van de 8 kanalen kan worden ingesteld op een van de codes, UIT of
• Opgelet! Er bestaat explosiegevaar als de
1-121. Code oF (UIT) geeft aan dat er geen subcode geselecteerd is en
batterij op een verkeerde manier wordt
uw radio een signaal kan ontvangen ongeacht de code-instellingen van
de radio die doorseint.
vervangen. Vervang alleen door een batterij van
• Druk op de MENU toets om de menumodus te openen. De subcode-
hetzelfde of een gelijkwaardig type.
indicator knippert.
• Druk op de CH ▲ / CH ▼ toets om het weergegeven codenummer te
verhogen of te verlagen. U kunt in deze fase tevens oF (UIT) selecteren.
ONDERDELENBESCHRIJVING
Scannen
1. Antenne
• Uw radio is voorzien van een scanfunctie om op een eenvoudige manier
2. PTT (Push to talk) knop
naar de 8 kanalen te scannen. Als een actief kanaal wordt gedetecteerd,
3. Oproepen/Vergrendelen-knop
blijft de radio op dit kanaal staan totdat het kanaal zuiver is. De radio
4. Menu-/ Aan/uit-toets
gaat na een vertraging van 2 seconden verder scannen. Druk op de
5. Kanaal omhoog/omlaag-toets
PTT-knop wanneer de scan op een bepaald kanaal stilstaat om via dit
6. Monitor-toets
kanaal door te seinen.
7. Luidspreker
8. Headsetaansluiting
• Om de scanfunctie in te schakelen, druk herhaaldelijk op MENU totdat
18. Indicateur de transmission
het scan... pictogram en oF knipperen. Druk op CH ▲ / CH ▼ om de
19. Indicateur de réglage de volume
scanmodus te selecteren en druk op MENU om het scannen te starten.
20. Indicateur de blocage de clavier
• Om de scanfunctie uit te schakelen, druk op MENU wanneer de
21. Indicateur VOX
scaninstelling is oF.
22. Indicateur de sous-code
Spraakgestuurd zenden
23. Contacts de charge
• Uw radio is voorzien van een door de gebruiker te selecteren
AVANT LA PREMIÈRE UTILISATION
spraakgestuurde zender (VOX) die kan worden gebruikt voor
• Chaque radio utilise le pack-batterie NiMH fourni ou 3 piles alcalines
automatische spraakoverdracht. De VOX-functie is ontworpen voor
gebruik met of zonder headset met een microfoon. De overdracht
AAA (non fournies).
• Installation du pack-batterie NiMH :
gebeurt door in de microfoon te spreken in plaats van op de PTT-knop te
drukken.
– Assurez-vous que la radio est arrêtée.
• Om het VOX-niveau te selecteren, druk herhaaldelijk op MENU totdat
– Appuyez sur la languette au bas de la trappe du compartiment de piles
het VOX-pictogram en het VOX-gevoeligheidsniveau (UIT, 1-5)
knipperen.
pour retirer le cache.
• Druk op CH ▲ / CH ▼ om het VOX-gevoeligheidsniveau te wijzigen.
– Installez le pack-batterie NiMH dans le compartiment de piles.
Gebruik niveau 1 voor een verhoogde gevoeligheid om in een stille
omgeving te spreken en gebruik een hoger niveau om ongewenste
Assurez-vous de suivre les instructions rédigées sur l'étiquette du
activering in een zeer luide omgeving te beperken.
pack-batterie. Une installation incorrecte du pack-batterie empêche
Beltoon
• Uw radio is uitgerust met 10 beschikbare beltonen die worden
l'unité de fonctionner.
doorgeseind wanneer OPROEPEN/VERGRENDELEN wordt ingedrukt.
– Replacez la trappe du compartiment de piles
• Om een beltoon te selecteren, druk herhaaldelijk op MENU totdat het
OPROEPEN pictogram en Beltoon op het display knipperen.
• L'affichage de cette unité comporte un indicateur de niveau de batterie
indiquant l'état des piles. Si les piles dans l'unité sont faibles, l'icône de
• Druk op CH ▲ / CH ▼ om de beschikbare beltonen te doorlopen. Elke
toon wordt via de luidspreker gehoord, deze wordt echter niet
l'indicateur du niveau de batterie clignote. Rechargez immédiatement le
pack-batterie NiMH ou, si vous utilisez des piles alcalines, remplacez-les
doorgeseind. Doorloop de tonen en blijf staan op de gewenste toon. Sluit
pour continuer à utiliser la radio.
Beltoon af om de gekozen toon in te stellen.
Toetsvergrendeling
• Avertissement ! Pour éviter toute blessure ou dommage suite à un
incendie ou un choc électrique, utilisez uniquement des accessoires
• Om het toetsenbord te vergrendelen, houd OPROEPEN/
VERGRENDELEN ingedrukt. De indicator voor toetsenbord
spécifiquement conçus pour ce produit.
vergrendelen wordt weergegeven. De volgende functies worden niet
• Si vous utilisez le pack-batterie NiMH rechargeable, vous pouvez
charger deux radios directement ou en utilisant la base de charge
vergrendeld:
fournie.
– Volume regelen
• Charge avec l'adaptateur CC :
– Beltoonoverdracht
– Connectez l'adaptateur CC optionnel à la fiche CC de la radio et à la
– Monitormodus openen
prise d'allume-cigare.
– PTT-transmissie
– Chargez le pack-batterie pendant 16 heures jusqu'à ce que l'indicateur
– Uitschakelen om het toetsenbord te ontgrendelen
de batterie cesse de clignoter.
• Om het toetsenbord te ontgrendelen, houd OPROEPEN/
• Charge avec la base :
VERGRENDELEN ingedrukt. De indicator voor toetsenbord
– Connectez l'adaptateur CA à la fiche CC et à une prise murale CA
vergrendelen verdwijnt.
Automatische energiebesparing
standard.
• Uw radio is voorzien van een circuit dat de levensduur van de batterijen
– Placez la base de charge sur le bureau ou le plan de travail et placez
aanzienlijk verlengd. Als er binnen de 3 seconden geen transmissie of
inkomende oproep is, schakelt uw radio naar de
la radio dans la base de charge, le clavier dirigé vers l'avant.
energiebesparingsmodus. De radio kan in deze modus nog steeds
– Assurez-vous que la LED s'allume. Chargez le pack-batterie pendant
transmissies ontvangen.
LCD-achtergrondverlichting
16 heures et retirez la radio de la base de charge une fois terminé.
• De LCD-achtergrondverlichting wordt automatisch ingeschakeld wanneer
• La fiche CC de la radio sert uniquement à la charger. Assurez-vous
er een toets (uitgezonderd de PTT-knop) wordt ingedrukt. Het LCD-
d'installer la batterie avant la charge.
display wordt 10 seconden verlicht en schakelt vervolgens uit.
• Utilisez uniquement la batterie et l'adaptateur CA fournis ou les
Bevestigingspieptoon
accessoires agréés.
• Een bevestigingspieptoon is een PIEPTOON die wordt verzonden om
• Le temps de charge varie selon l'autonomie restante de la batterie.
het einde van een transmissie (zowel PTT als VOX-transmissie) te
• Ne rechargez pas les piles alcalines. Ce faisant, vous créez un risque
melden. De bevestigingspieptoon kan door de luidspreker worden
pour la sécurité ou vous endommagez la radio.
gehoord wanneer zowel de bevestigingstoon als toetstoon zijn
• Pour une charge accélérée, coupez la radio avant la charge.
ingeschakeld. Wanneer de bevestigingstoon is ingeschakeld en de
• La batterie doit être installée pour que l'unité fonctionne, même si l'unité
toetstoon is uitgeschakeld, wordt de bevestigingstoon niet door de
est aussi connectée à une alimentation externe.
luidspreker gehoord maar wordt het wel naar de andere persoon
• Si l'alimentation de batterie est faible, vous ne pouvez pas faire
doorgeseind. Wanneer de bevestigingstoon is uitgeschakeld, wordt de
fonctionner la radio, même avec une alimentation externe. Laissez la
bevestigingstoon noch gehoord noch doorgeseind. Om de instelling voor
batterie se charger avant l'utilisation. Si vous tentez une transmission
de bevestigingstoon te wijzigen, druk en houd VOL ▲ ingedrukt terwijl
alors que l'alimentation est faible, la radio se coupe automatiquement.
de radio wordt in- en uitgeschakeld. Als de bevestigingstoon AAN is,
• Vous pouvez utiliser un casque pour des communications plus privées.
wordt deze uitgeschakeld; als deze toon UIT is, wordt deze
Pour utiliser un casque, levez le cache en caoutchouc de la fiche casque
ingeschakeld.
puis enfichez le casque.
• Important : Votre radio n'est pas résistante aux intempéries si vous
REINIGING EN ONDERHOUD
utilisez une fiche casque. Si vous retirez le casque, assurez-vous
• Reinig het apparaat met een vochtige doek. Gebruik nooit agressieve en
d'enfoncer à fond le cache de fiche pour restaurer sa capacité de
schurende schoonmaakmiddelen, schuursponzen of staalwol; dit
résistance aux intempéries.
beschadigt het apparaat.
• Dompel het apparaat nooit onder in water of andere vloeistoffen. Het
UTILISATION
apparaat is niet vaatwasserbestendig.
Mise en marche de la radio et réglage du volume
• Appuyez sur la touche Alimentation sans relâcher pour allumer la radio
GARANTIE
et augmentez le volume en appuyant sur VOL ▲ . Pour réduire le
• Op dit product wordt een garantie van 24 maanden verleend. Uw
volume, appuyez sur VOL ▼.
garantie is geldig indien het product is gebruikt in overeenstemming met
• Appuyez à nouveau sur la touche Alimentation sans relâcher pour
de gebruiksaanwijzing en voor het doel waarvoor het gemaakt is. Tevens
arrêter la radio.
dient de originele aankoopbon (factuur, kassabon of kwitantie) te worden
Réglage du son (Bips de touche)
overlegd met daarop de aankoopdatum, de naam van de retailer en het
• Votre radio émet un bip à chaque pression sur une touche (sauf pour
artikelnummer van het product.
PTT et APPEL/BLOCAGE). Pour couper ce son, appuyez sur la touche
• Voor uitgebreide garantievoorwaarden verwijzen wij u naar onze
APPEL/BLOCAGE sans relâcher tout en allumant la radio. Répétez cette
servicewebsite: www.service.tristar.eu
étape pour réactiver le son.
Choix d'un canal
MILIEU
• Votre radio a 8 canaux et 121 sous-codes que vous pouvez utiliser pour
parler avec quelqu'un. Pour parler avec une personne, vous devez tous
deux être réglés sur les mêmes canal et sous-code.
Dit apparaat mag aan het einde van de levensduur niet bij het
• Choix d'un canal : Avec la radio en mode de fonctionnement "Normal",
normale huisafval worden gedeponeerd, maar moet bij een speciaal
appuyez sur la touche CH ▲ / CH ▼ pour augmenter ou réduire le
inzamelpunt voor hergebruik van elektrische en elektronische apparaten
numéro du canal affiché.
worden aangeboden. Het symbool op het apparaat, in de
Parler avec votre radio
gebruiksaanwijzing en op de verpakking attendeert u hierop. De in het
• Pour parler aux autres avec la radio, appuyez sur le bouton PTT sans
apparaat gebruikte materialen kunnen worden gerecycled. Met het
relâcher et parlez d'une voix claire et normale à 5-7 cm du microphone.
recyclen van gebruikte huishoudelijke apparaten levert u een belangrijke
Pendant la transmission, l'icône tx s'affiche. Pour éviter de couper la
bijdrage aan de bescherming van ons milieu. Informeer bij uw lokale
première partie de votre transmission, faites une légère pause après
overheid naar het inzamelpunt.
avoir appuyé sur le bouton PTT et avant de parler.
• Dès que vous avez fini de parler, relâchez le bouton PTT. Vous pouvez
Support
maintenant recevoir des appels entrants. Pendant la réception, l'icône rx
U kunt alle beschikbare informatie en reserveonderdelen vinden op
s'affiche.
service.tristar.eu!
Fonction de mode Moniteur
• Avec votre radio, vous pouvez écouter les signaux faibles sur le canal
FR Manuel d'instructions
actif en appuyant sur une touche. Activation du mode Moniteur :
Appuyez de façon prolongée sur la touche Moniteur pendant environ 2
secondes jusqu'à ce que deux bips retentissent. Le circuit du récepteur
INSTRUCTIONS DE SÉCURITÉ
reste ouvert et vous entendez le bruit et les signaux faibles.
• Si vous ignorez les instructions de sécurité, le
• Pour couper le mode Moniteur, appuyez sur la touche Moniteur sans
fabricant ne saurait être tenu responsable des
relâcher pendant 2 secondes pour revenir au mode "Normal" mode ;
l'icône rx cesse de clignoter et disparaît.
dommages.
Fonctions avancées (Menus)
• Si le cordon d'alimentation est endommagé, il
• Appuyez sur la touche MENU pour accéder aux menus.
• Appuyez encore sur la touche MENU pour avancer dans les menus
doit être remplacé par le fabricant, son
jusqu'à revenir au mode de fonctionnement "Normal". Vous sortez aussi
réparateur ou des personnes qualifiées afin
du menu si vous n'appuyez sur aucune touche pendant 10 secondes.
Sous-code
d'éviter tout risque.
• Chacun des 8 canaux peut avoir l'un des codes, OFF ou 1-121
• Attention ! Danger d'explosion si la batterie est
sélectionné. Le code oF (OFF) indique l'absence de sélection d'un sous-
code. Votre radio peut recevoir un signal indépendamment des réglages
mal remplacée. Remplacez uniquement par le
de code de la radio de transmission.
même type ou équivalent.
• Appuyez sur la touche MENU pour accéder au mode Menu. L'indicateur
de sous-code clignote.
• Appuyez sur la touche CH ▲ / CH ▼ pour augmenter ou réduire le
DESCRIPTION DES PIÈCES
numéro de code affiché. Vous pouvez aussi sélectionner (OFF) à ce
1. Antenne
stade.
2. Bouton PTT (Poussoir)
Balayage
3. Bouton appel/blocage
• Votre radio comporte une fonction de balayage des canaux afin de
4. Touche menu/alimentation
balayer facilement les 8 canaux. Dès qu'un canal actif est détecté, la
5. Touche canal Haut/Bas
radio effectue une pause sur ce canal jusqu'à ce qu'il soit clair. Puis,
6. Touche moniteur
après un délai de 2 secondes, la radio poursuit le balayage. Appuyez sur
7. Haut-parleur
le bouton PTT alors que le balayage est en pause sur un canal pour
8. Fiche casque
pouvoir transmettre sur ce canal.
9. Touche volume Haut/Bas
• Pour activer le canal, appuyez sur la touche MENU de manière répétée
10. Micro
jusqu'à ce que l'icône balayage... et oF clignotent. Appuyez sur CH ▲ /
11. Indicateur de niveau de batterie
CH ▼ pour sélectionner le mode Balayage puis sur MENU pour le
12. Indicateur de réception
lancer.
13. Indicateur d'appel
• Pour couper le balayage des canaux, appuyez sur MENU lorsque le
14. Indicateur de balayage
réglage de canal est sur oF.
15. Indicateur de canal
Transmission à commande vocale
16. Indicateur d'alimentation élevée
17. Indicateur d'alimentation faible
Advertisement

Related Manuals for Topcom RC-6412


Summary of Contents for Topcom RC-6412
- Page 1 EN Instruction manual • To turn OFF Monitor mode, press and hold the Monitor key for 2 seconds 9. Volume omhoog/omlaag-toets • Om de scanfunctie in te schakelen, druk herhaaldelijk op MENU totdat 18. Indicateur de transmission to return to "Normal" mode; the rx icon stops blinking and disappears. 10.
- Page 2 • Votre radio bénéficie d'un transmetteur à commande vocale (VOX) • Ihr Funkgerät verfügt über einen vom Benutzer wählbaren ANTES DEL PRIMER USO Tono de llamada • Esta unidade possui um medidor do nível da bateria para indicar o – Drücken Sie auf die Zunge unten an der Batteriefachklappe, um den sélectionnable par l'utilisateur pour effectuer des transmissions vocales sprachgesteuerten Sender (VOX), der für automatische •...
- Page 3 • Ricarica con l'adattatore CC: • Per sbloccare il tastierino, tenere premuto il tasto CHIAMATA/BLOCCO; – Transmissão do tom de chamada – Podłącz opcjonalny zasilacz DC do gniazda DC radia i do portu – Regulacja głośności l'indicatore di blocco del tastierino scompare. –...
- Page 4 • Laddningstid kan variera beroende på batterinivå. OMGIVNING • Abyste mohli pomocí vysílačky mluvit s ostatními, stiskněte a podržte • Ak je napájací kábel poškodený, musí ho • Pre každý z 8 kanálov je možné vybrať ľubovolný kód, VYPNUTÉ alebo •...
Need help?
Do you have a question about the RC-6412 and is the answer not in the manual?
Questions and answers