Table of Contents
Advertisement
Advertisement
Table of Contents

Subscribe to Our Youtube Channel
Related Manuals for Sportop VST60


Summary of Contents for Sportop VST60
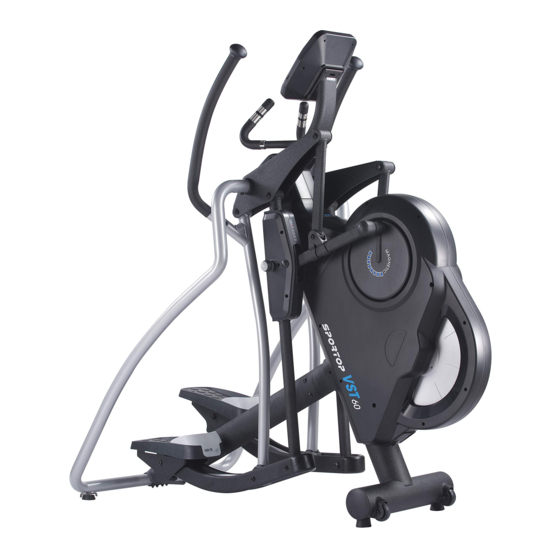
- Page 1 CHANGEABLE STRIDE ELLIPTICAL MODEL : VST60 Owner’s Operating Manual ENGLISH...
- Page 2 Warning: Unpacking Caution: Lay the box down flat so that the lid is able to be lifted. Unpack the handle bars, side supporting tubes, pedal supporting tube and owners manual. Remove the top polyfoam pieces #1 & #2 and finish up packing the console, console supporting tube, central supporting tube, pedal supporting tube, and hardware bag, leaving the main frame(A) and bottom polyfoam pieces #3 &...
- Page 3 2#465 .+56 Console supporting Main frame tube E2 Handle bar (R) Bottle holder E1 Handle bar (L) C1 Side connecting tube (L) Console B2 Pedal supporting C2 Side connecting tube (R) tube (R) B1 Pedal supporting tube (L) Adaptor F1 Central supporting tube Tool 5m/m...
- Page 4 CENTRAL SUPPORTING TUBE (F1) ASSEMBLY Step 1. Remove the two preassembled screw (F5) from the main frame(A) and two screws (F5) from the central supporting tube (F1). Step 2. Assembly the central tube (F1) onto the main frame (A) use the previously removed screw (F5) to attach them.
- Page 5 LEFT SIDE CONNECTING TUBE AND JOINT COVER ASSEMBLY Step 1. Equip the left side connecting tube (C1) onto the main frame (A). Secure it by using the screw (J8) on the top and the two screws (J2) with the iron bracket (F2) on the bottom as the right side tube (C2) in FIGURE 2.
- Page 6 HANDLE BAR ASSEMBLY Step 1. Remove the six preinstalled (J10 & J11) J11*6 screws from the left handle bar (E1). J10*6 Step 2. Assemble the left handle bar (E1) nto the main frame (A) and use the two 6mm Allan wrench to fix all screws (J10&...
-
Page 7: Console Assembly
CONSOLE ASSEMBLY Step 1. R emove 4 pieces of screws (G1) from the back of console (G). Step 2.Connect console wires (D1) and heart rate wires (D3) to the console. Make sure that the wires are connected together properly . Push and store excess wires back into housing cover and console supporting tube (D). - Page 8 HOW TO TRANSPORT THE ELLIPTICAL When the machine need to be transported to a different locatin, please lift up the both side connecting tubes until the front transportation wheels are touching the ground. You can move it to the desired location. After move, gently set the macine down at its new location.
- Page 9 HOW TO ADJUST THE VARIOUS STRIDE Step 1. There are 5 different stride choices on VST60 which is 18”, 20”, 22”, 24” and 26” that are shown on the LED displayed window. Step 2. Loosen the knob and pull out to adjust the stride length as you desired.
- Page 10 FUNCTION BUTTONS: START/STOP To start or stop training RECOVERY To test the heart rate recovery status (PLUS) To select training mode or adjust function value up (MINUS) To select training mode or adjust function value down RESET In stop mode, press the button back to main menu QUICK KEY To quickly select preferred settled programs (12 program) MODE...
- Page 11 POWER ON 1. Connect power supply to the monitor or press the RESET button for 3 seconds,the LCD will display all segment with a long- beep sound for 1 seconds and display 78.0 in below & 2. User may turn the +/- joggle wheel to select User 0~4 and press MODE for confirmation (FIGURE 3~4).
- Page 12 Range of User’s data Item/Descrip on Range Male / Female 10~99 HEIGHT 100~200 WEIGHT 20~150 MODE After setting user’s data, press Mode button for operation, pressing +/- to choose mode: MANUAL PROGRAM FITNESS WATT USER PROGRAM Item Range TIME 0:00~99:00 SPEED 0.0~99.9 DISTANCE...
- Page 13 (FIGURE 10) (FIGURE 11) (FIGURE 12) (FIGURE 13) (FIGURE 14) (FIGURE 15) AGE SET AGE + USER SELECT U0-U4 Reset Mode Mode PRESS PRESS PRESS ENTER ENTER RESET 3 SEC AGE - TO RESET WGT SET HGT SET PROG WGT + HGT + FITNESS Mode...
- Page 14 PROGRAM MODE (1) Press and hold the Reset button for 3 seconds, and select User and set the data; or only press Reset to main menu. (2) Select PROGRAM mode by +/- buttons, and press Mode button to confirm.(FIGURE 16) Preee +/- button to select program 1~program 12(FIGURE 17);...
- Page 16 AGE SET AGE + USER SELECT U0-U4 Reset Mode Mode PRESS PRESS PRESS ENTER ENTER RESET 3 SEC AGE - TO RESET WGT SET HGT SET PROG WGT + HGT + FITNESS Mode Mode Mode PRESS PRESS PRESS WGT - ENTER ENTER ENTER...
- Page 17 FITNESS MODE (1) Press and hold Reset button for 3 seconds, selecting User and set up the data; or, press Reset to back to main menu. (2) Select FITNESS mode by +/- buttons, and press Mode button to confirm.(FIGURE 24~25) (3) Press Start to start training.
- Page 18 WATT MODE (1) Press and hold Reset button for 3 seconds, selecting User and set up the data; or, press Reset to back to main menu. (2) Select WATT mode by +/- buttons, and press Mode button to confirm.(FIGURE 26) (3) Set up your target value of watt but +/- button, and press Mode button to confirm.
- Page 19 AGE SET AGE + USER SELECT U0-U4 Reset Mode Mode PRESS PRESS PRESS ENTER ENTER RESET 3 SEC AGE - TO RESET WGT SET HGT SET PROG WGT + HGT + FITNESS Mode Mode Mode PRESS PRESS PRESS WGT - ENTER ENTER ENTER...
- Page 20 USER MODE (1) Press and hold Reset button for 3 seconds, selecting User and set up the data; or, press Reset to back to main menu. (2) Select USER mode by +/- buttons, and press Mode button to confirm.(FIGURE 32) (3) Set up each column of load level by +/- buttons.
- Page 21 AGE SET AGE + USER SELECT U0-U4 Reset Mode Mode PRESS PRESS PRESS ENTER ENTER RESET 3 SEC AGE - TO RESET WGT SET HGT SET PROG WGT + FITNESS HGT + Mode Mode Mode PRESS PRESS PRESS ENTER WGT - ENTER ENTER HGT -...
- Page 22 (1) Press and hold Reset button for 3 seconds, selecting User and set up the data; or, press Reset to back to main menu. (2) Select HRC mode by +/- buttons, and press Mode button to confirm.(FIGURE 38) (3) Select different heart rate from 55% / 75% / 90% or Target by +/- buttons. (FIGURE 39~42) The geart rate value will be different depending on the setting of age.
- Page 23 AGE SET AGE + USER SELECT U0-U4 Reset Mode Mode PRESS PRESS PRESS ENTER ENTER RESET 3 SEC AGE - TO RESET WGT SET PROG HGT SET WGT + FITNESS HGT + Mode Mode Mode PRESS PRESS PRESS WGT - WATT ENTER ENTER...
- Page 24 RECOVERY After exercising for a period of time, keep holding on handgrips and press “RECOVERY” button. All function display will stop except “TIME” starts counting down from 00:60 to 00:00. Screen will display your heart rate recovery status with the F1, F2….to F6. F1 is the best, F6 is the worst.
Need help?
Do you have a question about the VST60 and is the answer not in the manual?
Questions and answers