Table of Contents
Advertisement
Quick Links
Please note that the Accessory Kit and Shipping Box contain the following items :
Items
Quick
Start Guide
CD
(Manual &
Software)
IR Remote
Controller
Administrator Login : Admin / Password: 1111
ATTENTION PLEASE !!!
This document is a Quick Start Guide.
Please refer to the user manual for more detailed information
Tel : 866-446-3595 / 813-888-9555
Technical support hours : 8:30AM to 8:00PM Eastern Time, Monday thru Friday
Photo
Quantity
yyyyyy
1
1
1
www.Digital-Watchdog.com
Items
Power Cord
Rack
Mount
Bracket
USB Mouse
Photo
Quantity
yyyyyy
1
2 Brackets
4 Screws
1
Advertisement
Table of Contents

Related Manuals for Digital Watchdog DW-VHD4


Summary of Contents for Digital Watchdog DW-VHD4
- Page 1 Please note that the Accessory Kit and Shipping Box contain the following items : Photo Items Photo Items Quantity Quantity yyyyyy yyyyyy Quick Power Cord Start Guide 2 Brackets Rack Mount (Manual & 4 Screws Bracket Software) IR Remote USB Mouse Controller Administrator Login : Admin / Password: 1111 ATTENTION PLEASE !!!
-
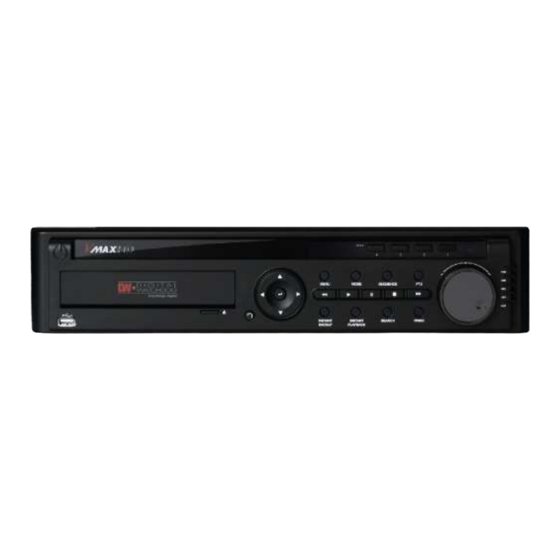
Page 2: Front Panel
FRONT PANEL Buttons Functions Menu Setup menu display Mode Change the cameras display Mode between single channel & 4-channel view. Sequence Change the display channel automatically when in single channel mode. Control a PTZ camera IR Receiver IR Receiver from Remote controller Instant Backup Start “Instant Backup"... -
Page 3: Rear Panel
REAR PANEL... -
Page 4: Dvr Installation
DVR INSTALLATION DVR Installation 1. Make sure all cameras and monitors are properly connected to the DVR. 2. The DVR should be placed in a dust and moisture free environment. It must never be exposed to direct sun light. Server room temperature is highly recommended to reduce the chance of overheating. -
Page 5: Initial Setup
INITIAL SETUP Date and Time Setup Right-click on the screen and select Menu. Go to System Information to setup the date & time. Set the DVR’s date & time using the mouse or the remote control. Press OK to apply changes. -
Page 6: Recording Configuration
RECORDING CONFIGURATION Record Configuration 1. Right-click on the screen and select Menu. Go to RECORD SETUP 2. Choose the desired resolution, frame rate, quality, and recording type from the drop down list. Individually configure the settings for each channel, or use the [APPLY ALL] button to apply the same configurations to multiple cameras. -
Page 7: Network Configuration
NETWORK CONFIGURATION Network Setup for Internal Access The VMAX HD can be setup to be accessed remotely either from within the network or externally via the internet. 1. Right-click on the screen and select Menu. Go to Network 2. Select the network type. [DHCP] If selected, the system will automatically assign the DVR an IP address, subnet mask, gateway and DNS server that match the network’s requirements. - Page 8 NETWORK CONFIGURATION Network Setup for External Access To connect to the VMAX HD externally via the internet, you will need to setup the DVR’s ports in your router. Contact your Network Administrator & Internet Service Provider for proper network configuration. 1.
- Page 9 NETWORK CONFIGURATION DDNS Setup The VMAX HD has three (3) DDNS registration options. Please select the one that best suits your requirements: 1. Server 1 : okddns – okddns.com is a free service. Go to okddns.com and click on DDNS REGISTRATION. Enter your DVR’s MAC address (found in the System info tab). Enter a desired Domain Name and click on Validate Duplication.
- Page 10 NETWORK CONFIGURATION HOW TO USE SERVER 3 1. You can input your hostname what you want and select ‘APPLY’ in order to register and checking the success status as below picture. 2. If you don’t want to put the hostname, select ‘AUTO’ and ‘APPLY’. MAC address appear when you selected ‘AUTO’...
-
Page 11: Web Viewer
CONNECTING TO THE VMAX HD Web Viewer Using a computer that has access to the internet, open an Internet Explorer browser. In the address bar, enter the DVR’s fixed IP address or the DDNS address. Press Enter Select the “Connect” icon then below configuration window appear. Enter the DVR’s IP address, assigned port number (default 5445), User ID and Password. -
Page 12: Quick Setup
QUICK SETUP Quick Setup [QUICK SETUP] enables easy setup for recording resolution, recording speed by frame, recording mode, and recording periods. The system will follow the configurations for [QUICK SETUP] regardless of configurations set in other menus. Do not check [USE QUICK STEUP], if you want to use full system configuration defined in other menus. Deactivate [QUICK SETUP] to use the configuration from the other menus. -
Page 13: Firmware Upgrading
Firmware Upgrading System Upgrade SYSTEM UPGRADE Users can easily upgrade the DVR via USB or Network (Remote Upgrade). Create a new folder named “upgrade” in the USB flash drive root directory. Copy the firmware upgrade file to that folder. Connect the USB flash drive on the front panel. Go to Menu ->...
Need help?
Do you have a question about the DW-VHD4 and is the answer not in the manual?
Questions and answers