
Related Manuals for Digital Watchdog DW-716 DW-709


Summary of Contents for Digital Watchdog DW-716 DW-709
- Page 1 Digital Video Recorder Digital Video Recorder Operating Instructions Operating Instructions REV 1.0 REV 1.0 Models DW-716 DW-709...
- Page 2 DW716 Manual DW716 Manual This manual is published by KALTECH Enterprises. and contains information on DW716 for you to use this product comfortably. If you require additional copies of this manual, please print and use the manual contained in the CD provided.
- Page 3 Thank you for purchasing KALTECH DW716. This DVR is produced by the most advanced technology developed by KALTECH and its quality is guaranteed by strict reliability and compatibility tests. This DW716 manual provides necessary information I order to use this product to its maximum capacity and also contains useful tip.
- Page 4 This manual applies to DW716 DVR only. This manual describes external features of DW716 DVR, part names, correct connection methods for Pan/Tilt control, Control devices, peripheral devices, and the system setting method. • KALTECH is not held responsible if the DVR is damaged due to non-compatible devices being used with the product.
- Page 5 All copyrights of this manual are reserved by KALTECH Enterprises. Copyright © 2003 It is prohibited to copy or republish this manual for commercial reasons. It is prohibited to transfer this manual via online media such as, but not limited to, Internet. It is also prohibited to post, distribute, or translate this manual without given permission.
- Page 6 Please beware of the following precautions before installing the DVR. • Avoid any place with moisture, dust, or soot. • Avoid any place with direct sunlight or heating appliances. • Keep the product away from electric shock or magnetic substances. •...
- Page 7 The following are warnings and cautions for the safety of the users and for the prevention of any property damage. Please read below thoroughly. Warning and Caution signs If you are not aware of this If you are not aware of this Warning Caution warning, you may be seriously...
- Page 8 Warning D not attempt to disassemble, repair, or modify the system on Install the system in a cool place without direct sunlight and always maintain room temperature. Avoid candle light and your own. It is extremely dangerous due to high voltage running through the system.
- Page 9 Warning When the system’s battery is deplete, you must change it with If the system’s HDD exceeded its life span, you may not be able the same or equivalent type of battery specified by the to recover any data stored inside the HDD. If the video on the manufacturer.
- Page 10 Caution Do not install the system in a place with high magnetic, electric Install the system in a place with appropriate moisture and wave, or wireless devices such as radio or TV. temperature level. • Install the system in a place without magnetic objects, electric •...
- Page 11 Caution The outlet must be placed on the ground. The system can be damaged from a strong impact or vibration. Avoid throwing objects within the vicinity of the system. If there is strange sound or smell, unplug the power cable Avoid direct sunlight or any heating appliances.
- Page 12 Caution KALTECH DW716 Manual KALTECH DW716 Manual...
- Page 13 Please check to make sure the following equipment are included when you purchased DW716. If any items are missing, contact your dealer. (Optional items: Monitor; External Modem) CD (Manual / Remote S/W) Remote Control Manual (Site/Center) BNC cable (3M) Mouse Monitor (Option) Power Cable KALTECH DW716 Manual...
-
Page 14: Chapter 1. Dw716 Guide
Chapter 1. DW716 Guide S y s t e m O v e r v i e w … … … … … … … … … … … … … … … … … … … … … … … … … … … … … … … … … … … … 1 . -
Page 15: Chapter 2. Dw716 Dvr Installation
7 . 5 C a m e r a S e t u p … … … … … … … … … … … … … … … … … … … … … … … … … … … … … … . … … … … … … 6 7 7 . - Page 16 Chapter 1. DW716 Guide S y s t e m O v e r v i e w … … … … … … … … … … … … … … … … … … … … … … … … … … … … … … … … … … … … 1 .
- Page 17 7 . 5 C a m e r a S e t u p … … … … … … … … … … … … … … … … … … … … … … … … … … … … … … … … … … … 6 7 7 .
-
Page 18: System Functions
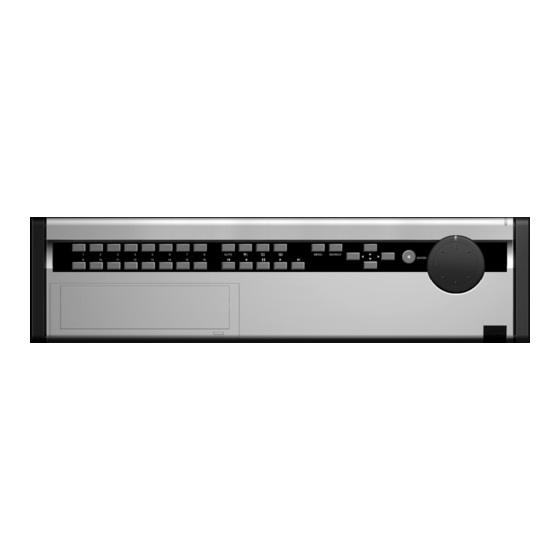
1.1 System Functions 1.1.1 System functions on Front Side The following describes keys and ports on the front part of the system and their functions: [Figure 1-1. System front view] [Directional Keys] • Use to move options in Setup mode or in Search mode. •... - Page 19 [CD-RW Open button] • Press to open CD-RW. [Camera/Number keys] • In Surveillance mode, press to enlarge a camera channel. • In Search mode, press to enlarge a camera channel during playback. • Press the keys to enter correct password when accessing Setup mode or Search mode. [Auto] •...
- Page 20 1.1.2 System Functions on the Rear Side The following describes keys and ports on the rear part of the system and their functions: [Figure 1-2. System rearview] [Power Connector] • Power cable input for system’s main power supply. • 110V ~ 220V power can be connected to the system. [Caution] •...
- Page 21 [Sensor Input Port] • External sensor inputs for channels 1~4. • The system supports NC and NO sensor types. [Control Output Port] • Control output for connecting control devices for channels 1~4. [Caution] • Since control devices use output in a contact point format without a polarity at the control output port, do not connect AC 110V ~ 220V of the power cable or supply DC power.
- Page 22 • • • ’ • • KALTECH DW716 Manual KALTECH DW716 Manual...
-
Page 23: Remote Control
1.2 Remote Control Below picture shows the description of each feature in remote control. All the feature is same with the front buttons in the system. MENU SEARCH Number AUTO Delete Shuttle ( + ) Shuttle ( - ) Arrow key Enter Jog (+) Jog ( - ) -
Page 24: Screen Layout
2.1 Screen Layout [Figure 2-1. Main Surveillance Mode] [Camera Number] [P/T/Z Status] Displays camera number. • Displays Pan/Tilt camera status. [Camera Name] [Audio Recording Status] Displays camera name. • Displays audio recording status. [Recording Status] Display camera recording mode. Recording Mode Available Recording Modes and Screen Display •... -
Page 25: Enlarging Channel And Automatic Channel Rotation
2.2 Enlarging channel and Automatic channel rotation [Enlarging a channel] • Press any 1~16 keys on the system to enlarge the camera channel and view the channel in fullscreen. [Selecting 4-splitscreen] • Press the splitscreen button to select 4-splitscreen. [Selecting 9-splitscreen] •... - Page 26 3. Pop up menu using mouse 3. Pop up menu using mouse 3.1 Pop-up menu in live mode Pop-up menu will appear when you click right mouse button on surveillance mode, search mode or Pan / Tilt mode. [picture 3-1. Pop-up menu using mouse on surveillance mode] [MENU] [AUTO] •...
- Page 27 • • • • Use direction key on the front of the system or move mouse pointer to ‘PTZ’ button, and click left mouse button or press ‘Enter’ on the front of the system. [Notice] Right mouse click • Use right mouse click to create or remove the Pop-up menu.
- Page 28 • • • • KALTECH DW716 Manual KALTECH DW716 Manual...
-
Page 29: Switching To Pan/Tilt Control Mode
4.1 Switching to Pan/Tilt control mode [Pan/Tilt Camera Control] • Select the camera channel connected to the P/T/Z camera by using the camera number keys on the system. This will enlarge the channel. • Once the channel is enlarged, press Enter to access [P/T/Z control mode]. -
Page 30: Pan/Tilt Camera Control
4.2 Pan/Tilt Camera Control In P/T/Z menu, you can switch the P/T/Z camera controls to manual control, as well as changing Zoom, Focus, and Auto Pan settings. [Figure 4-3. P/T/Z menu] [P/T/Z Model] [Z/F Speed] Displays the P/T/Z camera model. •... -
Page 31: Supported Pan/Tilt Camera List
4.3 Supported Pan/Tilt Camera List Manufacturer Model Name Zoom Focus Preset IRIS Note Manual Speed Speed Control and other functions KALTECH KRE-301 RX UNIMO KRX-3200 RX UNIMO KRX-2101 RX NIKO NK-97 SD SAMSUNG SPD-1600 SD SAMSUNG SCC-641 PANASONIC WV-CS854 DONG-YANG DRX-501A SUNG-JIN CCR-20G RX... -
Page 32: Accessing Search Mode
5.1 Accessing Search Mode To access Search mode, press Search button on the system. You will then be asked to enter password as shown below: • Use the number keys to enter the correct 4-digit password, then press Enter (The system has no password under factory settings). - Page 33 5.2.1 Graph color display • Recorded data shown on the time graph will be displayed in different color depending on the recording type (see table 5-1). [Figure 5-3. Graph color display] Color Display Description • Purple Continuous Recording • Blue Motion-detection Recording •...
-
Page 34: Selecting Date And Time
5.3 Selecting date and time 5.3.1 Selecting date • To select the date you wish to view, use the directional keys to select [Date] button, then press Enter. This will display a calendar (refer to page 18 for information on system keys). - Page 35 • After selecting the date you wish to view, press the [OK] Color Example Description button to return to Search mode display. The system will display the selected date’s recording in the time graph. • Orange Date with Recorded Data •...
- Page 36 5.3.3 Audio Output [Audio] • The system can play the recorded video with sound, provided an audio recording device is connected to a channel. • To play the recording with sound, use the mouse or the directional keys on the system to select [Audio] button, then press Enter.
- Page 37 5.3.4 Playing the recording [Playing Recorded data] • After selecting the date, time, and the cameras, press [OK] button to play the recording using the mouse or the Enter key. [Enlarging a channel] • To enlarge a channel during playback, use the number keys 1~16 on the system to select the channel you wish to enlarge.
-
Page 38: Saving Backup Into Local Drive
! " ! " 6.1 Saving backup into local drive • From Search screen display, select [Backup] button to save a backup copy of the recording using the system’s CD-RW, USB HDD, or a portable hard drive such as USB memory stick. The backup files can be saved as AVI, BMP, JPEG, or KDB formats. 6.1.1 Still Image backup •... - Page 39 • Press [OK] button to begin backup. You will see the backup progress through the progress bar. • When no USB drive is connected, the system will return to Search mode display. • Once backup is complete, the system will return to Search mode display.
- Page 40 [Figure 6-5. Start Time] [Figure 6-6. End Time] [Start Time] and [End Time] setup To select [Start Time] and [End Time], use the mouse or the directional keys to select the year/month/day and hour/minute/second, then use the mouse wheel or the shuttle to select the time the recording you wish to save was recorded. Select [OK] button to apply the select time.
- Page 41 • • • • • • KALTECH DW716 Manual KALTECH DW716 Manual...
-
Page 42: Saving Backup Using Remote Drive
6.2 Saving backup using remote drive • From Search screen display, select [Backup] button to save a backup copy of the recording using a remote drive. The backup files can be saved as AVI, BMP, JPEG, or KDB formats. 6.2.1 Remote backup [Backup mode –... - Page 43 [Figure 6-11. Start Time] [Figure 6-12. End Time] [Start Time] and [End Time] setup To select [Start Time] and [End Time], use the mouse or the directional keys to select the year/month/day and hour/minute/second, then use the mouse wheel or the shuttle to select the time the recording you wish to save was recorded. Select [OK] button to apply the select time.
- Page 44 [Figure 6-14. Entering IP] [Figure 6-15. Entering password] [Network Drive IP] and [Network Password] • To enter the Network Drive IP address and Network password, use the mouse or the directional keys and Enter button to select the numbers and letters. Press [OK] button to apply the selected IP address and password.
- Page 45 • • • • • • [Figure 6-17. Backup options display] • • • • [Figure 6-18. Pinrter setup] KALTECH DW716 Manual KALTECH DW716 Manual...
-
Page 46: Accessing Setup Mode
" " 7.1 Accessing Setup mode To access Setup mode, press Setup button on the system. You will then be asked to enter password as shown below: • Use the number keys to enter the correct 4-digit password, then press Enter (The system has no password under factory settings). - Page 47 Main Menu Setting Options Description Password Change and set system password. Site Information Change site code, date display type, and time. Software Upgrade Update system program • System Log Information Show recorded log information Setup OSD/Dwell Time Turn OSD on/off, and set automatic channel rotation setting System management Change system hardware settings System Shutdown...
-
Page 48: System Setup
7.3 System Setup 7.3.1 Password • Select [Password] in system Setup menu to change password. [Figure 7-3. Password Setup] • To change password, enter the correct [Old Password], then enter [New Password] and [Confirm] by entering the new password again. Then select [OK] button to apply the new password. - Page 49 7.3.2 Site Information • In [Site Information], you can change the [Site Code], [Date Type], and [Time Setup] options. [Figure 7-5. Site Information] [Language] • Select the language you wish to use. [Site Code] • You can assign an ID code to the system to make it recognizable when multiple systems are connected through network (see page 47 for details).
- Page 50 [Site Code] • You can assign an Site code to the system to make it recognizable when multiple systems are connected through network. • The Site Code is comprising 6 digits including numbers and “-” (dash) symbol. When entering Site Code, you can enter a maximum of 6 digits.
- Page 51 7.3.3 Software Upgrade • In [Software Upgrade] menu, you can update your system program to improve system performance and/or functions. [Figure 7-10. Software Upgrade] [Package Select] • You can upgrade the system program by using a portable storage device. Connect the storage device containing an upgrade package to the USB port, then press [Select].
- Page 52 7.3.4 Log Information • In [Log Information] menu, you can view the log information on Setup history, Search history, network connection history, and backup history. [Time] • Displays selected date and time. [Setup] • Displays log information on any changes made to Setup menu.
- Page 53 [Time] • Select [Time] to change time to view log information recorded on different date/time. • Change [Start Time] and [End Time] using the mouse and mouse wheel or the directional keys and the jog/shuttle, then press [OK] button. The system will display the log information recorded during this period.
- Page 54 [Network] • Whenever the system is connected through network by remote Center program, the system will record the IP address and the date and time the connection is made. [Figure 7-17. Log Information – Network connection history] [Backup] • Whenever the system saves a backup, it records the date, time, and the location of the backup saved.
- Page 55 7.3.5 OSD/Dwell Time • You can change the options on OSD – On Screen Display – and Automatic channel rotation. • You can turn the display settings in Surveillance mode on or off, such as [Camera Name], [Recording], [Audio], [P/T/Z], and [Date/Time] displays.
- Page 56 7.3.6 System Management • System Management allows you to check network connection status, certify Dynamic DNS (DDNS), change Video input Type, and format HDD. [Figure 7-22. System management] • Use the mouse wheel or the jog/shuttle to select [Network Management], [ DDNS Authentication], [Video-In Type], and [HDD Format] options.
- Page 57 [Assigned IP] • Assigned IP displays the system’s IP address used for remote backup and remote monitoring. [Connection Status] • Connection Status indicates whether the current assigned IP address can be used to connect to the Internet. If it is possible, the system will display “OK”...
- Page 58 • You can format the system’s built-in HDD to erase all recordings stored in your Hard Disk Drive. Use the mouse wheel or the jog/shuttle to select [HDD Format], then select [OK] button. • As shown in Figure 7-28, the system will display the installed HDD in a table.
- Page 59 • You can view the HDD format progress through the progress bar. • The system will restart once the format is complete. [Caution] • Any newly installed HDD must be formatted. • Formatting will erase all data stored in the selected HDD.
- Page 60 7.3.7 System Shutdown • In [System Shutdown] menu, you can safely shutdown, restart, or add reboot schedule to DW716. • Use mouse wheel or the jog/shuttle to select [Shutdown], [Restart], or [Add Schedule], then press [OK] button. [Figure 7-31. System Shutdown] [Shut down] •...
- Page 61 [Add schedule] • You can set the time and the system will automatically restart. • Use the mouse wheel or the jog/shuttle to select [System Restart Period]. You can assign the system to automatically restart [One time only], [Daily], [Every 2 days], [Every 3 days], [Weekly], [Every 2 weeks], [Every 3 weeks], or [Monthly].
-
Page 62: Recording Setup
7.4 Recording Setup 7.4.1 Recording Setup • In [Recording] setup menu, you can change the color, brightness, contrast, and the frame rate for each cameras as well as setting audio recording. [Color/Brightness/Contrast] • You can set the color, brightness, and contrast of the selected camera. - Page 63 7.4.2 Motion Detection • In [Motion Detection] menu, you can set motion detection area, set motion sensitivity, and enable or disable alert sound. [Setting Motion Detection] • To set Motion Detection area, highlight a block of the area of the channel screen by using the directional keys, then press Enter key to select the block.
- Page 64 7.4.3 Motion Link setting To access Motion Link setting, use the mouse or the directional keys to select [Setting]. The system will display Motion link setup as shown in Figure 7-38. [Motion Camera] • Select the camera that will detect the movement in its motion-detection area by using the mouse wheel or the jog/shuttle on the system.
- Page 65 7.4.4 Schedule • In [Schedule] menu, you can set automatic schedule for each camera and their recording mode. [Camera] • Use the mouse wheel or the jog/shuttle to select the camera to change its schedule. [Recording Mode] • You can select a recording mode for the selected camera by using the mouse or the direction keys to highlight the time you wish to set, then use the mouse wheel or the jog/shuttle to change the recording mode.
- Page 66 7.4.5 Quality/Resolution • In [Quality/Resolution] menu, you can change the video quality and resolution by using the mouse wheel or the jog/shuttle. • Any changes made to quality and resolution will apply to all cameras. [Quality] • You can change the video quality to “LOWEST”, “LOW”, “NORMAL”, “HIGH”, and “BEST’.
-
Page 67: Camera Setup
7.5 Camera Setup • In [Camera] setup menu, you can setup Pan/Tilt mode and change the connection setting between sensors and controls. [Figure 7-44. Camera setup menu] [Selecting channel] [Sensor/Control Link] • Select a camera to change its options on P/T/Z model type, sensor •... - Page 68 7.5.1 Camera name • Press [Input] button next to [Camera name] option to give the selected camera a name. [Figure 7-45. Camera name option] [Selecting camera name] • Use the mouse or the directional keys and Enter key to enter the camera name.
- Page 69 7.5.2 Sensor setting • In [Sensor setting] menu, you can select a sensor type for the connected sensors, and enable or disable alarm sound. [Figure 7-47. Sensor setting] [Sensor] • Use the mouse wheel or the jog/shuttle to select a sensor. [Sensor Type] •...
- Page 70 7.5.3 Sensor/Control link • In [Sensor/Control link] menu, you can link a sensor with controls and set control time. [Figure 7-49. Sensor/Control link] [Sensor] • Use the mouse wheel or the jog/shuttle to select a sensor. [Control] • You can link a sensor with control devices. When a sensor is triggered, the linked control device(s) will automatically activate.
- Page 71 7.5.4 Sensor/Camera Link • In [Sensor/Camera Link] menu, you can link cameras to Sensors. [Figure 7-51. Sensor/Camera Link] [Sensor] • Select the sensor you wish to link by using the mouse wheel or the jog/shuttle. [Camera] • Select the cameras you wish to link with the selected sensor by using the mouse or the directional keys and Enter key.
-
Page 72: Network Setup
7.6 Network Setup • In [Network] setup menu, you can set the system’s IP address in order to connect to the Center Program, as well as setting up Center IP address and telephone number, recording transfer time, and alarm sensor transfer. [Figure 7-53. - Page 73 [ID/Password setup] • When using ADSL or VDSL network, you must enter the ID and password of remote back up server. • Use the mouse or the directional keys and Enter key to enter the ID and password. [Figure 7-54. ID/Password setup] [Site IP address setup] •...
- Page 74 [Subnet mask/Gateway setup] • To use Subnet mask or Gateway, you must enter the IP address. • Use the mouse or the directional keys and Enter key to enter IP address. [Figure 7-56. Subnet Mask/Gateway setup] [Center IP address setup] •...
- Page 75 [Center Tel No. setup] • When using modem, you must enter the telephone number of the computer installed with the Center Program. Use the mouse or the directional keys and Enter key to enter the telephone number. [Figure 7-58. Center Tel No. setup] KALTECH DW716 Manual KALTECH DW716 Manual...
-
Page 76: Backup Schedule
7.7 Backup Schedule • In [Backup Schedule] menu, you can set up system backup schedule to have the system automatically save backup copies of its recording. [Figure 7-59 Backup Schedule] • Backup Schedule programs the system to save a backup copy of the recorded data to a designated storage device set on the schedule. - Page 77 7.7.1 Adding Backup schedule • To add a backup schedule to the list, select [Add] button. [Figure 7-61. Adding backup schedule] • To add a backup schedule, you must set the [Start Time] and [End Time], [Target Drive], and [Rotate] options. [Figure 7-62.
- Page 78 [Start Time / End Time] • To select [Start Time] and [End Time], use the mouse or the directional keys to select the year/month/day and hour/minute/second, then use the mouse wheel or the shuttle to select the time the recording you wish to save was recorded.
- Page 79 [Target Drive – Remote Drive] Use the mouse wheel or the jog/shuttle to select Local USB, or Remote Drive. • If the system is connected through LAN or Internet line, you can save a remote drive backup by entering the correct IP address.
- Page 80 [Connecting] • Press the [Connect] button to connect the system to the receiving PC or fileserver in order to save a remote drive backup. Once connected, you will be able to select Network Drive path. • Depending on the connection status, the system will display either “Connect”, “Disconnect”, or “Connect fail”...
- Page 81 [Backup Schedule List] • You will see the added schedule on the Backup Schedule list. Select [OK] button to accept the schedule and return to Setup menu. [Figure 7-72. Backup Schedule list] KALTECH DW716 Manual KALTECH DW716 Manual...
- Page 82 7.7.2 Deleting Backup Schedule • To delete a schedule from the list, select the schedule you wish to delete by using the directional keys and Enter key. Then select [Del] button to delete the schedule. [Figure 7-73. Deleting backup schedule] •...
-
Page 83: Switching To Control Mode
8.1 Switching to Control Mode If you wish to use the control devices manually, select the 16-splitscreen mode in Surveillance mode, then press Enter key. You will then be able to select the control devices you wish to use manually. [Figure 8-1. - Page 84 " " P a n / T i l t C o n n e c t i o n … … … … … … … … … … … … … … … … … … … … … … … … … … … … … … … … … 2 .
- Page 85 RS-422 Signal Cable Connection Port (Used for connecting RX-Receiver) [Caution] [Caution] • Please beware of (+ve) and (-ve) poles of the signal cable when connecting it. Wrong connection may • Please beware of (+ve) and (-ve) poles of the signal cable when connecting it. Wrong connection may cause malfunction to the system.
-
Page 86: Lan And Dedicated Line Connection
& ' () & ' () 2.1 LAN and Dedicated Line Connection (Used for connecting to DW716 UTP port) Center PC Router Internet Network & Local Intranet Network (Dedicated Modem) (Used for connecting UTP port of the LAN Card) Dedicated Line Router (Dedicated Modem) - Page 87 2.2 PSTN (telephone line) Connection (options) MODEM (DW716 RS-232 connection) MODEM CENTER PC KALTECH DW716 Manual KALTECH DW716 Manual...
- Page 88 * +, + - .+/ * 1 * 2 3 & - " * +, + - .+/ * 1 * 2 3 & - " KALTECH DW716 Manual KALTECH DW716 Manual...
-
Page 89: Part Name And Description
3.1 Part Name and Description “ ” “ ” “ ” – KALTECH DW716 Manual KALTECH DW716 Manual... - Page 90 - 5 " 2 - 5 " 2 SENSOR Connect one (of two) signal lines of sensor (infrared sensor, magnetic) to COM port, and connect the other signal line to the desired sensor number. (Set the sensor “NC, NO” type in “Set Camera” menu See Page 69 for details on Sensor type setting) [WARNING] Use a separate adapter to supply power to each sensor.
- Page 91 " 2 " 2 CONTROL Alarm Light, Amplification Siren, External Relay, External Power ( DC12V ) Etc. • During automatic controlling of an external sensor, the control output port is interworked (the value set in “Set Camera” menu) and “COM” port is connected.
-
Page 92: Installing New Hdd
& 633 & 633 6.1 Installing new HDD • Turn the system off and install the new HDD into the system. • Turn the system back on and wait for the HDD format message. • The message will ask you to confirm HDD format. HDD format is a necessary procedure before using the newly installed HDD. -
Page 93: Checking Hdd Database
6.2 Checking HDD Database • If the newly installed HDD database does not correspond with the original HDD, the system will display the HDD table. • If the database of the HDDs do not correspond, you must format either the system’s original HDD or the newly installed HDD. •... -
Page 94: Hdd Smart Check
7. HDD Smart Check 7. HDD Smart Check 7.1 HDD Smart Check This is a function to notify the user possibilities of HDD crash in advance. This prevents the HDD from losing data or crashing that may come from bad sector or overheat by warning the user in advance. - Page 95 1 . V i e w e r f o r K D B d a t a … … … … … … … … … … … … … … … … … … … … … … … … … … … … … … … … … … 9 6 2 .
- Page 96 KALTECH DW716 Manual KALTECH DW716 Manual...
- Page 97 Viewer • • • • • ’ • • • • • • • ‘ ’ ‘ ’ • ‘ ’ ‘ ’ KALTECH DW716 Manual KALTECH DW716 Manual...
- Page 98 • • You can playback with SKIP and DELAY. • Move to very last data from selected date [Backup] While you are searching for recorded data, select the image to backup and click this icon. Then “Backup” window will appear. ( Refer to page 44 of OSR Center manual) [Print] Print the selected image.
- Page 99 • “ ” • ‘ ’ • “ ” ‘ ’ • ‘ ’ • • • ‘ ’ • KALTECH DW716 Manual KALTECH DW716 Manual...
- Page 100 " 7 " 7 System Specifications • HDD : Max. HDD x 4 • O/S : Embedded Linux • LAN : Ethernet 10/100 MB • Modem : 56Kbps. External-type modem is supported. (Optional) Video Input • 16Ch Composite Video (NTSC/PAL) Video Output •...
- Page 101 Motion Detection - Yes Camera/Sensor link - Yes Pan/Tilt/Zoom Control - Yes Backup • Auto/Manual backup through USB portable storage device, CD-RW or remote drive through network Mouse ( PS/2 ) Power: • The rated voltage might vary depending on the specification of the power supply. Model Input Voltage ENP-0812A...
- Page 102 8 (9 8 (9 The system power does not turn on. Check if the power cable is connected correctly. Check if the input voltage is correct. If the system power does not turn on when the power cable is connected correctly, please contact the service center. The system power is turned on, but no video data is displayed on the monitor.
- Page 103 Q& Q& Color of some camera videos are strange or videos are shown abnormally. Check if the camera connected to the system has a problem. Check to make sure the camera is not damaged by trying another camera into a working video output. Check if the video system setting is the same with your camera system.
-
Page 104: Warranty Information
Warranty Information Warranty Information The quality of this product is guaranteed by strict quality control process and tests. If the product is damaged despite following the instructions provided in the manual, this warranty will be in effect, provided the product is damaged within 1 year of purchase. - Page 105 If you have any questions about this product, you may call: Kaltech Enterprises Tech Support Center 1-866-446-3595 helpdesk@kaltech.net Kaltech Enterprises Printed in U.S.A.
Need help?
Do you have a question about the DW-716 DW-709 and is the answer not in the manual?
Questions and answers