Table of Contents
Advertisement
Quick Links
Advertisement
Table of Contents

Related Manuals for REED ST-335


Summary of Contents for REED ST-335
- Page 1 ST-335 Model 400A AC Clamp Meter Instruction Manual reedinstruments...
-
Page 2: Table Of Contents
Table of Contents Safety ..................3-4 Features ..................5 Specifications ................5-7 Instrument Description ...............7-8 Operating Instructions ..............9-11 AC Current Measurements ............9 DC/AC Voltage Measurements ............ 9 µA DC/AC Current Measurements ..........10 Resistance & Continuity Measurements ........10 Diode Measurements ..............10 Capacitence Measurements ............. -
Page 3: Safety
Safety International Safety Symbols This symbol, adjacent to another symbol or terminal, indicates the user must refer to the manual for further information. This symbol, adjacent to a terminal, indicates that, under normal use, hazardous voltages may be present Double insulation Safety Notes •... - Page 4 Cautions con’t • Repair or replace any damage before use. • Use great care when taking measurements when the voltages are greater than 25VAC rms or 35VDC. These voltages are considered a shock hazard. • Remove the battery if the meter is to be stored for long periods. •...
-
Page 5: Features
Features • High resolution, 0.1μA • Temperature range to 1832°F/1000°C • LCD display with backlight • Data Hold and zero function • Auto shut off and low battery indication • Resistance to 20MΩ • Diode test to 0.3mA Specifications Function Range &... -
Page 6: Low Battery Indication
Function Range & Resolution Accuracy (% of reading) 40.00nF ±(5.0% reading + 10 digits) 400.0nF ±(3.0% reading + 5 digits) Capacitance 4.000μF ±(3.5% reading + 5 digits) 40.00μF ±(5.0% reading + 5 digits) 100.0μF ±(1.5% reading + 5 digits) 5.000Hz 50.00Hz ±(1.2% reading + 2 digits) 500.0Hz... -
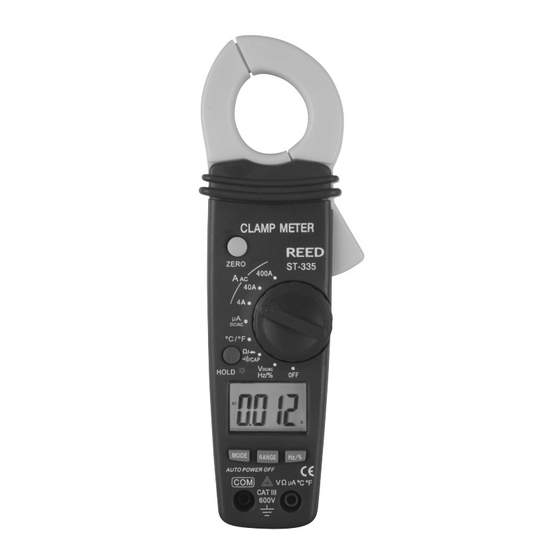
Page 7: Instrument Description
Relative Humidity 90% (0°C to 30°C); 75% (30°C to 40°C); 45% (40°C to 50°C) Altitude Operating: 3000m; Storage 10,000m Over Voltage Category III 600V Battery Two 1.5V “AAA” Batteries Auto OFF approx. 30 minutes Dimensions/Weight 200 x 50 x 35mm/200g Safety For indoor use and in accordance with Overvoltage Category II, Pollution Degree 2. - Page 8 Display Descriptions Direct Currrent Alternating Current Minus Sign 4000 Count (0 to 3999) Measurement Reading AUTO AutoRange Mode ZERO ZERO Mode Diode Test Mode Audible Continuity HOLD Data Hold Mode °C/°F, m, V, A, K, M, Ω Units of Measure List reedinstruments...
-
Page 9: Operating Instructions
Operation NOTICE: Read and understand all warning and precaution statements listed in the safety section of this operation manual prior to using this meter. Set the function select switch to the OFF position when the meter is not in use. AC Current Measurements WARNING: Ensure that the test leads are disconnected from the meter before making current clamp measurements. -
Page 10: Μa Dc/Ac Current Measurements
µA DC/AC Current Measurements 1. Insert the black test lead into the negative COM terminal and the red test lead into the positive µA terminal. 2. Set the function switch to the μA position. 3. Select AC or DC with the MODE button. 4. -
Page 11: Capacitence Measurements
Capacitance Measurements WARNING: To avoid electric shock, disconnect power to the unit under test and discharge all capacitors before taking any capacitance measurements. Remove the batteries and unplug the line cords. 1. Set the rotary function switch to the cap position. 2. -
Page 12: Data Hold
1. Remove the one rear Phillips head screw 2. Open the battery compartment 3. Replace the required two “AAA” batteries (UM4 R03) 4. Re-assemble the meter For service on this or any other REED product, contact REED Instruments at 1-800-561-8187 or info@reedinstruments.com. reedinstruments...
Need help?
Do you have a question about the ST-335 and is the answer not in the manual?
Questions and answers