Juniper T640 Hardware Manual
Core router
Hide thumbs
Also See for T640:
- Hardware manual (422 pages) ,
- Quick start manual (52 pages) ,
- Replacing (31 pages)

Related Manuals for Juniper T640


Summary of Contents for Juniper T640
- Page 1 T640 Core Router Hardware Guide Modified: 2017-03-31 Copyright © 2017, Juniper Networks, Inc.
- Page 2 END USER LICENSE AGREEMENT The Juniper Networks product that is the subject of this technical documentation consists of (or is intended for use with) Juniper Networks software. Use of such software is subject to the terms and conditions of the End User License Agreement (“EULA”) posted at http://www.juniper.net/support/eula.html.
-
Page 3: Table Of Contents
T640 System Architecture Description ........5... - Page 4 T640 Standard Control Boards LEDs ........
- Page 5 Redundancy ........... 105 T640 Six-Input DC Power Supply LEDs ....... . 105 T640 Three-Phase Delta and Wye AC Power Supply Description .
- Page 6 T640 Clearance Requirements for Airflow and Hardware Maintenance ..122 T640 Environmental Specifications ........122 Chapter 10 DC Power Requirements and Specifications .
- Page 7 Connecting the T640 to Ground ........
- Page 8 Installing a T640 Craft Interface ........266...
- Page 9 Upgrading to the T640 Quiet Fan Trays ....... . 292...
- Page 10 Removing a T640 DIMM Module ........324...
- Page 11 DC Power Supply ......... . . 376 Replacing a T640 Six-Input DC Power Supply ......380 Removing a T640 Six-Input DC Power Supply .
- Page 12 Replacing a T640 XENPAK Module ........
- Page 13 Tools and Parts Required to Remove Components from a T640 Router ..494 Packing the T640 Router for Shipment ....... . 494 Packing T640 Router Components for Shipment .
- Page 14 T640 Chassis Lifting Guidelines ........511...
- Page 15 Devices ............544 T640 Compliance Statements for NEBS ....... 544 T640 Compliance Statements for Acoustic Noise .
- Page 16 T640 Core Router Hardware Guide Copyright © 2017, Juniper Networks, Inc.
- Page 17 Figure 27: FPC Installed in a T640 Chassis ....... 68...
- Page 18 Figure 56: T640 DC Power Cable Lug ........
- Page 19 Connecting the T640 to Ground ........
- Page 20 T640 Core Router Hardware Guide Figure 102: Connecting Negative (–) DC Power Cables to INPUT 0, INPUT 1, INPUT 3, and INPUT 4 ......... . 229 Figure 103: Connecting Negative (–) DC Power Cables to INPUT 2 and...
- Page 21 Figure 164: Removing a T640 FPC ........
- Page 22 T640 Core Router Hardware Guide Figure 180: Standard Cable Restraint on a Three-Input 240-A DC Power Supply ............362 Figure 181: Optional Cable Restraint on a Three-Input 240-A DC Power Supply .
- Page 23 Figure 250: LCC-SIB Serial Number Label ......492 Copyright © 2017, Juniper Networks, Inc.
- Page 24 Figure 251: Placing a Component into an Electrostatic Bag ....506 Figure 252: ESD Point on the Front of T640 Chassis ..... . 507 Figure 253: ESD Point on the Rear View of T640 Chassis .
- Page 25 Table 3: T640 Hardware Components ........13...
- Page 26 Table 64: Site Preparation Checklist ........117 Table 65: T640 Physical Specifications ....... . . 119 Table 66: Router Environmental Specifications .
- Page 27 Table 92: SONET/SDH Interface Alarm Messages ......466 Table 93: T640 Chassis Alarm Messages ....... 467 Table 94: SCG Alarm Messages .
- Page 28 T640 Core Router Hardware Guide Table 100: SIB Alarm Messages ........479 xxviii Copyright ©...
-
Page 29: About The Documentation
® To obtain the most current version of all Juniper Networks technical documentation, see the product documentation page on the Juniper Networks website at http://www.juniper.net/techpubs/ If the information in the latest release notes differs from the information in the documentation, follow the product Release Notes. -
Page 30: Table 1: Notice Icons
T640 Core Router Hardware Guide Table 1: Notice Icons Icon Meaning Description Informational note Indicates important features or instructions. Caution Indicates a situation that might result in loss of data or hardware damage. Warning Alerts you to the risk of personal injury or death. -
Page 31: Documentation Feedback
We encourage you to provide feedback, comments, and suggestions so that we can improve the documentation. You can provide feedback by using either of the following methods: Online feedback rating system—On any page of the Juniper Networks TechLibrary site , simply click the stars to rate the content, http://www.juniper.net/techpubs/index.html and use the pop-up form to provide us with information about your experience. -
Page 32: Requesting Technical Support
7 days a week, 365 days a year. Self-Help Online Tools and Resources For quick and easy problem resolution, Juniper Networks has designed an online self-service portal called the Customer Support Center (CSC) that provides you with the following features: Find CSC offerings: http://www.juniper.net/customers/support/... - Page 33 About the Documentation For international or direct-dial options in countries without toll-free numbers, see http://www.juniper.net/support/requesting-support.html Copyright © 2017, Juniper Networks, Inc. xxxiii...
- Page 34 T640 Core Router Hardware Guide xxxiv Copyright © 2017, Juniper Networks, Inc.
-
Page 35: Overview
PART 1 Overview System Overview and Architecture on page 3 T640 Router Release Notes on page 11 Chassis Components and Descriptions on page 13 Cooling System Components and Descriptions on page 31 Host Subsystem Components and Descriptions on page 35... - Page 36 T640 Core Router Hardware Guide Copyright © 2017, Juniper Networks, Inc.
-
Page 37: System Overview And Architecture
Data Flow Through the T640 Router on page 7 T640 Router Description The T640 Core Router is a complete routing system that provides Gigabit Ethernet, SONET/SDH, and other high-speed interfaces for large networks and network applications, such as those supported by Internet service providers (ISPs). -
Page 38: T640 Component Redundancy
T640 Core Router Hardware Guide T640 Component Redundancy The T640 Core Router is designed so that no single point of failure can cause the entire system to fail. The following major hardware components are redundant: Switch Interface Boards (SIBs)—The router has five SIBs. A T640 router that is connected to a TX Matrix platform requires T640-SIBs ;... -
Page 39: T640 System Architecture Description
Forwarding operations in the router are performed by the Packet Forwarding Engines, which consist of hardware, including ASICs, designed by Juniper Networks. The T640 Core Router has two main architectural components: Routing Engine—This component provides Layer 3 routing services and network management. -
Page 40: Figure 2: Control Packet Handling For Routing And Forwarding Table Updates
T640 Core Router Hardware Guide Processing of routing protocol packets—The Routing Engine handles all packets that concern routing protocols, freeing the Packet Forwarding Engine to handle only packets that represent Internet traffic. Software modularity—Because each software process is devoted to a different function and uses a separate process space, the failure of one process has little or no effect on the others. -
Page 41: T640 Packet Forwarding Engine Architecture
Replacing T640 Packet Forwarding Engine Components Data Flow Through the T640 Router To ensure the efficient movement of data through the T640 Core Router, the router is designed so that ASICs on the hardware components handle the forwarding of data. -
Page 42: Figure 3: Data Flow Through The T640 Router
T640 Core Router Hardware Guide Figure 3: Data Flow Through the T640 Router Packets arrive at an incoming PIC interface. The PIC passes the packets to the FPC, where the Layer 2/Layer 3 Packet Processing ASIC performs Layer 2 and Layer 3 parsing and divides the packets into 64-byte cells. - Page 43 Layer 2 encapsulation, and sends the packets to the outgoing PIC interface. The outgoing PIC sends the packets out into the network. Related T640 Chassis Description on page 15 Documentation T640 Physical Specifications on page 119 Replacing T640 Packet Forwarding Engine Components...
- Page 44 T640 Core Router Hardware Guide Copyright © 2017, Juniper Networks, Inc.
-
Page 45: T640 Router Release Notes
(CIP) are always steadily green, even when no cables are connected to the ports. For model number RE-DUO-C1800-8G (part number 740-026941 Rev 8) and above, the CIP LED behavior is as described in the T640 Core Router Hardware Guide. Model numbers RE-DUO-C1800-8G and RE-DUO-C1800-16G—The LED labeled... -
Page 46: Errata With The T640 Router Documentation
T640 Core Router Hardware Guide Errata with the T640 Router Documentation There are no outstanding issues with the T640 router documentation. Related Outstanding Issues with the T640 Router on page 11 Documentation Copyright © 2017, Juniper Networks, Inc. -
Page 47: Chassis Components And Descriptions
T640 Connector Interface Panel (CIP) LEDs on page 22 T640 Craft Interface Description on page 22 T640 Craft Interface Alarm LEDs and ACO/LT Button on page 23 T640 Craft Interface FPC LEDs and Online/Offline Buttons on page 24 T640 Craft Interface Host Subsystem LEDs on page 24... - Page 48 T640 Core Router Hardware Guide Table 3: T640 Hardware Components (continued) Component Hardware Model Number Description Cooling system, including fan trays FAN-REAR-TX-T640 “T640 Cooling System Description” on page 31 and air filters FAN-REAR-TXP-LCC FAN-T-FBOT FAN-T-FTOP FLTR-KIT-T640 Connector interface panel (CIP) CIP-L-T640 “T640 Craft Interface Description”...
-
Page 49: T640 Chassis Description
T640 Router Description on page 3 Documentation T640 Field-Replaceable Units on page 261 T640 Chassis Description The T640 Core Router chassis is a rigid sheet metal structure that houses all the other router components (see Figure 4 on page 16 Figure 5 on page 17). -
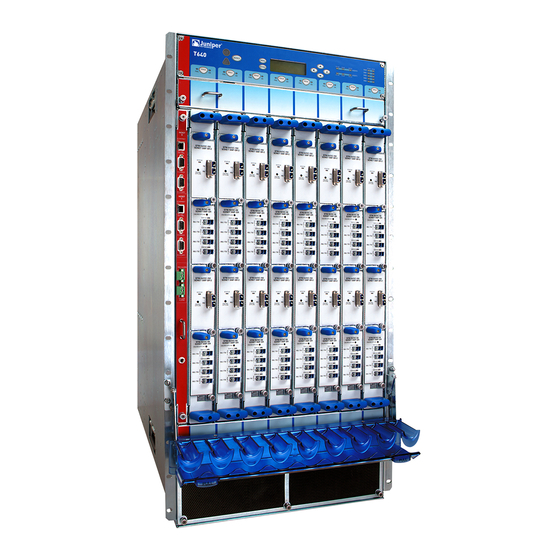
Page 50: Figure 4: Front View Of T640 Chassis
Failure to use an ESD strap could result in damage to the router. WARNING: The router must be connected to earth ground during normal operation. Figure 4: Front View of T640 Chassis Copyright © 2017, Juniper Networks, Inc. -
Page 51: T640 Midplane Description
T640 Chassis Grounding Cable and Lug Specifications on page 118 T640 Installation Safety Guidelines on page 511 T640 Midplane Description The T640 Core Router midplane is located in the center of the chassis and forms the rear of the FPC card cage (see Figure 6 on page 18). -
Page 52: Figure 6: T640 Midplane
T640 Core Router Hardware Guide install into the midplane from the rear of the chassis. The power supplies and cooling system components also connect to the midplane. The midplane performs the following major functions: Data path—Data packets are transferred across the midplane from the Packet Forwarding Engine on the originating FPC to the SIBs, and from the SIBs across the midplane to the Packet Forwarding Engine on the destination FPC. -
Page 53: T640 Cable Management System Description
Chapter 3: Chassis Components and Descriptions Related T640 Hardware Component Overview on page 13 Documentation T640 Router Description on page 3 T640 Physical Specifications on page 119 T640 Cable Management System Description The cable management system (see Figure 7 on page 19) consists of a row of nine semicircular plastic bobbins mounted on the front of the router below the FPC card cage. -
Page 54: Management Ports
T640 Core Router Hardware Guide Figure 8: CIP HOST ETHERNET ACT 0 YEL = 10M GRN = 100M CONSOLE AUXILIARY HOST ETHERNET ACT 1 YEL = 10M GRN = 100M CONSOLE AUXILIARY RED ALARM YELLOW ALARM The front electrostatic discharge point is located near the bottom of the CIP. The CIP is located at the left side of the FPC card cage. -
Page 55: Alarm Relay Contacts
T640 Component Serial Number Label Locations on page 486 T640 Routing Engine Interface Cable and Wire Specifications on page 145 T640 RJ-45 Connector Pinouts for the Routing Engine ETHERNET Port on page 146 T640 DB-9 Connector Pinouts for the Routing Engine AUXILIARY and CONSOLE Ports on page 146 Copyright ©... -
Page 56: T640 Connector Interface Panel (Cip) Leds
Documentation T640 Connector Interface Panel (CIP) Description on page 19 T640 RE-C1800 Description on page 42 Connecting the T640 Router to a Network for Out-of-Band Management on page 212 T640 LED Overview on page 464 T640 Craft Interface Description The craft interface allows you to view status and troubleshooting information at a glance and to perform many system control functions. -
Page 57: T640 Craft Interface Alarm Leds And Aco/Lt Button
Chapter 3: Chassis Components and Descriptions Figure 9: Front Panel of the T640 Craft Interface Related T640 Chassis Description on page 15 Documentation T640 Hardware Component Overview on page 13 Replacing a T640 Craft Interface on page 265 T640 Craft Interface Alarm LEDs and ACO/LT Button... -
Page 58: T640 Craft Interface Fpc Leds And Online/Offline Buttons
T640 Chassis Description on page 15 Documentation T640 LED Overview on page 464 Replacing a T640 Craft Interface on page 265 T640 Craft Interface FPC LEDs and Online/Offline Buttons Each FPC slot has two LEDs that indicate its status. The FPC LEDs, labeled... -
Page 59: T640 Craft Interface Lcd And Navigation Buttons
T640 Chassis Description on page 15 Documentation T640 LED Overview on page 464 Replacing a T640 Craft Interface on page 265 T640 Craft Interface LCD and Navigation Buttons A four-line LCD is located in the craft interface, along with six navigation buttons. The... -
Page 60: T640 Craft Interface Sib Leds
T640 Chassis Description on page 15 Documentation T640 LED Overview on page 464 Replacing a T640 Craft Interface on page 265 T640 Craft Interface SIB LEDs Each SIB has two LEDs on the craft interface that indicate its status. The SIB LEDs, labeled... -
Page 61: T640 Sonet Clock Generators (Scgs) Description
Chapter 3: Chassis Components and Descriptions Replacing a T640 Craft Interface on page 265 T640 SONET Clock Generators (SCGs) Description The SONET Clock Generators (SCGs) provide 19.44-MHz Stratum 3 clock signal for the SONET/SDH interfaces on the router. One SCG is shipped as part of the standard router configuration, but up to two SCGs can be installed to provide redundancy. -
Page 62: T640 Sonet Clock Generators (Scgs) Leds
Replacing a T640 SCG on page 277 Maintaining the T640 SCGs on page 443 T640 RJ-48 Connector Pinouts for the SCG EXTERNAL CLOCK INPUTS Ports T640 Component Serial Number Label Locations on page 486 T640 SONET Clock Generators (SCGs) LEDs Three LEDs, located on the SCG faceplate, display the status of the SCG. -
Page 63: Figure 14: Scg With Rj-48 Ports
SCG is not functioning as the master. Green On Steadily Link is online and active. LINK No link. Related T640 SONET Clock Generators (SCGs) Description on page 27 Documentation Replacing a T640 SCG on page 277 Copyright © 2017, Juniper Networks, Inc. - Page 64 T640 Core Router Hardware Guide Maintaining the T640 SCGs on page 443 T640 LED Overview on page 464 Troubleshooting the T640 SONET Clock Generators on page 468 T640 Component Serial Number Label Locations on page 486 Copyright © 2017, Juniper Networks, Inc.
-
Page 65: Cooling System Components And Descriptions
CHAPTER 4 Cooling System Components and Descriptions T640 Cooling System Description on page 31 T640 Cooling System Description The cooling system components work together to keep all router components within the acceptable temperature range. The host subsystem monitors the temperature of the router components. -
Page 66: Fan Trays
One upper front fan tray and one lower front fan tray that cool the components installed in the front card cage (the FPCs, PICs, CIP, and midplane). The T640 router supports the following front fan trays: The upper and lower standard front fan trays, each of which contain six fans and have no labels. -
Page 67: Air Filters
Each AC power supply contains two fans that cool that power supply. Related T640 Hardware Component Overview on page 13 Documentation Maintaining the T640 Air Filters on page 444 Maintaining the T640 Fan Trays on page 445 Copyright © 2017, Juniper Networks, Inc. - Page 68 T640 Core Router Hardware Guide Troubleshooting the T640 Cooling System on page 469 Copyright © 2017, Juniper Networks, Inc.
-
Page 69: Host Subsystem Components And Descriptions
T640 Standard Control Boards Description on page 63 T640 Standard Control Boards LEDs on page 64 T640 T Series Control Boards (T-CBs) Description on page 64 T640 T Series Control Boards (T-CBs) LEDs on page 66 T640 Host Subsystem Description The host subsystem provides the routing and system management functions of the router. -
Page 70: T640 Routing Engine Description
The T640 router is shipped with Junos OS preinstalled and ready to be configured when the T640 router is powered on. There are three copies of the software: one on a CompactFlash card in the Routing Engine, one on a hard disk or solid-state drive in the Routing Engine, and one on a PC Card or USB storage device that can be inserted into the slot in the Routing Engine faceplate. -
Page 71: T640 Re-600 Description
The ports for connecting the Routing Engine to external management devices are located on the Connector Interface Panel (CIP). The T640 router supports the Routing Engines listed in Table 11 on page Table 11: T640 Supported Routing Engines First Supported Junos OS... - Page 72 Engine. You can also copy Junos OS from the Routing Engine onto a PC Card, for example, to create a backup copy of upgrade software that you have obtained from Juniper Networks. Instructions for copying software to a PC Card are available at the Juniper Networks Support Web site ( http://www.juniper.net/support/...
-
Page 73: T640 Re-600 Leds
T640 Host Subsystem Description on page 35 T640 Routing Engine Description on page 36 T640 RE-600 LEDs on page 39 Maintaining the T640 Routing Engines on page 448 T640 RE-600 LEDs Table 12 on page 39 describes the functions of the HD LED. -
Page 74: Figure 19: Routing Engine 1600 (Re-1600)
Routing Engine onto a PC Card, for example, to create a backup copy of upgrade software that you have obtained from Juniper Networks. Instructions for copying software to a PC Card are available at the Juniper Networks Support Web site http://www.juniper.net/support/ ). -
Page 75: T640 Re-1600 Leds
T640 Host Subsystem Description on page 35 T640 Routing Engine Description on page 36 T640 RE-1600 LEDs on page 41 Maintaining the T640 Routing Engines on page 448 T640 RE-1600 LEDs LEDs—Table 13 on page 41 describes the functions of these LEDs. -
Page 76: T640 Re-C1800 Description
T640 Core Router Hardware Guide T640 RE-C1800 Description RE-C1800 Components on page 42 RE-C1800 Boot Order on page 42 RE-C1800 Components Each RE-C1800 (Figure 20 on page 42) consists of the following components: CPU—Runs the Junos OS to maintain the routing tables and routing protocols. -
Page 77: T640 Re-C1800 Leds
Chapter 5: Host Subsystem Components and Descriptions Related T640 Hardware Component Overview on page 13 Documentation T640 Host Subsystem Description on page 35 T640 Routing Engine Description on page 36 T640 RE-C1800 LEDs on page 43 T640 RE-C1800 LEDs Figure 21 on page 43 shows the RE-C1800 LEDs. -
Page 78: T640 Re-2000 Description
Related T640 Routing Engine Description on page 36 Documentation T640 RE-C1800 Description on page 42 Troubleshooting the T640 Host Subsystem on page 472 T640 RE-2000 Description Each RE-2000 (shown in Figure 22 on page 45) consists of the following components: CPU—Runs Junos OS to maintain the router's routing tables and routing protocols. -
Page 79: T640 Re-2000 Leds
T640 Host Subsystem Description on page 35 T640 Routing Engine Description on page 36 T640 RE-2000 LEDs on page 45 Maintaining the T640 Routing Engines on page 448 T640 RE-2000 LEDs Table 15 on page 45 describes the functions of these LEDs. -
Page 80: Routing Engine Specifications
T640 Host Subsystem Description on page 35 Documentation T640 Routing Engine Description on page 36 T640 RE-2000 Description on page 44 Troubleshooting the T640 Host Subsystem on page 472 Routing Engine Specifications Table 16 on page 46 lists the current specifications for Routing Engines supported on M Series, MX Series, and T Series routers. - Page 81 R E M X 2 K - 1 8 0 0 - 3 2 G - S 1800 Ghz 32 GB Gigabit 32 GB SSD 4GB Fixed 12.3R4 Ethernet Internal 13.2R1 CompactFlash card RE-S-X6-64G 2 Ghz 64 GB Gigabit Two 50-GB 15.1F4, 16.1 Ethernet SSDs Copyright © 2017, Juniper Networks, Inc.
-
Page 82: Table 17: End-Of-Life Routing Engine Specifications
T640 Core Router Hardware Guide Table 16: Routing Engine Specifications (continued) Routing Connection First Junos OS Engine Processor Memory to PFEs Disk Media Support RE-S-X6-64G 2 Ghz 64 GB Gigabit Two 50-GB 15.1F4, 16.1 Ethernet SSDs REMX2K-X8-64G 2.3 Ghz 64 GB... -
Page 83: Supported Routing Engines By Router
MX480 Routing Engines on page 53 MX960 Routing Engines on page 54 MX2008 Routing Engines on page 55 MX2010 Routing Engines on page 55 MX2020 Supported Routing Engines on page 56 PTX3000 Routing Engines on page 56 Copyright © 2017, Juniper Networks, Inc. -
Page 84: M7I Routing Engines
T640 Core Router Hardware Guide PTX5000 Routing Engines on page 57 T320 Routing Engines on page 57 T640 Routing Engines on page 58 T1600 Routing Engines on page 58 T4000 Routing Engines on page 59 TX Matrix Routing Engines on page 60... -
Page 85: M40E Routing Engines
RE-A-1800x2 12.1R3 fxp2 RE-A-1800X2-16G RE-A-1800x2 11.4R5 10.4 fxp0 fxp1 12.1R3 fxp2 RE-A-1800X4-16G RE-A-1800x4 11.4R5 10.4 fxp0 12.1R3 M320 Routing Engines Table 22 on page 52 lists the Routing Engines supported by the M320 router. Copyright © 2017, Juniper Networks, Inc. -
Page 86: Mx5, Mx10, Mx40, And Mx80 Routing Engine
T640 Core Router Hardware Guide Table 22: M320 Routing Engines First First Supported Supported Management Name in CLI 32-bit Junos OS 64-bit Junos Ethernet Internal Ethernet Model Number Output Release OS Release Interface Interface RE-1600-2048 (EOL – fxp0 fxp1 RE-4.0... -
Page 87: Mx240 Routing Engines
RE-S-1800x4 12.1R3 RE-S-1800X4-32G-S 12.3R4 12.3R4 fxp0 em0, RE-S-1800X4 13.2R1 13.2R1 RE-S-X6-64G – 15.1F4 fxp0 ixlv0, igb0 RE-S-2X00x6 16.1R1 MX480 Routing Engines Table 26 on page 54 lists the Routing Engines supported by MX480 routers. Copyright © 2017, Juniper Networks, Inc. -
Page 88: Mx960 Routing Engines
T640 Core Router Hardware Guide Table 26: MX480 Supported Routing Engines First Supported First Supported Management Name in CLI 32-bit Junos OS 64-bit Junos OS Ethernet Internal Ethernet Model Number Output Release Release Interface Interface RE-S-1300-2048 RE-S-1300 – fxp0 fxp1... -
Page 89: Mx2008 Routing Engines
First Supported 64-bit Junos Ethernet Ethernet Model Number Output OS Release Interface Interface REMX2008-X8-64G 15.1F7 fxp0 ixlv0 RE-MX2008-X8-64G ixlv1 MX2010 Routing Engines Table 29 on page 56 lists the Routing Engines supported by MX2010 routers. Copyright © 2017, Juniper Networks, Inc. -
Page 90: Mx2020 Supported Routing Engines
T640 Core Router Hardware Guide Table 29: MX2010 Supported Routing Engines Management Internal Name in CLI First Supported 64-bit Junos Ethernet Ethernet Model Number Output OS Release Interface Interface RE-MX2000-1800X4 RE-S-1800x4 12.3R2 fxp0 REMX2K-1800-32G-S 12.3R4 fxp0 RE-S-1800x4 13.2R1 REMX2K-X8-64G 15.1F5-S1... -
Page 91: Ptx5000 Routing Engines
Routing Engines supported by the T320 router. Table 33: T320 Routing Engines First Supported 32-bit Junos OS Management Internal Ethernet Model Number Name in CLI Output Release Ethernet Interface Interface RE-600-2048 (EOL details: RE-3.0 RE-3.0 fxp0 fxp1 TSB14373 (RE-600) fxp2 Copyright © 2017, Juniper Networks, Inc. -
Page 92: T640 Routing Engines
RE-A-2000-4096 fxp0 fxp1 RE-A-2000 fxp2 T640 Routing Engines Table 34 on page 58 lists the Routing Engines supported by the T640 router. Table 34: T640 Routing Engines Management Internal Name in CLI First Supported 32-bit First Supported 64-bit Ethernet... -
Page 93: T4000 Routing Engines
T1600 router in a 11.4R2 routing matrix: 11.4R2 T4000 Routing Engines Table 36 on page 60 lists the Routing Engines supported by the T4000 router. NOTE: The T4000 router supports 64-bit Junos OS only. Copyright © 2017, Juniper Networks, Inc. -
Page 94: Tx Matrix Routing Engines
T640 Core Router Hardware Guide Table 36: T4000 Routing Engines Management Name in CLI First Supported 64-bit Junos OS Ethernet Internal Ethernet Model Number Output Release Interface Interface RE-DUO-C1800-8G RE-DUO-1800 Standalone T4000 router: 12.1 bcm0 T4000 router in a routing matrix: 13.1 RE-DUO-C1800-16G Standalone T4000 router: 12.1R2... -
Page 95: Tx Matrix Plus (With 3D Sibs) Routing Engines
Switch processor mezzanine board (SPMB). Figure 23 on page 61 shows the LCC-CB. Figure 23: LCC-CB The following components are located on the LCC-CB faceplate: Three LEDs labeled , and indicate its status. MASTER FAIL The online/offline button. Copyright © 2017, Juniper Networks, Inc. -
Page 96: T640 Lcc-Cb Leds
, which are not currently supported on the T640 router. Two LEDs for each port—labeled — are also not supported. LINK One JCS port, which is not supported on the T640 router. The LED indicates the LINK status of the port. -
Page 97: T640 Standard Control Boards Description
T640 Host Subsystem Description on page 35 T640 Control Boards Description T640 LCC-CB Description on page 61 Troubleshooting the T640 Host Subsystem on page 472 Troubleshooting the T640 Control Board on page 473 T640 Standard Control Boards Description Figure 25 on page 63 shows the standard control board. -
Page 98: T640 Standard Control Boards Leds
Related T640 Chassis Description on page 15 Documentation Replacing a T640 Standard Control Board or T-CB on page 313 Maintaining the T640 Control Boards on page 449 T640 T Series Control Boards (T-CBs) Description Each T-CB consists of the following components: 100-MB Ethernet switch for intermodule communication. -
Page 99: Figure 26: T-Cb
“Taking the T640 Host Subsystem Offline” on page 307. Two RJ-45 ports labeled on the T-CB faceplate. For T640 routers connected to a TX Matrix platform, only the port is used. For more information, see the TX Matrix Router Hardware Guide. CHASSIS ID configuration switches. -
Page 100: T640 T Series Control Boards (T-Cbs) Leds
T640 Host Subsystem Description on page 35 Documentation T640 Control Boards Description T640 T Series Control Boards (T-CBs) Description on page 64 Troubleshooting the T640 Host Subsystem on page 472 Troubleshooting the T640 Control Board on page 473 Copyright © 2017, Juniper Networks, Inc. -
Page 101: Line Card Components And Description
T640 End-of-Life PICs Supported on page 87 T640 PIC/FPC Compatibility on page 89 T640 FPC Description Up to eight Flexible PIC Concentrators (FPCs) install vertically in the front of the T640 Core Router (see Figure 27 on page 68). The FPC slots are numbered left to right from... -
Page 102: Fpc Terminology
“T640 Craft Interface FPC LEDs and Online/Offline Buttons” on page FPC online/offline button, located on the craft interface above the FPC. Figure 27: FPC Installed in a T640 Chassis FPC Terminology Regardless of whether you are holding an FPC vertically or horizontally, this document... -
Page 103: Identifying T640 Fpcs
PIC's offline button and how the PIC is secured to the FPC. See Table 43 on page Table 43: Identifying the FPCs Supported by the T640 Router Label on the FPC Method of Securing the... - Page 104 T640 Core Router Hardware Guide Table 43: Identifying the FPCs Supported by the T640 Router (continued) Label on the FPC Method of Securing the Faceplate Location of PIC Offline Button PIC to the FPC Enhanced Scaling FPC2 T640-FPC2-ES Inside an opening directly on the...
-
Page 105: Figure 29: Enhanced Scaling Fpc1 Supported By The T640 Router
The T640 router supports the Enhanced Scaling FPC1, as shown in Figure 29 on page Figure 29: Enhanced Scaling FPC1 Supported by the T640 Router The T640 router supports the standard FPC2 and FPC3, as shown in Figure 30 on page Copyright © 2017, Juniper Networks, Inc. -
Page 106: Figure 30: Standard Fpc2 And Fpc3 Supported By The T640 Router
T640 Core Router Hardware Guide Figure 30: Standard FPC2 and FPC3 Supported by the T640 Router FPC2 FPC3 Copyright © 2017, Juniper Networks, Inc. -
Page 107: Figure 31: Enhanced Ii Fpc1, Fpc2, And Fpc3 Supported By The T640 Router
Chapter 6: Line Card Components and Description The T640 router supports the Enhanced II FPC1, FPC2 and FPC3, as shown in Figure 31 on page Figure 31: Enhanced II FPC1, FPC2, and FPC3 Supported by the T640 Router Copyright © 2017, Juniper Networks, Inc. -
Page 108: Figure 32: Enhanced Scaling Fpc2 Supported By The T640 Router
T640 Core Router Hardware Guide The T640 router supports the Enhanced Scaling FPC2, as shown in Figure 32 on page Figure 32: Enhanced Scaling FPC2 Supported by the T640 Router The T640 router supports the Enhanced Scaling FPC3, as shown in Figure 33 on page Copyright ©... -
Page 109: Figure 33: Enhanced Scaling Fpc3 Supported By The T640 Router
Chapter 6: Line Card Components and Description Figure 33: Enhanced Scaling FPC3 Supported by the T640 Router Copyright © 2017, Juniper Networks, Inc. -
Page 110: Figure 34: Enhanced Scaling Fpc4 Supported By The T640 Router
T640 Core Router Hardware Guide The T640 router supports the Enhanced Scaling FPC4, as shown in Figure 34 on page Figure 34: Enhanced Scaling FPC4 Supported by the T640 Router Copyright © 2017, Juniper Networks, Inc. -
Page 111: T640 Fpcs Supported
Chapter 6: Line Card Components and Description The T640 router supports the T640 Enhanced Scaling FPC4-1P, as shown in Figure 35 on page Figure 35: T640 Enhanced Scaling FPC4-1P Supported by the T640 Router Related T640 Hardware Component Overview on page 13... -
Page 112: Table 44: Fpcs Supported By The T640 Router
EOS date associated with each product. For more information about EOS or EOL products, see the product support notification (PSN) hardware end-of-life announcements. Table 44: FPCs Supported by the T640 Router Maximum FPC Model... -
Page 113: T640 Pic Description
Chapter 6: Line Card Components and Description Table 44: FPCs Supported by the T640 Router (continued) Maximum FPC Model Maximum Throughput per First Junos OS FPC Type FPC Name Number Number of PICs Release FPC3 T640-FPC3 40 Gbps Enhanced FPC3... -
Page 114: T640 Pics Supported
T640 End-of-Life PICs Supported on page 87 T640 PICs Supported Table 45 on page 80 lists the PICs supported by the T640 router. The PICs are listed alphabetically by PIC family. Table 45: PICs Supported in the T640 Router First Junos OS... - Page 115 PIC (T640 Router) connector (female) Channelized OC3/STM1 Enhanced IQ PB-2CHOC3-STM1-IQE-SFP Optical: LC/PC (IQE) PIC with SFP (T640 Router) Channelized OC12/STM4 Enhanced IQ (IQE) PICs with SFP (T640 Router) Channelized OC12/STM4 PB-1CHOC12-STM4-IQE-SFP Optical: LC/PC Enhanced IQ (IQE) PIC with SFP Channelized OC12/STM4...
- Page 116 T640 Core Router Hardware Guide Table 45: PICs Supported in the T640 Router (continued) First Junos OS Release PIC Family and Type Ports Model Number Connector Support Gigabit Ethernet PIC with SFP PB-1GE-SFP Optical: LC/PC Copper: RJ-45 Four-pair, Category 5...
- Page 117 Chapter 6: Line Card Components and Description Table 45: PICs Supported in the T640 Router (continued) First Junos OS Release PIC Family and Type Ports Model Number Connector Support Gigabit Ethernet IQ Gigabit Ethernet IQ PICs with SFP (T640 Router)
- Page 118 Four-pair, Category 5 shielded twisted-pair connectivity Pinout: MDI crossover Gigabit Ethernet and 10-Gigabit Ethernet Enhanced IQ2 (IQ2E) Gigabit Ethernet Enhanced IQ2 (IQ2E) PICs with SFP (T640 Router) Gigabit Ethernet Enhanced IQ2 PB-4GE-TYPE1-SFP-IQ2E Optical: LC/PC (IQ2E) PIC with SFP Copper: RJ-45...
- Page 119 Chapter 6: Line Card Components and Description Table 45: PICs Supported in the T640 Router (continued) First Junos OS Release PIC Family and Type Ports Model Number Connector Support 10-Gigabit Ethernet DWDM PIC (T640 PC-1XGE-DWDM-CBAND Optical: SC/PC Router) 10-Gigabit Ethernet DWDM OTN PIC...
- Page 120 T640 Core Router Hardware Guide Table 45: PICs Supported in the T640 Router (continued) First Junos OS Release PIC Family and Type Ports Model Number Connector Support SONET/SDH OC3/STM1 PB-4OC3-1OC12-SON-SFP Optical: LC/PC (Multi-Rate) PIC with SFP SONET/SDH OC12/STM4 Enhanced PB-1OC12-STM4-IQE-SFP...
-
Page 121: T640 End-Of-Life Pics Supported
T640 PIC/FPC Compatibility on page 89 T640 End-of-Life PICs Supported Table 45 on page 80 lists the end-of-life PICs supported by the T640 router. The PICs are listed alphabetically by PIC family. Table 46: End-of-Life PICs Supported in the T640 Router... - Page 122 T640 Core Router Hardware Guide Table 46: End-of-Life PICs Supported in the T640 Router (continued) First Junos OS Release PIC Family and Type Ports Model Number Connector Support Monitoring Services II EOL PIC PB-PM2 None 7.1R2 (T640 Router) Monitoring Services III EOL PIC...
-
Page 123: T640 Pic/Fpc Compatibility
The PIC/FPC compatibility matrixes lists the current PICs for T640 routers, both standalone and connected to a T640 Matrix router unless otherwise noted, and the first Junos OS Release in which the FPC supports the PIC. For example, Junos 7.6 is the first release in which the T640-FPC1-E2 supports the ATM2 OC3/STM1 IQ, 2-port PIC. -
Page 124: Pic/Fpc Compatibility (Type 2 Fpcs And Type 2 Pics)
T640 Core Router Hardware Guide Table 47: T640 PIC/FPC Compatibility Type 1 (continued) PIC Model Number T640-FPC1-E T640-FPC1-E2 T640-FPC1-ES DS3, 4-port PB-4DS3 – – E3 IQ, 4-port PB-4E3-QPP – Fast Ethernet and Gigabit Ethernet PICs Fast Ethernet, 4-port PB-4FE-TX Gigabit Ethernet, 1-port SFP... - Page 125 Chapter 6: Line Card Components and Description Table 48: T640 PIC/FPC Compatibility Type 2 PIC Model Number T640-FPC2 T640-FPC2-E T640-FPC2-E2 T640-FPC2-ES ATM2 IQ PICs ATM2 OC12/ STM4 IQ, PB-1OC12-ATM2-MM – 1-port PB-1OC12-ATM2-SMIR ATM2 OC48/ STM16 IQ, PB-1OC48-ATM2-SFP – 1-port SFP...
-
Page 126: Pic/Fpc Compatibility (Type 3 Fpcs And Type 3 Pics)
T640 Core Router Hardware Guide Table 48: T640 PIC/FPC Compatibility Type 2 (continued) PIC Model Number T640-FPC2 T640-FPC2-E T640-FPC2-E2 T640-FPC2-ES OC12c/STM4 PB-4OC3-4OC12-SON-SFP – (Multi-Rate), 4-port (Type OC48c/ PB-1OC48-SON-SFP – STM16, 1-port SFP OC48/STM16 PB-1OC48-SON-B-SFP – (Multi-Rate), 4-port (Type PIC/FPC Compatibility (Type 3 FPCs and Type 3 PICs) -
Page 127: Pic/Fpc Compatibility (Type 4 Fpcs And Type 4 Pics)
Chapter 6: Line Card Components and Description Table 49: T640 PIC/FPC Compatibility Type 3 (continued) PIC Model Number T640-FPC3 T640-FPC3-E T640-FPC3-E2 T640-FPC3-ES 10-Gigabit Ethernet PICs 10-Gigabit PC-1XGE-XENPAK with Ethernet, 1-port 10GBASE-ER and XENPAK 10GBASE-LR transceivers installed PC-1XGE-XENPAK with 7.4: 10GBASE-SR and... -
Page 128: Table 50: T640 Pic/Fpc Compatibility Type 4
T640 Core Router Hardware Guide Table 50: T640 PIC/FPC Compatibility Type 4 PIC Model Number T640-FPC4-ES T640-FPC4-1P-ES 10-Gigabit Ethernet PICs 10-Gigabit LAN/WAN PD-5-10XGE-SFPP 10.1 10.1 with SFP+ 10-Gigabit Ethernet, PD-4XGE-XFP 4-port LAN/WAN with 40 Gigabit Ethernet PICs 40-Gigabit with CFP PD-1XLE-CFP –... -
Page 129: Power System Components And Descriptions
T640 Six-Input DC Power Supply Description on page 104 T640 Six-Input DC Power Supply LEDs on page 105 T640 Three-Phase Delta and Wye AC Power Supply Description on page 106 T640 Three-Phase Delta and Wye AC Power Supply LEDs on page 109... -
Page 130: T640 Two-Input 160-A Dc Power Supply Description
Related T640 Hardware Component Overview on page 13 Documentation Powering On a DC-Powered T640 Router on page 239 Maintaining the T640 Power Supplies on page 456 T640 DC Power System Electrical Specifications on page 125 T640 Two-Input 160-A DC Power Supply Description... -
Page 131: Two-Input 160-A Dc Power Supply Inputs
Table 53 on page 98 describes the behavior of the two-input 160-A DC power supply and router if one of the inputs fails. Copyright © 2017, Juniper Networks, Inc. -
Page 132: T640 Two-Input 160-A Dc Power Supply Leds
Related T640 Power System Description on page 95 Documentation Powering On a DC-Powered T640 Router on page 239 Maintaining the T640 Power Supplies on page 456 T640 Two-Input 160-A DC Power Supply LEDs Four LEDs on each two-input 160-A DC power supply faceplate indicate the status of the power supply. -
Page 133: T640 Three-Input 240-A Dc Power Supply Description
Chapter 7: Power System Components and Descriptions Related T640 Power System Description on page 95 Documentation Powering On a DC-Powered T640 Router on page 239 Maintaining the T640 Power Supplies on page 456 T640 LED Overview on page 464 T640 Three-Input 240-A DC Power Supply Description... -
Page 134: Three-Input 240-A Dc Power Supply Load Sharing And Fault Tolerance
Related T640 Power System Description on page 95 Documentation Powering On a DC-Powered T640 Router on page 239 Maintaining the T640 Power Supplies on page 456 T640 Three-Input 240-A DC Power Supply LEDs LEDs on each power supply faceplate (see... -
Page 135: Figure 38: Three-Input 240-A Dc Power Supply Leds
Related T640 Power System Description on page 95 Documentation Powering On a DC-Powered T640 Router on page 239 Maintaining the T640 Power Supplies on page 456 T640 LED Overview on page 464 Copyright © 2017, Juniper Networks, Inc. -
Page 136: T640 Four-Input 240-A Dc Power Supply Description
T640 Core Router Hardware Guide T640 Four-Input 240-A DC Power Supply Description Four-Input 240-A DC Power Supply on page 102 Four-Input 240-A DC Power Supply Inputs on page 102 Four-Input 240-A DC Power Supply Load Sharing and Fault Tolerance on page 103 Four-Input 240-A DC Power Supply Each four-input 240-A DC power supply weighs approximately 26.6 lb (12.0 kg) and... -
Page 137: Four-Input 240-A Dc Power Supply Load Sharing And Fault Tolerance
T640 Four-Input 240-A DC Power Supply LEDs on page 103 Documentation Troubleshooting the T640 Power System on page 476 Replacing a T640 Four-Input 240-A DC Power Supply on page 366 T640 DC Power Supply Electrical Specifications on page 126 T640 Four-Input 240-A DC Power Supply LEDs... -
Page 138: T640 Six-Input Dc Power Supply Description
Maintaining the T640 Power Supplies on page 456 T640 LED Overview on page 464 Troubleshooting the T640 Power System on page 476 Replacing a T640 Four-Input 240-A DC Power Supply on page 366 T640 Six-Input DC Power Supply Description Power Supply Components on page 104... -
Page 139: Inputs
T640 Six-Input DC Power Supply LEDs on page 105 Documentation Troubleshooting the T640 Power System on page 476 Replacing a T640 Six-Input DC Power Supply on page 380 T640 DC Power Supply Electrical Specifications on page 126 T640 Six-Input DC Power Supply LEDs LEDs on each six-input DC power supply faceplate indicate the status of the power supply. -
Page 140: T640 Three-Phase Delta And Wye Ac Power Supply Description
T640 LED Overview on page 464 Troubleshooting the T640 Power System on page 476 Replacing a T640 Six-Input DC Power Supply on page 380 T640 Three-Phase Delta and Wye AC Power Supply Description Three-Phase Delta AC Power Supply on page 106... -
Page 141: Figure 42: Three-Phase Delta Ac Power Supply
Figure 43 on page 107 shows the three-phase delta AC power supply connections. Figure 43: Three-Phase Delta AC Power Supply Connections L2 L3 L2 L3 Figure 44 on page 108 shows the three-phase delta AC power cord. Copyright © 2017, Juniper Networks, Inc. -
Page 142: Three-Phase Wye Ac Power Supply
T640 Core Router Hardware Guide Figure 44: Three-Phase Delta AC Power Cord Three-Phase Wye AC Power Supply Each three-phase wye AC power supply weighs approximately 31.0 lb (14.06 kg). A metal wiring compartment contains the AC terminal block and ground labeled . -
Page 143: Ac Power Supply Load Sharing And Fault Tolerance
Related T640 Power System Description on page 95 Documentation T640 Three-Phase Delta and Wye AC Power Supply LEDs on page 109 Troubleshooting the T640 Power System on page 476 T640 AC Power Requirements on page 137 T640 AC Power Cord Specifications on page 139... -
Page 144: Figure 48: Delta Ac Power Supply Leds
LED indicates that power supply is within the recommended temperature. Related T640 Three-Phase Delta and Wye AC Power Supply Description on page 106 Documentation T640 LED Overview on page 464 Troubleshooting the T640 Power System on page 476 T640 AC Power Requirements on page 137 Copyright ©... -
Page 145: Switch Fabric Components And Descriptions
SIB LEDs. SIB online/offline button, located on the SIB faceplate. Each T640-SIB also has a fiber-optic adapter for connection to a TX Matrix router. See the TX Matrix Router Hardware Guide. Table 63: Links to the SIBs From the FPCs... -
Page 146: Figure 49: Standard Sib Or Standard Sib Version B
Enhanced Scaling FPCs in a T640 router that is not part of a routing matrix, each SIB in the router must be a SIB version B. All the SIBs in the T640 router can be either standard SIB or SIB version B. You cannot use both on the same router at the same time. - Page 147 T640 Router Description on page 3 T640 Switch Interface Boards (SIBs) LEDs Maintaining the T640 SIBs on page 459 Replacing a T640 SIB on page 424 Upgrading to a T640 Standard SIB Version B on page 427 Copyright © 2017, Juniper Networks, Inc.
- Page 148 T640 Core Router Hardware Guide Copyright © 2017, Juniper Networks, Inc.
-
Page 149: Site Planning, Preparation, And Specifications
Preparation Overview on page 117 DC Power Requirements and Specifications on page 125 AC Power Requirements and Specifications on page 135 Network Cable and Transceiver Planning on page 141 Management Cable Specifications and Pinouts on page 145 Copyright © 2017, Juniper Networks, Inc. - Page 150 T640 Core Router Hardware Guide Copyright © 2017, Juniper Networks, Inc.
-
Page 151: Preparation Overview
T640 Chassis Grounding Cable and Lug Specifications on page 118 T640 Physical Specifications on page 119 T640 Rack Requirements on page 120 T640 Clearance Requirements for Airflow and Hardware Maintenance on page 122 T640 Environmental Specifications on page 122 T640 Site Preparation Checklist... -
Page 152: T640 Chassis Grounding Cable And Lug Specifications
T640 Chassis Grounding Cable and Lug Specifications To meet safety and electromagnetic interference (EMI) requirements and to ensure proper operation, the T640 router must be adequately grounded before power is connected. Two pairs of threaded inserts (PEM nuts) are provided on the right rear of the chassis for connecting the router to earth ground. -
Page 153: T640 Physical Specifications
Documentation Connecting the T640 Grounding Cable on page 208 T640 Preventing Electrostatic Discharge Damage on page 506 General Electrical Safety Warnings for Juniper Networks Devices on page 530 T640 Physical Specifications Table 65 on page 119 lists the physical specifications for the T640 router. -
Page 154: T640 Rack Requirements
T640 Installation Safety Guidelines on page 511 T640 Rack Requirements The T640 Core Router can be installed in a rack or cabinet. Many types of racks are acceptable, including four-post (telco) racks and open-frame racks. An example of an open-frame rack is shown in Figure 52 on page 121. -
Page 155: Figure 52: Typical Open-Frame Rack
The outer edges of the mounting brackets extend the width to 19 in. (48.3 cm). The spacing of rails and adjacent racks must also allow for the clearances around the router and rack that are specified in “T640 Clearance Requirements for Airflow and Hardware Maintenance” on page 122. -
Page 156: T640 Clearance Requirements For Airflow And Hardware Maintenance
T640 Chassis Description on page 15 Documentation Installing the T640 Mounting Hardware for a Four-Post Rack or Cabinet on page 159 Installing the T640 Mounting Hardware for an Open-Frame Rack on page 162 T640 Clearance Requirements for Airflow and Hardware Maintenance... -
Page 157: Table 66: Router Environmental Specifications
Maintaining the T640 Air Filters on page 444 Maintaining the T640 Fan Trays on page 445 Troubleshooting the T640 Cooling System on page 469 T640 General Electrical Safety Guidelines and Electrical Codes on page 529 Compliance Statements for Environmental Requirements for Juniper Networks Devices on page 544... - Page 158 T640 Core Router Hardware Guide Copyright © 2017, Juniper Networks, Inc.
-
Page 159: Dc Power Requirements And Specifications
T640 DC Power Supply Electrical Specifications on page 126 T640 DC Power System Requirements on page 128 Maintaining the T640 Power Supplies on page 456 T640 General Electrical Safety Guidelines and Electrical Codes on page 529 Copyright © 2017, Juniper Networks, Inc. -
Page 160: T640 Dc Power Supply Electrical Specifications
–48 VDC, or as required by local code. Table 68 on page 126 lists the power supply electrical specifications for the two-input 160-A DC power supply. Table 68: T640 Two-Input 160-A DC Power Supply Electrical Specifications Item Specification DC input voltage Nominal –48 VDC, –60 VDC... -
Page 161: Table 70: Four-Input 240-A Dc Power Supply Electrical Specifications
Input 4: 56 A @ –48 VDC (nominal) (2448 W) Input 5: 56 A @ –48 VDC (nominal) (2448 W) Related T640 Power System Description on page 95 Documentation T640 DC Power System Electrical Specifications on page 125 Copyright © 2017, Juniper Networks, Inc. -
Page 162: T640 Dc Power System Requirements
T640 General Electrical Safety Guidelines and Electrical Codes on page 529 T640 DC Power System Requirements To allow for future growth so that you can operate the T640 router in any hardware configuration without upgrading the power infrastructure, we recommend that you provision the following per each input. - Page 163 Chapter 10: DC Power Requirements and Specifications Table 72: T640 Component DC Power Requirements (continued) Current Requirement Component (Amps @ –48 VDC) Type 4 FPC 8.2 A T640 Enhanced Scaling FPC4-1P 7.0 A Host subsystem (Routing Engine and control board) 2.6 A...
-
Page 164: T640 Dc Power Distribution
T640 DC Power System Electrical Specifications on page 125 T640 DC Power Supply Electrical Specifications on page 126 T640 General Electrical Safety Guidelines and Electrical Codes on page 529 T640 DC Power Distribution Most sites distribute DC power through a main conduit that leads to frame-mounted DC power distribution panels, one of which might be located at the top of the rack that houses the router. -
Page 165: Figure 54: Typical Dc Source Cabling From Pem0 To Feed A
T640 Power System Description on page 95 Documentation T640 DC Power System Electrical Specifications on page 125 T640 DC Power Supply Electrical Specifications on page 126 T640 General Electrical Safety Guidelines and Electrical Codes on page 529 Copyright © 2017, Juniper Networks, Inc. -
Page 166: T640 Dc Power Cable And Lug Specifications
T640 Core Router Hardware Guide T640 DC Power Cable and Lug Specifications The accessory box shipped with the T640 router includes eighteen 4-AWG (21.2 mm cable lugs for the DC cables that attach to the terminal studs of each power supply (see Figure 56 on page 132). - Page 167 T640 Power System Description on page 95 Documentation T640 DC Power System Electrical Specifications on page 125 T640 DC Power Supply Electrical Specifications on page 126 T640 General Electrical Safety Guidelines and Electrical Codes on page 529 Copyright © 2017, Juniper Networks, Inc.
- Page 168 T640 Core Router Hardware Guide Copyright © 2017, Juniper Networks, Inc.
-
Page 169: Ac Power Requirements And Specifications
Delta: 11765 W Wye: 11765 W Related T640 Three-Phase Delta and Wye AC Power Supply Description on page 106 Documentation T640 Three-Phase Delta AC Power Supply Specifications on page 136 T640 Three-Phase Wye AC Power Supply Specifications on page 136 T640 AC Power Electrical Safety Guidelines on page 537 Copyright ©... -
Page 170: T640 Three-Phase Delta Ac Power Supply Specifications
11,775 W per input Related T640 Three-Phase Delta and Wye AC Power Supply Description on page 106 Documentation Connecting AC Power to a T640 Router with Three-Phase Wye AC Power Supplies on page 244 Copyright © 2017, Juniper Networks, Inc. -
Page 171: T640 Ac Power Requirements
Table 78 on page 137 lists the power requirements for various hardware components when the router is operating under typical voltage conditions. For power requirements for specific PICs, see the T640 Core Router Interface Module Reference. Table 78: T640 Base AC Power Requirements Component... - Page 172 T640 Power System Description on page 95 Documentation T640 AC Power System Specifications on page 135 T640 Three-Phase Delta AC Power Supply Specifications on page 136 T640 Three-Phase Wye AC Power Supply Specifications on page 136 T640 AC Power Cord Specifications on page 139...
-
Page 173: T640 Ac Power Cord Specifications
Chapter 11: AC Power Requirements and Specifications T640 AC Power Cord Specifications Most sites distribute power through a main conduit that leads to frame-mounted power distribution panels, one of which can be located at the top of the rack that houses the router. -
Page 174: Figure 58: Three-Phase Wye Ac Power Cord
Power cords and cables must not block access to device components or drape where people could trip on them. Related Connecting AC Power to a T640 Router with Three-Phase Wye AC Power Supplies on Documentation page 244 Connecting AC Power to a T640 Router with Three-Phase Delta AC Power Supplies... -
Page 175: Network Cable And Transceiver Planning
Attenuation is the reduction in power of the light signal as it is transmitted. Attenuation is caused by passive media components, such as cables, cable splices, and connectors. Although attenuation is Copyright © 2017, Juniper Networks, Inc. -
Page 176: Calculating Power Budget And Power Margin For Fiber-Optic Cables
(including those from dispersion), and a safety margin for unexpected losses. Related Determining Transceiver Support and Specifications for Juniper Networks Devices Documentation Calculating Power Budget and Power Margin for Fiber-Optic Cables Use the information in this topic and the specifications for your optical interface to calculate the power budget and power margin for fiber-optic cables. -
Page 177: Calculating Power Margin For Fiber-Optic Cable
Higher-order mode losses Single-mode—None Multimode—0.5 dB Modal and chromatic dispersion Single-mode—None Multimode—None, if product of bandwidth and distance is less than 500 MHz-km Connector 0.5 dB Splice 0.5 dB Fiber attenuation Single-mode—0.5 dB/km Multimode—1 dB/km Copyright © 2017, Juniper Networks, Inc. - Page 178 T640 Core Router Hardware Guide The following sample calculation for a 2-km-long multimode link with a power budget ) of 13 dB uses the estimated values from Table 81 on page 143 to calculate link loss (LL) as the sum of fiber attenuation (2 km @ 1 dB/km, or 2 dB) and loss for five connectors (0.5 dB per connector, or 2.5 dB) and two splices (0.5 dB per splice, or 1 dB) as well as...
-
Page 179: Management Cable Specifications And Pinouts
T640 DB-9 Connector Pinouts for the Routing Engine AUXILIARY and CONSOLE Ports on page 146 T640 RJ-45 Connector Pinouts for the Routing Engine ETHERNET Port on page 146 T640 Routing Engine Interface Cable and Wire Specifications Table 82 on page 145 lists the specifications for the cables that connect to management ports and the wires that connect to the alarm relay contacts. -
Page 180: T640 Db-9 Connector Pinouts For The Routing Engine Auxiliary And Console Ports
T640 Connector Interface Panel (CIP) Description on page 19 Documentation Connecting the T640 Router to a Management Console or Auxiliary Device on page 210 T640 Routing Engine Interface Cable and Wire Specifications on page 145 T640 RJ-45 Connector Pinouts for the Routing Engine ETHERNET Port... - Page 181 T640 Connector Interface Panel (CIP) Description on page 19 Documentation Connecting the T640 Router to a Network for Out-of-Band Management on page 212 T640 Routing Engine Interface Cable and Wire Specifications on page 145 Copyright © 2017, Juniper Networks, Inc.
- Page 182 T640 Core Router Hardware Guide Copyright © 2017, Juniper Networks, Inc.
-
Page 183: Initial Installation And Configuration
Installing the Rack Mounting Hardware on page 159 Installing the T640 Router into a Rack on page 167 Installing the T640 Router With a Mechanical Lift on page 169 Installing the T640 Router Without a Mechanical Lift on page 179... - Page 184 T640 Core Router Hardware Guide Copyright © 2017, Juniper Networks, Inc.
-
Page 185: Installation Overview
Unpack the router and verify the parts received. “Unpacking the T640 Router” on page 153. Install the mounting hardware. “Installing the T640 Mounting Hardware for a Four-Post Rack or Cabinet” on page 159 “Installing the T640 Mounting Hardware for an Open-Frame Rack” on page 162. - Page 186 T640 Core Router Hardware Guide Power on the router. “Powering On a DC-Powered T640 Router” on page 239. Perform the initial system configuration. “Initially Configuring the T640 Router” on page 251. Related T640 Chassis Description on page 15 Documentation T640 Installation Safety Guidelines on page 511...
-
Page 187: Unpacking The T640
CHAPTER 15 Unpacking the T640 Tools and Parts Required to Unpack the T640 Router on page 153 Unpacking the T640 Router on page 153 Verifying the T640 Router Parts Received on page 155 Tools and Parts Required to Unpack the T640 Router... - Page 188 T640 Core Router Hardware Guide Move the shipping crate to a staging area as close to the installation site as possible, where you have enough room to remove the components from the chassis. While the chassis is bolted to the pallet, you can use a forklift or pallet jack to move it.
-
Page 189: Verifying The T640 Router Parts Received
T640 Chassis Description on page 15 Documentation Verifying the T640 Router Parts Received on page 155 Installing the T640 Router Using a Mechanical Lift on page 170 Installing the T640 Chassis in the Rack Manually on page 192 Verifying the T640 Router Parts Received A packing list is included in each shipment. - Page 190 T640 Core Router Hardware Guide Table 85: Router Parts List (continued) Component Quantity Routing Engines 1 or 2 Control boards 1 or 2 (one for each Routing Engine) SCGs 1 or 2 Power supplies Front fan trays Rear fan tray Quick Start installation Large mounting shelf—Required for all...
-
Page 191: Table 86: Accessory Box Parts List
Serial cable, 6-ft length, to connect Routing Engine to management console End User License Agreement Related T640 Chassis Description on page 15 Documentation Installing the T640 Router Using a Mechanical Lift on page 170 Copyright © 2017, Juniper Networks, Inc. - Page 192 T640 Core Router Hardware Guide Installing the T640 Chassis in the Rack Manually on page 192 Copyright © 2017, Juniper Networks, Inc.
-
Page 193: Installing The Rack Mounting Hardware
CHAPTER 16 Installing the Rack Mounting Hardware Installing the T640 Mounting Hardware for a Four-Post Rack or Cabinet on page 159 Installing the T640 Mounting Hardware for an Open-Frame Rack on page 162 Installing the T640 Mounting Hardware for a Four-Post Rack or Cabinet To prepare to install the T640 router into a four-post rack or cabinet: Install cage nuts, if needed. - Page 194 T640 Core Router Hardware Guide Table 87: T640 Four-Post or Cabinet Rack Mounting Hole Locations (continued) Large Spacer Small Hole Distance Above U Division Shelf Bars Shelf 6.76 in. (17.1 cm) 3.86 U 5.01 in. (12.7 cm) 2.86 U 3.26 in. (8.3 cm) 1.86 U...
-
Page 195: Figure 60: Positioning The Spacer Bar On The Rack
Remove the center-mounting brackets from the chassis by loosening the screws at the top and bottom of each bracket. Figure 4 on page 16 shows the center-mounting brackets. Figure 60: Positioning the Spacer Bar on the Rack Copyright © 2017, Juniper Networks, Inc. -
Page 196: Installing The T640 Mounting Hardware For An Open-Frame Rack
T640 Site Preparation Checklist on page 117 Installing the T640 Mounting Hardware for an Open-Frame Rack Before installing the T640 router into an open-frame rack, you must first install the large mounting shelf on the rack. If you are front-mounting the router, you must remove the center-mounting brackets from the chassis. - Page 197 The router is shipped with each spacer bar attached to the rear of each front-mounting flange. Remove each spacer bar by removing the screws that fasten the spacer bar to the front-mounting flange. Figure 4 on page 16 shows the front-mounting flanges. Copyright © 2017, Juniper Networks, Inc.
-
Page 198: Figure 62: Installing The Mounting Hardware For An Open-Frame Rack
U divisions on the rack. For reference, the bottom of all mounting shelves is at 0.04 in. (0.02 U) above a U division. Table 88: T640 Open-Frame Rack Mounting Hole Locations Hole Distance Above U Division Large Shelf 34.13 in. - Page 199 Chapter 16: Installing the Rack Mounting Hardware Table 88: T640 Open-Frame Rack Mounting Hole Locations (continued) Hole Distance Above U Division Large Shelf 18.38 in. (46.7 cm) 10.50 U 17.75 in. (45.1 cm) 10.14 U Related T640 Chassis Description on page 15...
- Page 200 T640 Core Router Hardware Guide Copyright © 2017, Juniper Networks, Inc.
-
Page 201: Installing The T640 Router Into A Rack
Install the mounting hardware. “Installing the T640 Mounting Hardware for an Open-Frame Rack” on page 162 “Installing the T640 Mounting Hardware for a Four-Post Rack or Cabinet” on page 159. Because of the router's size and weight—up to 565 lb (256.3 kg) depending on the configuration—we strongly recommend that you install the router using a mechanical... - Page 202 T640 Core Router Hardware Guide Copyright © 2017, Juniper Networks, Inc.
-
Page 203: Installing The T640 Router With A Mechanical Lift
Installing the T640 Router Using a Mechanical Lift on page 170 Overview of Installing a T640 Router Using a Mechanical Lift Because of the T640 router's size and weight—up to 565 lb (256.3 kg) depending on the configuration—we strongly recommend that you install the router using a mechanical lift. -
Page 204: Installing The T640 Router Using A Mechanical Lift
Removing the T640 Power Supplies on page 170 Attaching the T640 Router Installation Handle on page 171 Mounting the T640 Chassis Using a Mechanical Lift on page 173 Removing the T640 Router Installation Handle and Reinstalling the Power Supplies on page 176 Removing the T640 Power Supplies The power supplies are located at the rear of the chassis below the SIBs. -
Page 205: Attaching The T640 Router Installation Handle
Figure 63: Removing a Power Supply Before Installing the Router Attaching the T640 Router Installation Handle To assist you with the installation of the T640 router, attach the installation handle over the power supply slots of the chassis. To remove the power supplies and attach the... -
Page 206: Figure 64: Removing A Power Supply Before Installing The Installation
T640 Core Router Hardware Guide Grasp the handle on the power supply faceplate and pull firmly to start removing the power supply. Slide it halfway out of the chassis (see Figure 64 on page 172). CAUTION: Be prepared to support the full weight of the power supply as you remove it from the router. -
Page 207: Mounting The T640 Chassis Using A Mechanical Lift
Chapter 18: Installing the T640 Router With a Mechanical Lift Figure 65: Attaching the Installation Handle Mounting the T640 Chassis Using a Mechanical Lift CAUTION: Before front-mounting the router in a rack, have a qualified technician verify that the rack is strong enough to support the router's weight and is adequately supported at the installation site. - Page 208 T640 Core Router Hardware Guide Carefully slide the router onto the mounting shelves so that the bottom of the chassis and the mounting shelves overlap by approximately 2 inches. With one person pulling on the installation handle from the rear of the rack or cabinet...
-
Page 209: Figure 66: Loading The Router Onto The Lift
Chapter 18: Installing the T640 Router With a Mechanical Lift Figure 66: Loading the Router onto the Lift Copyright © 2017, Juniper Networks, Inc. -
Page 210: Supplies
164. Removing the T640 Router Installation Handle and Reinstalling the Power Supplies After you have installed the T640 router, remove the installation handle and reinstall the two power supplies in the chassis, starting with the lower power supply: Attach an electrostatic discharge (ESD) grounding strap to your bare wrist, and connect the strap to an approved site ESD grounding point. -
Page 211: Figure 68: Reinstalling A Power Supply
Chapter 18: Installing the T640 Router With a Mechanical Lift Using both hands, slide the power supply into the chassis until you feel resistance. Twist the ejector handles at the upper corners of the power supply faceplate clockwise until they stop. - Page 212 T640 Core Router Hardware Guide Copyright © 2017, Juniper Networks, Inc.
-
Page 213: Installing The T640 Router Without A Mechanical Lift
CHAPTER 19 Installing the T640 Router Without a Mechanical Lift Overview of Installing the T640 Router Without a Mechanical Lift on page 179 Tools and Parts Required to Install the T640 Router Without a Mechanical Lift on page 180 Removing Components from the T640 Chassis on page 180... -
Page 214: Lift
T640 Installation Safety Guidelines on page 511 Removing Components from the T640 Chassis If you cannot use a mechanical lift to install the T640 router (the preferred method), you can install it manually. Before installing the router manually, you must first remove most components from the chassis, and you must reinstall the components after the router is installed in the rack. -
Page 215: Removing The T640 Power Supplies
Removing the T640 Control Boards on page 183 Removing the T640 SCGs on page 184 Removing the T640 Standard or Quiet Rear Fan Tray on page 185 Removing the T640 Cable Management System on page 186 Removing the T640 Standard or Quiet Front Fan Trays on page 187... -
Page 216: Removing The T640 Sibs
Figure 69: Removing a Power Supply Before Installing the Router Removing the T640 SIBs Five standard SIBs, SIB version B, or T640-SIBs are installed in the router. The SIBs are located in the rear of the chassis in the slots marked through . -
Page 217: Removing The T640 Control Boards
Chapter 19: Installing the T640 Router Without a Mechanical Lift Place one hand underneath the SIB to support it and slide it completely out of the chassis. Place it on the antistatic mat. Repeat the procedure for each of the remaining SIBs. -
Page 218: Removing The T640 Scgs
T640 Core Router Hardware Guide CAUTION: Do not stack hardware components on one another after you remove them. Place each component on an antistatic mat resting on a stable, flat surface. Repeat the procedure for the second control board. Figure 71: Removing a T-CB... -
Page 219: Removing The T640 Standard Or Quiet Rear Fan Tray
Chapter 19: Installing the T640 Router Without a Mechanical Lift Loosen the captive screws on the edges of the SCG faceplate. Grasp the SCG by the handle on the faceplate, and slide it out of the chassis. Place the SCG on the antistatic mat. -
Page 220: Removing The T640 Cable Management System
T640 Core Router Hardware Guide Figure 74: Removing the Rear Fan Tray Removing the T640 Cable Management System The cable management system is located below the FPC card cage. The cable management system weighs approximately 5 lb (2.3 kg). To remove the cable management system: Attach an electrostatic discharge (ESD) grounding strap to your bare wrist, and connect the strap to an approved site ESD grounding point. -
Page 221: Removing The T640 Standard Or Quiet Front Fan Trays
Chapter 19: Installing the T640 Router Without a Mechanical Lift Removing the T640 Standard or Quiet Front Fan Trays WARNING: Use this procedure only for routers that are powered off. The upper front fan tray is located above the FPC card cage, and the lower front fan tray is located below the air filter. -
Page 222: Removing The T640 Fpcs
T640 Core Router Hardware Guide Grasp both sides of the fan tray, and pull the fan tray out of the chassis approximately 1 to 3 inches. Press the two latches located on each side of the fan tray up to release the fan tray from the chassis. - Page 223 Chapter 19: Installing the T640 Router Without a Mechanical Lift Place an electrostatic bag or antistatic mat on a flat, stable surface. Attach an electrostatic discharge (ESD) grounding strap to your bare wrist, and connect the strap to an approved site ESD grounding point. See the instructions for your site.
-
Page 224: Attaching The T640 Router Installation Handle
T640 Cooling System Description on page 31 Attaching the T640 Router Installation Handle To assist you with the installation of the T640 router, attach the installation handle over the power supply slots of the chassis. To remove the power supplies and attach the handle, starting with the upper power supply: Copyright ©... - Page 225 Chapter 19: Installing the T640 Router Without a Mechanical Lift Attach an electrostatic discharge (ESD) grounding strap to your bare wrist, and connect the strap to an approved site ESD grounding point. See the instructions for your site. Switch the circuit breakers on the two-input 160-A, three-input 240-A, or four-input...
-
Page 226: Installing The T640 Chassis In The Rack Manually
Figure 78: Removing a Power Supply Before Installing the Installation Handle Figure 79: Attaching the Installation Handle Installing the T640 Chassis in the Rack Manually To install the T640 router in the rack (see Figure 81 on page 195): CAUTION: If you are installing two routers in one rack, install the lower one first. -
Page 227: Figure 80: Attaching The Installation Handle
Chapter 19: Installing the T640 Router Without a Mechanical Lift CAUTION: Lifting the chassis and mounting it in a rack requires four people. The empty chassis weighs approximately 205 lb (93 kg). If you are installing the router in an open-frame rack, ensure that the rack is in its permanent location and is secured to the building. - Page 228 T640 Core Router Hardware Guide With one person pulling on the installation handle from the rear of the rack or cabinet while two people push on the front-mounting flanges, slide the router onto the mounting shelves until the mounting brackets or front-mounting flanges contact the rack rails or spacer bars (depending on your type of installation).
-
Page 229: Reinstalling Components In The T640 Chassis
T640 Installation Safety Guidelines on page 511 Reinstalling Components in the T640 Chassis After the T640 chassis is installed in the rack, you reinstall the removed components before booting and configuring the router. The following procedures describe how to reinstall components in the chassis, first in the rear and then in the front:... -
Page 230: Reinstalling The T640 Standard Or Quiet Rear Fan Tray
Reinstalling the T640 Power Supplies on page 200 Reinstalling the T640 FPCs on page 201 Reinstalling T640 Standard or Quiet Front Fan Trays on page 203 Reinstalling the T640 Cable Management System on page 205 Reinstalling the T640 Standard or Quiet Rear Fan Tray... -
Page 231: Reinstalling The T640 Scgs
Chapter 19: Installing the T640 Router Without a Mechanical Lift Figure 82: Reinstalling the Rear Fan Tray Reinstalling the T640 SCGs To reinstall the SCGs (see Figure 83 on page 198): Attach an electrostatic discharge (ESD) grounding strap to your bare wrist, and connect the strap to an approved site ESD grounding point. -
Page 232: Reinstalling The T640 Control Boards
T640 Core Router Hardware Guide Figure 83: Reinstalling an SCG Reinstalling the T640 Control Boards To reinstall the control boards (see Figure 84 on page 198 Figure 85 on page 199): Attach an electrostatic discharge (ESD) grounding strap to your bare wrist, and connect the strap to an approved site ESD grounding point. -
Page 233: Reinstalling The T640 Sibs
Chapter 19: Installing the T640 Router Without a Mechanical Lift Figure 85: Reinstalling an LCC-CB Reinstalling the T640 SIBs To reinstall the SIBs (see Figure 86 on page 200): Attach an electrostatic discharge (ESD) grounding strap to your bare wrist, and connect the strap to an approved site ESD grounding point. -
Page 234: Reinstalling The T640 Power Supplies
T640 Core Router Hardware Guide Figure 86: Reinstalling a SIB Reinstalling the T640 Power Supplies Each two-input 160-A DC power supply weighs approximately 23 lb (10.5 kg). Each three-input 240-A DC power supply weighs approximately 25 lb (11.3 kg). Each four-input 240–A weighs approximately 26.6 lb (12.0 kg). -
Page 235: Reinstalling The T640 Fpcs
Chapter 19: Installing the T640 Router Without a Mechanical Lift CAUTION: “Removing the T640 Power Supplies” on page 181 shows the two-input 160-A DC power supply, but the procedure also applies to the three-input 240-A DC power supply, four-input 240-A DC power supply, or six-input DC power supply. -
Page 236: Figure 88: Reinstalling An Fpc
T640 Core Router Hardware Guide CAUTION: Take care not to bend or otherwise damage the power connector prongs. Slide the FPC all the way into the card cage until you feel resistance. Starting with the ejector handles on the FPC faceplate nearly horizontal, simultaneously turn both ejector handles clockwise to seat the FPC. -
Page 237: Reinstalling T640 Standard Or Quiet Front Fan Trays
Chapter 19: Installing the T640 Router Without a Mechanical Lift Reinstalling T640 Standard or Quiet Front Fan Trays To reinstall the standard front fan trays (see Figure 91 on page 204): Attach an electrostatic discharge (ESD) grounding strap to your bare wrist, and connect the strap to an approved site ESD grounding point. -
Page 238: Figure 89: Reinstalling The Quiet Upper Front Fan Tray
T640 Core Router Hardware Guide Figure 89: Reinstalling the Quiet Upper Front Fan Tray Figure 90: ReInstalling the Quiet Lower Front Fan Tray Figure 91: Reinstalling the Standard Upper Front Fan Tray Copyright © 2017, Juniper Networks, Inc. -
Page 239: Reinstalling The T640 Cable Management System
Chapter 19: Installing the T640 Router Without a Mechanical Lift Reinstalling the T640 Cable Management System To reinstall the cable management system: Attach an electrostatic discharge (ESD) grounding strap to your bare wrist, and connect the strap to one of the ESD points on the chassis. - Page 240 T640 Core Router Hardware Guide Copyright © 2017, Juniper Networks, Inc.
-
Page 241: Connecting The T640 To Ground
CHAPTER 20 Connecting the T640 to Ground Tools and Parts Required to Ground the T640 Router on page 207 Connecting the T640 Grounding Cable on page 208 Tools and Parts Required to Ground the T640 Router Grounding cable (which you must provide) -
Page 242: Connecting The T640 Grounding Cable
T640 Core Router Hardware Guide Connecting the T640 Grounding Cable You ground the T640 router by attaching a grounding cable to the grounding points on the chassis. You must provide the grounding cable (the cable lugs are supplied with the router). -
Page 243: Connecting The T640 To External Devices
Overview of Connecting the T640 Router to External Devices on page 209 Tools and Parts Required to Connect the T640 Router to External Devices on page 210 Connecting the T640 Router to a Management Console or Auxiliary Device on page 210... -
Page 244: Tools And Parts Required To Connect The T640 Router To External Devices
“Connecting PIC Cables to the T640 Router” on page 216. Related Tools and Parts Required to Connect the T640 Router to External Devices on page 210 Documentation Tools and Parts Required to Connect the T640 Router to External Devices To connect the router to management devices and PICs, you need the following tools... -
Page 245: Figure 93: Console And Auxiliary Serial Port Connector
Figure 94: Console and Auxiliary Ports on the CIP Related Overview of Connecting the T640 Router to External Devices on page 209 Documentation Tools and Parts Required to Connect the T640 Router to External Devices on page 210 Copyright © 2017, Juniper Networks, Inc. -
Page 246: Connecting The T640 Router To A Network For Out-Of-Band Management
T640 Core Router Hardware Guide T640 DB-9 Connector Pinouts for the Routing Engine AUXILIARY and CONSOLE Ports on page 146 T640 Routing Engine Interface Cable and Wire Specifications on page 145 Connecting the T640 Router to a Network for Out-of-Band Management... -
Page 247: Figure 96: Ethernet Port On The Cip
Overview of Connecting the T640 Router to External Devices on page 209 Documentation Tools and Parts Required to Connect the T640 Router to External Devices on page 210 T640 Routing Engine Interface Cable and Wire Specifications on page 145 T640 RJ-45 Connector Pinouts for the Routing Engine ETHERNET Port on page 146... -
Page 248: Connecting The T640 Router To An External Alarm-Reporting Device
Overview of Connecting the T640 Router to External Devices on page 209 Documentation T640 Routing Engine Interface Cable and Wire Specifications on page 145 Tools and Parts Required to Connect the T640 Router to External Devices on page 210 Copyright © 2017, Juniper Networks, Inc. -
Page 249: Connecting The T640 Router To An External Clocking Device
Chapter 21: Connecting the T640 to External Devices Connecting the T640 Router to an External Clocking Device To connect the router to one or two external clocking devices, connect a cable with RJ-48 connectors to one of the ports on the SCG. -
Page 250: Connecting Pic Cables To The T640 Router
T640 Core Router Hardware Guide Overview of Connecting the T640 Router to External Devices on page 209 Tools and Parts Required to Connect the T640 Router to External Devices on page 210 T640 RJ-48 Connector Pinouts for the SCG EXTERNAL CLOCK INPUTS Ports... -
Page 251: Figure 97: Attaching A Cable To A Pic
T640 PIC Description on page 79 Documentation Overview of Connecting the T640 Router to External Devices on page 209 Tools and Parts Required to Connect the T640 Router to External Devices on page 210 Copyright © 2017, Juniper Networks, Inc. - Page 252 T640 Core Router Hardware Guide Copyright © 2017, Juniper Networks, Inc.
-
Page 253: Providing Power To The T640
CHAPTER 22 Providing Power to the T640 Tools and Parts Required to Provide Power to the T640 Router on page 219 Connecting DC Power to a T640 Router with Two-Input 160-A DC Power Supplies on page 220 Connecting DC Power to a T640 Router with Three-input 240-A DC Power Supplies... -
Page 254: Supplies
Connecting DC Power to a T640 Router with Two-Input 160-A DC Power Supplies To connect the DC source power cables to each power supply in the T640 router: Switch off the dedicated customer site circuit breakers. Follow the instructions for your site. - Page 255 Chapter 22: Providing Power to the T640 Remove the nut and washer from each power terminal stud. If no washers and nuts are already installed, they should be in the accessory box. Secure the cable lug on the DC power cable to the terminal stud, first with a washer,...
-
Page 256: Connecting Dc Power To A T640 Router With Three-Input 240-A Dc Power Supplies (2-Input Mode)
Verify that the input mode switch is correctly set to 2–INPUT mode. See “Setting the Input Mode Switch on a Three-Input 240-A DC Power Supply for a T640 Router” on page 360. Replace the cable restraint, if needed. See “Replacing the T640 Cable Restraint on a Three-Input 240-A DC Power Supply”... - Page 257 Remove the nut and washer from the power terminal studs for INPUT O INPUT 1 is not supported for the T640 router. If no washers and nuts are already INPUT 2 installed, they should be in the accessory box. Secure the cable lug on the DC power cable to the terminal studs for...
-
Page 258: Figure 99: Connecting Dc Power To A Three-Input 240-A Dc Power Supply In
Site Electrical Wiring Guidelines for Juniper Networks Devices on page 538 Connecting DC Power to a T640 Router with Four-Input 240-A DC Power Supplies You connect DC power to the router by attaching power cables from the DC power sources to the terminal studs on the power supply faceplates. - Page 259 Chapter 22: Providing Power to the T640 To connect the DC source power cables to the router, follow this procedure for each power supply: Ensure that the voltage across the DC power source cable leads is 0 V and that there is no chance that the cable leads might become active during installation.
-
Page 260: Figure 100: Connecting Power To The Four-Input 240-A Dc Power Supply
Replace the clear plastic cover over the terminal studs on the faceplate. Figure 100: Connecting Power to the Four-Input 240-A DC Power Supply Cable lug Terminal studs Locking washer Related T640 Power System Description on page 95 Documentation T640 DC Power Distribution on page 130 Copyright © 2017, Juniper Networks, Inc. -
Page 261: Supplies
T640 General Electrical Safety Guidelines and Electrical Codes on page 529 Site Electrical Wiring Guidelines for Juniper Networks Devices on page 538 Connecting DC Power to the T640 Router (Six 60-A Inputs to Six-Input DC Power Supplies) You connect DC power to the router by attaching power cables from the DC power sources to the terminal studs on the power supply faceplates. - Page 262 T640 Core Router Hardware Guide To connect DC source power cables to the router, follow this procedure for each DC power supply: Verify that a properly rated customer site circuit breaker for each DC power cable has been installed. See the DC power electrical safety guidelines for your router for more information.
-
Page 263: Figure 101: Connecting Dc Power Cables
Chapter 22: Providing Power to the T640 Figure 101: Connecting DC Power Cables Cable lug Terminal studs Locking washer Figure 102: Connecting Negative (–) DC Power Cables to INPUT 0, INPUT 1, INPUT 3, and INPUT 4 Replace the smallest cable restraint on the far right, and tighten the captive screw to... -
Page 264: Figure 103: Connecting Negative (-) Dc Power Cables To Input 2 And
T640 Core Router Hardware Guide Figure 103: Connecting Negative (–) DC Power Cables to INPUT 2 and INPUT 5 Route the positive (+) DC source power cables for over the middle RTN 2 RTN 5 cable restraint. The middle cable restraint is marked as follows from top to bottom:... -
Page 265: Power Supplies)
Replace the clear plastic cover over the terminal studs on the faceplate. Related Tools and Parts Required to Provide Power to the T640 Router on page 219 Documentation Connecting DC Power to the T640 Router (Four 60-A Inputs to Six-Input DC Power... - Page 266 T640 Core Router Hardware Guide CAUTION: Do not use a terminal jumper for 60-A DC power cables. Using a terminal jumper is not supported for this procedure. Doing so will cause a short across the inputs and trip your external circuit breaker.
-
Page 267: Figure 105: Connecting Dc Power Cables
Chapter 22: Providing Power to the T640 Verify that a licensed electrician has attached appropriate cable lugs to the DC power cables. See the DC power cable and lug specifications for your router for more information. Switch the power switch on the power supply faceplate to the standby position. -
Page 268: Figure 106: Connecting Negative (-) Dc Power Cables To Input 0, Input
T640 Core Router Hardware Guide Figure 106: Connecting Negative (–) DC Power Cables to INPUT 0, INPUT 1, INPUT 3, and INPUT 4 Replace the smallest cable restraint on the far right, and tighten the captive screw to hold the power cables for... -
Page 269: Figure 108: Connecting Positive (+) Dc Power Cable To Rtn 2, Rtn 0, Rtn
Chapter 22: Providing Power to the T640 NOTE: You must route the cables as marked to be able to replace the clear plastic cover over the terminal studs. Attach the positive (+) DC source power cable lug to the (return) terminal on RTN 2 the left. -
Page 270: Connecting Dc Power To The T640 Router (Four 60-A Inputs To Six-Input Dc Power Supplies)
T640 Core Router Hardware Guide Related Tools and Parts Required to Provide Power to the T640 Router on page 219 Documentation Connecting DC Power to the T640 Router (Four 60-A Inputs to Six-Input DC Power Supplies) on page 236 Connecting DC Power to the T640 Router (Six 60-A Inputs to Six-Input DC Power... - Page 271 Chapter 22: Providing Power to the T640 color coding used by the external DC power source at your site determines the color coding for the leads on the power cables that attach to the terminal studs on each power supply.
-
Page 272: Figure 109: Connecting Dc Power Cables
T640 Core Router Hardware Guide Figure 109: Connecting DC Power Cables Cable lug Terminal studs Locking washer Figure 110: Connecting Negative (–) DC Power Cables to INPUT 0, INPUT 1, INPUT 3, and INPUT 4 Replace the smallest cable restraint on the far right, and tighten the captive screw to... -
Page 273: Powering On A Dc-Powered T640 Router
Replace the clear plastic cover over the terminal studs on the faceplate. Related Tools and Parts Required to Provide Power to the T640 Router on page 219 Documentation Connecting DC Power to the T640 Router (Five 60-A Inputs to Six-Input DC Power... - Page 274 AUXILIARY CONSOLE ETHERNET connecting management devices, see “Overview of Connecting the T640 Router to External Devices” on page 209. Turn on the power to the external management device. Switch on the customer site circuit breakers to provide voltage to the DC power source cables.
- Page 275 “Powering Off the T640 Router” on page 248. Related Setting the Input Mode Switch on a Three-Input 240-A DC Power Supply for a T640 Documentation Router on page 360 Powering Off the T640 Router on page 248...
- Page 276 T640 Core Router Hardware Guide Screw the retaining nut onto the AC power cord to secure it to the metal wiring compartment. Copyright © 2017, Juniper Networks, Inc.
-
Page 277: Figure 112: Connecting Power To A Three-Phase Delta Ac Power Supply
Chapter 22: Providing Power to the T640 Connect the wires to the AC terminal block on the three-phase delta AC power supply (Figure 112 on page 243). Loosen the input terminal or grounding point screw, insert each wire into the grounding point or input terminal, and tighten the screw. -
Page 278: Supplies
T640 AC Power Cord Specifications on page 139 T640 Preventing Electrostatic Discharge Damage on page 506 Connecting AC Power to a T640 Router with Three-Phase Wye AC Power Supplies To connect an AC power cord: Attach an electrostatic discharge (ESD) grounding strap to your bare wrist, and connect the strap to an approved site ESD grounding point. -
Page 279: Figure 113: Connecting Power To The Three-Phase Wye Ac Power Supply
Chapter 22: Providing Power to the T640 Screw the retaining nut onto the AC power cord to secure it to the metal wiring compartment. Connect the wires to the AC terminal block on the three-phase wye AC power supply (Figure 113 on page 245). -
Page 280: Powering On An Ac-Powered T640 Router
Repeat the procedure for the other three-phase wye AC power supply. Related T640 Three-Phase Delta and Wye AC Power Supply Description on page 106 Documentation Powering On an AC-Powered T640 Router on page 246... - Page 281 Connecting AC Power to a T640 Router with Three-Phase Delta AC Power Supplies on page 241 Connecting AC Power to a T640 Router with Three-Phase Wye AC Power Supplies on page 244 Powering Off the T640 Router on page 248...
-
Page 282: Powering Off The T640 Router
T640 Core Router Hardware Guide T640 Preventing Electrostatic Discharge Damage on page 506 T640 General Electrical Safety Guidelines and Electrical Codes on page 529 T640 AC Power Electrical Safety Guidelines on page 537 T640 Preventing Electrostatic Discharge Damage on page 506... - Page 283 Chapter 22: Providing Power to the T640 T640 General Electrical Safety Guidelines and Electrical Codes on page 529 Copyright © 2017, Juniper Networks, Inc.
- Page 284 T640 Core Router Hardware Guide Copyright © 2017, Juniper Networks, Inc.
-
Page 285: Configuring The Junos Os Software
Documentation Initially Configuring the T640 Router The T640 Core Router is shipped with the Junos OS preinstalled and ready to be configured when the T640 router is powered on. These procedures connect a router to the network but do not enable it to forward traffic. For complete information about enabling the router to forward traffic, including examples, see the Junos OS configuration guides. -
Page 286: Entering Configuration Mode
T640 Core Router Hardware Guide NOTE: These procedures enable you to use the management ETHERNET port. For the initial configuration, use a device attached to the port CONSOLE on the CIP. Entering Configuration Mode on page 252 Configuring User Accounts and Passwords on page 252... -
Page 287: Configuring System Attributes
After the routing process starts, the backup routing engine address is removed from the local routing and forwarding tables. Copyright © 2017, Juniper Networks, Inc. -
Page 288: Committing The Configuration
T640 Core Router Hardware Guide [edit] root# set system backup-router address (Optional) Configure the static routes to remote subnets with access to the management port. Access to the management port is limited to the local subnet. To access the management port from a remote subnet, you must add a static route to that subnet within the routing table. -
Page 289: Configuring Dc Power On A T640 Router
Configuring DC Power on a T640 (Four 60-A Cables on a Six-Input DC Power Supply) on page 256 Configuring DC Power on a T640 Router (Five 60-A Cables on a Six-Input DC Power Supply) When you connect five cables on a six-input DC power supply, you must specify the number of input feeds connected in the software. -
Page 290: Configuring Dc Power On A T640
Configuring DC Power on a T640 (Four 60-A Cables on a Six-Input DC Power Supply) When you connect four cables on a six-input DC power supply, you must specify the number of input feeds connected in the software. If the number of physical input feeds receiving power does not match the number of configured input feeds, the router displays an alarm message. - Page 291 Chapter 23: Configuring the Junos OS Software Connecting DC Power to the T640 Router (Four 60-A Inputs to Six-Input DC Power Supplies) on page 236 Connecting DC Power to the T640 Router (Five 60-A Inputs to Six-Input DC Power Supplies) on page 231...
- Page 292 T640 Core Router Hardware Guide Copyright © 2017, Juniper Networks, Inc.
-
Page 293: Installing And Replacing Components
Replacing Cooling System Components on page 281 Replacing Host Subsystem Components on page 307 Replacing Line Card Components on page 333 Replacing Power System Components on page 349 Replacing Switch Fabric Components on page 421 Copyright © 2017, Juniper Networks, Inc. - Page 294 T640 Core Router Hardware Guide Copyright © 2017, Juniper Networks, Inc.
-
Page 295: Overview Of Installing And Replacing Components
Overview of Installing and Replacing Components T640 Field-Replaceable Units on page 261 Tools and Parts Required to Replace the T640 Hardware Components on page 262 T640 Field-Replaceable Units Field-replaceable units (FRUs) are router components that can be replaced at the customer site. -
Page 296: Tools And Parts Required To Replace The T640 Hardware Components
T640 Router Description on page 3 Documentation Taking the T640 Host Subsystem Offline on page 307 Tools and Parts Required to Replace the T640 Hardware Components To replace hardware components, you need the tools and parts listed in Table 90 on page 262. - Page 297 Flat-blade (–) screwdriver for Type 1 PICs Electrostatic bag or antistatic mat Blank panel (if component is not reinstalled) Routing Engine Phillips (+) screwdrivers, numbers 1 and 2 Electrostatic bag or antistatic mat Blank panel (if component is not reinstalled) Copyright © 2017, Juniper Networks, Inc.
- Page 298 Electrostatic bag or antistatic mat Blank panel (if component is not reinstalled) Phillips (+) screwdrivers, numbers 1 and 2 Related T640 Chassis Description on page 15 Documentation Returning a Hardware Component to Juniper Networks, Inc. on page 493 Copyright © 2017, Juniper Networks, Inc.
-
Page 299: Replacing Chassis Components
Replacing the T640 CIP on page 267 Replacing the T640 Alarm Relay Wires on page 270 Replacing the T640 Console or Auxiliary Cable on page 273 Replacing the T640 Management Ethernet Cable on page 275 Replacing a T640 SCG on page 277 Replacing a T640 Craft Interface The craft interface is hot-insertable and hot-removable. -
Page 300: Installing A T640 Craft Interface
T640 Core Router Hardware Guide Insert the blade of a flat-blade screwdriver into the slot on the other side of the craft interface, and then gently pry that side out from the chassis. Grasp the craft interface by the top and bottom edges, and carefully pull it straight out of the chassis. -
Page 301: Replacing The T640 Cip
Figure 116: Installing a Replacement Craft Interface Related T640 Craft Interface Description on page 22 Documentation T640 Craft Interface LCD and Navigation Buttons on page 25 T640 Preventing Electrostatic Discharge Damage on page 506 Replacing the T640 CIP Removing a T640 CIP on page 267... -
Page 302: Installing A T640 Cip
T640 Core Router Hardware Guide CAUTION: Be sure to slide the CIP straight within the slot to avoid damaging the connector pins on the front of the midplane. Figure 117: Removing a CIP Installing a T640 CIP To install the CIP (see... - Page 303 To verify that the CIP is installed correctly, plug an Ethernet cable into the Ethernet port on the CIP. If the host module is operational, the LED blinks to indicate ACTIVE Ethernet activity. If you can run the CLI, the CIP is installed correctly. Copyright © 2017, Juniper Networks, Inc.
-
Page 304: Replacing The T640 Alarm Relay Wires
Documentation T640 Connector Interface Panel (CIP) Description on page 19 Connecting the T640 Router to a Management Console or Auxiliary Device on page 210 Replacing the T640 Connections to Routing Engine Interface Ports T640 Routing Engine Interface Cable and Wire Specifications on page 145... - Page 305 Plug the terminal block into the relay contact and use a 2.5-mm flat-blade screwdriver to tighten the screws on the face of the block. Attach the other end of the wires to the external device. Copyright © 2017, Juniper Networks, Inc.
-
Page 306: Figure 119: Routing Engine Alarm Relay Wires
YEL = 10M GRN = 100M CONSOLE AUXILIARY RED ALARM YELLOW ALARM Related T640 Connector Interface Panel (CIP) Description on page 19 Documentation Overview of Connecting the T640 Router to External Devices on page 209 Copyright © 2017, Juniper Networks, Inc. -
Page 307: Replacing The T640 Console Or Auxiliary Cable
Chapter 25: Replacing Chassis Components Replacing the T640 Console or Auxiliary Cable To use a system console to configure and manage the Routing Engine, connect it to the appropriate port on the CIP. To use a laptop, modem, or other auxiliary device,... -
Page 308: Figure 120: Routing Engine Console
YELLOW ALARM Related Connecting the T640 Router to a Management Console or Auxiliary Device on page 210 Documentation T640 Routing Engine Interface Cable and Wire Specifications on page 145 T640 DB-9 Connector Pinouts for the Routing Engine AUXILIARY and CONSOLE Ports on page 146 Copyright ©... -
Page 309: Replacing The T640 Management Ethernet Cable
Chapter 25: Replacing Chassis Components Replacing the T640 Management Ethernet Cable To replace the management Ethernet cable: Press the tab on the connector and pull the connector straight out of the ETHERNET port. Figure 121 on page 276 shows the connector. -
Page 310: Figure 121: Ethernet Cable Connectors
GRN = 100M CONSOLE AUXILIARY RED ALARM YELLOW ALARM Related T640 Routing Engine Interface Cable and Wire Specifications on page 145 Documentation T640 RJ-45 Connector Pinouts for the Routing Engine ETHERNET Port on page 146 Copyright © 2017, Juniper Networks, Inc. -
Page 311: Replacing A T640 Scg
Backup SCGs are hot-removable and hot-insertable. Master and nonredundant SCGs are hot-pluggable. To replace an SCG, perform the following procedures: Removing a T640 SCG on page 277 Installing a T640 SCG on page 278 Removing a T640 SCG The router can have one or two SCGs installed. The SCGs are located in the upper rear of the chassis, above the control boards and Routing Engines. -
Page 312: Installing A T640 Scg
T640 Core Router Hardware Guide Figure 122: Removing an SCG Installing a T640 SCG To install a replacement SCG (see Figure 123 on page 279): Attach an electrostatic discharge (ESD) grounding strap to your bare wrist, and connect the strap to one of the ESD points on the chassis. -
Page 313: Figure 123: Installing An Scg
Chapter 25: Replacing Chassis Components Figure 123: Installing an SCG Related T640 SONET Clock Generators (SCGs) Description on page 27 Documentation T640 SONET Clock Generators (SCGs) LEDs on page 28 Maintaining the T640 SCGs on page 443 Copyright © 2017, Juniper Networks, Inc. - Page 314 T640 Core Router Hardware Guide Copyright © 2017, Juniper Networks, Inc.
-
Page 315: Replacing Cooling System Components
Replacing Cooling System Components Replacing a T640 Air Filter on page 281 Replacing the T640 Standard Lower Front Fan Tray on page 286 Replacing the T640 Standard Upper Front Fan Tray on page 288 Replacing the T640 Standard Rear Fan Tray on page 290... -
Page 316: Figure 124: Removing The Front Air Filter
T640 Core Router Hardware Guide CAUTION: Do not let fiber-optic cable hang free from the connector. Do not allow fastened loops of cable to dangle, which stresses the cable at the fastening point. Simultaneously pull the two releases on the cable management system. Lift it up and outward to lock it in place to access the air filter. -
Page 317: Installing A Front T640 Air Filter
Chapter 26: Replacing Cooling System Components Installing a Front T640 Air Filter To install the front air filter (see Figure 126 on page 283): Attach an electrostatic discharge (ESD) grounding strap to your bare wrist, and connect the strap to one of the ESD points on the chassis. -
Page 318: Figure 127: Removing The Rear Air Filter
T640 Core Router Hardware Guide Press the filter element inward until it clears the hooks at the top and bottom of the air filter slot, then push it to the left to unseat it. Move the tabs on the filter element to a horizontal position. -
Page 319: Installing A Rear T640 Air Filter
Chapter 26: Replacing Cooling System Components Figure 128: Removing the Rear Air Filter Element Installing a Rear T640 Air Filter To install the rear air filter (see Figure 129 on page 286): Attach an electrostatic discharge (ESD) grounding strap to your bare wrist, and connect the strap to one of the ESD points on the chassis. -
Page 320: Replacing The T640 Standard Lower Front Fan Tray
18.6 lb (8.4 kg). The fan trays are hot-insertable and hot-removable. The standard upper and lower fan trays are interchangeable with each other. Removing the T640 Standard Lower Front Fan Tray on page 287 Installing the T640 Standard Lower Front Fan Tray on page 287... -
Page 321: Removing The T640 Standard Lower Front Fan Tray
Chapter 26: Replacing Cooling System Components Removing the T640 Standard Lower Front Fan Tray The upper front fan tray is located above the FPC card cage, and the lower front fan tray is located below the front air filter. Each fan tray weighs about 18.6 lb (8.4 kg). -
Page 322: Replacing The T640 Standard Upper Front Fan Tray
18.6 lb (8.4 kg). The fan trays are hot-insertable and hot-removable. The standard upper and lower fan trays are interchangeable with each other. Removing the T640 Standard Upper Front Fan Tray on page 288 Installing the T640 Standard Upper Front Fan Tray on page 289... -
Page 323: Installing The T640 Standard Upper Front Fan Tray
Chapter 26: Replacing Cooling System Components Figure 130: Removing a Standard Upper Front Fan Tray Installing the T640 Standard Upper Front Fan Tray To install a standard upper front fan tray (see Figure 131 on page 289): Attach an electrostatic discharge (ESD) grounding strap to your wrist, and connect the strap to one of the ESD points on the chassis. -
Page 324: Replacing The T640 Standard Rear Fan Tray
T640 Preventing Electrostatic Discharge Damage on page 506 Replacing the T640 Standard Rear Fan Tray Removing the T640 Standard Rear Fan Tray on page 290 Installing the T640 Standard Rear Fan Tray on page 291 Removing the T640 Standard Rear Fan Tray The rear fan tray is mounted vertically on the right side of the rear of the chassis. -
Page 325: Installing The T640 Standard Rear Fan Tray
Chapter 26: Replacing Cooling System Components Figure 132: Removing the Standard Rear Fan Tray Installing the T640 Standard Rear Fan Tray To install a replacement standard rear fan tray (see Figure 133 on page 292): Attach an electrostatic discharge (ESD) grounding strap to your bare wrist, and connect the strap to one of the ESD points on the chassis. -
Page 326: Upgrading To The T640 Quiet Fan Trays
Related T640 Cooling System Description on page 31 Documentation Maintaining the T640 Fan Trays on page 445 Troubleshooting the T640 Cooling System on page 469 T640 Preventing Electrostatic Discharge Damage on page 506 Upgrading to the T640 Quiet Fan Trays... -
Page 327: Upgrading The Standard Lower Front Fan Tray To A Quiet Lower Front Fan Tray
Rearrange the PIC cables in the cable management system. For more information about proper cable arrangement, see “Maintaining T640 PICs and PIC Cables” on page 454. Loosen the captive screws on the corners of the standard lower front fan tray faceplate. -
Page 328: Removing The Standard Upper Front Fan Tray
Unlock the cable management system and lower it to the fully lowered position. Rearrange the PIC cables in the cable management system. For more information about proper cable arrangement, see “Maintaining T640 PICs and PIC Cables” on page 454. Figure 134: Installing a Quiet Lower Front Fan Tray Removing the Standard Upper Front Fan Tray The upper front fan tray is located above the FPC card cage. -
Page 329: Removing The Craft Interface
Grasp the craft interface by the top and bottom edges and carefully pull it straight out of the chassis. Remove the Craft Interface Panel by loosening the four fasteners. Figure 136: Removing the Craft Interface Copyright © 2017, Juniper Networks, Inc. -
Page 330: Installing The Air Deflector And Craft Interface
T640 Core Router Hardware Guide Installing the Air Deflector and Craft Interface NOTE: If an air deflector is already installed, installing another air deflector is not required. To install the air deflector: Slide in the air deflector. See Figure 137 on page 296 for proper orientation of air deflector. -
Page 331: Upgrading The Standard Rear Fan Tray To A Quiet Rear Fan Tray
Grasp the quiet rear fan tray by its handles and insert it straight into the chassis. Tighten the captive screws on the quiet rear fan tray faceplate to secure it in the chassis, using a Phillips (+) screwdriver, number 2. Copyright © 2017, Juniper Networks, Inc. -
Page 332: Figure 139: Removing The Standard Rear Fan Tray
T640 Core Router Hardware Guide Figure 139: Removing the Standard Rear Fan Tray Copyright © 2017, Juniper Networks, Inc. -
Page 333: Replacing The T640 Quiet Lower Front Fan Tray
The quiet lower front fan tray is labeled FAN-T-FBOT-S LOWER FANTRAY Removing the T640 Quiet Lower Front Fan Tray on page 300 Installing the T640 Quiet Lower Front Fan Tray on page 301 Copyright © 2017, Juniper Networks, Inc. -
Page 334: Removing The T640 Quiet Lower Front Fan Tray
T640 Core Router Hardware Guide Removing the T640 Quiet Lower Front Fan Tray To remove the quiet lower front fan tray: Attach an electrostatic discharge (ESD) grounding strap to your wrist, and connect the strap to one of the ESD points on the chassis. -
Page 335: Installing The T640 Quiet Lower Front Fan Tray
Chapter 26: Replacing Cooling System Components Figure 141: Removing the Quiet Lower Front Fan Tray Installing the T640 Quiet Lower Front Fan Tray To install a quiet lower front fan tray (see Figure 142 on page 302): Attach an electrostatic discharge (ESD) grounding strap to your wrist, and connect the strap to one of the ESD points on the chassis. -
Page 336: Replacing The T640 Quiet Upper Front Fan Tray
The quiet upper front fan tray is labeled FAN-T-FTOP-S UPPER FANTRAY Removing the T640 Quiet Upper Front Fan Tray on page 302 Installing the T640 Quiet Upper Front Fan Tray on page 303 Removing the T640 Quiet Upper Front Fan Tray... -
Page 337: Installing The T640 Quiet Upper Front Fan Tray
When the fans stop spinning, place one hand under the fan tray to support it and pull the fan tray completely out of the chassis. Figure 143: Removing the Quiet Upper Front Fan Tray Installing the T640 Quiet Upper Front Fan Tray To install a quiet upper front fan tray (see Figure 144 on page... -
Page 338: Replacing The T640 Quiet Rear Fan Tray
The quiet rear fan tray must be used in conjunction with the quiet front fan trays. The quiet rear fan tray weighs about 10 lb (4.5 kg). Removing the T640 Quiet Rear Fan Tray on page 304 Installing the T640 Quiet Rear Fan Tray on page 305... -
Page 339: Installing The T640 Quiet Rear Fan Tray
After the fans stop spinning, place one hand under the fan tray to support it, and pull the fan tray completely out of the chassis. Figure 145: Removing the Quiet Rear Fan Tray Installing the T640 Quiet Rear Fan Tray To install a replacement quiet rear fan tray (see Figure 146 on page... -
Page 340: Figure 146: Installing The Quiet Rear Fan Tray
Figure 146: Installing the Quiet Rear Fan Tray Related T640 Cooling System Description on page 31 Documentation Maintaining the T640 Fan Trays on page 445 Troubleshooting the T640 Cooling System on page 469 T640 Preventing Electrostatic Discharge Damage on page 506 Copyright © 2017, Juniper Networks, Inc. -
Page 341: Replacing Host Subsystem Components
Replacing a T640 Standard Control Board or T-CB on page 313 Replacing a T640 Routing Engine on page 317 Replacing a CompactFlash Card in a T640 RE-C1800 Routing Engine on page 320 Replacing a DIMM Module in a T640 Routing Engine on page 324... - Page 342 NOTE: The first supported release for graceful Routing Engine switchover and nonstop active routing on the T640 router is Junos OS Release 7.0 and Junos OS Release 8.4, respectively. Graceful restart software requirements depend on the routing protocols configured on the router. For the minimum software requirements for graceful restart, see the Junos OS High Availability Library for Routing Devices.
- Page 343 On the console or other management device connected to the other Routing Engine, enter CLI operational mode and issue the following command. user@host> request chassis cb offline slot n Copyright © 2017, Juniper Networks, Inc.
-
Page 344: Replacing A T640 Lcc-Cb
Taking the T640 Host Subsystem Offline on page 307 Maintaining the T640 Host Subsystem on page 447 T640 Routing Engine Functions on page 5 T640 Routing Engine Interface Cable and Wire Specifications on page 145 T640 Preventing Electrostatic Discharge Damage on page 506 Replacing a T640 LCC-CB... -
Page 345: Figure 147: Removing An Lcc-Cb
Place one hand underneath the LCC-CB to support it and slide it completely out of the chassis. Place the LCC-CB on the antistatic mat. If you are not replacing the LCC-CB now, install a blank panel over the empty slot. Figure 147: Removing an LCC-CB Copyright © 2017, Juniper Networks, Inc. -
Page 346: Installing A T640 Lcc-Cb
T640 Core Router Hardware Guide Installing a T640 LCC-CB To install an LCC-CB (see Figure 148 on page 313): Attach an electrostatic discharge (ESD) grounding strap to your bare wrist, and connect the strap to one of the ESD points on the chassis. -
Page 347: Replacing A T640 Standard Control Board Or T-Cb
. Each weighs approximately 5 lb (2.3 kg). To replace a standard control board or T-CB, perform the following procedures: Removing a T640 Standard Control Board or T-CB on page 314 Installing a T640 Standard Control Board or T-CB on page 315... -
Page 348: Removing A T640 Standard Control Board Or T-Cb
Attach an electrostatic discharge (ESD) grounding strap to your bare wrist, and connect the strap to one of the ESD points on the chassis. For T-CBs in a T640 router connected to a TX matrix router, disconnect the cable plugged into the port labeled Loosen the captive screws (using a Phillips (+) screwdriver, number 2) on the ejector handles on both sides of the control board faceplate. -
Page 349: Installing A T640 Standard Control Board Or T-Cb
Chapter 27: Replacing Host Subsystem Components Figure 149: Removing a Standard Control Board Figure 150: Removing a T-CB Installing a T640 Standard Control Board or T-CB To install a standard control board or T-CB (see Figure 151 on page 316... -
Page 350: Figure 151: Installing A Standard Control Board
T640 Core Router Hardware Guide For a T-CB in a T640 router connected to a TX matrix router, reconnect the cable previously plugged into the port. Verify that the control board is functioning normally: Check the LEDs on the control board faceplate. The green LED should light steadily a few minutes after the control board is installed. -
Page 351: Replacing A T640 Routing Engine
Chapter 27: Replacing Host Subsystem Components Maintaining the T640 Control Boards on page 449 Replacing a T640 Routing Engine To replace a Routing Engine, perform the following procedures: Removing a T640 Routing Engine on page 317 Installing a T640 Routing Engine on page 318 Removing a T640 Routing Engine The router can have one or two Routing Engines. -
Page 352: Installing A T640 Routing Engine
T640 Core Router Hardware Guide Grasp the Routing Engine by the ejector handles, and slide it about halfway out of the chassis. Place one of your hands underneath the Routing Engine to support it and slide it completely out of the chassis. - Page 353 LED still lights steadily, the Routing Engine is not functioning properly. FAIL Contact your customer support representative. Check the status of the Routing Engine, use the CLI command: user@host> show chassis routing-engine For more information about using the CLI, see the Junos OS manuals. Copyright © 2017, Juniper Networks, Inc.
-
Page 354: Replacing A Compactflash Card In A T640 Re-C1800 Routing Engine
Preparing to Replace a CompactFlash Card in a T640 RE-C180 Routing Engine on page 321 Removing a CompactFlash Card in a T640 RE-C1800 Routing Engine on page 321 Installing a CompactFlash Card in a T640 RE-C1800 Routing Engine on page 322... -
Page 355: Removing A Compactflash Card In A T640 Re-C1800 Routing Engine
Chapter 27: Replacing Host Subsystem Components Preparing to Replace a CompactFlash Card in a T640 RE-C180 Routing Engine To prepare to replace a CompactFlash card in a T60 RE-C1800 Routing Engine: Determine whether the host subsystem is functioning as the master or as the backup, using one of these methods: Check the Host Subsystem LEDs on the craft interface. -
Page 356: Installing A Compactflash Card In A T640 Re-C1800 Routing Engine
Place the CompactFlash card on the antistatic mat. Figure 157: Removing a CompactFlash Card Installing a CompactFlash Card in a T640 RE-C1800 Routing Engine To install a CompactFlash card (see Figure 158 on page 323): Attach an electrostatic discharge (ESD) grounding strap to your bare wrist, and connect the strap to one of the ESD points on the chassis. -
Page 357: Routing Engine
SSD. Figure 158: Installing a CompactFlash Card Copying the Junos OS to the CompactFlash Card in a T640 RE-C1800 Routing Engine After installing the CompactFlash card for the first time, you must copy the software from the Routing Engine's solid-state disk (SSD) to the CompactFlash card. -
Page 358: Replacing A Dimm Module In A T640 Routing Engine
T640 RE-C1800 Description on page 42 T640 RE-C1800 LEDs on page 43 T640 Preventing Electrostatic Discharge Damage on page 506 Replacing a DIMM Module in a T640 Routing Engine Removing a T640 DIMM Module on page 324 Installing a T640 DIMM Module on page 324 Removing a T640 DIMM Module The DIMM modules are located on the top of the Routing Engine. -
Page 359: Replacing A Pc Card In A T640 Routing Engine
T640 Routing Engine Description on page 36 Documentation Replacing a T640 Routing Engine on page 317 Replacing a PC Card in a T640 Routing Engine To replace a PC Card, perform the following procedures: Removing a T640 PC Card on page 325... -
Page 360: Installing A T640 Pc Card
If the Routing Engine cover is in place, remove the cover by loosening the captive screws on the corners of its faceplate. Insert the PC Card into the PC Card slot on the Routing Engine, with the Juniper Networks logo facing downward. -
Page 361: Replacing A Solid-State Disk In A T640 Re-C1800 Routing Engine
T640 Routing Engine Functions on page 5 Replacing a Solid-State Disk in a T640 RE-C1800 Routing Engine Preparing to Replace a Solid-State Disk in a T640 RE-C1800 Routing Engine on page 328 Removing a Solid-State Disk in a T640 RE-C1800 Routing Engine on page 328... -
Page 362: Removing A Solid-State Disk In A T640 Re-C1800 Routing Engine
T640 Core Router Hardware Guide Preparing to Replace a Solid-State Disk in a T640 RE-C1800 Routing Engine To prepare to replace an SSD: Determine whether the host subsystem is functioning as the master or as the backup, using one of these methods: Check the Host Subsystem LEDs on the craft interface. -
Page 363: Installing A Solid-State Disk In A T640 Re-C1800 Routing Engine
Place the SSD on the antistatic mat. Figure 162: Removing an SSD Installing a Solid-State Disk in a T640 RE-C1800 Routing Engine To install an SSD in a Routing Engine (see Figure 163 on page 330): Insert the SSD into the slot on the Routing Engine, with the logo facing down. -
Page 364: Engine
T640 Core Router Hardware Guide Figure 163: Installing an SSD Copying the Junos OS to the Solid-State Disk in a T640 RE-C1800 Routing Engine After installing an SSD for the first time, you must copy the software from the Routing Engine's CompactFlash card to the SSD. - Page 365 Chapter 27: Replacing Host Subsystem Components T640 Preventing Electrostatic Discharge Damage on page 506 Copyright © 2017, Juniper Networks, Inc.
- Page 366 T640 Core Router Hardware Guide Copyright © 2017, Juniper Networks, Inc.
-
Page 367: Replacing Line Card Components
CHAPTER 28 Replacing Line Card Components Replacing a T640 FPC on page 333 Replacing a T640 PIC on page 340 Replacing T640 PIC Cables on page 346 Replacing a T640 FPC The FPCs are hot-insertable and hot-removable. When you remove an FPC, the router continues to function, although the PIC interfaces installed on the FPC being removed no longer function. - Page 368 T640 Core Router Hardware Guide Issue the CLI command: user@host>request chassis fpc slot slot-number offline For more information about the command, see request chassis fpc. Disconnect the cables from the PICs installed in the FPC. Immediately cover each fiber-optic transceiver and the end of each cable with a rubber safety cap. Arrange the disconnected cables in the cable management system, to prevent the cables from developing stress points.
- Page 369 If necessary, remove each installed PIC from the FPC. For information about removing a PIC, see “Removing a T640 PIC” on page 341. After you remove each PIC, immediately place it on an antistatic mat or in an electrostatic bag.
-
Page 370: Installing A T640 Fpc
T640 Core Router Hardware Guide Figure 164: Removing a T640 FPC Installing a T640 FPC To install an FPC (see Figure 166 on page 340): Attach an electrostatic discharge (ESD) grounding strap to your bare wrist, and connect the strap to one of the ESD points on the chassis. - Page 371 Install each PIC into the appropriate slot on the FPC. For information on installing a PIC, see “Installing a T640 PIC” on page 343. Locate the slot in the FPC card cage in which you plan to install the FPC.
-
Page 372: Figure 165: Installing An Fpc
T640 Core Router Hardware Guide Figure 165: Installing an FPC Do not bend or damage prongs on power connector Gently rest the bottom edge of the FPC on the bottom edge of the slot opening, making contact a short distance forward of the power connector. - Page 373 You can verify correct FPC and PIC functioning by issuing the show chassis fpc commands, as described in “Maintaining T640 FPCs” on show chassis fpc pic-status page 450 “Maintaining T640 PICs and PIC Cables” on page 454. Copyright © 2017, Juniper Networks, Inc.
-
Page 374: Replacing A T640 Pic
Figure 166: Installing a T640 FPC Related T640 FPC Description on page 67 Documentation Troubleshooting the T640 FPCs on page 474 Replacing a T640 PIC Removing a T640 PIC on page 341 Installing a T640 PIC on page 343 Copyright © 2017, Juniper Networks, Inc. -
Page 375: Removing A T640 Pic
CAUTION: Do not leave a fiber-optic transceiver uncovered except when inserting or removing cable. The safety cap keeps the port clean and prevents accidental exposure to laser light. Copyright © 2017, Juniper Networks, Inc. - Page 376 T640 Core Router Hardware Guide Arrange the cable in the cable management system to prevent it from dislodging or developing stress points. Secure the cable so that it is not supporting its own weight as it hangs to the floor. Place excess cable out of the way in a neatly coiled loop in the cable management system.
-
Page 377: Installing A T640 Pic
FPC and then slide the PIC in until it lodges firmly in the FPC. CAUTION: Slide the PIC straight into the slot to avoid damaging the components on the bottom of the PIC. Copyright © 2017, Juniper Networks, Inc. - Page 378 T640 Core Router Hardware Guide Secure the PIC to the FPC faceplate: Type 1 or Type 2 PICs—Tighten the captive screws at the top and bottom of the faceplate. Type 3 PICs—Turn the ejector handle at the top of the PIC faceplate clockwise, then tighten the captive screw at the bottom of the faceplate.
-
Page 379: Figure 168: Installing A Pic
Figure 168: Installing a PIC Related T640 Preventing Electrostatic Discharge Damage on page 506 Documentation T640 PIC Description on page 79 Maintaining T640 PICs and PIC Cables on page 454 Troubleshooting the T640 PICs on page 475 Copyright © 2017, Juniper Networks, Inc. -
Page 380: Replacing T640 Pic Cables
To replace a PIC cable, , perform the following procedures: Removing a T640 PIC Cable on page 346 Installing a T640 PIC Cable on page 347 Removing a T640 PIC Cable... -
Page 381: Installing A T640 Pic Cable
Have ready a length of the type of cable used by the PIC. For cable specifications, see the T640 Core Router Interface Module Reference. If the PIC cable connector port is covered by a rubber safety plug, remove the plug. -
Page 382: Figure 169: Connecting Fiber-Optic Cable To A Pic
Figure 169: Connecting Fiber-Optic Cable to a PIC Fiber-optic cable Related T640 PIC Description on page 79 Documentation Connecting PIC Cables to the T640 Router on page 216 Troubleshooting the T640 PICs on page 475 Copyright © 2017, Juniper Networks, Inc. -
Page 383: Replacing Power System Components
Replacing a T640 Six-Input DC Power Supply Side Air Filter on page 389 Replacing a Front Air Filter Element on a T640 AC or DC Power Supply on page 391 Replacing a Side Air Filter on a T640 AC Power Supply on page 393... -
Page 384: Figure 170: Disconnecting Power Cables From A Two-Input 160-A Dc Power
T640 Core Router Hardware Guide automatically assumes the entire electrical load for the router. If you have only one power supply, you must power off the system before removing the power supply. To remove a two-input 160-A DC power supply: Make sure that the voltage across the DC power source cable leads is 0 V and that there is no chance that the cables might become active during the removal process. - Page 385 Place one hand underneath the power supply to support it, and slide it completely out of the chassis. WARNING: Do not touch the power connectors on the rear of the power supply (see Figure 172 on page 352). They can contain dangerous voltages. Copyright © 2017, Juniper Networks, Inc.
-
Page 386: Installing A T640 Two-Input Dc Power Supply
T640 Core Router Hardware Guide Figure 171: Removing a Two-Input 160-A Power Supply Figure 172: Rear of the Power Supply Showing Midplane Connectors Installing a T640 Two-Input DC Power Supply To install a power supply (see Figure 173 on page 355): Copyright ©... - Page 387 160-A DC power supply in slot PEM1 must be powered by dedicated power feeds derived from feed B. This configuration provides the commonly deployed A/B feed redundancy for the system. Copyright © 2017, Juniper Networks, Inc.
- Page 388 T640 Core Router Hardware Guide NOTE: on the three-input 240-A DC power supply INPUT 0 INPUT 1 in slot must be powered by dedicated power feeds derived from PEM0 feed A, and on the three-input 240-A DC power supply INPUT 0...
-
Page 389: Figure 173: Installing A Replacement Two-Input 160-A Dc Power Supply
After powering on a power supply, wait at least 60 seconds before turning it off. If you have only one power supply, power off the system before turning off the power supply. Figure 173: Installing a Replacement Two-Input 160-A DC Power Supply Copyright © 2017, Juniper Networks, Inc. -
Page 390: Replacing A T640 Three-Input 240-A Dc Power Supply
Removing a T640 Three-Input 240-A DC Power Supply on page 357 Setting the Input Mode Switch on a Three-Input 240-A DC Power Supply for a T640 Router on page 360... -
Page 391: Removing A T640 Three-Input 240-A Dc Power Supply
Chapter 29: Replacing Power System Components Removing a T640 Three-Input 240-A DC Power Supply To remove a three-input 240-A DC power supply: Switch off the external circuit breakers to the power supply being removed. Make sure that the voltage across the DC power source cable leads is 0 V and that there is no chance that the cables might become active during the removal process. -
Page 392: Figure 175: Disconnecting Power Cables From The Dc Power Supply
T640 Core Router Hardware Guide Figure 175: Disconnecting Power Cables from the DC Power Supply Remove the cable lugs from the terminal studs. Loosen the captive screw or screws on the cable restraint on the right edge of the power supply faceplate. -
Page 393: Figure 176: Rear Of The Power Supply Showing Midplane Connectors
Do not touch the power connectors on the rear of the power supply (see Figure 176 on page 359). They can contain dangerous voltages. Figure 176: Rear of the Power Supply Showing Midplane Connectors Figure 177: Removing a Three-Input 240-A DC Power Supply Copyright © 2017, Juniper Networks, Inc. -
Page 394: Setting The Input Mode Switch On A Three-Input 240-A Dc Power Supply For A T640 Router
T640 Core Router Hardware Guide Setting the Input Mode Switch on a Three-Input 240-A DC Power Supply for a T640 Router NOTE: Do not set the input mode switch if the power supply is installed in the chassis. If the power supply is already installed, you must disconnect all cables and remove the power supply before setting the input mode switch. -
Page 395: Installing A T640 Three-Input 240-A Dc Power Supply
Figure 179: Installing a Three-Input 240-A DC Power Supply Replacing the T640 Cable Restraint on a Three-Input 240-A DC Power Supply Each three-input 240-A DC power supply is shipped with the standard cable restraint, as shown in “Standard Cable Restraint on a Three-Input 240-A Power Supply”... -
Page 396: Supply
To replace the cable restraint on a three-input 240-A DC power supply, perform the following tasks: Removing the T640 Standard Cable Restraint from a Three-Input 240-A DC Power Supply on page 362 Installing the T640 Optional Cable Restraint on a Three-Input 240-A DC Power... -
Page 397: Router
Figure 181: Optional Cable Restraint on a Three-Input 240-A DC Power Supply Connecting DC Power to a Three-Input 240-A DC Power Supply in a T640 Router To connect a three-input 240-A DC power supply to the power sources: Attach an electrostatic discharge (ESD) grounding strap to your bare wrist, and connect the strap to one of the ESD points on the chassis. - Page 398 T640 Core Router Hardware Guide the color coding for the leads on the power cables that attach to the terminal studs on each power supply. Secure the cable lugs to the terminal studs, first with a washer, then with a nut (see Figure 182 on page 365).
-
Page 399: Figure 182: Connecting Power Cables To The Power Supply
Chapter 29: Replacing Power System Components Figure 182: Connecting Power Cables to the Power Supply Powering On a T640 Replacement Three-Input 240-A DC Power Supply To power on a three-input 240-A DC power supply: Attach an electrostatic discharge (ESD) grounding strap to your bare wrist, and connect the strap to one of the ESD points on the chassis. -
Page 400: Replacing A T640 Four-Input 240-A Dc Power Supply
If you have only one power supply, you must power off the system before removing the power supply. Removing a T640 Four-Input 240-A DC Power Supply on page 366 Installing a T640 Four-Input 240-A DC Power Supply on page 370... -
Page 401: Figure 183: Four-Input 240-A Dc Power Supply
There is no standard color coding for DC power cables. The color coding used by the external DC power source at your site determines the color coding for the leads on the power cables that attach to the terminal studs on each power supply. Copyright © 2017, Juniper Networks, Inc. -
Page 402: Figure 184: Disconnecting Power Cables From The Four-Input 240-A Dc Power
T640 Core Router Hardware Guide Figure 184: Disconnecting Power Cables from the Four-Input 240-A DC Power Supply Cable lug Terminal studs Locking washer Remove the cable lugs from the terminal studs. Loosen the captive screw or screws on the cable restraint on the right edge of the power supply faceplate. -
Page 403: Figure 185: Removing A Four-Input 240-A Dc Power Supply
Do not touch the power connectors on the rear of the power supply (see Figure 186 on page 369). They can contain dangerous voltages. Figure 186: Rear of the Power Supply Showing Midplane Connectors Copyright © 2017, Juniper Networks, Inc. -
Page 404: Installing A T640 Four-Input 240-A Dc Power Supply
T640 Core Router Hardware Guide Installing a T640 Four-Input 240-A DC Power Supply Each four-input 240-A DC power supply weighs approximately 26.6 lb (12.0 kg). To install a four-input 240-A DC power supply: Make sure that the voltage across the DC power source cable leads is 0 V and that there is no chance that the cables might become active during installation. -
Page 405: Figure 187: Connecting A Power Cable To A Four-Input 240-A Dc Power
Tighten the cable restraint captive screws to hold the power cables in place. Verify that the power cabling is correct, that the power cables do not touch or block access to other hardware components, and that they do not drape where people could trip on them. Copyright © 2017, Juniper Networks, Inc. -
Page 406: Figure 188: Installing A Four-Input 240-A Dc Power Supply
Related T640 Power System Description on page 95 Documentation T640 Four-Input 240-A DC Power Supply Description on page 102 T640 Four-Input 240-A DC Power Supply LEDs on page 103 Troubleshooting the T640 Power System on page 476 Copyright © 2017, Juniper Networks, Inc. -
Page 407: Supply
Three-Input 240-A DC Power Supply, or a Four-Input 240-A DC Power Supply on page 376 Removing a T640 DC Power Supply Cable from a Two-Input 160-A Power Supply, Three-Input 240-A DC Power Supply, or a Four-Input 240-A DC Power Supply... -
Page 408: Figure 189: Disconnecting A Dc Power Cable From A Two-Input 160-A Dc Power
T640 Core Router Hardware Guide Switch the circuit breakers on the power supply faceplate to the off position ( Remove the clear plastic cover protecting the terminal studs on the faceplate. CAUTION: You must ensure that power connections maintain the proper polarity. -
Page 409: Figure 190: Disconnecting A Dc Power Cable From A Three-Input 240-A Dc Power
Chapter 29: Replacing Power System Components Figure 190: Disconnecting a DC Power Cable from a Three-Input 240-A DC Power Supply Copyright © 2017, Juniper Networks, Inc. -
Page 410: Dc Power Supply
Terminal studs Locking washer Installing a T640 DC Power Supply Cable on a Two-Input 160-A Power Supply, Three-Input 240-A DC Power Supply, or a Four-Input 240-A DC Power Supply NOTE: All inputs on the two-input 160-A DC power supply in slot... - Page 411 For a three-input 240-A DC power supply, verify that the LED is lit INPUT PRESENT steadily, indicating that the input is receiving power. Switch the circuit breakers on the power supply to the on position ( Copyright © 2017, Juniper Networks, Inc.
-
Page 412: Figure 192: Connecting A Dc Power Cable To A Two-Input 160-A Dc Power
T640 Core Router Hardware Guide NOTE: After a power supply is powered on, it can take up to 60 seconds for status indicators—such as the output status LEDs on the power supply, the command output display, and messages on the LCD on the craft interface—to indicate that the power supply is functioning normally. -
Page 413: Figure 193: Connecting A Dc Power Cable To A Three-Input 240-A Dc Power
Chapter 29: Replacing Power System Components Figure 193: Connecting a DC Power Cable to a Three-Input 240-A DC Power Supply Copyright © 2017, Juniper Networks, Inc. -
Page 414: Replacing A T640 Six-Input Dc Power Supply
Maintaining the T640 Power Supplies on page 456 T640 DC Power Supply Electrical Specifications on page 126 Site Electrical Wiring Guidelines for Juniper Networks Devices on page 538 Replacing a T640 Six-Input DC Power Supply Removing a T640 Six-Input DC Power Supply on page 381 Installing a T640 Six-Input DC Power Supply on page 383 Copyright ©... -
Page 415: Removing A T640 Six-Input Dc Power Supply
Chapter 29: Replacing Power System Components Removing a T640 Six-Input DC Power Supply To remove a six-input DC power supply: Switch off the customer site circuit breakers to the power supply being removed. Make sure that the voltage across the DC power source cable leads is 0 V and that there is no chance that the cables might become active during the removal process. -
Page 416: Figure 196: Disconnecting Power Cables From The Dc Power Supply
T640 Core Router Hardware Guide Figure 196: Disconnecting Power Cables from the DC Power Supply Cable lug Terminal studs Locking washer Remove the cable lugs from the terminal studs. Loosen the captive screws on the cable restraints on the right edge of the power supply faceplate. -
Page 417: Installing A T640 Six-Input Dc Power Supply
383). They can contain dangerous voltages. Figure 198: Rear of the Power Supply Showing Midplane Connectors Installing a T640 Six-Input DC Power Supply Each DC power supply weighs approximately 39.7 lb (18.0 kg). To install a six-input DC power supply: Make sure that the voltage across the DC power source cable leads is 0 V and that there is no chance that the cables might become active during installation. -
Page 418: Figure 199: Inserting The Dc Power Supply Into The Chassis
T640 Core Router Hardware Guide Using both hands, slide the power supply into the chassis until you feel resistance (see Figure 199 on page 384). Figure 199: Inserting the DC Power Supply into the Chassis Twist the ejector handles at the upper corners of the power supply faceplate clockwise until they stop. -
Page 419: Figure 200: Attaching The Dc Power Cable
LEDs on the power supply faceplate are lit steadily, INPUT PRESENT indicating that the inputs are receiving power. Switch the power switch on the power supply to the position ( ). The DC OK blinks momentarily, then lights steadily. Copyright © 2017, Juniper Networks, Inc. -
Page 420: Replacing A T640 Dc Power Supply Cable On A Six-Input Dc Power Supply
Removing a T640 DC Power Supply Cable from a Six-Input DC Power Supply on page 386 Installing a T640 DC Power Supply Cable on a Six-Input DC Power Supply on page 387 Removing a T640 DC Power Supply Cable from a Six-Input DC Power Supply... -
Page 421: Figure 201: Disconnecting The Dc Power Cable
Carefully move the power cable out of the way. Installing a T640 DC Power Supply Cable on a Six-Input DC Power Supply To install a DC power supply cable on a six-input DC power supply: Locate a DC power cable that meets the specifications for the power supply. -
Page 422: Figure 202: Connecting The Dc Power Cable
Related T640 Power System Description on page 95 Documentation T640 Six-Input DC Power Supply Description on page 104 T640 Six-Input DC Power Supply LEDs on page 105 Troubleshooting the T640 Power System on page 476 T640 DC Power Supply Electrical Specifications on page 126... -
Page 423: Supply
Site Electrical Wiring Guidelines for Juniper Networks Devices on page 538 Replacing a T640 Six-Input DC Power Supply Front Air Filter Removing a T640 Six-Input DC Power Supply Front Air Filter on page 389 Installing a T640 Six-Input DC Power Supply Front Air Filter on page 389... -
Page 424: Removing A T640 Six-Input Dc Power Supply Side Air Filter
T640 Core Router Hardware Guide Removing a T640 Six-Input DC Power Supply Side Air Filter To remove a six-input DC power supply side air filter element: Attach an electrostatic discharge (ESD) grounding strap to your bare wrist, and connect the strap to one of the ESD points on the chassis. -
Page 425: Replacing A Front Air Filter Element On A T640 Ac Or Dc Power Supply
AC power supply. Removing a Front Air Filter Element on a T640 AC or DC Power Supply on page 391 Installing a Front Air Filter Element on a T640 AC or DC Power Supply on page 392... -
Page 426: Installing A Front Air Filter Element On A T640 Ac Or Dc Power Supply
Remove the front air filter element. Figure 205: Removing a Front Air Filter Element Installing a Front Air Filter Element on a T640 AC or DC Power Supply To install a power supply front filter element (see Figure 206 on page... -
Page 427: Replacing A Side Air Filter On A T640 Ac Power Supply
Figure 206: Installing a Front Air Filter Element Replacing a Side Air Filter on a T640 AC Power Supply Removing a Side Air Filter on a T640 AC Power Supply on page 393 Installing a Side Air Filter on a T640 AC Power Supply on page 394... -
Page 428: Installing A Side Air Filter On A T640 Ac Power Supply
Air filter bracket Air filter Installing a Side Air Filter on a T640 AC Power Supply To install the side AC power supply filter: Verify that the customer site circuit breakers to the power supply is off, that that the voltage across the AC power source cord is 0 V, and that there is no chance that the AC power cord might become active during the replacement. - Page 429 LEDs on the power supply, the command output displays, and messages on the LED display on the craft interface—to indicate that the power supply is functioning normally. Ignore error indicators that appear during the first 60 seconds. Copyright © 2017, Juniper Networks, Inc.
-
Page 430: Replacing A T640 Three-Phase Delta Ac Power Supply
Figure 208: Installing the Side Power Supply Filter Air filter bracket Air filter Related T640 Three-Phase Delta and Wye AC Power Supply Description on page 106 Documentation T640 Three-Phase Delta and Wye AC Power Supply LEDs on page 109 Powering Off the T640 Router on page 248... -
Page 431: Figure 209: Three-Phase Delta Ac Power Supply
Using a number 2 Phillips (+) screwdriver, loosen the two screws on the door of the metal wiring compartment that protects the AC terminal block. Open the door of the metal wiring compartment. Copyright © 2017, Juniper Networks, Inc. -
Page 432: Figure 210: Disconnecting The Power Cord From A Three-Phase Delta Ac Power
T640 Core Router Hardware Guide Disconnect the wires from the AC terminal block on the three-phase delta AC power supply (Figure 210 on page 398), loosen each of the input terminals or grounding point screws, and remove each wire from the grounding point or input terminal. -
Page 433: Figure 211: Removing A Three-Phase Delta Ac Power Supply
Figure 211: Removing a Three-Phase Delta AC Power Supply WARNING: Do not touch the power connectors on the rear of the power supply (see Figure 212 on page 400). They can contain dangerous voltages. Copyright © 2017, Juniper Networks, Inc. -
Page 434: Installing A T640 Three-Phase Delta Ac Power Supply
T640 Core Router Hardware Guide Figure 212: Rear of the Power Supply Showing Midplane Connectors Installing a T640 Three-Phase Delta AC Power Supply Each three-phase delta AC power supply weighs approximately 31.0 lb (14.06 kg). To install a three-phase delta AC power supply: Make sure that the voltage across the AC power source cord leads is 0 V and that there is no chance that the cord might become active during installation. - Page 435 Place the retaining nut inside the metal wiring compartment. Put the wires of the AC power cord through the hole of the metal wiring compartment. Screw the retaining nut onto the AC power cord to secure it to the metal wiring compartment. Copyright © 2017, Juniper Networks, Inc.
-
Page 436: Figure 213: Connecting Power To A Three-Phase Delta Ac Power Supply
T640 Core Router Hardware Guide Connect the wires to the AC terminal block on the three-phase delta AC power supply (Figure 213 on page 402). Loosen each of the input terminal or grounding point screws, insert the wire into the grounding point or input terminal, and tighten the screw. - Page 437 LEDs on the power supply, the command output displays, and messages on the LED display on the craft interface—to indicate that the power supply is functioning normally. Ignore error indicators that appear during the first 60 seconds. Copyright © 2017, Juniper Networks, Inc.
-
Page 438: Replacing A T640 Three-Phase Delta Ac Power Supply Cord
T640 Core Router Hardware Guide Figure 214: Installing a Three-Phase Delta AC Power Supply Related T640 Three-Phase Delta and Wye AC Power Supply Description on page 106 Documentation T640 Three-Phase Delta and Wye AC Power Supply LEDs on page 109... -
Page 439: Figure 215: Three-Phase Delta Ac Power Supply
Using a number 2 Phillips (+) screwdriver, loosen the two screws on the door of the metal wiring compartment that protects the AC terminal block. Open the door of the metal wiring compartment. Copyright © 2017, Juniper Networks, Inc. -
Page 440: Figure 216: Disconnecting The Power Cord From A Three-Phase Delta Ac Power
T640 Core Router Hardware Guide Disconnect the wires from the AC terminal block on the three-phase delta AC power supply (Figure 216 on page 406). Loosen each of the input terminals or grounding point screws, and remove each wire from the grounding point or input terminal. -
Page 441: Installing A T640 Three-Phase Delta Ac Power Supply Cord
Carefully move the AC power cable out of the way. Disconnect the AC power cord from the AC power supply. Installing a T640 Three-Phase Delta AC Power Supply Cord To install a three-phase delta AC power supply cord: Make sure that the voltage across the AC power source cord leads is 0 V and that there is no chance that the cord might become active during installation. - Page 442 T640 Core Router Hardware Guide Insert the wires to the AC terminal block on the three-phase delta AC power supply (Figure 217 on page 409). Loosen each of the input terminal or grounding point screws, and insert the wire into the grounding point or input terminal.
-
Page 443: Figure 217: Connecting Power To A Three-Phase Delta Ac Power Supply
Figure 217: Connecting Power to a Three-Phase Delta AC Power Supply L2 L3 L2 L3 Related T640 Three-Phase Delta and Wye AC Power Supply Description on page 106 Documentation T640 Three-Phase Delta and Wye AC Power Supply LEDs on page 109 Troubleshooting the T640 Power System on page 476... -
Page 444: Replacing A T640 Three-Phase Wye Ac Power Supply
T640 Core Router Hardware Guide Replacing a T640 Three-Phase Wye AC Power Supply Removing a T640 Three-Phase Wye AC Power Supply on page 410 Installing a T640 Three-Phase Wye AC Power Supply on page 412 Removing a T640 Three-Phase Wye AC Power Supply To remove a three-phase wye AC power supply: Switch off the customer site circuit breakers to the power supply being removed. -
Page 445: Figure 219: Disconnecting The Ac Power Cord From A Three-Phase Wye Ac Power
Pull the AC power cord out of the metal wiring compartment. Carefully move the AC power cable out of the way. Loosen the captive screws on the lower corners of the power supply faceplate completely. Copyright © 2017, Juniper Networks, Inc. -
Page 446: Installing A T640 Three-Phase Wye Ac Power Supply
Figure 220: Removing a Three-Phase Wye AC Power Supply Installing a T640 Three-Phase Wye AC Power Supply Each three-phase wye AC power supply weighs approximately 31.0 lb (14.06 kg). To install a three-phase wye AC power supply: Make sure that the voltage across the AC power cord leads is 0 V and that there is no chance that the power cord might become active during installation. - Page 447 Place the retaining nut inside the metal wiring compartment. Put the wires of the AC power cord through the hole of the metal wiring compartment. Screw the retaining nut onto the AC power cord to secure it to the metal wiring compartment. Copyright © 2017, Juniper Networks, Inc.
-
Page 448: Figure 221: Connecting Power To The Three-Phase Wye Ac Power Supply
T640 Core Router Hardware Guide Connect the AC power cord wires to ground and the AC terminal block on the three-phase wye AC power supply (Figure 221 on page 414). Loosen each of the input terminals or grounding point screws, insert each wire into the grounding point or input terminal, and tighten the screw. -
Page 449: Figure 222: Installing A Three-Phase Wye Ac Power Supply
60 seconds. Figure 222: Installing a Three-Phase Wye AC Power Supply Related T640 Three-Phase Delta and Wye AC Power Supply Description on page 106 Documentation T640 Three-Phase Delta and Wye AC Power Supply LEDs on page 109... -
Page 450: Replacing A T640 Three-Phase Wye Ac Power Supply Cord
T640 Preventing Electrostatic Discharge Damage on page 506 Replacing a T640 Three-Phase Wye AC Power Supply Cord Removing a T640 Three-Phase Wye AC Power Supply Cord on page 416 Installing a T640 Three-Phase Wye AC Power Supply Cord on page 418... -
Page 451: Figure 224: Disconnecting The Ac Power Cord From A Three-Phase Wye Ac Power
Loosen the plastic cable tie fastening the AC power cord to the power supply. Loosen and remove the retaining nut from the AC power cord. Pull the AC power cord out of the metal wiring compartment. Carefully move the AC power cable out of the way. Copyright © 2017, Juniper Networks, Inc. -
Page 452: Installing A T640 Three-Phase Wye Ac Power Supply Cord
T640 Core Router Hardware Guide Installing a T640 Three-Phase Wye AC Power Supply Cord To install a three-phase wye AC power supply cord: Make sure that the voltage across the AC power cord leads is 0 V and that there is no chance that the power cord might become active during installation. -
Page 453: Figure 225: Connecting Power To The Wye 3-Phase Ac Power Supply
Remove the ESD grounding strap from the ESD points on the chassis. Connect the strap to an approved site ESD grounding point. See the instructions for your site. Copyright © 2017, Juniper Networks, Inc. - Page 454 Ignore error indicators that appear during the first 60 seconds. Related T640 Three-Phase Delta and Wye AC Power Supply Description on page 106 Documentation T640 Three-Phase Delta and Wye AC Power Supply LEDs on page 109...
-
Page 455: Replacing Switch Fabric Components
Replacing Switch Fabric Components Replacing a T640 SFP on page 421 Replacing a T640 SIB on page 424 Upgrading to a T640 Standard SIB Version B on page 432 Replacing a T640 XENPAK Module on page 434 Replacing a T640 SFP... -
Page 456: Removing A T640 Sfp
T640 Core Router Hardware Guide Removing a T640 SFP Small form-factor pluggables (SFPs) are transceivers that can be removed from a PIC. SFPs are hot-insertable and hot-removable. Removing an SFP does not interrupt PIC functioning, but the removed SFP no longer receives or transmits data. -
Page 457: Installing A T640 Sfp
WARNING: Do not look directly into a fiber-optic transceiver or into the ends of fiber-optic cables. Fiber-optic transceivers and fiber-optic cable connected to a transceiver emit laser light that can damage your eyes. Copyright © 2017, Juniper Networks, Inc. -
Page 458: Replacing A T640 Sib
T640 PIC Description on page 79 T640 Packet Forwarding Engine Architecture on page 7 Replacing a T640 SIB Five SIBs are installed in the T640 router. The SIBs are located in the rear of the chassis in the slots marked SIB0... -
Page 459: Removing A T640 Standard Sib Or Standard Sib Version B
The T640-SIB requires Junos OS Release 7.0 or later. To replace a SIB, perform the following procedures: Removing a T640 Standard SIB or Standard SIB Version B on page 425 Installing a T640 Standard SIB or Standard SIB Version B on page 426... -
Page 460: Installing A T640 Standard Sib Or Standard Sib Version B
T640 Core Router Hardware Guide Figure 227: Removing a SIB Installing a T640 Standard SIB or Standard SIB Version B To install a SIB into the rear of the chassis (see Figure 228 on page 427): Attach an electrostatic discharge (ESD) grounding strap to your bare wrist, and connect the strap to one of the ESD points on the chassis. -
Page 461: Upgrading To A T640 Standard Sib Version B
Upgrading to a T640 Standard SIB Version B NOTE: Before you install one or more FPC4s in a T640 router that is not part of a routing matrix, you must replace each SIB in the router with a SIB version B. -
Page 462: Replacing T640 Standard Sibs With Standard Sib Version B
Replacing T640 Standard SIBs with Standard SIB Version B To replace the T640 standard SIBs with Standard SIB Version B, perform the following procedures: Attach an electrostatic discharge (ESD) grounding strap to your bare wrist, and connect the strap to one of the ESD points on the chassis. -
Page 463: Removing A T640-Sib
For more information about the command, see request chassis sib. Press and hold the online/offline button on the craft interface that corresponds to the T640-SIB. Hold the button down until all of the LEDs surrounding the button are not lit. -
Page 464: Installing A T640-Sib
Figure 229: Removing a SIB Installing a T640-SIB Use this procedure to install a T640-SIB in a T640 router that is connected to a TX Matrix platform. To convert the switching plane from standard SIBs to T640-SIBs, see the procedures in the TX Matrix Router Hardware Guide. - Page 465 Attach an electrostatic discharge (ESD) grounding strap to your bare wrist, and connect the strap to one of the ESD points on the chassis. Place one hand under the bottom edge of the T640-SIB and one hand around the top of the T640-SIB faceplate.
-
Page 466: Upgrading To A T640 Standard Sib Version B
Issue the following CLI command: user@host> request chassis sib lcc number slot slot-number online Check the LEDs on the T640-SIB faceplate to verify that the SIB is functioning normally. The green LED should light steadily a few minutes after the T640-SIB is installed. -
Page 467: Preparing To Upgrade To A T640 Standard Sib Version B
Replacing T640 Standard SIBs with Standard SIB Version B To replace the T640 standard SIBs with Standard SIB Version B, perform the following procedures: Attach an electrostatic discharge (ESD) grounding strap to your bare wrist, and connect the strap to one of the ESD points on the chassis. -
Page 468: Replacing A T640 Xenpak Module
Replace the SIB with a standard SIB version B. Use the replacement procedures described in “Removing a T640 Standard SIB or Standard SIB Version B” on page 425 “Installing a T640 Standard SIB or Standard SIB Version B” on page 426... - Page 469 Unscrew the thumbscrews at the top and bottom of the XENPAK module. Slide the module out of the PIC and place it in the electrostatic bag or on the antistatic mat. Copyright © 2017, Juniper Networks, Inc.
-
Page 470: Installing A T640 Xenpak Module
T640 Core Router Hardware Guide Figure 230: Removing a XENPAK Module Installing a T640 XENPAK Module To install a replacement XENPAK module (see Figure 231 on page 437): Attach an electrostatic discharge (ESD) grounding strap to your bare wrist, and connect the strap to one of the ESD points on the chassis. -
Page 471: Figure 231: Installing A Xenpak Module
Figure 231: Installing a XENPAK Module Related T640 Preventing Electrostatic Discharge Damage on page 506 Documentation T640 PIC Description on page 79 T640 Packet Forwarding Engine Architecture on page 7 Maintaining T640 PICs and PIC Cables on page 454 Copyright © 2017, Juniper Networks, Inc. - Page 472 T640 Core Router Hardware Guide Copyright © 2017, Juniper Networks, Inc.
-
Page 473: Maintaining The Chassis And Components
PART 5 Maintaining the Chassis and Components Routine Maintenance Procedures on page 441 Maintaining Components on page 443 Copyright © 2017, Juniper Networks, Inc. - Page 474 T640 Core Router Hardware Guide Copyright © 2017, Juniper Networks, Inc.
-
Page 475: Routine Maintenance Procedures
CHAPTER 31 Routine Maintenance Procedures Routine Maintenance Procedures for the T640 Router on page 441 Routine Maintenance Procedures for the T640 Router Purpose For optimum router performance, perform preventive maintenance procedures. NOTE: Some components, such as the Connector Interface Panel (CIP) and the craft interface, require no maintenance. - Page 476 T640 Core Router Hardware Guide Copyright © 2017, Juniper Networks, Inc.
-
Page 477: Maintaining Components
CHAPTER 32 Maintaining Components Tools and Parts Required to Maintain the T640 Hardware Components on page 443 Maintaining the T640 SCGs on page 443 Maintaining the T640 Air Filters on page 444 Maintaining the T640 Fan Trays on page 445... -
Page 478: Maintaining The T640 Air Filters
FAIL The blue LED on the SCG faceplate indicates which SCG is the master. MASTER For more information, see “T640 SONET Clock Generators (SCGs) Description” on page Issue the show chassis environment scg command to display information about the SCGs. The output is similar to the following: user@host>... -
Page 479: Maintaining The T640 Fan Trays
Related T640 Cooling System Description on page 31 Documentation T640 Clearance Requirements for Airflow and Hardware Maintenance on page 122 Replacing a T640 Air Filter on page 281 Maintaining the T640 Fan Trays Purpose For optimum cooling, verify the condition of the fans. - Page 480 T640 Core Router Hardware Guide Rear Tray Fourth fan Spinning at normal speed Rear Tray Fifth fan Spinning at normal speed Rear Tray Sixth fan Spinning at normal speed Rear Tray Seventh fan Spinning at normal speed Rear Tray Bottom fan Spinning at normal speed...
-
Page 481: Maintaining The T640 Host Subsystem
Spinning at normal speed Related T640 Cooling System Description on page 31 Documentation Troubleshooting the T640 Cooling System on page 469 Maintaining the T640 Host Subsystem Purpose For optimum router performance, verify the condition of the host subsystem. The host subsystem comprises a Routing Engine and up to two adjacent control boards functioning together. -
Page 482: Maintaining The T640 Routing Engines
Related T640 Host Subsystem Description on page 35 Documentation Taking the T640 Host Subsystem Offline on page 307 Maintaining the T640 Routing Engines on page 448 Maintaining the T640 Control Boards on page 449 Replacing the T640 Host Subsystem Components on page 307... -
Page 483: Maintaining The T640 Control Boards
T640 Control Boards Description Documentation T640 Standard Control Boards LEDs on page 64 T640 T Series Control Boards (T-CBs) LEDs on page 66 T640 LCC-CB LEDs on page 62 Troubleshooting the T640 Host Subsystem on page 472 Troubleshooting the T640 Control Board on page 473... -
Page 484: Maintaining T640 Fpcs
5 hours, 18 minutes, 51 seconds For further description of the output from the commands, see show chassis environment fpc. Related T640 Chassis Description on page 15 Documentation T640 FPC Description on page 67 Copyright © 2017, Juniper Networks, Inc. -
Page 485: Holding And Storing T640 Fpcs
Chapter 32: Maintaining Components T640 Craft Interface FPC LEDs and Online/Offline Buttons on page 24 Holding and Storing T640 FPCs Holding T640 FPCs on page 451 Storing T640 FPCs on page 454 Holding T640 FPCs CAUTION: Many components on the FPC are fragile. Failure to handle FPCs as specified in this document can cause irreparable damage. -
Page 486: Figure 233: Do Not Carry An Fpc With Only One Hand
T640 Core Router Hardware Guide Figure 233: Do Not Carry an FPC with Only One Hand Do not rest any edge of an FPC directly against a hard surface (see Figure 234 on page 452). If you must rest the FPC temporarily on an edge while changing its orientation between vertical and horizontal, use your hand as a cushion between the edge and the surface. -
Page 487: Figure 235: Holding An Fpc Vertically
Place your other hand at the bottom edge of the FPC. If the FPC has heat sinks about midway between the faceplate and connector edge, place your other hand against the heat sinks. Figure 235: Holding an FPC Vertically Copyright © 2017, Juniper Networks, Inc. -
Page 488: Storing T640 Fpcs
454). Related T640 FPC Description on page 67 Documentation Troubleshooting the T640 FPCs on page 474 Maintaining T640 PICs and PIC Cables Purpose For optimum router performance, verify the condition of the PICs and PIC cables. Copyright © 2017, Juniper Networks, Inc. - Page 489 Anchor fiber-optic cable to avoid stress on the connectors. When attaching fiber to a PIC, be sure to secure the fiber so it is not supporting its own weight as it hangs to the floor. Never let fiber-optic cable hang free from the connector. Copyright © 2017, Juniper Networks, Inc.
-
Page 490: Maintaining The T640 Power Supplies
Related T640 Chassis Description on page 15 Documentation T640 PIC Description on page 79 Connecting PIC Cables to the T640 Router on page 216 Replacing T640 PIC Cables on page 346 Maintaining the T640 Power Supplies Purpose For optimum router performance, verify the condition of the power supplies. - Page 491 Chapter 32: Maintaining Components Front Air Filter Element on a T640 AC or DC Power Supply” on page 391. To replace a side air filter, see “Replacing a Side Air Filter on a T640 AC Power Supply” on page 393.
- Page 492 T640 Core Router Hardware Guide For DC-powered routers with two-input 160-A DC power supplies, three-input 240-A DC power supplies or four-input 240-A DC power supplies, the output is similar to the following: PEM 0 status: State Online Temperature 24 degrees C / 75 degrees F...
-
Page 493: Maintaining The T640 Sibs
T640 Four-Input 240-A DC Power Supply LEDs on page 103 T640 Six-Input DC Power Supply LEDs on page 105 T640 Three-Phase Delta and Wye AC Power Supply LEDs on page 109 Troubleshooting the T640 Power System on page 476 T640 General Electrical Safety Guidelines and Electrical Codes on page 529... - Page 494 7050 mV For more information about using the command, see show chassis environment sib. Related T640 Switch Interface Boards (SIBs) Description on page 111 Documentation T640 Craft Interface SIB LEDs on page 26 Replacing a T640 SIB on page 424...
-
Page 495: Troubleshooting Hardware
PART 6 Troubleshooting Hardware Troubleshooting Components on page 463 Copyright © 2017, Juniper Networks, Inc. - Page 496 T640 Core Router Hardware Guide Copyright © 2017, Juniper Networks, Inc.
-
Page 497: Troubleshooting Components
CHAPTER 33 Troubleshooting Components Overview of Troubleshooting Resources for the T640 Router on page 463 T640 LED Overview on page 464 T640 Alarm Messages Overview on page 466 Troubleshooting the T640 Craft Interface on page 467 Troubleshooting the T640 SONET Clock Generators on page 468... -
Page 498: T640 Led Overview
For information about using the CLI to troubleshoot the Junos OS, see the appropriate Junos OS configuration guide. JTAC—If you need assistance during troubleshooting, you can contact the Juniper Networks Technical Assistance Center (JTAC) by using the Web or by telephone. If you encounter software problems, or problems with hardware components not discussed here, contact JTAC. -
Page 499: Component Leds
T640 Three-Input 240-A DC Power Supply LEDs on page 100 T640 Four-Input 240-A DC Power Supply LEDs on page 103 T640 Six-Input DC Power Supply LEDs on page 105 T640 Three-Phase Delta and Wye AC Power Supply LEDs on page 109 Copyright © 2017, Juniper Networks, Inc. -
Page 500: T640 Alarm Messages Overview
Related T640 Chassis Description on page 15 Documentation T640 Component Serial Number Label Locations on page 486 Replacing a T640 Craft Interface on page 265 T640 Alarm Messages Overview When the Routing Engine detects an alarm condition, it lights the red or yellow alarm LED on the craft interface as appropriate, trips the corresponding alarm relay contact on the CIP, and reports the cause of the alarm in the craft interface LCD. -
Page 501: Troubleshooting The T640 Craft Interface
UNEQ interface-name so-x/x/x - SONET unequipped Related T640 Chassis Description on page 15 Documentation T640 Craft Interface Alarm LEDs and ACO/LT Button on page 23 Replacing a T640 Craft Interface on page 265 Troubleshooting the T640 Craft Interface Problem Description:... -
Page 502: Troubleshooting The T640 Sonet Clock Generators
Use the CLI to check for alarms. Standalone T640 router—Issue the command to view the show chassis alarms alarms. T640 router in a routing matrix—Issue the show chassis alarms lcc lcc-number command to view the alarms. Related T640 Craft Interface Description on page 22... -
Page 503: Troubleshooting The T640 Cooling System
Router in a routing matrix—Issue the command show chassis alarms lcc lcc-number to view the alarms. Related T640 SONET Clock Generators (SCGs) LEDs on page 28 Documentation T640 SONET Clock Generators (SCGs) Description on page 27 Troubleshooting the T640 Cooling System Problem Description: Copyright ©... -
Page 504: Table 95: T640 Cooling System Alarm Messages
470, the text in the column labeled ”LCD Message” appears in the display of the craft interface. The text in the column labeled “CLI Message” appears in the output from the command. show chassis alarms Table 95: T640 Cooling System Alarm Messages Component Alarm Type LCD Message CLI Message... - Page 505 Chapter 33: Troubleshooting Components Table 95: T640 Cooling System Alarm Messages (continued) Component Alarm Type LCD Message CLI Message Alarm Condition Solution Temperature The chassis Verify that the Temperature Hot Temperature Hot sensors temperature room exceeded the hot temperature is...
-
Page 506: Troubleshooting The T640 Host Subsystem
470. Related T640 Cooling System Description on page 31 Documentation Maintaining the T640 Air Filters on page 444 Maintaining the T640 Fan Trays on page 445 Replacing a T640 Air Filter on page 281 Troubleshooting the T640 Host Subsystem Problem... -
Page 507: Troubleshooting The T640 Control Board
Documentation T640 Craft Interface Description on page 22 T640 LCC-CB LEDs on page 62 T640 T Series Control Boards (T-CBs) LEDs on page 66 T640 RE-600 LEDs on page 39 T640 RE-1600 LEDs on page 41 T640 RE-2000 LEDs on page 45... -
Page 508: Troubleshooting The T640 Fpcs
T640 T Series Control Boards (T-CBs) Description on page 64 T640 T Series Control Boards (T-CBs) LEDs on page 66 Replacing a T640 LCC-CB on page 310 Replacing a T640 Standard Control Board or T-CB on page 313 Troubleshooting the T640 FPCs Problem... -
Page 509: Troubleshooting The T640 Pics
To troubleshoot the PICs: To check the status of each port on a PIC, look at the LED located on the PIC faceplate. For information about the meaning of LED states on different PICs, see the T640 Core Router Interface Module Reference. -
Page 510: Troubleshooting The T640 Power System
T640 Core Router Hardware Guide Related T640 PIC Description on page 79 Documentation Maintaining T640 PICs and PIC Cables on page 454 Replacing a T640 PIC on page 340 Troubleshooting the T640 Power System Problem Description: The following alarms, LEDs, and other conditions indicate a problem with the power... -
Page 511: Table 99: T640 Power Supply Alarm Messages
The text in the column labeled “CLI Message” appears in the output from the command. show chassis alarms Table 99: T640 Power Supply Alarm Messages Alarm Type LCD Message CLI Message PEM pem-number Over Temp... - Page 512 T640 Core Router Hardware Guide NOTE: If the system temperature exceeds the threshold, the Junos OS shuts down all power supplies so that no status is displayed on the craft interface. The Junos OS also can shut down one of the power supplies for other reasons.
-
Page 513: Troubleshooting The T640 Sibs
Three-Input 240-A DC Power Supply, or a Four-Input 240-A DC Power Supply on page 373 Replacing a T640 DC Power Supply Cable on a Six-Input DC Power Supply on page 386 Replacing a T640 Three-Phase Delta AC Power Supply on page 396... - Page 514 T640 router in a routing matrix—Issue the show chassis alarms lcc lcc-number command to view the alarms. Related T640 Switch Interface Boards (SIBs) Description on page 111 Documentation T640 Switch Interface Boards (SIBs) LEDs Copyright © 2017, Juniper Networks, Inc.
-
Page 515: Contacting Customer Support And Returning The Chassis Or Components
PART 7 Contacting Customer Support and Returning the Chassis or Components Contacting Customer Support on page 483 Locating Component Serial Numbers on page 485 Packing and Returning Components on page 493 Copyright © 2017, Juniper Networks, Inc. - Page 516 T640 Core Router Hardware Guide Copyright © 2017, Juniper Networks, Inc.
-
Page 517: Contacting Customer Support
Contacting Customer Support on page 483 Contacting Customer Support You can contact Juniper Networks Technical Assistance Center (JTAC) 24 hours a day, 7 days a week in one of the following ways: On the Web, using the Case Manager link at: http://www.juniper.net/support/... - Page 518 T640 Core Router Hardware Guide Copyright © 2017, Juniper Networks, Inc.
-
Page 519: Locating Component Serial Numbers
CHAPTER 35 Locating Component Serial Numbers Locating T640 Component Serial Numbers Using the CLI on page 485 T640 Component Serial Number Label Locations on page 486 Locating T640 Component Serial Numbers Using the CLI Before contacting Juniper Networks, Inc. to request a Return Materials Authorization (RMA), you must find the serial number on the router or component. -
Page 520: T640 Component Serial Number Label Locations
Figure 237 on page 486) attached to the component body. Figure 237: Serial Number ID Label Related T640 Router Description on page 3 Documentation T640 Chassis Description on page 15 T640 Component Serial Number Label Locations Control Board Serial Number Label on page 486... -
Page 521: Cip Serial Number Label
Figure 240: CIP Serial Number Label Craft Interface Serial Number Label The serial number is located on the back of the craft interface panel, behind the alarm LEDs (see Figure 241 on page 488). Copyright © 2017, Juniper Networks, Inc. -
Page 522: Fpc Serial Number Label
T640 Core Router Hardware Guide Figure 241: Craft Interface Serial Number Label FPC Serial Number Label The location of the serial number label varies depending on the FPC: Type 1 FPCs: located near the top PIC slot Type 2 FPCs: located near the top PIC slot... -
Page 523: Power Supply Serial Number Label
Figure 244: Two-Input 160-A DC Power Supply Serial Number Label For the three-input 240-A DC power supply, the serial number label is located on the left side of the power supply faceplate (see Figure 245 on page 490). Copyright © 2017, Juniper Networks, Inc. -
Page 524: Routing Engine Serial Number Label
T640 Core Router Hardware Guide Figure 245: Three-Input 240-A DC Power Supply Serial Number Label For the six-input DC power supply, the serial number label is located on the lower left side of the faceplate. (see Figure 246 on page 490). -
Page 525: Scg Serial Number Label
SIB Serial Number Label For the standard SIB or SIB version B, the serial number label is located on the right side of the top of the SIB (see Figure 249 on page 492). Copyright © 2017, Juniper Networks, Inc. -
Page 526: Figure 249: Standard Sib And Sib Version B Serial Number Label
A A 0 0 0 0 Serial number ID label Related Locating T640 Component Serial Numbers Using the CLI on page 485 Documentation Contacting Customer Support on page 483 Returning a Hardware Component to Juniper Networks, Inc. on page 493... -
Page 527: Packing And Returning Components
Packing and Returning Components Returning a Hardware Component to Juniper Networks, Inc. on page 493 Tools and Parts Required to Remove Components from a T640 Router on page 494 Packing the T640 Router for Shipment on page 494 Packing T640 Router Components for Shipment on page 496 Returning a Hardware Component to Juniper Networks, Inc. -
Page 528: Tools And Parts Required To Remove Components From A T640 Router
Contacting Customer Support on page 483 Documentation Guidelines for Packing Hardware Components for Shipment Tools and Parts Required to Remove Components from a T640 Router To remove components from the router or the router from a rack, you need the following tools and parts: 2.5-mm flat-blade (–) screwdriver, for detaching alarm relay terminal block... - Page 529 Place the router in the shipping crate or onto the pallet. If on a pallet, bolt the router to the pallet. Cover the router with an ESD bag and place the packing foam on top of and around the router. Replace the accessory box on top of the packing foam. Copyright © 2017, Juniper Networks, Inc.
-
Page 530: Packing T640 Router Components For Shipment
T640 Router Description on page 3 Replacing a T640 PIC on page 340 Replacing a T640 DC Power Supply Cable on a Two-Input 160-A Power Supply, Three-Input 240-A DC Power Supply, or a Four-Input 240-A DC Power Supply on page 373... - Page 531 Pack the router or component for shipment. Related T640 Preventing Electrostatic Discharge Damage on page 506 Documentation T640 Chassis Description on page 15 Locating T640 Component Serial Numbers Using the CLI on page 485 T640 Physical Specifications on page 119 Copyright © 2017, Juniper Networks, Inc.
- Page 532 T640 Core Router Hardware Guide Copyright © 2017, Juniper Networks, Inc.
-
Page 533: Safety And Compliance Information
Laser and LED Safety Guidelines and Warnings on page 519 Maintenance and Operational Safety Guidelines and Warnings on page 523 Electrical Safety Guidelines and Warnings on page 529 Agency Approvals and Compliance Statements on page 541 Copyright © 2017, Juniper Networks, Inc. - Page 534 T640 Core Router Hardware Guide Copyright © 2017, Juniper Networks, Inc.
-
Page 535: General Safety Guidelines And Warnings
General Safety Guidelines and Warnings Definition of Safety Warning Levels on page 501 General Safety Guidelines for Juniper Networks Devices on page 503 General Safety Warnings for Juniper Networks Devices on page 504 T640 Preventing Electrostatic Discharge Damage on page 506... - Page 536 Documentation Installation Safety Warnings for Juniper Networks Devices on page 512 Maintenance and Operational Safety Warnings for Juniper Networks Devices on page 523 General Electrical Safety Warnings for Juniper Networks Devices on page 530 DC Power Electrical Safety Warnings for Juniper Networks Devices on page 534...
-
Page 537: General Safety Guidelines For Juniper Networks Devices
Such an action could cause electrical shock. Some parts of the router might become hot. The following label provides the warning of the hot surfaces on the router: Related General Safety Warnings for Juniper Networks Devices on page 504 Documentation Copyright © 2017, Juniper Networks, Inc. -
Page 538: General Safety Warnings For Juniper Networks Devices
T640 Core Router Hardware Guide General Safety Warnings for Juniper Networks Devices Qualified Personnel Warning on page 504 Restricted-Access Area Warning on page 504 Qualified Personnel Warning WARNING: Only trained and qualified personnel should install or replace the hardware equipment. - Page 539 Varning! Denna enhet är avsedd för installation i områden med begränsat tillträde. Ett område med begränsat tillträde får endast tillträdas av servicepersonal med ett speciellt verktyg, lås och nyckel, eller annan säkerhetsanordning, och kontrolleras av den auktoritet som ansvarar för området. Copyright © 2017, Juniper Networks, Inc.
-
Page 540: T640 Preventing Electrostatic Discharge Damage
DC Power Electrical Safety Warnings for Juniper Networks Devices on page 534 T640 Preventing Electrostatic Discharge Damage Many T640 router hardware components are sensitive to damage from static electricity. Some components can be impaired by voltages as low as 30 V. You can easily generate potentially damaging static voltages whenever you handle plastic or foam packing material or if you move components across plastic or carpets. - Page 541 Chapter 37: General Safety Guidelines and Warnings Figure 252: ESD Point on the Front of T640 Chassis Copyright © 2017, Juniper Networks, Inc.
- Page 542 T640 Core Router Hardware Guide Figure 253: ESD Point on the Rear View of T640 Chassis Related T640 Router Description on page 3 Documentation Site Electrical Wiring Guidelines for Juniper Networks Devices on page 538 T640 General Electrical Safety Guidelines and Electrical Codes on page 529...
-
Page 543: Fire Safety Requirements
Establish procedures for protecting people in a fire emergency, provide safety training, and properly provision fire-control equipment and fire extinguishers. In addition, establish procedures to protect your equipment in a fire emergency. Juniper Networks products must be installed in an environment suitable for electronic equipment. - Page 544 To keep warranties effective, do not use a dry chemical fire extinguisher to control a fire at or near a Juniper Networks device. If a dry chemical fire extinguisher is used, the unit is no longer eligible for coverage under a service agreement.
-
Page 545: Installation Safety Guidelines And Warnings
Before installing the router, verify that the intended site meets the specified power, environmental, and clearance requirements. See the following documentation: T640 Clearance Requirements for Airflow and Hardware Maintenance on page 122 T640 Rack Requirements on page 120 T640 Environmental Specifications on page 122... -
Page 546: Installation Safety Warnings For Juniper Networks Devices
T640 Core Router Hardware Guide Related T640 Site Preparation Checklist on page 117 Documentation Installation Safety Warnings for Juniper Networks Devices Observe the following warnings before and during hardware equipment installation: Intrabuilding Ports Warning on page 512 Installation Instructions Warning on page 512... -
Page 547: Rack-Mounting Requirements And Warnings
Varoitus Kun laite asetetaan telineeseen tai huolletaan sen ollessa telineessä, on noudatettava erityisiä varotoimia järjestelmän vakavuuden säilyttämiseksi, jotta vältytään loukkaantumiselta. Noudata seuraavia turvallisuusohjeita: Copyright © 2017, Juniper Networks, Inc. - Page 548 T640 Core Router Hardware Guide Router on asennettava telineeseen, joka on kiinnitetty rakennukseen. Jos telineessä ei ole muita laitteita, aseta laite telineen alaosaan. Jos laite asetetaan osaksi täytettyyn telineeseen, aloita kuormittaminen sen alaosasta kaikkein raskaimmalla esineellä ja siirry sitten sen yläosaan.
- Page 549 ¡Atención! Para evitar lesiones durante el montaje de este equipo sobre un bastidor, o posteriormente durante su mantenimiento, se debe poner mucho cuidado en que el sistema quede bien estable. Para garantizar su seguridad, proceda según las siguientes instrucciones: Copyright © 2017, Juniper Networks, Inc.
-
Page 550: Ramp Warning
T640 Core Router Hardware Guide El router debe instalarse en un bastidor fijado a la estructura del edificio. Colocar el equipo en la parte inferior del bastidor, cuando sea la única unidad en el mismo. Cuando este equipo se vaya a instalar en un bastidor parcialmente ocupado, comenzar la instalación desde la parte inferior hacia la superior colocando... - Page 551 Related General Safety Guidelines for Juniper Networks Devices on page 503 Documentation General Safety Warnings for Juniper Networks Devices on page 504 Maintenance and Operational Safety Warnings for Juniper Networks Devices on page 523 Copyright © 2017, Juniper Networks, Inc.
- Page 552 T640 Core Router Hardware Guide Copyright © 2017, Juniper Networks, Inc.
-
Page 553: Laser And Led Safety Guidelines And Warnings
Laser and LED Safety Guidelines and Warnings T640 General Laser Safety Guidelines on page 519 Laser Safety Warnings for Juniper Networks Devices on page 519 T640 General Laser Safety Guidelines Devices with single-mode optical interfaces are equipped with laser transmitters, which are considered Class 1 Laser product by the U.S. -
Page 554: Class 1 Laser Product Warning
T640 Core Router Hardware Guide Laser Beam Warning on page 521 Radiation from Open Port Apertures Warning on page 521 Class 1 Laser Product Warning WARNING: Class 1 laser product. Waarschuwing Klasse-1 laser produkt. Varoitus Luokan 1 lasertuote. Attention Produit laser de classe I. -
Page 555: Laser Beam Warning
Attention Des radiations invisibles à l'il nu pouvant traverser l'ouverture du port lorsqu'aucun câble en fibre optique n'y est connecté, il est recommandé de ne pas regarder fixement l'intérieur de ces ouvertures. Copyright © 2017, Juniper Networks, Inc. - Page 556 öppningar. Related General Safety Guidelines for Juniper Networks Devices on page 503 Documentation General Safety Warnings for Juniper Networks Devices on page 504 Installation Safety Warnings for Juniper Networks Devices on page 512 Copyright ©...
-
Page 557: Maintenance And Operational Safety Guidelines And Warnings
CHAPTER 41 Maintenance and Operational Safety Guidelines and Warnings Maintenance and Operational Safety Warnings for Juniper Networks Devices on page 523 Maintenance and Operational Safety Warnings for Juniper Networks Devices As you maintain the hardware equipment, observe the following warnings:... -
Page 558: Jewelry Removal Warning
T640 Core Router Hardware Guide Warnung Bei Einsetzen einer falschen Batterie besteht Explosionsgefahr. Ersetzen Sie die Batterie nur durch den gleichen oder vom Hersteller empfohlenen Batterietyp. Entsorgen Sie die benutzten Batterien nach den Anweisungen des Herstellers. Avvertenza Pericolo di esplosione se la batteria non è installata correttamente. -
Page 559: Lightning Activity Warning
Waarschuwing Tijdens onweer dat gepaard gaat met bliksem, dient u niet aan het systeem te werken of kabels aan te sluiten of te ontkoppelen. Varoitus Älä työskentele järjestelmän parissa äläkä yhdistä tai irrota kaapeleita ukkosilmalla. Copyright © 2017, Juniper Networks, Inc. -
Page 560: Operating Temperature Warning
T640 Core Router Hardware Guide Attention Ne pas travailler sur le système ni brancher ou débrancher les câbles pendant un orage. Warnung Arbeiten Sie nicht am System und schließen Sie keine Kabel an bzw. trennen Sie keine ab, wenn es gewittert. -
Page 561: Product Disposal Warning
Avvertenza L'eliminazione finale di questo prodotto deve essere eseguita osservando le normative italiane vigenti in materia Advarsel Endelig disponering av dette produktet må skje i henhold til nasjonale lover og forskrifter. Copyright © 2017, Juniper Networks, Inc. - Page 562 Varning! Slutlig kassering av denna produkt bör skötas i enlighet med landets alla lagar och föreskrifter. Related General Safety Guidelines for Juniper Networks Devices on page 503 Documentation General Safety Warnings for Juniper Networks Devices on page 504 Copyright © 2017, Juniper Networks, Inc.
-
Page 563: Electrical Safety Guidelines And Warnings
Electrical Safety Guidelines and Warnings In Case of an Electrical Accident on page 529 T640 General Electrical Safety Guidelines and Electrical Codes on page 529 General Electrical Safety Warnings for Juniper Networks Devices on page 530 DC Power Electrical Safety Warnings for Juniper Networks Devices on page 534... -
Page 564: General Electrical Safety Warnings For Juniper Networks Devices
Never install equipment if it appears damaged. Related Documentation General Electrical Safety Warnings for Juniper Networks Devices Grounded Equipment Warning on page 530 Grounding Requirements and Warning on page 531 Midplane Energy Hazard Warning on page 532... -
Page 565: Grounding Requirements And Warning
Aviso Ao instalar a unidade, a ligação à terra deverá ser sempre a primeira a ser ligada, e a última a ser desligada. ¡Atención! Al instalar el equipo, conectar la tierra la primera y desconectarla la última. Copyright © 2017, Juniper Networks, Inc. -
Page 566: Midplane Energy Hazard Warning
T640 Core Router Hardware Guide Varning! Vid installation av enheten måste jordledningen alltid anslutas först och kopplas bort sist. Midplane Energy Hazard Warning WARNING: High levels of electrical energy are distributed across the midplane. Be careful not to contact the midplane connectors, or any component connected to the midplane, with any metallic object while servicing components. -
Page 567: Power Disconnection Warning
(CA); cortar la alimentación desde el interruptor automático en los equipos de corriente continua (CC). Varning! Innan du arbetar med ett chassi eller nära strömförsörjningsenheter skall du för växelströmsenheter dra ur nätsladden och för likströmsenheter bryta strömmen vid överspänningsskyddet. Copyright © 2017, Juniper Networks, Inc. -
Page 568: Dc Power Electrical Safety Warnings For Juniper Networks Devices
T640 Core Router Hardware Guide Related DC Power Electrical Safety Warnings for Juniper Networks Devices on page 534 Documentation DC Power Electrical Safety Warnings for Juniper Networks Devices When working with DC-powered equipment, observe the following warnings: DC Power Copper Conductors Warning on page 534... - Page 569 Varning! Innan du utför någon av följande procedurer måste du kontrollera att strömförsörjningen till likströmskretsen är bruten. Kontrollera att all strömförsörjning är BRUTEN genom att slå AV det överspänningsskydd som skyddar likströmskretsen och tejpa fast överspänningsskyddets omkopplare i FRÅN-läget. Copyright © 2017, Juniper Networks, Inc.
-
Page 570: Dc Power Wiring Terminations Warning
T640 Core Router Hardware Guide DC Power Wiring Terminations Warning WARNING: When stranded wiring is required, use approved wiring terminations, such as closed-loop or spade-type with upturned lugs. These terminations must be the appropriate size for the wires and must clamp both the insulation and conductor. -
Page 571: T640 Ac Power Electrical Safety Guidelines
General Electrical Safety Warnings for Juniper Networks Devices on page 530 T640 AC Power Electrical Safety Guidelines The following electrical safety guidelines apply to an AC-powered T640 or T1600 router with three-phase AC power supplies: AC-powered routers are shipped with three-phase electrical cords with grounding. Do not circumvent this safety feature. -
Page 572: Site Electrical Wiring Guidelines For Juniper Networks Devices
For Juniper systems with AC power supplies, an external surge protective device (SPD) must be used at the AC power source. Related T640 Three-Phase Delta and Wye AC Power Supply Description on page 106 Documentation T640 General Electrical Safety Guidelines and Electrical Codes on page 529... - Page 573 OSP cabling. The addition of primary protectors is not sufficient protection in order to connect these interfaces metallically to OSP wiring. Related General Electrical Safety Guidelines and Electrical Codes for Juniper Networks Devices Documentation Copyright © 2017, Juniper Networks, Inc.
- Page 574 T640 Core Router Hardware Guide Copyright © 2017, Juniper Networks, Inc.
-
Page 575: Agency Approvals And Compliance Statements
(Israel) on page 543 Compliance Statements for EMC Requirements for Juniper Networks Devices (Japan) on page 543 Compliance Statements for EMC Requirements for Juniper Networks Devices (United States) on page 544 Compliance Statements for Environmental Requirements for Juniper Networks Devices on page 544... -
Page 576: Compliance Statements For Emc Requirements For Juniper Networks Devices
Equipment SR-3580 NEBS Criteria Levels (Level 3 Compliance) GR-63-Core: NEBS, Physical Protection Related T640 Compliance Statements for Acoustic Noise on page 545 Documentation T640 Compliance Statements for EMC Requirements (European Community) on page 543 Compliance Statements for EMC Requirements for Juniper Networks Devices (Canada) -
Page 577: T640 Compliance Statements For Emc Requirements
Chapter 43: Agency Approvals and Compliance Statements Compliance Statements for EMC Requirements for Juniper Networks Devices (Japan) on page 543 Compliance Statements for EMC Requirements for Juniper Networks Devices (United States) on page 544 T640 Compliance Statements for EMC Requirements (European Community) This is a Class A product. -
Page 578: Compliance Statements For Emc Requirements For Juniper Networks Devices (United States)
The battery return connection is to be treated as an isolated DC return (DC-I), as defined in GR-1089-CORE. For Juniper systems with AC power supplies, an external surge protective device (SPD) must be used at the AC power source. Related... -
Page 579: T640 Compliance Statements For Acoustic Noise
Translation—The emitted sound pressure resulted in 74 dB(A) per EN ISO 7779. Related T640 Agency Approvals on page 541 Documentation General Safety Guidelines for Juniper Networks Devices on page 503 General Safety Warnings for Juniper Networks Devices on page 504 Copyright © 2017, Juniper Networks, Inc. - Page 580 T640 Core Router Hardware Guide Copyright © 2017, Juniper Networks, Inc.
Need help?
Do you have a question about the T640 and is the answer not in the manual?
Questions and answers