Advertisement
Table of Contents
*READ THROUGHLY BEFORE MOUNTING BAGS TO MOTORCYCLE
*Helpful Hint: Stuff each bag with a sleeping bag or quilt to give it body.
*For best results take a test ride before putting your E-12 Saddle Bags/ Day Trippers to use.
*Mounting is the same for both sides.
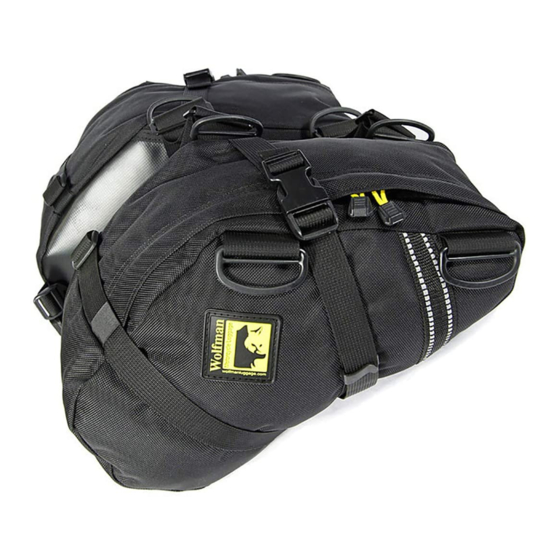
A Properly mounted pair of E-12 Saddle Bags/Day Trippers. Figure-1
Figure-1
Front Mounting Straps
Mounting Instructions
Wolfman E-12 Saddle Bags and Day Trippers
Including our "Tension-O-Matic" pat.pend.
Rear mounting system
**The E-12 Saddle Bags and Day Trippers are virtually identical. The only
difference between them is the E-12 Saddle Bags are 2" Wider than the Day
Trippers. Thus the mounting is the same.
2" Seat Straps
1
Tension-O-Matic
Rear Mounting
Advertisement
Table of Contents

Related Manuals for Wolfman E-12


Summary of Contents for Wolfman E-12
- Page 1 *READ THROUGHLY BEFORE MOUNTING BAGS TO MOTORCYCLE *Helpful Hint: Stuff each bag with a sleeping bag or quilt to give it body. *For best results take a test ride before putting your E-12 Saddle Bags/ Day Trippers to use. *Mounting is the same for both sides.
- Page 2 Step-1 Place the E-12 Saddle Bags/Day Trippers over the seat as shown. Place the Rear Seat Strap on the rear fender just pas the end of the seat. Figure-2 Adjust the straps between the bags so the top seam of each bag is equal to the top of the seat. Figure-2 Figure-2 The “Tension-O-Matic”...
- Page 3 Step-2 Spread the Gutter Hooks of the Tension-O-Matic mounting across the rear fender so the Gutter Hooks catch the bottom lip on each side of the rear fender. Figure-4 Figure-4 Step-3 Pull each Tension-O-Matic strap away from the rear fender to tension the straps. Figure-5 (Direction of Arrows) Step-4...
- Page 4 Tighten the bags to the Tension-O-Matic straps, Both sides. (Direction of Arrows.) Figure-6 Figure-6 Step-5 The front mounting straps on each bag thread around the sub frame side tubes, below the side panels. Thread the webbing behind the sub frame from the bottom and out the top. On the Exhaust side be very careful. (Yes, the webbing can be close to the exhaust header, the pipe can be very Hot.) We have designed the front straps so they can be replaced if they get melted.
- Page 5 Step-6 Once all the straps are mounted the E-12 Saddle Bags/Day Trippers should look like. Figure-1 **Tighten all straps snug. Helpful hints: During a ride check the straps tension every so often. Put most of your heavy items on the non-exhaust side. (This is to make sure the bag does not flex the side panel onto the exhaust pipe.)
Need help?
Do you have a question about the E-12 and is the answer not in the manual?
Questions and answers