Table of Contents
Advertisement
Cuchen IH Electric Pressure Rice
※
Cooker – User Manual
■ Read this manual carefully before use to ensure the proper use of your Cuchen
electric pressure rice cooker.
■ Once you have finished reading it, keep the manual at a place where other
people would be able to find it easily
PA1000 Series_ENG_US-1.indd 1
2013-08-08
11:22:59
Advertisement
Chapters
Table of Contents

Related Manuals for Cuchen IH PA1000 Series


Summary of Contents for Cuchen IH PA1000 Series
- Page 1 Cuchen IH Electric Pressure Rice ※ Cooker – User Manual ■ Read this manual carefully before use to ensure the proper use of your Cuchen electric pressure rice cooker. ■ Once you have finished reading it, keep the manual at a place where other people would be able to find it easily PA1000 Series_ENG_US-1.indd 1...
- Page 2 Thank you for purchasing a Cuchen electric pressure rice cooker. To ensure proper use and maintenance of the product, please read this document carefully. Also, refer to this document if you experience issues or problems while using the product. Product Specifications...
-
Page 3: Table Of Contents
Table of Contents Before Getting Started Safety Precautions .......4 Name and Features of Each Part ..7 Care and Maintenance ......9 Operating Instructions Suggestions ........15 Taste Control ........17 Cooking Rice ........19 Preset Timer ........21 Cooking in Steam or Slow Mode ..22 Keeping Warm ........23 Language and Volume Control/Auto Clean ..........25... -
Page 4: Before Getting Started Safety Precautions
Safety Precautions Safety Precautions ※ Information contained in this section serves to protect the user’s safety and to prevent financial loss from occurring. ※ Carefully read all safety precautions, and properly follow them. Danger Risk of severe injury or even death is assumed if the instructions are not followed. Warning Risk of serious injury or property damage is assumed if the instructions are not followed. - Page 5 Before Getting Started Before Getting Started Installation Install the product on an even Be cautious against tripping on the Do not drop the product or the Secure at least 1.5 m of clearance surface, and protect the product power cord and knocking off the inner pot.
- Page 6 Safety Precautions During Use Contact the service center if the Do not overfill the inner pot. Do not place magnetic objects on Remove the collected water from inner pot’s coating has been top of the lid or use the cooker in inside the cooker after each use.
-
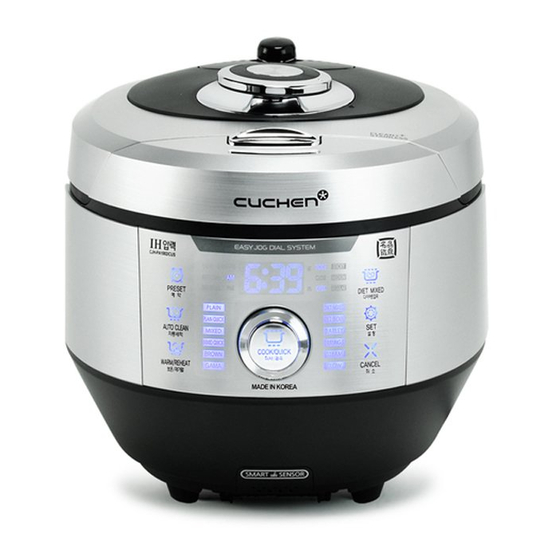
Page 7: Name And Features Of Each Part
Name and Features of Each Part Name and Features of Each Part Front and Inside Pressure Cap Auto Pressure Regulator Regulates the cooker’s internal (Steam Vent) pressure. Automatically discharges pressure from inside the cooker. Lid Lock Handle Steam Cap Cooking will not commence if the handle is not in the close (●) position. - Page 8 Name and Features of Each Part Controls/Display PRESET Button PRESSURE/QUICK Button DIET MIXED Button 1. Allows you to cook in Preset 1. Allows you to start cooking under the selected Allows you to start Diet Mixed mode mode. mode. immediately. 2.
-
Page 9: Care And Maintenance
Care and Maintenance Care and Maintenance Cleaning the Clean Cover After washing the clean cover, make sure to dry it completely before attaching it back on. ● Not keeping the clean cover clean is one of the causes of rice taking on a smell while being kept warm. (Pull out the power cord first and allow the cooker to cool before cleaning.) ●... - Page 10 Care and Maintenance Caution Proper Assembly : If the pressure packing or inner packing is not attached, steam may escape. Text Shown Right Side Up < Front View of the Clean Cover > <Rear View of the Clean Cover> The texts should be shown properly, and the bumps of The texts are shown in the opposite order.
-
Page 11: Operating Instructions
Operating Instructions Operating Instructions Replacement of the Pressure Packing ● The packing serves to prevent steam from escaping out from the cooker and is firmly inserted into the lid. However, it can be pulled out with your hands and using little bit of force. Pull out and clean the packing whenever the need arises. ●... - Page 12 Care and Maintenance Using a pen with a cover, press down on the pressing part of the pressure packing to complete the insertion. Refer to < Pressure Packing Section > below. It is now properly attached. Proper Assembly Improper Assembly <...
- Page 13 Operating Instructions Cleaning Unplug the power cord before cleaning. Do not spray water directly on the product and do not use benzene or thinner to clean. Failure to keep the cooker clean is one of the causes of ricea tking on a smell while being kept warm. Inner Pot Inner Pot Lid and Pressure Packing Do not use a rough or metallic scrubber, a brush, or harsh...
- Page 14 Care and Maintenance Cleaning of Clogged Pressure Nozzle If the pressure regulation nozzle’s packing is out of place as shown in the figure Pressure Cap/ on the left, steam will be Pressure Regulation allowed to seep through. Nozzle Ensure that the packing is If water has collected here, properly seated in place.
-
Page 15: Suggestions
Suggestions Suggestions ● Cooking flavorful rice starts from using the right amount of water. 4 Servings of PLAIN Type of Rice Water Level Cooking Old Rice or to Cooking Fresh/ Get Fluffy Rice Soaked Rice or to Get Old Rice Slightly above the scale Hard-Boiled Rice Fresh Rice... - Page 16 Operating Instructions Setting the Time (Example: 9:30 AM) In standby mode, press the [SET] button once to enter Time Setting Blink mode. Turn the dial after entering Time Setting mode to set hour. Blink - Direction of Dial: Right - Increases hour. - Direction of Dial: Left - Decreases hour.
-
Page 17: Taste Control
▶ Melanoizing Cooking rice with a Cuchen electric pressure rice cooker leaves rice at the bottom of the pot slightly brown in color. This is known as "melanoizing" and adds savory flavor and aromato the cooked rice. In Preset mode, starch released from the rice may settle to th ebottom of the pot and lead to a more evident melanoi-zing effect than regular cooking. - Page 18 Operating Instructions Fine-Tuning ※ The fine-tuning feature is enabled in Sticky, Medium, Regular, Mixed, Brown, Gama, Barley, and Nurungji. ※ The fine-tuning feature is disabled in Preset mode. Press the [SET] button four times while in standby mode. Turn the dial to choose the desired menu. This will activate the fine-tuning mode.
-
Page 19: Cooking Rice
Cooking Rice Cooking Rice Cooking Plug in the cooker, close the lid, and turn the Lid Lock to Turn the dial to choose the desired menu. the Lock(●) position Turn the dial to the left to cycle through Plain Sticky, Plain Medium, Plain Regular, Plain Quick, Health Mixed, Brown, Gama, ●... - Page 20 Operating Instructions Cooking Menu Plain Diet Health Diet Health Mixed Barley Nurungji GAMA Steam Slow Brown Mixed Mixed Quick Brown Quick Sticky Misc. Category 2 Servings 2 Servings 2 Servings 2 Servings 2 Servings 2 Servings 2 Servings 2 Servings 2 Servings 2 Servings 2 Servings...
-
Page 21: Preset Timer
Preset Timer Preset Timer Cooking in Preset mode (When current time is 8:00 PM and the cooker is preset to the Sticky menu at 8:00 AM) Check to see if the clock setting is correct. For instructions for setting the current time, see p.16. If the current clock setting is incorrect, the preset time wi lnl ot be accurate. -
Page 22: Cooking In Steam Or Slow Mode
Cooking in Steam or Slow Mode Cooking in Steam or Slow Mode Instructions (40 Minutes of Steam) Turn the dial to select the Steam or Slow menu. Blink Blink Then, press the [SET] button to set time by using the dial. Menus that can be Steam Slow... -
Page 23: Keeping Warm
Keeping Warm Keeping Warm Energy Keep Warm (Energy Keep Warm at 7:30 AM in Sticky mode) Check to see if the clock setting is correct. Press the [WARM/REHEAT] button and then the Turn the dial to set the completion time for Energy Keep [PRESET] button for at least one second to enter Warm. - Page 24 Keeping Warm Keeping Warm Adjusting Warming Temperature Settings In Standby mode, press the [SET] button three times to enter Warming Temperature Setting mode. Use the dial to set the desired warming temperature. ● The default temperature is 74 °C. ● The temperature may be set to between 69 °C and 77 °C. ●...
-
Page 25: Language And Volume Control/Auto Clean
Language and Volume Control/Auto Clean Language and Volume Control/Auto Clean Language and Volume Control In standby mode, press the [SET] button twice. ● Then, the volume control feature will be enabled. ● Default Settings: Korean and Volume 2 Blink ※ This feature is enabled only in Standby mode. Turn the dial to the left or right to set an language and volume. -
Page 26: Recipes
Recipes Recipes White Rice Rice with Peas Barley ● ● ● Ingredients: Rice and Water Ingredients: Rice, Diverse Types of Beans, and Ingredients: (Up to 6 Servings): Barley and Water Water ● ● How to Cook How to Cook ● How to Cook 1. - Page 27 Operating Instructions Green Tea Rice Sprouts Rice Mushroom Tian Garnished with Chicken Breast ● ● ● Ingredients: Ingredients: Ingredients: 2 Cups of Brown Rice, 3g of Green Tea 2 Cups of Brown Rice, a Small Amount of 2 Cups of Brown Rice, 20g of Brown Gravy ⅓...
- Page 28 Recipes Mushroom and Pine Nut Porridge Porridge with Bamboo Shoot Rice Abalone ● ● ● Ingredients: 4 Cups of Rice, 200g of Oyster Ingredients : 1 Cup of Water, ½ Cups of Pine Nuts, Ingredients : 1 Cup of Rice, 1 Tablespoon of Mushrooms, 100g of Bamboo Shoots, 10 Ginkgo 6½...
- Page 29 Operating Instructions Ginseng Chicken Braised Short Ribs Braised Chicken Soup ● ● ● Ingredients : (10 Servings) : 800g of Chicken, 4 Ingredients : 800g of Ribs, 1 Carrot, ½ of Onion, Ingredients : 1 Chicken (0.8~0.9 kg), 50g of Cloves of Garlic, ¾...
- Page 30 Recipes Corn Boiled Eggs Steak ● ● ● Ingredients : 4 Corns Ingredients : 10 Eggs, 4 Cups of Water, and One or Ingredients : 500g of Meat for Steak, a Small Two Drops of Vinegar Amount of Steak Sauce, a Small Amount of Salt, ●...
- Page 31 Operating Instructions Sweet Potatoes Potatoes Rice Cake Gratin ● ● ● Ingredients : 5 Sweet Potatoes Ingredients : 200g or Less of 6 Potatoes Ingredients : 100g of Sliced Rice Cake, 2 Boiled Eggs, 1 Sweet Potato, 80g of Pizza Cheese, 2 ※...
- Page 32 Recipes Vegetable Rice Steamed Rice Sliced Pork with Gruel Cake Five Spice Ingredients : ⅔ Cups of Rice, 30g of Brocolli, 1½ Ingredients : 3⅓ Cups of Nonglutinous Rice ● ● ● Ingredients : 700g of Pork, 130ml of Soy Sauce, Cups of Water, and a Small Amount of Salt Powder, 1⅓...
- Page 33 Operating Instructions Whipped-Cream Steamed Eggs Tuna Vegetable Rice Cake Ingredients : ⅔ ● ● ● Ingredients : 3 Eggs, 300ml of Water or Anchoy Ingredients : 70g of Boiled Rice, 40g of Canned Cups of Weak Flour, 2 Eggs, ½ Tablespoons ½...
- Page 34 Recipes Rice Pizza Steamed Eggplant Butter Chocolate Cake ● ● ● Dow Ingredients : 200g of Rice Ingredients : 2 Eggplants Ingredients : 200g of Butter, 90g of Sugar, 3 Eggs, 110g of Hot Cake Powder, and 70g of Chocolate ●...
- Page 35 Operating Instructions Diet Brown Rice Diet Mixed Rice Brown Rice Mixed with Vegetables 1 Serving = 321 Kcal 1 Serving = 167 Kcal 1 Serving = 162 Kcal ● ● ● Ingredients : Brown Rice and Water Ingredients : Rice, Diverse Cereals, and Water Ingredients : 2 Cups of Brown Rice, 2½...
-
Page 36: Troubleshooting
Troubleshooting before Contacting the Service Center Troubleshooting before Contacting the Service Center Check the information below before contacting the service center: A fully functional cooker may appear to be malfunctioning if you are not familiar with the cooker’s use or due to easily correctable causes. - Page 37 Troubleshooting Troubleshooting Problem Check Troubleshooting These error messages indicate a problem with the temperature sensor. Please contact the service center. shown on the display. 9. Rice at the bottom of This is called melanoizing effect and actually the result of added rice flavor and aroma. the inner pot takes on a yellowish tinge.
- Page 38 MEMO MEMO PA1000 Series_ENG_US-1.indd 38 2013-08-08 11:23:27...
- Page 39 Memo Memo PA1000 Series_ENG_US-1.indd 39 2013-08-08 11:23:27...
- Page 40 PA1000 Series_ENG_US-1.indd 40 2013-08-08 11:23:28...
- Page 41 PA1000 Series_KOR_US-1.indd 1 2013-08-08 11:29:54...
- Page 42 저희 쿠첸 전기압력밥솥을 사용해 주셔서 감사합니다. 제품의 올바른 사용과 유지를 위해 사용설명서를 반드시 읽어보시기 바랍니다. 제품의 사용 중 문제가 발생했을 때에는 사용설명서를 참고하시기 바랍니다. 제품규격 제품명 IH 전기압력밥솥 PA1000 Series 정격전압 및 주파수 AC 120V , 60Hz 정격 소비전력 1400W 최대취사용량...
- Page 43 차례 사용하기 전에 안전을 위한 주의 사항 ......4 각 부분의 이름 및 기능 ......7 제품 손질 방법 ........9 사용하기 맛있는 밥을 지으려면 ......15 밥맛 조절 기능 ........17 밥 짓는 방법 ........19 예약취사 방법 ........21 영양찜 및 슬로우쿡 취사 방법 ..22 보온...
-
Page 44: 안전을 위한 주의 사항
안전을위한주의사항 안전을위한주의사항 ※사용자의 안전을 지키고 재산상의 손해를 막기 위한 내용입니다. ※주의사항을 잘 읽고 올바르게 사용해 주십시오. 위험 지시한 내용이 지켜지지 않으면 사망 또는 중대한 상해가 예상되는 경우 경고 지시한 내용이 지켜지지 않으면 상당한 신체 상해 또는 물적 손해가 예상되는 경우 주의... - Page 45 사용하기전에 사용하기전에 설치관련 경사진곳에제품을설치하지 전원코드에손이나발,기타 제품,내솥을떨어뜨리거나 제품상측의공간을1.5m이상 마시고제품에무리하게힘을 물체가걸려제품이떨어지지 충격을주지마십시오. 확보하여설치하여주십시오. 가하거나충격을주지마십시오. 않도록주의해주십시오. 주의 신체 상해 제품 이상 동작의 원인이 됩니다. 및 제품 신체 상해 및 신체 상해 및 제품 파손의 우려가 파손의 제품 파손의 있습니다. 우려가 우려가 1.5m 이상 있습니다.
- Page 46 안전을위한주의사항 사용 중에 내솥코팅이벗겨진경우 최대용량이상으로내용물을 뚜껑위에자성을지닌물체를 취사가끝난뒤에는반드시본체에 고객상담실로문의하여주십시오. 넣어사용하지마십시오. 올려놓거나자성이강한물체 고인물을닦아주십시오. 근처에서사용하지마십시오. 주의 제품을 장시간 사용 할 경우 내솥의 취사 불량 및 밥물넘침 등 고장의 변색, 냄새 및 코팅이 벗겨질 수 있습니다. 거친 원인이 됩니다. 제품 성능 고장의 원인이 됩니다. 수세미, 금속성...
-
Page 47: 각 부분의 이름 및 기능
각부분의이름및기능 각부분의이름및기능 전면 / 내부 이름 압력추 자동증기조절장치(증기배출구) 내솥 내부의 압력을 일정하게 자동증기배출장치가 내장되어 있어 조절하여 줍니다. 내솥의 증기를 자동으로 배출시켜 줍니다. 뚜껑 결합 손잡이 스팀캡 취사 시 손잡이 표시가 "잠금(●)" 위치로 되어야 작동이 됩니다. 압력 패킹 클린 커버 분리 버튼 내솥... - Page 48 각부분의이름및기능 조작부 / 표시부 예약 버튼 압력취사/쾌속취사 버튼 다이어트잡곡 버튼 1. 예약 취사를 할 경우에 1. 각 메뉴의 취사 시작 시 사용합니다. 다이어트잡곡 취사를 바로 시작할 사용합니다. 경우에 사용합니다. 2 [압력취사/쾌속취사] 버튼을 연속하여 2. 절약 보온 설정 모드로 진입할 누르면 쾌속 취사로 작동하여 밥짓는 경우에...
-
Page 49: 제품 손질 방법
제품손질방법 제품손질방법 클린 커버 청소 방법 클린 커버를 세척 후에는 반드시 건조하여 뚜껑에 장착해 주십시오. ● 청소를 하지 않으면 보온 중에 냄새가 나는 원인이 됩니다. (반드시 전원 플러그를 빼고 본체에 열이 식고 난 후 청소해 주십시오.) ● 본체 및 뚜껑(특히, 클린커버 내측 패킹)은 물기를 제거한 행주로 닦아 주십시오. 벤젠, 신나 등은 사용하지 마십시오. ●... - Page 50 제품손질방법 주의 : 압력 패킹/내측 패킹을 미장착 시 증기 누설의 원인이 됩니다. 올바른조립방법 글자가 똑바로 보임 <클린 커버 앞 모습> <클린 커버 뒷 모습> 글자가 반대로 적혀 있습니다. 글자가 똑바로 적혀 있고 압력 패킹부의 돌기와 클린커버 돌기 위치가 정확하게 위치해야 합니다. ※...
- Page 51 사용하기 사용하기 압력패킹 교체 방법 ● 패킹은 김이 새는 것을 방지하기 위하여 잘 빠지지 않도록 되어 있으나, 손으로 잡고 힘주어 당기면 뺄 수 있으며 필요 시 빼서 청소하시면 됩니다. ● 패킹은 소모품입니다. 김이 샐 경우는 패킹을 빼내어 청소를 하시고 아래와 같은 방법으로 패킹을 끼우신 후 확인해 주십시오. 그 이후에도...
- Page 52 제품손질방법 뚜껑이있는펜을이용하여압력패킹의누름부(A→B순서)를 그림의화살표방향으로문질러삽입을완료해주십시오.아래의 <압력패킹단면>참조바랍니다. 정상적으로부착이완료된상태입니다. 올바른조립방법 잘못된조립방법 < 압력패킹 단면 > ● 잘못 부착을 하였을 경우 사용 중 증기누설에 의하여 밥이 설익거나 화상의 우려가 있습니다. 바르게 부착되었는지 확인 후 사용하시기 바랍니다. 내측 누름부 * 'A'부를 먼저 삽입후 'B'부를 삽입해 주세요. 주의...
- Page 53 사용하기 청소 방법 전원플러그를 뺀 후, 청소하고 물을 직접 뿌리거나 벤젠, 신나 등으로 제품을 닦지 마십시오. 청소를 깨끗이 하지 않으면 보온 중 냄새가 나는 원인이 됩니다. 내솥 내솥뚜껑,압력패킹 거친 수세미, 금속성 수세미, 솔, 연마제 등은 사용하지 행주를 더운물에 적셔 물기를 짠 다음 이물질을 닦아 마십시오.
- Page 54 제품손질방법 압력 노즐 막힘 청소 방법 그림과 같이 압력 조절 압력추/압력조절노즐 노즐의 패킹이 이탈되어 있는 경우 증기누설이 발생 물이 고여있는 경우에는 물을 꼭 짠 하오니 패킹을 노즐에 행주로 닦아 주십시오. 안착해 주십시오. 스팀캡 증기배출구 ※ 취사 직후에는 뜨거우므로 만지지 마십시오. ●...
-
Page 55: 맛있는 밥을 지으려면
맛있는밥을지으려면 맛있는밥을지으려면 ● 맛있는 밥은 알맞은 물 조절로부터! 백미4인분기준 쌀의 종류 물조절 묵은쌀, 진밥을 지을 햅쌀, 불린 쌀, 밥을 경우 지을 경우 묵은쌀로 밥을 지을 때 눈금보다 많게 햅쌀로 밥을 지을 때 눈금보다 적게 불린 쌀로 밥을 지을 때 눈금보다 적게 된밥을... - Page 56 사용하기 현재시각 맞추는 방법 (작동 예 : 오전 9시 30분으로 설정할 경우) 대기상태에서[설정]버튼을1회눌러시간설정모드로진입합니다. 깜빡 시간설정모드진입후다이얼을돌리면시설정이가능합니다. 깜빡 - 다이얼 방향 우 : 시 증가 - 다이얼 방향 좌 : 시 감소 ※ 오전, 오후를 확인해 주십시오. 깜빡 [압력취사/쾌속취사]버튼을눌러시설정을완료한후분을설정해주세요. 깜빡 다이얼을돌리면분설정이가능합니다. - 다이얼 방향 우 : 분 증가 - 다이얼...
-
Page 57: 밥맛 조절 기능
밥맛조절기능 밥맛조절기능 3단계 압력 밥맛 조절 기능 ※ 3단 압력 밥맛 조절은 백미 모드에서만 가능합니다. 메뉴/밥맛 조절 버튼으로 백미의 밥맛에 해당하는 모드를 선택할 수 있습니다. 밥맛 조절을 하여 취사도중 증기 배출현상이 나타나는 것은 내솥의 내부 압력을 맞추기 위한 정상적인 작동입니다. (밥맛... - Page 58 사용하기 미세 밥맛 조절 기능 ※ 미세 밥맛 조절 기능은 백미찰진밥, 백미중간밥, 백미일반밥, 건강잡곡, 건강현미, 가마솥밥, 꽁보리밥, 누룽지 취사 시 사용 가능합니다. ※ 미세 밥맛 조절 기능은 예약 모드 시 사용하실 수 없습니다. 대기상태에서[설정]버튼을4회눌러미세밥맛조절 다이얼을좌/우로돌려원하시는메뉴를선택합니다. 모드에진입합니다. 초기 설정된 불림시간 0분, 가열온도 0℃ ●...
-
Page 59: 밥 짓는 방법
밥짓는방법 밥짓는방법 취사 방법 전원플러그를꽂은후뚜껑을닫고,뚜껑결합손잡이를 다이얼을돌려원하시는메뉴를선택하십시오. 돌려잠금(●)에맞춰주십시오. 대기상태에서 다이얼을 좌로 돌릴 때마다“백미 찰진밥 ↔ 백미 중간밥 ↔ 백미 일반밥 ↔ 백미쾌속 ↔ 건강잡곡 ↔ 잡곡쾌속 압력패킹이 바르게 끼워졌는지 압력추가 수평인지 항상 ● ↔ 건강현미 ↔ 가마솥밥 ↔ 슬로우쿡 ↔ 영양찜 ↔ 누룽지 ↔ 확인하십시오. - Page 60 사용하기 취사 방법 메뉴명 백 미 다이어트 건강 다이어트 건강 잡곡 꽁보리밥 가마솥밥 누룽지 영양찜 슬로우쿡 현미 현미 잡곡 잡곡 쾌속 찰진밥 기 타 쾌속 구분 2인분 2인분 2인분 2인분 2인분 2인분 2인분 2인분 2인분 2인분 2인분 취사량 메뉴별 상세 6인분...
-
Page 61: 예약취사 방법
예약취사방법 예약취사방법 예약취사를 할 경우 (현재 시각이 오후 8시이고 오전 8시로 백미찰진밥 메뉴 예약 시) 현재시각이맞는지확인하십시오. 현재시각을 맞추는 방법은 16페이지를 참조하십시오. 현재시각이 맞지 않으면 예약시각도 틀려지므로 정확히 맞추어 주십시오. 대기상태에서뚜겅결합손잡이를잠금으로 예약설정모드로진입후다이얼을이용하여원하시는예약시간을 맞추고[예약]버튼을1회누르면예약설정 설정하여주십시요. 모드로진입합니다. 다이얼 방향 우 : 10분 증가 ●... -
Page 62: 영양찜 및 슬로우쿡 취사 방법
영양찜및슬로우쿡취사방법 영양찜및슬로우쿡취사방법 취사 방법 (영양찜 40분 취사 시) 다이얼을돌려영양찜및슬로우쿡메뉴를선택하여주십시오. 깜빡 깜빡 메뉴선택후[설정]버튼을누르면다이얼로시간설정이가능합니다. 예약 가능 메뉴 영양찜 슬로우쿡 시간설정 10~90분 1시간~12시간 50분 다이얼 우 5분씩 증가 10분씩 증가 깜빡 다이얼 좌 5분씩 감소 10분씩 감소 깜빡 시간설정후[압력취사/쾌속취사]버튼을눌러주십시오. 영양찜 또는 슬로우쿡 취사가 시작되면 남은 시간이 표시됩니다. PA1000 Series_KOR_US-1.indd 22 2013-08-08 11:30:25... -
Page 63: 보온 중에
보온중에 보온중에 절약보온을 할 경우 (오전 7시 30분으로 백미찰진밥 메뉴 절약보온 설정 시) 현재시각이맞는지확인합니다. [보온/재가열]버튼을누른후[예약]버튼을1초간이상 다이얼을돌려절약보온완료시간을설정합니다. 누르면절약보온설정모드로진입합니다. 다이얼 방향 우 : 10분 증가 ● 다이얼 방향 좌 : 10분 감소 ● ※ 오전, 오후를 확인해 주십시오. 깜빡 깜빡 [보온/재가열]버튼을누르시거나버튼입력없이15초가지나면자동으로절약보온을 시작합니다. 설정을... - Page 64 보온중에 보온중에 보온 온도 조절 방법 대기상태에서[설정]버튼을3회누르면보온온도설정모드로진입합니다. 다이얼을이용하여원하는보온온도를설정합니다. 기본 설정 온도는 74도 입니다. ● 온도는 69~77도까지 변경 가능합니다. ● 밥이 차갑거나 쉰냄새가 발생 시 제어 온도를 2~3도 높여주세요. ● 깜빡 밥이 누렇게 변하면 제어 온도를 2~3도 낮춰주세요. ● 깜빡 [보온/재가열]버튼을누르거나버튼입력없이15초가지나면보온온도가 설정됩니다.
-
Page 65: 언어, 음성조절/자동세척 방법
언어,음성조절/자동세척방법 언어,음성조절/자동세척방법 언어, 음성 조절 기능 대기상태에서[설정]버튼을2회눌러주십시오. 대기 상태에서 [설정] 버튼을 2회 누르면 음량 조절 기능이 설정됩니다. ● 기본 설정 : 한국어, 볼륨 2단 ● ※ 언어 및 음성 조절은 반드시 대기 상태에서만 설정 가능합니다. 깜빡 다이얼을좌또는우로돌려언어및음량을선택할수있습니다. ※ 다이얼을 돌릴 경우 0:0 ↔1:1↔1:2↔1:3↔1:4↔2:1↔2:2↔2:3↔2:4↔0:0 순으로 변경이 됩니다. 앞... -
Page 66: 요리안내
요리안내 요리안내 쌀밥(백미) 콩밥 꽁보리밥 ● 재료 : 쌀, 물 ● 재료 : 쌀, 여러 가지 콩, 물 ● 재료 : (최대 6인분) : 쌀보리, 물 ● 조리 방법 ● 조리 방법 ● 조리 방법 1. 쌀을 인분 수에 맞게 계량컵으로 계량하여 1. - Page 67 사용하기 닭가슴살을 곁들인 새싹밥 머쉬룸티안 녹차밥 ● 재료 : 현미 2컵, 녹찻잎 3g, 녹차 가루 10g, ● 재료 : 현미 2컵, 새싹채소 조금씩 약고추장 ● 재료 : 현미 2컵, 브라운그래비소스 20g, 소금 닭가슴살 4쪽, 올리브오일 약간, 소금 약간, 후추 : 고추장 ½컵, 쇠고기(다진 것) 40g, 참기름 약간, 깻잎...
- Page 68 요리안내 버섯죽순밥 잣죽 전복죽 ● 재료 : 쌀 4컵, 느타리버섯 200g, 죽순 100g, ● 재료 : 쌀 1컵, 잣 ½컵, 물 6½컵, 소금 약간 ● 재료 : 쌀 1컵, 참기름 1큰술, 전복 1개, 물 6컵, 은행 10개, 청주 1큰술 소금 약간 ●...
- Page 69 사용하기 삼계탕 갈비찜 닭찜 ● 재료 : (10인용) : 닭 800g, 통마늘 4쪽, 찹쌀 ● 재료 : 소갈비 800g, 당근 1개, 양파 ½개, 배 ● 재료 : 닭 1마리(약0.8~0.9kg), 감자 50g, 당근 ¾컵, 수삼 1~2뿌리, 대추 2개, 소금·후추 약간 ¼개 , 밤 10개, 은행 10개, 설탕, 술 2큰술씩 50g, 소금, 후춧가루...
- Page 70 요리안내 옥수수 삶은달걀 스테이크 ● 재료 : 옥수수 4개 ● 재료 : 달걀 10개, 물 4컵, 식초 한두 방울 ● 재료 : 고기(스테이크용) 500g, 스테이크 소스 약간, 소금 약간, 후춧가루 약간 ● 조리 방법 ● 조리 방법 ● 조리 방법 1.
- Page 71 사용하기 고구마 감자 떡그라탕 ● 재료 : 고구마 5개 ● 재료 : 감자(200g이하) 6개 ● 재료 : 떡국떡 100g, 삶은 달걀 2개, 고구마 1개, 피자치즈 80g, 슬라이스 치즈 2장, 올리브유 ※ 큰 고구마(150g이상)는 반으로 잘라서 ● 조리 방법 약간, 화이트 소스 1컵, 파슬리가루 약간 조리하십시오.
- Page 72 요리안내 채소쌀미음 시루떡 오향장육 ● 재료 : 쌀 ⅔컵, 브로콜리 30g, 물 1½컵, 소금 ● 재료 : 멥쌀가루 3⅓컵, 팥 1⅓컵, 소금 ½ 큰술, ● 재료 : 돼지고기 700g, 간장 130ml, 설탕 3큰술, 약간 설탕 2큰술, 물 1½큰술 무명실 조금 ●...
- Page 73 사용하기 생크림케이크 달걀찜 참치채소무른밥 ● 재료 : ● 재료 : 달걀 3개, 물 또는 멸치 다시마 육수 ● 재료 : 밥 70g, 참치살(캔) 40g, 피망 15g, 당근 밀가루(박력분) ⅔컵, 달걀 2개, 버터 ½큰술, 300ml, 새우젓 ½작은술, 소금 약간, 당근 15g, 15g, 물...
- Page 74 요리안내 밥피자 가지찜 버터초콜릿케이크 ● 도우 재료 : 밥 200g ● 재료 : 가지 2개 ● 재료 : 버터 200g, 설탕 90g, 달걀 3개, 핫케이크 가루 110g, 초콜릿 70g ● 토핑 재료 : 슬라이스햄 4장, 양송이버섯 4개, ● 양념장 : 진간장 2큰술, 붉은고추 1개, 풋고추 캔옥수수...
- Page 75 사용하기 다이어트 현미밥 다이어트 잡곡밥 현미 나물밥 1인분=167 Kcal 1인분=162 Kcal 1인분=321 Kcal ● 재료 : 현미, 물 ● 재료 : 쌀, 여러가지 잡곡, 물 ● 재료 : 현미 2컵, 다시마 우린 물 2½ 컵, 참나물 50g, 삶은 고사리 100g, 콩나물 100g, 표고버섯 ●...
-
Page 76: 고장신고 전에 확인 하십시오
고장신고전에확인하십시오. 고장신고전에확인하십시오. A/S를 요청하시기 전에 아래의 사항을 확인해 주십시오. 제품의 고장은 아니지만 사용법에 익숙하지 않거나 사소한 원인으로 전기압력밥솥이 정상적으로 작동하지 않을 수 있습니다. 이런 때에는 다음의 사항에 대해 점검하신다면 서비스 센터의 도움 없이도 간단한 문제는 해결할 수 있습니다. 아래의 항목에 대해... - Page 77 고장신고전에 고장신고전에 현상 확인해 주세요. 조치 방법 예약취사를 13시간이 초과하도록 설정하지 자동으로 13시간으로 예약시간이 조정되어 않았습니까? 예약취사가 시작됩니다. 표시가 나타날 때 절약보온을 8시간이 초과하도록 설정하지 자동으로 8시간으로 시간이 조정되어 않았습니까? 절약보온이 시작됩니다. 표시가 온도감지기에 이상이 있을 때 나타납니다. 서비스 센터로 문의하십시오. 나타날...
- Page 78 MEMO MEMO PA1000 Series_KOR_US-1.indd 38 2013-08-08 11:30:38...
- Page 79 Memo Memo PA1000 Series_KOR_US-1.indd 39 2013-08-08 11:30:38...
- Page 80 PA1000 Series_KOR_US-1.indd 40 2013-08-08 11:30:38...
Need help?
Do you have a question about the IH PA1000 Series and is the answer not in the manual?
Questions and answers