Table of Contents
Advertisement
Advertisement
Table of Contents

Related Manuals for Suntek HC-550A


Summary of Contents for Suntek HC-550A
- Page 1 Scouting Trail Camera HC-550A...
-
Page 2: Table Of Contents
1. Introduction.......................3 1.1 Application......................3 1.2 Power Supply......................3 1.3 Caution........................3 1.4 Key Features......................4 2. Whole View and Details of Camera................4 2.1 Front View of Camera....................4 2.2 Back View of Camera....................5 2.3 Bottom View of Camera..................5 3.Quick Operation......................6 3.1 Load Battery......................6 3.2 Remoter........................6 3.3 Power On.......................7 3.3.1 Test........................7... -
Page 3: Introduction
1. Introduction Thank you for choosing our highly qualified scouting trail camera. This 16MP HD digital camera totally R&D by our diligent and smart engineers based on feedbacks and requirements from customers globally. Please read this manual carefully before the camera using. 1.1 Application This digital camera is an ideal product for housing security, warehouse surveillance and monitoring wild animals with its camouflage appearance and nice shape. -
Page 4: Key Features
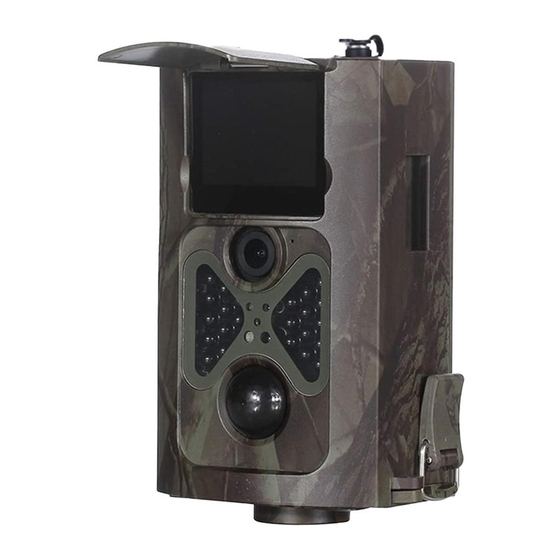
1.4 Key Features Built-in 2.0" TFT color screen to review photos and videos 48pcs IR LEDs for flash range 20 meters Programmable 16/12/8 Mega pixels high-quality resolution Color pictures during daylight, black and white at night Adjustable PIR sensitivity: High/Normal/Low Impressive quick trigger time: 0.5second Multi-shot pictures;... -
Page 5: Back View Of Camera
2.2 Back View of Camera Bottom View of Camera... -
Page 6: Quick Operation
3. Quick Operation 3.1 Load Batteries 3.2 Remoter The infrared remoter is an input device of the camera and primarily used for customer settings. Its maximum remote distance is 9 meters. Note: Press the punctuation “ ” for laser light. Note (Under TEST mode): 1. -
Page 7: Power On
4. Viewing video, press “Left” to start, again to stop, press “OK” to return. 3.3 Power on Slide Power Switch from OFF to Test (for setting) then to ON position, the camera powers on. (Please don’t slide the power switch from OFF to directly) 3.3.1 TEST (The first way to set the menu) In TEST mode, the screen lights up. -
Page 8: Settings Menu
3.5 Settings Menu There are 3 parts setting of the camera, user can set Camera, Video and System menu setting by remoter; 3.5.1 Camera Menu Resoluation 16M/12M/8M Sequence Single/3/6/9 Camera Auto/100/200/400 1/5/10/30S Delay 1/5/10/30Min Address 26 Alphabet+number Description:... -
Page 9: Video Menu
Menu Content Description Resolution 16MP, 12MP, 8MP Photo size Delay 1/5/10/30 sec/min Waiting time from the last taking Sequence 1/3/6/9 Number of photos taken every time Auto,100,200,400 The camera exposure level Camera ID 26alphabet +number Camera id 3.5.2Video Menu Resoluation 1080P/720P/VGA Video VideoLength... -
Page 10: Time Lapse Setting
Mode Camera, video, camera Taking picture, video, &video Time lapse picture and video, taking picture regular Language English, François, Camera Menu language Deutsch (totally 12 languages) Time Lapse OFF/30/60/240MIN Camera take pictures regularly no matter there is motion Motion Detection HIGH/MID/LOW PIR distance Date/Time... -
Page 11: Specification
5. Specification Image Sensor 5 Mega Pixels Color CMOS Memory TF Card to 32GB F=3.1; FOV=120 ° Lens Size 145mm x 80mm x 55mm TFT Display Screen 2.0 inch Black Invisible 940nm PIR Distance High/Normal/Low PIR Sensor Sight Angle 120 Degrees Number of IR LED 48LEDs Max Night Vision Lighting Distance...