Table of Contents
Advertisement
Advertisement
Table of Contents

Related Manuals for Suntek HC-800M


Summary of Contents for Suntek HC-800M
- Page 1 User Manual HC-800M...
-
Page 2: Table Of Contents
1. Introduction.......................3 1.1 Application......................3 1.2 Power Supply......................3 1.3 Caution........................3 1.4 Key Features......................4 2. Whole View and Details of Camera................5 2.1 Front View of Camera....................5 2.2 Back View of Camera....................5 2.3 Bottom View of Camera..................6 3.Quick Operation......................6 3.1 Load Battery......................6 3.2 Insert TF Card......................7 3.3 Remoter........................7 3.4 Power On.......................8 3.4.1 Test........................8... -
Page 3: Introduction
1. Introduction Thank you for choosing our highly qualified SMS control Scouting Trail Camera. This 16MP HD digital camera was totally R&D by our diligent and smart engineers based on feedbacks and requirements from customers globally. Please read this introduction carefully before the camera using. 1.1 Application a. -
Page 4: Key Features
1.4 Key Features Built-in 2.0" TFT color screen to review photos and videos on camera 42pcs IR LEDs for flash range as 20 meters Programmable 16/12/8 Megapixel high-quality resolution Color pictures during daylight; black and white at night Adjustable PIR sensitivity; HIGH, MID, LOW Impressive quick trigger time: 0.3s Multi-shot pictures;... -
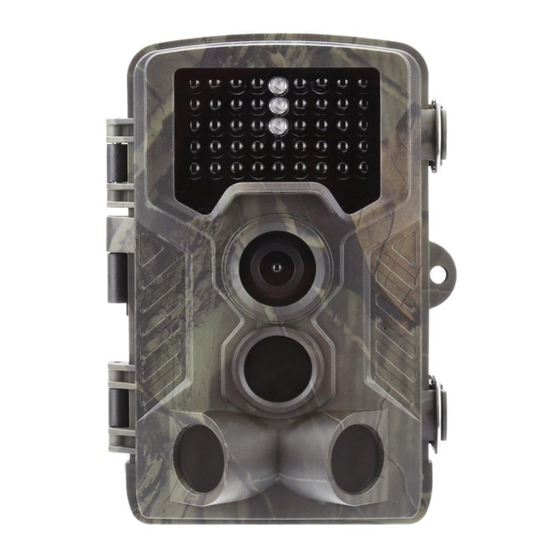
Page 5: Whole View And Details Of Camera
2. Whole View and Details of Camera 2.1 Front View of Camera 2.2 Back View of Camera... -
Page 6: Bottom View Of Camera
2.3 Bottom View of Camera 3. Quick Operation 3.1 Load Batteries 3.2 Insert TF card and SIM card Note: To active its MMS or SMTP function, please save setting file “Parameter.dat” by MMSCONFIG to TF card. Press “Left” directly to get the IMEI (in the TEST interface). -
Page 7: Power On
3.3 Power on Slide Power Switch from OFF to Test (for setting) then to ON position, the camera powers on. (Please don’t slide the power switch from OFF to directly) 3.4.1 TEST (The first way to set the menu) In TEST mode, the screen lights up. User can do the below operations by OSD buttons of camera: a. -
Page 8: Settings Menu
Note: To active its MMS or SMTP function, the camera should find signal and SIM card firstly. 3.6 Settings Menu There are five parts setting of the camera, user can fix Camera, Video and System menu setting by camera buttons; MMS menu and SMTP menu setting by software “MMSCONFIG”... - Page 9 3.6.1 Camera Menu setting Resoluation 16MP/12MP/8MP Sequence Signal/3/6/9 Camera Auto/100/200/400 1/5/10/30s Delay /1/5/10/30min Address 26 alphabet+number Description: Menu Content Description Resolution 16MP, 12MP, 8MP Photo size Delay 1/5/10/30 sec/min Waiting time from the last taking Sequence 1/3/6/9 Number of photos taken every time Auto,100,200,400 The camera exposure level...
-
Page 10: Video Menu
To change 16MP to 8MP Resolution, the operations are: Note: 1. The mode is Camera or Camera &Video or Time lapse. 2. Delay, Sequence and ISO setting operations are the same. 3.6.2 Video Menu setting... - Page 11 1080P/720P/WVGA Resoluation /VGA Video Video Length 10/30/60/90S Record Audio ON/OFF Menu Content Description Resolution 1080P, 720P, WVGA, QVGA Video size Video Length 10S, 30S, 60S, 90S The time length of video Record Audio On, Off If On, Video sound is recorded Change 1080P to 720P Resolution, the operations are: Note: 1.
-
Page 12: System Menu
Time lapse means camera take pictures regularly no matter there is motion or not. Working mode-TIMELAPSE, choose – TIMELAPSEINTERVAL-set the working time (30/60/240minutes selectable) 3.6.4 System Menu Camera/Video/Camera+Video/ Timelapse Mode 12 languages Language Timelapse 30/60/240mins interval Image size Small/Normal/Big TV Mode NTSC/PAL Motion High/Mid/Low... - Page 13 Menu Content Description Mode Camera, video, camera&video Taking picture, video, picture Time lapse and video, taking picture regular Language English, Francais, Deutsch Camera Menu language and so on Date/Time 31-07-2014 15:49:40 Date-Month-Year Hour:Minute:Second Password ON/OFF ON, OFF Password of entering camera Password **** 4 digital numbers(1314...
-
Page 14: 5Mms Menu
Setting Default Items Mode Camera Camera, Video, Camera&Video, Time lapse Resolution (Camera) 16M, 12M, 8M Delay 1 Seconds 1-30 Seconds, 1-30 Minute Multi Single Single, 3, 6, 9 Pictures Auto Auto 100, 200, 400 Resolution (Video) 1080P 1080P, 720P, WVGA, QVGA Video Length 10s, 30s, 60s, 90s Date/Time... -
Page 15: Mmsconfig Setting
4. MMSCONFIG Setting 4.1 Load CD into the computer 4.2 Click the MMSCONFIG.exe file from MMSCONFIG folder 4.3 Fix Camera, Video and System Menu Setting (the second way to set the menu) Note: If you have done the menu setting by remoter in TEST mode, you can skip 4.3. - Page 16 In Auto MMS Mode, there is configured information for selection a. Choose Country b. Choose Operator c. Fill in the phone number in the right side blank column as receiver d. Fill in the email address for photos receiving 4.4.2. Manual MMS Mode: If there is no configured information for selection, please choose Manual MMS Mode.
- Page 17 4.5 Fix SMTP Setting This way of sending pictures is also called GPRS transmission by users. It’s highly welcome now, because the picture is sent from email to email, only charging the flow cost. 4.5.1 Auto SMTP Mode: In Auto SMTP Mode, there is configured information for selection a.
- Page 18 e. Add sending email address password on the left f. Add receiving email address on the right 4.5.2 Manual SMTP Mode: If there is no configured information for selection, please choose Manual SMTP Mode. Firstly, User need to contact SIM card carrier to get APN, Account, Password information and fill in;...
- Page 19 4.6 Save the file “Parameter. dat” to TF card...
-
Page 20: Firmware Upgrade
5. SMS Command Code There are 2 ways for using: 1. Send SMS code directly 2. Install phone application, select function command The SMS codes are: Code Function Meaning *530* Camera Start Start Working *531* Camera Sleep Stop Working Camera takes a picture, then sends it to *500* Capture configured phone or email... - Page 21 Image Sensor 5 Mega Pixels Color CMOS Memory Micro SD Card to 32GB Lens F=1.8; FOV=120 ° Size 135mm * 90mm * 86 mm TFT Display Screen 2.0 inch Black 940nm PIR Distance High/Normal/Low PIR Sensor Sight Angle 120 Degrees Number of IR LED 42LEDs Max Night Vision Lighting Distance...
-
Page 22: Packing List
8. Packing List...
Need help?
Do you have a question about the HC-800M and is the answer not in the manual?
Questions and answers