Table of Contents
Advertisement
Thank you for your purchasing Robstep-M1
Robstep-M1 is an intelligent robot that balances automatically product.
This User Manual providing you information about how to assemble and use Robstep-M1 safely, and how to maintain it . If
you want to get the most pleasure of riding Robstep-M1 , please read it carefully.
It is very important for you to know all safety notices and precautions before your first riding, then operating as required.
It is recommended that all consumers should follow the instructions mentioned in the Product Manual, otherwise,
consumers should take full responsibility for all consequences.
accident caused above and will reserve the right to the legal responsibility.
For further related service support, please refer to official website :(www.robstep.com)
To avoid the possibility of losing control, collision or falling, we insist that
all customers should learn how to use Robstep-M1 securely and safely.
This Product Manual provides you all information about safety video and
road senses.
Dongguan Robstep Robot Co.,Ltd
M1 Product Manual
will not liable for
Advertisement
Table of Contents

Related Manuals for Robstep Robin M1


Summary of Contents for Robstep Robin M1
- Page 1 Robstep-M1 is an intelligent robot that balances automatically product. This User Manual providing you information about how to assemble and use Robstep-M1 safely, and how to maintain it . If you want to get the most pleasure of riding Robstep-M1 , please read it carefully.
-
Page 3: Table Of Contents
3. Assembly Instruction ............................4 3.1 Double check the spare parts inside the package ......................... 4 3.2 Assembling Robstep ................................4 4. Controlling of Robstep and the display device ....................6 4.1 Buttons of remote control..............................6 4.2 Sreen of remote control ............................... 9 4.3 Display board .................................. - Page 4 7.2 The maximum driving distance ............................22 7.3 Speed limit ..................................22 7.4 Vibration warning ................................23 7.5 Abnormal condition ................................23 8. How to use Robstep ............................24 8.1 Start up Robstep ................................24 8.2 Safe Parking ..................................24 8.3 Driving steps ..................................25 8.4 Driving practice .................................
- Page 5 12. Robstep dimension ............................33 13. Fault finding ..............................34 14. Android tool instruction ..........................35 15.1 Start Robstep tools ................................35 15.2 Robstep tools main screen .............................. 36 15.3 Robstep tools main menu ..............................37 15.4 Bluetooth device ................................38 15.5 Setting .................................... 40 15.6 Self balance ..................................
- Page 6 16.6 Manual telecontrol ................................56 16.7 Firmware upgrade ................................57 16.8 Setting .................................... 60 Hope you enjoy the fun of Robstep ........................61...
-
Page 7: Document Overview
Product Manual will help you assemble and install M1 correctly and efficiently, please read the user manual for further information. Driving tutorial video and the user Manual in PDF format. You may download them from official website www.robstep.com. To avoid danger, please make sure that you follow all instructions provided from the video. -
Page 8: Introduction
Note : Precautions and use-method that should be noticed by all users. 2. Introduction 2.1 Illustration about vehicle types M1 is an intelligent robot researched and developed by M1, which made the usage of principle of mobile equilibrium for controlling of moving forward, backward and stop. -
Page 9: How Robstep Works
Serial number is important for quality tracing, insurance claim, claim of missing. The way to get the serial number Acquiring the serial number at the outer box of the package. The serial number consists of eleven number or letter in total Record it and keep it well 2.3 How M1 works M1 consists of main body, wheels, electric drive system, etc. -
Page 10: Assembly Instruction
3. Assembly Instruction In this part, we will talk about the parts of M1 and how to install M1. 3.1 Double check the spare parts inside the package Please check the package of M1 and make sure that all parts are complete. The spare parts of M1are listed as follows, if any of them is missing, please contact the local agent or us directly. - Page 11 Please make sure the power is off when you conduct any maintenance or installation of M1.
-
Page 12: Controlling Of Robstep And The Display Device
4. Controlling of M1 and the display device 4.1 Remote control of Robstep 1 You can control Robstep-M1 by the remote control within 10 meters. In some heavy electromagnetic interference area may not reach 10 meters A: the beginner mode. Pressing this button so you can enter into the beginner model whose speed limits within 7km per hour. -
Page 13: Buttons Of Remote Control
C in the following 3 seconds, M1 can enter into self-checking system. Before the start of self-checking, the body of Robstep shall be hung up. In the state of self-checking, you will hear the bumming sound and all five lights keep flickering. - Page 14 ,Press the button M1 to turn it off. Beginner mode. This button have 2 function: When robstep is turned off and connected with remote control,by pressing this button M1 will enter beginner mode (top speed limit to 7KM/H). M1 will turn off automatically when it is idle for more than 10 minutes and remote control will enter energy saving mode and keep connected with M1.
-
Page 15: Sreen Of Remote Control
4.2.2 Sreen of remote control Silence Signal Remote USB icon Normal mode icon Lock Beginer mode icon Driving icon Milage/Speed indicator Digital indicator M1 power indicator... - Page 16 The sreen of remote control detail description: If the frame of this icon keeps flashing, that means remote control is trying to connect with M1 If the remote control is connected with M1, frame of this icon will be shown all the time. When remote control is connected, M1 power indicator update automatically, frame of silence icon and lock icon...
-
Page 17: Display Board
4.3 Display board The display board of M1 is located on the top of the battery. It shows information about M1 when it is working. A Display board of power consumption. After a fully charge all five lights will be always on normally. Each of them means 20% of power. If four lights are on it means there is 60%-80% left. -
Page 18: Introduction Of Short-Handlebar
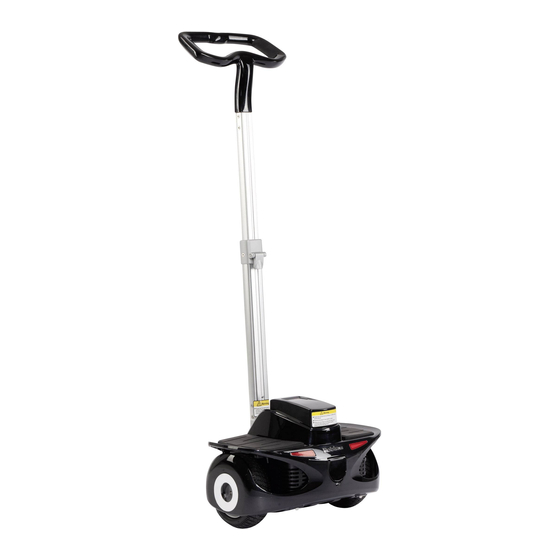
5.1 Description of short-handlebar Short-handlebar is developed and manufactured by Robstep with using driver’s knees to control the direction of M1 . Short -handlebar is small and light weight; easy to install and flexible to control. When the M1 is under the balance mode, user can control the driving speed and direction of M1 by the short-handlebar to user destination, 5.2 Parameters of short-handlebar... -
Page 20: How Does Robstep Work
5.3 How does Robstep work ? M1 short-handlebar is an accessory of M1 , which can displace the deflection bar combination and the handlebar. It will meet the function to adjust the direction of M1. In addition, the M1 with short-handlebar has the same working principle with the normal M1. -
Page 21: Check The Package
5.4 Check the package In this part it shows how to assemble a short-handlebar M1 short handlebar package come with the following components(View 3.1), please contact local distributor or us if you find something missing. 5.5 Assemble the short-handlebar Step 1: Make sure M1 is disconnect with charger and turn off. Step 2: According to the instruction, dismantle the handlebar of M1. -
Page 23: Instructions Of Battery
6. Instructions of battery This part mainly describes how to charge M1 at home, how to take good care of the battery, needed precautions and battery specification. To protect your safety and maximize the service life of battery, please operate it under the following instructions. when it’s almost no power please stop using and recharge. -
Page 24: Low Power
6.1 Low power Please stop riding M1 when the battery shows low power. At that time, the system will gradually slow down, and shut down automatically after 7 seconds. If you insist to ride, you might fall from M1, get injuries and cause damage to the battery and the unit. 6.2 Charging steps Open the charging port at the back of M1’s body Make sure that the charging port is clean and dry... -
Page 25: Temperature Too High Or Too Low
Do not put the battery in the fire or heat it, and no storage in high temperature is allowed. Do not put the battery in the water, keep away from wetness when it needs to be stored. Do not put anything into the charging port, it may cause the internal electric device short circuit. Do not disassemble the battery and change the battery structure. -
Page 26: Specification Of Battery
6.5 Specification of battery Battery type Lithium battery Charging time Four hours (Approx.) Voltage Weight 3.1kg(For reference, Detailed see the actual weight) Beginning volume Size 165mmX145mmX 85mm -10 ~50 (Recommended temperature : 10 ~30 ) Operating temperature -10 ~35 (Recommended temperature : 10 ~30 ) Charging temperature Three months(Fully charge before storage) Storage(10 ~ 30 ) -
Page 27: Safety Precautions
Dongguan Robstep Robot Co., LTD hopes all users can drive M1 safely and enjoy it. Remembering that how you learn biking, driving a car, skiing or using other similar traffic tools , all these experience can be applied to our products. -
Page 28: The Maximum Driving Distance
You may fall down from M1 if it is overweight. 7.2 The maximum driving distance The maximum driving distance is related to all kinds of factors, for example: Terrain: The driving distance will be increased when driving on the smooth and flat surface, otherwise the driving distance might be reduced. -
Page 29: Vibration Warning
7.4 Vibration warning M1 will send a vibrate warning message under the following circumstances 1 Alarm when it is in lock mode; 2 Over speeding for going backward; 3 Any attempts of stepping upon M1 during charging Please stop using M1 when it is under (2)&(3) situations listed above. -
Page 30: Safe Parking
8. How to use M1 You need to note some safety information before driving M1. It is very important for you to understand all safety information provide by the user manual. 8.1 Start up M1 Introduction of start up If this is your first time to start M1, please press the start button at the back of M1’s Body. Then you can turn on and off M1 by remote control directly. -
Page 31: Driving Steps
8.3 Driving steps Step 1:Starting M1 By press the button at the back to M1 to start it up ,then you can see the indication light turn on. If the indication light keep flashing that means the machine operates normally. Step 2: prepare to get onto M1 There are two sensors under each pedal, they can detect the pressures when user step on it. -
Page 32: Driving Practice
8.4 Driving practice Before you drive M1 outside, for your safety, please make sure you can handle it well: Practice driving in an open field on your first riding. Keep practice until you can easily get on, make forward and backward, turn, stop and get off. By practice, you can drive M1 on narrow and winding ground. - Page 33 When you drive M1 , please ensure for the safety measures such as wearing helmet ,knee pad, elbow pad. M1 is only applicable to personal entertainment and it is not recommended to use as public transportation. It is banned to use on Motor lane. Please don’t drive M1 on abrupt slopes.
- Page 34 standing on the pedals. Please keep some distance between your body and the handle when you driving , it will increase the possibility of losing control, collision and falling down if it is too close. Please wear suitable sports clothes to drive M1, which will help you deal with emergency better. Please remember that you will be 21 centimeters higher than your normal height when driving M1, so remember to keep your head a little bit down when getting through doors.
-
Page 35: Repair And Maintenance
installation in an area where a water jet could be used 10. Repair and maintenance Daily maintenance is necessary for M1. This section is mainly about how to maintain M1: Please ensure the power and charging cable are disconnected before carry out for the following operation. - Page 36 Lifting notice Raise and lower M1 in the right way: If you want to carry M1, please follow the steps below: Make sure that M1 is disconnected to charger and turned off. Grab the bottom of the short-handlebar like the pictures showing below, lift it up, and carry M1 with another hand to other places.
-
Page 37: Cleaning
10.3 Cleaning Please note these matters before cleaning: Make sure M1 is power off. Please wipe M1’s shell with soft dry cloth for cleaning. Please avoid using water or other liquids to clean M1. If the water and the other liquids seep into M1, it will cause permanent damage to internal electronic components. -
Page 38: Technical Parameters
11. Technical Parameters Model NO remarks Maximum speed 15km/h *The running distance of 20km after single charging is tested Distance( 20km* after single charging under the Max climb capability 15 degree condition of the environment for 25 degrees Celsius, 70 kg weight Total Weight 18.5 kg Min-Max load... - Page 39 Charging time 4 hours only, please refer to the specific data under different environment. Tyre type Vacuum tyre Full lifetime 35000km 12. M1 dimension...
-
Page 40: Fault Finding
13. Fault finding... -
Page 41: Android Tool Instruction
Self-checking projects of M1 include : the sensors, system static electricity, system dynamic electricity, motor speed fluctuation etc. If there is something wrong with M1 , please contact the local agents or us directly. About all the information, please visit official website :www.robstep.com Product liability insurance covered by PICC 14. - Page 42 with M1 via Bluetooth. With this tool you can control M1 by your free will. ( this software does not apply to IOS version M1) 14.1 Start M1 tools You may download the software from our website. After installation, click the icon to start the software as image at right: Click here...
-
Page 43: Robstep Tools Main Screen
14.2 Robstep tools main screen Main screen provice graphic information, like current Speed, Milage, Temperature, Voltage, Version, etc. (Auto display after Bluetooth connection success) Bluetooth icon Speed Milage Battery voltage PCB temperature Heat sink temperature Serial number Firmware version for each... -
Page 44: Robstep Tools Main Menu
14.3 Robstep tools main menu After get into main screen, click the bluetooth icon, connect with Robstep via bluetooth; click menu, there are 6 options: Bluetooth device, Setting, Auto balance, Real-time graphic display, Event list, Firmware upgrade. If the Bluetooth connection failed, setting, auto balance, real-time graphic display, event list and firmware upgrade will not be able to access (icon show as gray color). -
Page 45: Bluetooth Device
14.4 Bluetooth device Click the “Bluetooth device” on menu or click the Bluetooth icon on screen, Bluetooth device page pop up as image follow : Click Bluetooth icon... - Page 46 Enter Bluetooth section, search Bluetooth device, found the target and match connection as Image 2 at right. Once match success back to Robstep tools and connect again. If the connection does not success, go to android system setting, select wireless and network ->...
-
Page 47: Setting
14.5 Setting Select Setting on menu, as image follow: Rename Robstep on Bluetooth change handlebar mode... - Page 48 Please refer to short handlebar user manual for further information. (Experienced of normal handlebar is highly recommended before change to short handle bar) After changing all the info, press the menu button at your android device and click save. Restart M1 and Robstep Tolls.
-
Page 49: Self Balance
14.6 Self balance Click menu on android device and select “Auto balance”, as image below:... - Page 50 User may control M1 to move by mobile phone As image at right, into self balance mode: Press start control Button, enter manual control mode, use finger move the trackball the control the direction of M1 move. If you would like to enter auto control mode, press “ Gravity control” button, hold your device horizontally, tilt your device to any direction you want and trackball will move Button as your way, then press “start control”...
-
Page 51: Real-Time Graphic Display
14.7 Real-time graphic display Select “Real-time graphic display” as image below:... - Page 52 Real-time graphic display shows the status of every part inside of M1. You can choose the content you would like to display, after the selection, set the Sample rate(default 100ms). Press chart to show the chart. Also you may save the chart as data or image.
-
Page 53: Event List
14.8 Event list Click menu and select “Event list” as image below:... - Page 54 Event list can be divide to normal event list and error event list (as image below). It is more convenient for maintenance and repair. Event type Event name Data when event occur...
-
Page 55: Firmware Upgrade
14.9 Firmware upgrade Click android menu and select “Firmware upgrade”as image below:... - Page 56 Mobile need to be within 5 meters with M1. M1 may restart automatically after upgrade complete. Please exit the software and reconnect bluetooth. Here is how user use mobile phone upgrade their Robstep:...
- Page 57 If the green indication light keep flashing, press “start downloading” directly. If the green indication light always on or not on at all, please tick “download peripherals controller only” and start download. If you still could’t fix follow by the way above, please contact Robstep customers service.
-
Page 58: Ios Tool Instruction
Bluetooth. With this tool you can control M1 by your free will. ( this software only apply to IOS version M1). 15.1 Start Robstep Tools You could download Robstep Tools from App Store. Install and open it as image at right:... -
Page 59: Robstep Tools Main Screen
Click the Bluetooth icon, make connection with M1; When the Bluetooth become blue, click the menu button, there are 4 parts - Firmware upgrade, Bluetooth device, Self balance and Setting. If your device is not connected with M1, the Bluetooth icon is in gray color, it will turn blue when connected. Then Robstep tools will function correctly. -
Page 60: Bluetooth Device
15.3 Bluetooth device Press the menu button then select “Bluetooth device” or click icon directly, bluetooth setup screen pops up Bluetooth current status Connect mobile devce and M1 Select M1 inside the Bluetooth page and then connect. After connection success, status will become connected ( at the mean time Bluetooth light will turn on at M1). -
Page 61: Robstep Status
15.4 Robstep status Press Robstep status at main screen, all the detail will be display in a new status page. Status page shows current Speed, Milage, Temperature and Battery percentage. Milage Temperature Battery Speed... -
Page 62: Auto Telecontrol
15.5 Auto telecontrol Press the “Auto telecontrol” button at main screen: User may control the direction with mobile phone. Place your mobile horizontal, press ON, then M1 enter telecontrol mode. Tilt your mobile to one direction, M1 run to the same direction. Turn the steer to change direction. - Page 63 15.6 Manual telecontrol Select manual telecontrol at main screen; User may control the direction with mobile phone. Slide control to ON, enter the manual telecontrol mode. Rotate the steer wheel by finger,M1 will follow the direction you steer and run. Slide the bar at right hand side to front, that means acceleration.
- Page 64 enough. If you would like to quite the program, just slide the bar to OFF or step you foot on the pedal. 15.7 Firmware upgrade Press the “Firmware upgrade”button at main screen: Before upgrade the system, make sure M1 have more than 40% power and you mobile phone have more than 30%.
- Page 65 Connect your mobile with Robstep via bluetooth and get the Serial Number. Send the serial number to M1 customer service. Get the firmware Robstep update bin from our staff and copy it to your mobile . Reconnect with M1, then choose firmware upgrade.
- Page 66 Connect iPhone with PC, turn on i Tunes, select your device, click “program” at top menu. Find “file share” function, select Robstep Tools, “add” Robstep_update.bin file you receive from after sales service department. if upgrade fail, please try the follow ways: If the green indication light keep flashing, press “start downloading”...
- Page 67 Please refer to short handlebar user manual for further information. (Experienced of normal handlebar is highly recommended before change to short handle bar) After changing all the info, press the menu button at your android device and click save. Restart M1 and Robstep Tools.
- Page 68 If there is any problem occur, please read through <M1 Product manual>. If the Product manual is not able to help you, please log in to www.robstep.com or call the hotline:(0086)0769-26620928 contact our customer service. Current document version is: V1.1...
- Page 71 Dongguan Robstep Robot Co.,Ltd. Address: Songhuhuake No.2 Building, Songhuhuake Industrial Park, Songshan Lake, Dongguan, China Tel: (0086)0769-26620928 . Website:www.robstep.com...
Need help?
Do you have a question about the Robin M1 and is the answer not in the manual?
Questions and answers