Grandstream Networks GVC3200 User Manual
For android
Hide thumbs
Also See for GVC3200:
- User manual (146 pages) ,
- Administration manual (94 pages) ,
- Quick installation manual (52 pages)

Related Manuals for Grandstream Networks GVC3200


Summary of Contents for Grandstream Networks GVC3200
- Page 1 Grandstream Networks, Inc. GVC3200 Video Conferencing System for Android User Guide...
-
Page 2: Table Of Contents
FEATURE HIGHTLIGHTS..........................11 SAFETY COMPLIANCES..........................13 WARRANTY................................13 INSTALLING GVC3200..................14 EQUIPMENT PACKAGE CONTENT......................14 CONNECTING GVC3200..........................14 GETTING TO KNOW GVC3200................. 19 REMOTE CONTROL............................19 USING THE REMOTE CONTROL......................21 PAIRING AND CONNECTING THE REMOTE CONTROL..............22 USING MOUSE & KEYBOARD........................22 OLED SCREEN..............................23 USING THE LED INDICATOR......................... 23 STATUS ICONS.............................. - Page 3 ANSWERING A CALL............................43 SINGLE INCOMING CALL........................43 MULTIPLE CALLS/CALL WAITING......................43 SWITCHING LINES DUING CALL........................43 CALL HOLD................................ 44 CALL TRANFER..............................44 BLIND TRANSFER............................44 AUTO-ATTENDED TRANSFER......................44 ATTENDED TRANSFER.......................... 45 MUTE................................... 45 CALL RECORDING............................45 Firmware Version 1.0.0.X GVC3200 User Guide Page 2 of 86...
- Page 4 ADD CONTACT FROM CALL HISTORY....................67 DELETE CALL HISTORY......................... 68 FILEMANAGER..............................68 COPY FILE..............................68 SEND FILE..............................69 DELETE FILE............................. 69 RENAME FILE............................69 ECORDING.................................69 BACKUP................................70 BACKUP DATA............................70 RESTORE BACKUP..........................72 SET BACKUP PATH..........................72 DIAGNOSIS................................ 72 Firmware Version 1.0.0.X GVC3200 User Guide Page 3 of 86...
- Page 5 CUSTOM APP ON HOME SCREEN......................73 UNINSTALL APPLICATION..........................73 GS MARKET......................75 SEARCH APPS..............................75 DOWNLOAD AND INSTALL APPS......................... 75 UPDATE APPS..............................75 GVC3200 WEB UI FEATURES................76 ACCESSING GVC3200 WEB GUI........................76 SAVING CHANGES............................76 DEFINITIONS..............................77 TOOLBAR................................77 CALL PAGE.................................78 MAKING A CALL............................78 CONFERENCE CONTROL........................78...
- Page 6 Table 17 GVC3200 Import Contacts Parameters....................62 Table 18 GVC3200 Download Contacts Parameters..................63 Table 19 GVC3200 Export Contacts Parameters....................64 Table 20 GVC3200 WEB ACCESS........................77 Table 21 GVC3200 Web UI - Audio Control Parameters..................84 Firmware Version 1.0.0.X GVC3200 User Guide Page 5 of 86...
- Page 7 Figure 7 GVC3200 English Input Method - Capslock..................25 Figure 8 GVC3200 Soft Keyboard - Symbols and Numbers................25 Figure 9 GVC3200 Soft Keyboard - More Symbols and Numbers..............25 Figure 10 GVC3200 Home Screen........................26 Figure 11 GVC3200 Add Wi-Fi Screen........................28 Figure 12 GVC300 Bluetooth - Paired Device....................29...
- Page 8 Figure 46 GVC3200 Web GUI - Login......................... 76 Figure 47 GVC3200 Web UI Tool Bar........................77 Figure 48 GVC3200 Web UI - Call........................78 Figure 49 GVC3200 Web UI - Conference Control................... 79 Figure 50 GVC3200 Web UI - Contacts......................80 Figure 51 GVC3200 Web UI - Groups.........................81 Figure 52 GVC3200 Web Page—Schedule.......................
-
Page 9: Gvc3200 User Guide
CHANGE LOG GVC3200 user manuals. Only This section documents significant changes from previous versions of major new features or major document updates are listed here. Minor updates for corrections or editing are not documented here. FIRMWARE VERSION 1.0.0.X This is the initial version. -
Page 10: Welcome
User Manual, could void your manufacturer warranty. Warning: Please do not use a different power adaptor with the GVC3200 as it may cause damage to the products and void the manufacturer warranty. - Page 11 This equipment complies with FCC radiation exposure limits set forth for an uncontrolled environment. This equipment should be installed and operated with minimum distance 20cm between the radiator & your body. Firmware Version 1.0.0.X GVC3200 User Guide Page 10 of 86...
-
Page 12: Product Overview
Interoperable with 3rd party SIP-based video conferencing solutions (such as Cisco, Polycom, and Huawei) using BFCP and TIP Integrated dual-band Wi-Fi, integrated Bluetooth 4.0, Gigabit network port, SD interface (for local recording) Table 1 GVC3200 Technical Specifications Specification Description SIP RFC3261, BFCP, TIP (pending), RTP/RTCP, HTTP/HTTPS, ARP, ICMP, DNS Protocols/ (A record, SRV, NAPTR), DHCP, PPPoE, SSH, TFTP, NTP, STUN, LLDP-MED, LDAP (pending), TR-069, 802.1x, TLS, SRTP, TCP/IP/UDP, IPv6 (pending), FEC,... - Page 13 TR-069 or AES encrypted XML configuration file Provisioning Power & Green Universal power adapter included: Input 100-240VAC 50-60Hz; Output 12VDC/5A Energy Efficiency (60W) Package Content GVC3200 video conference system, external USB speaker/MIC, remote control, Firmware Version 1.0.0.X GVC3200 User Guide Page 12 of 86...
-
Page 14: Safety Compliances
WARRANTY If the GVC3200 phone was purchased from a reseller, please contact the company where the device was purchased for replacement, repair or refund. If the phone was purchased directly from Grandstream, please contact Grandstream Support for a RMA (Return Materials Authorization) number before the product is returned. -
Page 15: Installing Gvc3200
INSTALLING GVC3200 EQUIPMENT PACKAGE CONTENT The GVC3200 package contains the following items: Table 2 GVC3200 Package List Name Number GVC3200 Main Case External USB Speakerphone Remote Control (No lithium battery) 12V Universal Power Adapter Power Cable 1.5m Ethernet Cable 5m USB Extension Cable 3m HDMI Cable 1.5m HDMI Cable... -
Page 16: Table 3 Gvc3200 Front Panel
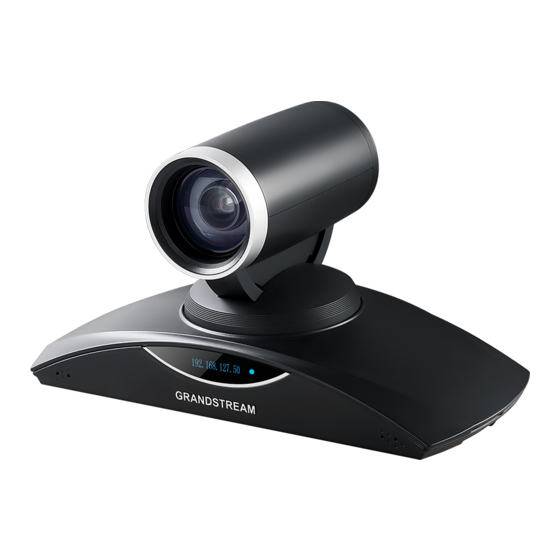
Figure 1 GVC3200 Front Panel Table 3 GVC3200 Front Panel Name Explanation 1/3" 2 Megapixel CMOS 1920Hx1080V@30fps Camera 70°(W)*- 6.3°(T) field of view Vertical Rotating +/-23° tilt Stent Horizontal Rotating +/-90° pan Platform Power on: Green Standby: Flash red LED Indicator... -
Page 17: Table 5 Gvc3200 Optional Equipment List
When the GVC3200 is powered up, use a small pin to press the button one time to reboot. When powering up GVC3200, long press the button for 4 to ... - Page 18 Connect the external speakerphone to the USB speaker interface on the GVC3200. Connect Ethernet cable from the LAN port of the GVC3200 to the RJ-45 socket of a hub/switch or a router (LAN side of the router) for network access. It is recommended to use Gigabit LAN to assure audio and video quality of video conference.
-
Page 19: Figure 3 Gvc3200 Back Panel Connection Diagram
Figure 3 GVC3200 Back Panel Connection Diagram The following diagram shows multiple GVC3200s deployed with other VoIP/network devices for video conference and collaboration. Figure 4 Deploy Multiple GVC3200s with Other Devices Firmware Version 1.0.0.X GVC3200 User Guide Page 18 of 86... -
Page 20: Getting To Know Gvc3200
Numeric Keys letter but it can be used to search for contact in Call interface. For example, typing 5 (JKL), 6 (MNO), 4 (GHI), 6 (MNO) can look for John if existed in GVC3200 contacts. Camera Switch to PTZ control mode. - Page 21 Input "#" on dialing screen to use it as REDIAL key. Display call details on call screen during a call. Display system status when the GVC3200 is idle. Press each shortcut key for designated functions on different Shortcut Key: Red screen context.
-
Page 22: Using The Remote Control
Please follow the steps below to troubleshoot: 1. Connect a USB mouse or use the virtual remote control in GVC3200 web UI to navigate in the LCD display device connected to the GVC3200; 2. Go to Settings->Network->Bluetooth, select and click on “Search For Devices”;... -
Page 23: Pairing And Connecting The Remote Control
Or, if in any other instance that the remote control is not paired with the GVC3200 anymore, please follow the steps below to re-pair and connect the remote control to the GVC3200: 1. Connect a USB mouse or use the virtual remote control in the GVC3200 web UI to navigate in LCD screen->Settings->Network->Bluetooth. -
Page 24: Oled Screen
USING THE LED INDICATOR The GVC3200 LED indicator is located next to the OLED. It can be used to notify the users with current status of the device. Please refer to the status description below. -
Page 25: Using The Onscreen Keyboard
Unknown Wi-Fi Wi-Fi Signal strength USING THE ONSCREEN KEYBOARD ENGLISH KEYBOARD This is the default keyboard on the GVC3200. The GVC3200 English keyboard supports multiple languages input methods. Users could tap on to switch among different languages. See figure below. -
Page 26: Numbers And Symbols
Figure 9 GVC3200 Soft Keyboard - More Symbols and Numbers HOME SCREEN GVC3200 Home screen displays the icons for users to easily access applications, camera, schedule, call, contacts, settings and custom applications. Press the left/right keys on the remote control to navigate. -
Page 27: Figure 10 Gvc3200 Home Screen
Figure 10 GVC3200 Home Screen Firmware Version 1.0.0.X GVC3200 User Guide Page 26 of 86... -
Page 28: Connecting To Network And Devices
Go to LCD menu->Settings->Network->Ethernet->IPv4 Settings. Tap on "Address Type" to select DHCP, Static IP or PPPoE as the address type. For DHCP, save the setting and the GVC3200 should be able to get IP address from the DHCP server in the network. -
Page 29: Turning Wi-Fi On Or Off
On the LCD display device, go to Settings->Network->Bluetooth. Tap on the green switch next to the GVC3200 device on the top row to turn on/off Bluetooth. Please note the Bluetooth needs to be turned on in order to use the remote control. -
Page 30: Connecting To A Bluetooth Device
GVC3200 LCD display device. If the user happens to reset the GVC3200, or need replace the remote control and pair it to the GVC3200 afterwards, follow the steps below: 1. Connect a USB mouse or open the virtual remote control after logging in GVC3200 web UI. -
Page 31: Figure 13 Always Ring Internal Ringer
"Search for devices". 3. Select 4. On the remote control you would like to pair with the GVC3200, press "OK" and digit 5 keys at the same time for about 5 seconds. 5. The pairing and connection process will be initiated and finished a few seconds. Please do not press any keys on the remote control or switch screens during this process to avoid connection failure. -
Page 32: Figure 14 Gvc3200 Add Vpn Files Screen
Figure 15 GVC3200 VPN Validation Screen Fill in correct username and password to connect to VPN. If the GVC3200 is connected to VPN successfully, icon will be shown in the top status bar; if the connection is failed, a prompt box will pop up to remind users whether to connect again. If Firmware Version 1.0.0.X... -
Page 33: Table 10 Gvc3200 Vpn File Parameters
DNS Server Input DNS server address. Forwarding Routes Input Forwarding Routes. For example, 10.0.0.0/8. VLAN SETTINGS Access GVC3200 home screen, go to Applications ->Settings ->Network->VLAN to configure VLAN settings on the GVC3200. Table 11 GVC3200 VLAN Configuration Parameters Parameters Descriptions Assigns the VLAN Tag of the Layer 2 QoS packets for LAN port. -
Page 34: Table 13 Gvc3200 802.1X Mode Parameters
IP Precedence, Diff-Serv or MPLS. The Default value is 48; 802.1X MODE Access GVC3200 home screen, go to Applications ->Settings ->Network->802.1X Mode. By default 802.1X is disabled. Selecting 802.1X mode to “EAP-MD5”, “EAP-TLS5” or “EAP-PEAP” to turn on 802.1X. -
Page 35: Figure 16 Gvc3200 Camera Screen
Select on home screen to access Applications. Then click on The GVC3200 camera screen has the following options: Figure 16 GVC3200 Camera Screen PRESET ADD/EDIT PRESET The users can create and save maximum of 24 camera presets, with each preset storing the camera position and focal length. -
Page 36: Figure 17 Gvc3200 Add Preset Screen
Figure 17 GVC3200 Add Preset Screen Select the preset window and press the blue shortcut key on the remote control to access the editing screen. Adjust camera position and zoom in/zoom out using the remote control. On the remote control, press the "OK" key to save the preset, or press Back key to cancel. -
Page 37: Table 14 Gvc3200 Camera Parameters
Figure 18 GVC3200 Camera Parameters Setting Screen Table 14 GVC3200 Camera Parameters Parameters Descriptions The GVC3200 has 4 built-in mode as well as "Manual" for customization. When set to "Manual", press the "OK" key to access each setting to configure sharpness, contrast, saturation and brightness. ... - Page 38 Blue Shortcut Key Auto focus. (AF) Firmware Version 1.0.0.X GVC3200 User Guide Page 37 of 86...
- Page 39 Users could view, copy and paste files by using the USB storage device. SD CARD Insert your SD card into SD card slot at the back of the GVC3200. Please make sure the SD card is inserted with right direction on GVC3200.
-
Page 40: Conference
GVC3200 is equipped with a built-in microphone; alternatively, you can connect external microphone arrays or other audio devices to the GVC3200 as audio input sources. Before using the GVC3200, connect the required audio input devices to the GVC3200 and set audio input parameters. The GVC3200 supports one speaker output.