Table of Contents
Advertisement
Quick Links
FlexTech
Assembly Instructions
Models EP-550, EP-850, EP-950
For gravity-assisted stretching and decompression
FULL
5
YEAR
To download and print Teeter's FlexTech
Series
TM
instructions, visit the product support page at teeter.com.
™
NEW!
Follow along with
your smartphone
to make assembly
even easier!
* Specifications may vary from this image and
are subject to change without notice.
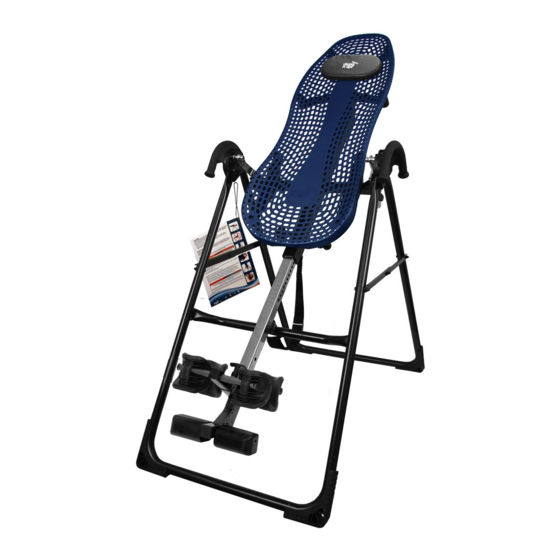
The EP-550 is shown here.
Your actual model may vary.
EN
Advertisement
Table of Contents

Subscribe to Our Youtube Channel
Related Manuals for Teeter FlexTech EP-550


Summary of Contents for Teeter FlexTech EP-550
-
Page 1: Assembly Instructions
YEAR * Specifications may vary from this image and are subject to change without notice. The EP-550 is shown here. Your actual model may vary. To download and print Teeter’s FlexTech instructions, visit the product support page at teeter.com. ™... -
Page 2: Table Of Contents
Assembly Steps ....... 6 – 13 Get the Most Out of Your Teeter ....6 Misassembly Check. -
Page 3: Important Safety Instructions
• DO NOT store the inversion table upright if children are present. Fold and lay the table on the floor. DO NOT store outdoors. • DO NOT use aggressive movements, or use weights, elastic bands, any other exercise or stretching device or non-Teeter attachments ®... -
Page 4: Items For Assembly
Items for Assembly Items not shown to scale. Hardware drawings located on the insert inside each Hardware Kit. ITEM NO. ITEM NAME ITEM NO. ITEM NAME A-Frame Base Assembly FlexTech Table Bed Assembly A-Frame with Angle Tether EP1140 FlexTech Table Bed ™... -
Page 5: Understanding Your Inversion Table
Understanding Your Inversion Table Before reading further, study the drawing below to familiarize yourself with the important components of your Teeter Inversion Table. The EP-550 is shown here. Your actual model may vary. Identifying Parts and Components Head Pillow Handles A-Frame FlexTech™... -
Page 6: Safety Warning Labels & Product Specifications
This drawing indicates the locations of the warning labels found on your product. If a label is missing, illegible or is removed, contact Teeter Customer Service to request a complimentary replacement label. Note: Image and labels below not shown at actual size. -
Page 7: Before Beginning Assembly
• Use Instructions - Learn how to test your balance and rotation control, and how to properly invert and return upright. • Advanced Stretching & Exercises - Use your Teeter for rotational stretches, sit ups, squats and more! • BONUS Healthy Back Classes* Get guided instruction on stretches and exercises you can do on your own to help strengthen your back and gain flexibility. -
Page 8: Assembly Steps
For EP-550 Models STEP 1 Assemble A-Frame Base & Tri-Grip Handles ™ • Follow these instructions if you have an EP-550 model. FIGURE 1 LOCKED • On a level surface, position the A-Frame so that it is standing upright RIGHT LEFT and the Stability Feet are on the ground. - Page 9 For EP-850 Models STEP 1 Assemble A-Frame Base & Over-EZ Handles ™ • Follow these instructions if you have an EP-850 model. FIGURE 4 LOCKED • On a level surface, position the A-Frame so that it is standing upright LEFT RIGHT and the Stability Feet are on the ground.
- Page 10 For EP-950 Models STEP 1 Assemble A-Frame Base & Large Over-EZ Handles • Follow these instructions if you have an EP-950 model. FIGURE 7 LOCKED • On a level surface, position the A-Frame so that it is standing upright RIGHT LEFT and the Stability Feet are on the ground.
- Page 11 For All Models STEP 2 Assemble Table Bed • Locate the Table Bed Assembly Hardware Kit (HK1010). FIGURE 10 • Place the Table Bed face down on the floor and push down on the Support Beam, so the two holes align evenly with the holes at the base of the Upper Support Arms (Figure 10).
- Page 12 For All Models STEP 3 Assemble Roller Hinges to Table Bed FIGURE 12 NOTE: Some models come with Traction Handles pre-assembled to the Roller Hinges. However, the assembly instructions detailed below UNLOCKED still apply. LOCKED • Familiarize yourself with the 3-Hole Roller Hinge and Cam Lock terms (Figure 12).
- Page 13 For All Models STEP 4 Assemble Table Bed to A-Frame • Face the front of the A-Frame where the Crossbar is located (Figure 17). FIGURE 17 • Grasp both Roller Hinges, right above the Cam Lock, and lift the Table Bed. Allow the top of the Table Bed to rotate toward the floor, so that the back of the Table Bed is now facing you and the top of the Table Bed is in front of the Crossbar (Figure 18).
- Page 14 For All Models STEP 5 Assemble Main Shaft to Table Bed • Your model’s Main Shaft may differ from what is shown in the FIGURE 21 figures, however the assembly instructions remain the same. • Loosen the De-Rattler Knob on the left side of the Main Shaft Housing.
- Page 15 For All Models STEP 6 Attach Angle Tether & Head Pillow Attach Angle Tether FIGURE 25 • The tether will come pre-assembled to the A-Frame. • Unfold the adjustable tether and clip it to the U-Bar on the underside of the Table Bed (Figure 25). •...
-
Page 16: Misassembly Check
For All Models Misassembly Check WARNING If your Teeter Inversion Table looks like either of these images, your inversion table has been misassembled and is unfit for use. Improper assembly could result in serious injury or death! Image B Image A Go back to Step 3 for instruction. -
Page 17: Before Inverting
Ensure Owner’s Manual is Attached FIGURE 28 The Owner’s Manual contains important information on how to use your Teeter Inversion Table, including how to personalize the user settings, properly secure and release the Ankle Lock System, and test and adjust the rotation control. -
Page 18: Warranty Terms & Registration
Under no circumstances shall Teeter, or any other party involved in the sale of this product, have any liability for incidental or consequential damage arising from breach of an express or implied warranty on any Teeter product. - Page 19 Tel. +49 511 62628630 Teeter Decompression Devices are multiple user, reusable devices for home use, intended to provide traction to the spine while stretching the para-spinal muscles and soft tissues. The devices provide non-powered traction and are meant for use by adults.
Need help?
Do you have a question about the FlexTech EP-550 and is the answer not in the manual?
Questions and answers