Table of Contents
Advertisement
Quick Links
Download this manual
See also:
User Manual
Advertisement
Table of Contents

Related Manuals for Kramer VM-8HN


Summary of Contents for Kramer VM-8HN
-
Page 1: User Manual
K R A ME R E LE CT R O N IC S L TD . USER MANUAL MODEL: VM-8HN 1:8+2 HDMI Looping DA P/N: 2900-300427 Rev 4... -
Page 3: Table Of Contents
EDID Source Signal Validation Stage HDCP Types Technical Specifications Figures Figure 1: VM-8HN 1:8+2 HDMI Looping DA Front Panel Figure 2: VM-8HN 1:8+2 HDMI Looping DA Rear Panel Figure 3: Connecting the VM-8HN 1:8+2 HDMI Looping DA VM-8HN – Contents... -
Page 4: Introduction
Room Connectivity; GROUP 10: Accessories and Rack Adapters; GROUP 11: Sierra Video Products; GROUP 12: Digital Signage; GROUP 13: Audio; and GROUP 14: Collaboration. Congratulations on purchasing your Kramer VM-8HN 1:8+2 HDMI Looping DA, which is ideal for the following typical applications: ... -
Page 5: Getting Started
Avoid interference from neighboring electrical appliances that may adversely influence signal quality Position your Kramer VM-8HN away from moisture, excessive sunlight and dust This equipment is to be used only inside a building. It may only be connected to other equipment that is installed inside a building. -
Page 6: Safety Instructions
To comply with the WEEE Directive, Kramer Electronics has made arrangements with the European Advanced Recycling Network (EARN) and will cover any costs of treatment, recycling and recovery of waste Kramer Electronics branded equipment on arrival at the EARN facility. VM-8HN - Getting Started... -
Page 7: Overview
Plug and Play operation for HDMI systems A default EDID for fast and efficient connection of the unit The default EDID feature lets you connect the VM-8HN without having to connect a display to the output Support for EDID Designer ... -
Page 8: Defining The Vm-8Hn 1:8+2 Hdmi Looping Da
Defining the VM-8HN 1:8+2 HDMI Looping DA This section defines the VM-8HN. VM-8HN - Overview... -
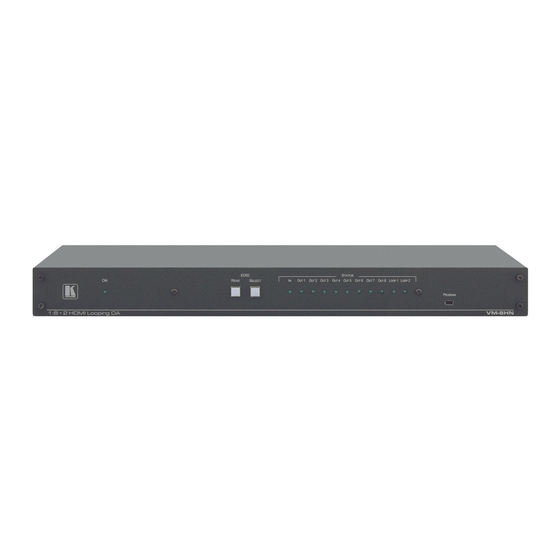
Page 9: Figure 1: Vm-8Hn 1:8+2 Hdmi Looping Da Front Panel
Figure 1: VM-8HN 1:8+2 HDMI Looping DA Front Panel Feature Function ON LED Lights when the device is powered on EDID READ Button Press to select the chosen output EDID SELECT Button Press to sequentially cycle through the outputs IN LED... -
Page 10: Figure 2: Vm-8Hn 1:8+2 Hdmi Looping Da Rear Panel
Figure 2: VM-8HN 1:8+2 HDMI Looping DA Rear Panel Feature Function INPUT Connector Connects to the HDMI source OUT Connector (1-8) Connect to up to 8 HDMI acceptors LOOP Connector (1-2) Connect to up to 2 HDMI loop acceptors SETUP DIP-Switches Adjust to set output delay, automatic power off for the 5V output, MAC mode, programming, force RGB MAC settings enable the system to force the source to input non-HDCP content. -
Page 11: Installing In A Rack
Installing in a Rack This section provides instructions for rack mounting the unit. VM-8HN - Installing in a Rack... -
Page 12: Connecting The Vm-8Hn
Connecting the VM-8HN Always switch off the power to each device before connecting it to your VM-8HN. After connecting your VM-8HN, connect its power and then switch on the power to each device. To connect the VM-8HN, do the following: 1. -
Page 13: Acquiring An Edid
The VM-8HN reads the EDID for a few seconds. When finished, all LEDS return to display the present output connection status. If an unconnected output is chosen or the EDID cannot be read, the VM-8HN loads the default EDID. Note: After reading an EDID, there is an interruption on the video outputs while syncing with the monitors. -
Page 14: Setting The Dip-Switches
Use monitor EDID and force RGB support Note: After setting force RGB, you must reset the device. DIPs 7 – Reserved for future use DIP 8 – Firmware Update DIP 8 FW Update Normal operation down Update firmware VM-8HN - Connecting the VM-8HN... -
Page 15: Protocol 3000
Protocol 3000 Command Summary The VM-8HN supports the following Protocol 3000 commands: Command Description Type Permission Copy EDID data from the output to the input CPEDID EEPROM EDID Handling End User DISPLAY? Get output HPD status System End User FACTORY... - Page 16 End User Public Get: Description Syntax Reset device to factory default Set: #FACTORY␍ configuration Get: Response ~nn@FACTORY␠OK␍␊ Parameters Response Triggers Notes This command deletes all user data from the device. The deletion can take some time. VM-8HN - Protocol 3000...
- Page 17 Response Triggers Notes To avoid locking the port due to a USB bug in Windows, disconnect USB connections immediately after running this command. If the port was locked, disconnect and reconnect the cable to reopen the port. VM-8HN - Protocol 3000...
- Page 18 Description Syntax Set: Get: Get device serial number #SN?␍ Response ~nn@SN␠serial_number␍␊ Parameters serial_number - 11 decimal digits, factory assigned Response Triggers Notes For new products with 14 digit serial numbers, use only the last 11 digits VM-8HN - Protocol 3000...
-
Page 19: Edid Source
Signal or sink is not valid Signal or sink is valid Sink and EDID is valid Stage Number Value Input Output (Reserved) (Reserved) HDCP Types Number Value HDCP Off HDCP On Follow input Mirror output (“MAC mode”) VM-8HN - Protocol 3000... -
Page 20: Technical Specifications
100-240V AC, 50/60Hz, 26VA OPERATING TEMPERATURE: 0° to +40°C (32° to 104°F) STORAGE TEMPERATURE: -40° to +70°C (-40° to 158°F) HUMIDITY: 10% to 90%, RHL non-condensing 19” x 7” x 1U DIMENSIONS: WEIGHT: 1.5kg (3.3lbs) INCLUDED ACCESSORIES: Power cord VM-8HN - Technical Specifications... - Page 21 VM-8HN - Technical Specifications...
- Page 22 For the latest information on our products and a list of Kramer distributors, visit our Web site where updates to this user manual may be found. SAFETY WARNING Disconnect the unit from the power supply before opening and servicing 2900- 300427...
Need help?
Do you have a question about the VM-8HN and is the answer not in the manual?
Questions and answers