Table of Contents
Advertisement
Quick Links
Advertisement
Table of Contents

Related Manuals for Eurotherm Nanodac


Summary of Contents for Eurotherm Nanodac
- Page 1 Recorder Controller User Guide Part Number HA030554 Issue 9 March 2015...
- Page 2 This page is intentionally blank...
-
Page 3: Table Of Contents
HA025464 EMC installation guidelines HA027962 Printable version of ‘Review’ Help Application notes HA030817U001 Archiving data from the nanodac recorder/controller HA030817U002 Heat/Cool with carbon potential or oxygen level monitoring HA030817U003 Heat only temperature control and carbon potential control HA030817U004 Virtual channels using the nanodac recorder/controller. - Page 4 RECORDER/CONTROLLER: USER GUIDE nanodac Recorder/Controller User Guide Contents List Section 1 INTRODUCTION ........4 1.1 UNPACKING THE INSTRUMENT .
- Page 5 RECORDER/CONTROLLER: USER GUIDE List of Contents (Cont.) Section Page 4 CONFIGURATION ........59 4.1 INSTRUMENT MENU .
- Page 6 RECORDER/CONTROLLER: USER GUIDE List of Contents (Cont.) Section Page 4.10.3 Explicit inputs/outputs ........146 4.11 WEB SERVER .
- Page 7 RECORDER/CONTROLLER: USER GUIDE List of Contents (Cont.) Section Page 6.4 PARAMETER EXPLORER ........270 6.4.1 Parameter explorer detail .
- Page 8 RECORDER/CONTROLLER: USER GUIDE List of Contents (Cont.) Section Page B2.3 LOOP PARAMETERS ..........303 Note: B2.3.1 Relative cool gain (R2G) .
- Page 9 RECORDER/CONTROLLER: USER GUIDE List of Contents (Cont.) Section Page DEADBAND ..........323 Note: B2.6.10 Valve nudge .
- Page 10 RECORDER/CONTROLLER: USER GUIDE List of Contents (Cont.) Section Page E.1.3 Error Message ..........351 E.1.4 Home Page .
- Page 11 RECORDER/CONTROLLER: USER GUIDE SAFETY NOTES Warning: Any interruption of the protective conductor inside or outside the apparatus, or dis- connection of the protective earth terminal is likely to make the apparatus dangerous under some fault conditions. Intentional interruption is prohibited.
- Page 12 RECORDER/CONTROLLER: USER GUIDE This instrument is intended for industrial temperature and process control applications within the require- ments of the European directives on safety and EMC. Installation may be carried out only by qualified personnel. To prevent hands or metal tools coming into contact with parts that are electrically live the instrument must be installed in an enclosure.
- Page 13 RECORDER/CONTROLLER: USER GUIDE USB DEVICE PRECAUTIONS Note: The use of U3 USB Flash drives is not recommended. Precautions against electrostatic discharge should be taken when the instrument terminals are being accessed. The USB and Ethernet connections are particularly vulnerable.
-
Page 14: Introduction
RECORDER/CONTROLLER: USER GUIDE INTRODUCTION This document describes the installation, operation and configuration of a paperless graphic recorder/control- ler. The instrument comes, as standard with four input channels and is equipped, for secure archiving via FTP transfer and/or to USB memory stick. -
Page 15: Operation
RECORDER/CONTROLLER: USER GUIDE 2.1.2 Demounting Warning: Before removing the supply voltage wiring, isolate the supply voltage and secure it against unintended operation. Isolate the mains supply and secure it against accidental operation. Remove all wiring and the USB device and Ethernet cable (if any). - Page 16 RECORDER/CONTROLLER: USER GUIDE Mechanical Installation (Cont.) Side View Latching ears Panel cutout: 92mm x 92mm (both -0 + 0.8mm) 3.62in x 3.62in (both -0.00 + 0.03in) Minimum inter-unit spacing: Top View Horizontal (‘x’) = 10mm (0.4in) Vertical (‘y’) = 38mm (1.5in) Figure 2.1a Mechanical installation details (standard case)
-
Page 17: Electrical Installation
RECORDER/CONTROLLER: USER GUIDE Mechanical Installation (Cont.) Side View Latching ears Panel cutout: 92mm x 92mm (both -0 + 0.8mm) Top View 3.62in x 3.62in (both -0.00 + 0.03in) Minimum inter-unit spacing: Horizontal (‘x’) = 10mm (0.4in) Vertical (‘y’) = 38mm (1.5in) Figure 2.1a Mechanical installation details (wash down case option) - Page 18 RECORDER/CONTROLLER: USER GUIDE ELECTRICAL INSTALLATION (Cont.) 100 to 230Vac±15%; 48/62 Hz Brown Blue Mains (Line) supply voltage 24Vac; -15%, +10% 48 to 62 Hz or 24V dc; -15%, +20% Supply (polarity irrelevant) Voltage Safety Earth Low voltage option wiring I/O1 R>500R = inactive...
-
Page 19: Low Voltage Option
RECORDER/CONTROLLER: USER GUIDE 2.2.2 Low Voltage Option This option allows the use of a low voltage ac or dc 24 V supply. The specification in Appendix A gives full details. The polarity of the dc supply connection is not important - it may be connected either way round. -
Page 20: Operation
RECORDER/CONTROLLER: USER GUIDE OPERATION On power up a default or custom splash screen appears and remains visible whilst the unit is ini- tialising. If during this process a network broadcast storm is detected, the unit stops, displaying a network failure icon until the broadcast storm has cleared, after which the initialisation process re- sumes. -
Page 21: On Screen Help
RECORDER/CONTROLLER: USER GUIDE Navigation Pushbuttons (Cont.) PAGE BUTTON From any non-configuration page, pressing this push button causes the top level menu (figure 3.1.2) to appear. The figure shows the menu for a user logged in with ‘Engineer’ level access. Other access levels may have fewer menu items. -
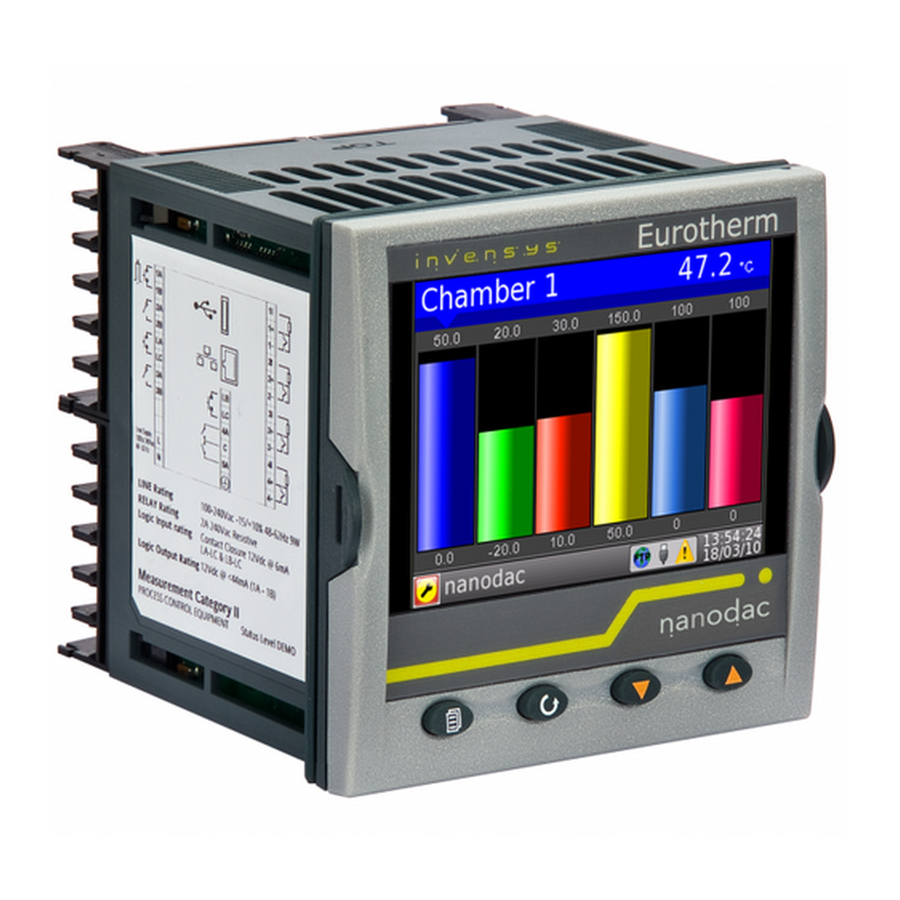
Page 22: Process Variable Display
RECORDER/CONTROLLER: USER GUIDE PROCESS VARIABLE DISPLAY As discussed above, the operator interface consists of a display screen and associated push buttons. The display screen shows process variables in one of a number of formats, or operational details (notes or alarm history for example), or configuration details for use in setting up the recorder to produce the required displays and history formats. -
Page 23: Status Bar Icons
RECORDER/CONTROLLER: USER GUIDE Alarm Icons (Cont.) Absolute High Absolute Low Deviation High Deviation Low Deviation Band Rising Rate of change Falling Rate of change Digital High Digital Low Table 3.2.1 Alarm icons 3.2.2 Status Bar Icons The following items can appear in a dedicated window immediately to the left of the time and date, at the bottom right-hand corner of the display. - Page 24 RECORDER/CONTROLLER: USER GUIDE Status Bar Icons (Cont.) FTP Primary Server Failure This error occurs if the recorder fails to establish connection with the primary server, after two attempts. After the second attempt fails, the recorder attempts to establish connection with the secondary server instead.
- Page 25 RECORDER/CONTROLLER: USER GUIDE CHANNEL ALARM This indicator appears if any channel (including channels not in the display group) is in an alarm state. The symbol is illuminated continuously if all alarms are acknowledged or flashes if any one or more alarms is unacknowledged.
-
Page 26: Breaks In Recording
RECORDER/CONTROLLER: USER GUIDE 3.2.3 Breaks in recording Breaks in recording can be caused by the unit being powered down, by the user entering configuration mode or when the recorder time is changed manually. In vertical and horizontal trend modes, a line is drawn across the width/height of the chart to indicate that recording has been interrupted. -
Page 27: Go To View
RECORDER/CONTROLLER: USER GUIDE 3.3.3 Go to View Operating the scroll key whilst the ‘Go to view’ item is highlighted, calls the Go to view submenu (figure 3.3.3a). This allows the user to view channel alarms, system alarms, messages or to select a different display mode. - Page 28 RECORDER/CONTROLLER: USER GUIDE Go To View (Cont.) ALARM SUMMARY For each active alarm, this page displays the channel identifier with alarm number (e.g. C1(2) = channel 1; alarm 2), the channel descriptor, the alarm threshold the current process value and an alarm type symbol.
- Page 29 RECORDER/CONTROLLER: USER GUIDE Go To View (Cont.) MESSAGE SUMMARY Operating the scroll key whilst the ‘Message summary’ field is highlighted displays the10 most recent messag- Operating the scroll key whilst a message is highlighted shows the selected message in more detail (and using the up/down keys allows the other messages to be scrolled through).
-
Page 30: History
RECORDER/CONTROLLER: USER GUIDE Go To View (Cont.) Alarm Summary DISPLAY MODE SELECTION System Alarms Use the up/down arrow buttons to highlight the required display mode. Message Summary Once the required display mode is highlighted, operation of the scroll but- ton causes the recorder to leave the ‘Go to View’... -
Page 31: Demand Archiving
RECORDER/CONTROLLER: USER GUIDE 3.3.7 Demand Archiving This allows a user, with a high enough access level, to archive a selected portion of the recorder history, either to a ‘memory stick’ plugged into the USB port at the rear of the recorder (Local Archiving), or to a pc, by means of the FTP protocol (Remote Archiving). - Page 32 RECORDER/CONTROLLER: USER GUIDE Demand Archiving (Cont.) FTP SERVER ARCHIVING This allows the archiving of recorder files to a remote computer via the RJ45 type connector at the rear of the recorder, either directly or via a network. In order to carry out a successful transfer: Details of the remote host must be entered in the Network.Archive area of configuration (Section 4.2.2).
-
Page 33: Login
RECORDER/CONTROLLER: USER GUIDE 3.3.8 Login Login allows the user to enter a password in order to gain access to areas of the unit’s configuration which are not available when the user is logged out. LOGGED OUT ACCESS LEVEL Logged out mode allows the user to select viewing mode, to view history, to view alarms, to toggle faceplate cycling on and off, to send notes, to suspend/resume USB archiving and to access the login process. - Page 34 RECORDER/CONTROLLER: USER GUIDE Logged out Access Password Access Operator Access Supervisor Access Engineer Access Engineer Password Password Accept changes Cancel No Yes Figure 3.3.8. Log in Menu To log in as Engineer (password = 100): Operate the up arrow key three times, to display ‘Engineer’.
-
Page 35: Display Modes
RECORDER/CONTROLLER: USER GUIDE DISPLAY MODES The following subsections describe the various display modes available to the user. By default, the ‘Home’ dis- play mode is ‘Vertical Trend’, but this can be edited as a part of ‘Instrument.Display’ configuration. This config- uration area also allows the user to disable one or more display modes should they not be required. -
Page 36: Horizontal Trend Mode
RECORDER/CONTROLLER: USER GUIDE 3.4.2 Horizontal Trend mode This view is similar to the vertical trend mode described in section 3.4.1 above, except that the traces are pro- duced horizontally rather than vertically. Initially, as each channel appears, its scale appears at the left edge of the display (as shown below), but in order to show the maximum amount of trend data, the scale is overwritten after a few seconds. -
Page 37: Horizontal Bargraph Mode
RECORDER/CONTROLLER: USER GUIDE 3.4.4 Horizontal Bargraph mode Similar to the Vertical bargraph mode described in Section 3.4.3, above, but includes channel descriptors. Furnace 1 temp 12 Furnace 1 temp 12 2 channels Channel 2 Channel 2 The scroll button tog-... -
Page 38: Alarm Panel
RECORDER/CONTROLLER: USER GUIDE 3.4.6 Alarm panel This display appears only if enabled in the Instrument Display configuration (Section 4.1.3) Alarm panel mode shows current value and alarm status for each channel enabled in the Trend Group. The status is shown in two ways, by the colour of the relevant bar, and by the alarm status indicators. -
Page 39: Control Loop1/Loop2
RECORDER/CONTROLLER: USER GUIDE 3.4.7 Control Loop1/Loop2 These displays appear only if the controller option is enabled (Section 4.1.6). The loop display modes are interactive, in that the setpoint, the Auto/Manual mode and the Manual Output value can be edited from the user interface. Full configuration is carried out in the Loop setup menus (Section 4.6) -
Page 40: Cascade Display Mode
RECORDER/CONTROLLER: USER GUIDE 3.4.8 Cascade Display Mode This display mode appears only if ’Cascade’ has been enabled in the Instrument.Display area of configuration Section 4.1.3). See also Advanced Loop configuration (Section 4.7). Master Mode Cascade Slave Man.OP Inst name Figure 3.4.8a Cascade display mode... -
Page 41: Programmer Display Mode
RECORDER/CONTROLLER: USER GUIDE 3.4.9 Programmer Display Mode Program edit Program status Program Name (Segment name) Program Name (Segment name) Ramp Events Status: Running Events Mode Status: Running Mode Seg Time Left 00:01:05 Ch1 PSP 123.2 Seg Time Left 00:00:44 Ch1 PSP 123.2... - Page 42 RECORDER/CONTROLLER: USER GUIDE Programmer Display Mode (cont.) The current process value of the signal wired to Ch1(2) PV Input. Ch1(2)PSP This is the output setpoint from the programmer for the channel. In reset this value tracks the configured servo parameter.
- Page 43 RECORDER/CONTROLLER: USER GUIDE Programmer Display Mode (cont.) PROGRAM RUN/RESET/HOLD Programs can be controlled by users with the correct access level (defined in Programmer configuration - Sec- tion 4.25). The display page is placed in edit mode by operation of the scroll key (‘Mode’ highlights). A second operation of the scroll key followed by operation of the up/down arrows allows the user to select ‘Run’, ‘Hold’...
- Page 44 RECORDER/CONTROLLER: USER GUIDE Programmer Display Mode (cont.) PROGRAM EDITING The program edit page is accessed by operating the scroll button once to highlight the Mode, then using the up arrow key to highlight the page symbol at the top right hand corner of the display and then the scroll button again to enter the program editor.
- Page 45 Delete All. Deletes all programs. Copy. Copies the selected program for ‘pasting’ either from the internal drive to the USB device, or vice-versa. This is useful if you wish to transfer a program to other nanodac instruments. Copy All. As above, for ‘Copy’, but copies all the programs in the selected directory.
- Page 46 RECORDER/CONTROLLER: USER GUIDE Programmer Display Mode (cont.) PROGRAM DETAILS (Cont.) HOLDBACK Holdback pauses the program (freezes the Programmer setpoint (PSP) and the time remaining parameters) if the difference between the Process value (PV) and the PSP exceeds a user-specified amount (Holdback value).
- Page 47 RECORDER/CONTROLLER: USER GUIDE Programmer Display Mode (cont.) Type Select a segment type. Default is ‘End’. Ramp. For any program, Ramp segments can be either ‘Ramp Rate’ segments or ‘Ramp Time’ segments according to the ‘Ramp Style’ setting described above. See also ‘Ch1(2) Time’...
- Page 48 RECORDER/CONTROLLER: USER GUIDE Programmer Display Mode (cont.) SEGMENT CONFIGURATION (Cont.) Ch1(2) PV Event Appear only if ‘PV Events’ have been enabled in the Programmer Features menu (Section 4.8.1). A PV Event (an analogue alarm on the channel PV) is available for each channel in every segment (excluding Wait and Go Back segment types).
- Page 49 RECORDER/CONTROLLER: USER GUIDE Programmer Display Mode (cont.) SEGMENT CONFIGURATION (Cont.) Figure 3.4.9h iTools example showing Ch1 UserVal being used to trigger custom message 1. FUTURE TREND DISPLAY MODE If enabled in Instrument.Display configuration (Section 4.1.3), this allows the user to view the actual value of the PSP alongside the expected value, so the two can be compared to see how the process is performing.
- Page 50 RECORDER/CONTROLLER: USER GUIDE Programmer Display Mode (cont.) PROGRAM STORE Note: The access levels required for the operations described below are configured in the Program- mer Set Up menu ‘Prog Edit Access’ and ‘Prog Store Access’ parameters, described in Sec- tion 4.8.3.
- Page 51 RECORDER/CONTROLLER: USER GUIDE PROGRAM LOAD - QUICK ACCESS From firmware version V5.00 and above a quick selection of an internally stored program may be made directly from the Program Summary page. The programmer must be in Reset. Press and hold the scroll key for 2 sec- onds.
- Page 52 RECORDER/CONTROLLER: USER GUIDE PROGRAM LOAD VIA A PROGRAM NUMBER This feature has been added to firmware versions V5.00 and above. To allow a program (stored as a file) to be loaded, either via a BCD switch, wired to a set of digital inputs, or via a single comms transaction, it is necessary to prefix the progam name with a program number in the range 01 to 99.
-
Page 53: Steriliser Display Mode
RECORDER/CONTROLLER: USER GUIDE 3.4.10 Steriliser display mode This display mode appears only if the Steriliser option is fitted and if the display mode has been enabled in the Instrument Display configuration (Section 4.1.3). Steriliser configuration parameters are to be found in Section 4.17. - Page 54 RECORDER/CONTROLLER: USER GUIDE Steriliser Display Mode (Cont.) DISPLAYED INFORMATION Cycle A five-digit counter to indicate the total number of cycles started. Status Wait start: The initial state at power up. This status remains until the first cycle is initiated Waiting: Waiting for input 1 to reach its target setpoint.
- Page 55 RECORDER/CONTROLLER: USER GUIDE Steriliser Display Mode (Cont.) APPLICATION DETAILS Figure 3.4.10c shows a typical steriliser application, with temperature and pressure signals from the sterilisation chamber being applied directly to the rear terminals of the controller/recorder, and control signals connected from the controller to both the chamber and the controller/recorder.
- Page 56 RECORDER/CONTROLLER: USER GUIDE Steriliser Display Mode (Cont.) is a means of calculating ‘equivalent time at sterilising temperature’ for temperatures below, at and above sterilizing temperature, using the equation below. Temp− × Sterilisat ion time Where: Sterilisation time Depends on the application, typically 15 minutes at Ts = 121°C Temp The value of the temperature measuring input.
-
Page 57: Promote List
RECORDER/CONTROLLER: USER GUIDE 3.4.11 Promote list This display page allows the user to display up to 10 of the parameters that appear anywhere in the operator interface. The parameters can be selected only by using iTools, as described below. -
Page 58: Modbus Master Display Mode
RECORDER/CONTROLLER: USER GUIDE 3.4.12 Modbus Master display mode This display mode consists of two pages, as shown below. Page one opens by default and shows the first eight parameters being read from (left pointing arrow) or written to (right pointing arrow) the relevant slave. These items are configured in the Modbus Master configuration de- scribed in Section 4.9. - Page 59 RECORDER/CONTROLLER: USER GUIDE Modbus Master Display Mode (Cont.) PING DETAILS Slave 2 Slave 1 Slave Name Slave address nanodac 3rd Party 123.123.123.123 123.123.123.124 otal no of successful read 26684 and write transactions Total no of failed read Ping... Ping...
-
Page 60: Ethernet/Ip Display Mode
RECORDER/CONTROLLER: USER GUIDE 3.4.13 EtherNet/IP display mode This display mode appears only if enabled in Instrument.Display configuration ( Section 4.1.3) and is used to display the input and output parameters assigned to the Client and Server input and output tables. Parameters which have been configured with descriptors are identified by these descriptors instead of their ‘opc’... - Page 61 RECORDER/CONTROLLER: USER GUIDE Ethernet/IP Display Mode (Cont.) If the EtherNet/IP option has been ordered and enabled, the nanodac can be configured as either a client (mas- ter) or a server (slave) (see Section 4.10). The client and server displays are identical except that the configu- ration area of the client display is more extensive than that of the server display.
- Page 62 RECORDER/CONTROLLER: USER GUIDE Ethernet/IP Display Mode (Cont.) Adding parameters to the input and output tables can be achieved only through the proprietary software pack- age ‘iTools’, running on a pc. It cannot be configured through the user interface. The following description as- sumes that the user is familiar with ‘iTools’.
- Page 63 Once all the information has been entered, the read is requested by setting ‘Send’ to ‘Yes’. The Data field changes to ‘3’ for this example and from table 5.3 it can be seen that the recording status is ‘Recording enabled’. Note: The nanodac supports only 16 bit data types for reading and writing of explicit messages. HA030554...
- Page 64 RECORDER/CONTROLLER: USER GUIDE Ethernet/IP Display Mode (Cont.) When wired to parameters which have descrip- EtherNet/IP Client tors, the descriptor names appear instead of the ‘opc’ names (e.g. Loop.1.Setpoint.SP1) shown here. Virtual Channel.1.Main.Input1 11.1 Virtual Channel.2.Main.Input1 -19.1 Loop.1.Setpoint.SP1 23.0 Loop.1.Setpoint.SP2 132.0...
- Page 65 Note: 2. Input data direction is always to the nanodac: in server mode input data is written to the nanodac from the client in client mode, input data is read by the nanodac from the server device. Note: 3. Output data direction is always from the nanodac: in server mode output data is written to the client from the nanodac in client mode, output data is read by the server from the nanodac.
- Page 66 RECORDER/CONTROLLER: USER GUIDE TREND HISTORY Entered from the top level menu (Section 3.1), this allows vertical and horizontal traces to be reviewed for Trend group channels. The amount of data displayed in one screen depends on the ‘Zoom In/Out’ setting in the History menu (Section 3.5.2) and on the recording interval selected in Group Recording configuration (Section 4.3.2).
-
Page 67: History Options Menu
RECORDER/CONTROLLER: USER GUIDE 3.5.2 History Options Menu Operating the page key from within a history display, causes the History Options menu to appear. History Menu Zoom In/Out 0.125 sec Trend All Points Show Messages Exit History Figure 3.5.2 History Options menu... -
Page 68: Text Entry
RECORDER/CONTROLLER: USER GUIDE TEXT ENTRY The user is often required to enter text characters or numbers (when editing operator notes, for example). This is done using the pop-up keyboards which are displayed when required. When only numerals are required a special keyboard is presented which contains only numerals. -
Page 69: Configuration
RECORDER/CONTROLLER: USER GUIDE CONFIGURATION Entered from the top level menu (Section 3.1) this allows the recorder configuration to be accessed and edited (‘Engineer’ access level required for full editing). Caution: Recording is stopped for as long as the recorder login is at Engineer level. This means that Input/output circuits are switched off during configuration. -
Page 70: Instrument Menu
RECORDER/CONTROLLER: USER GUIDE INSTRUMENT MENU Instrument Clock Locale Display Info Upgrade Security I/O Fitted Save/Re- (section (Section (Section (Section (Section (Section store (Section 4.1.2) 4.1.1) 4.1.3) 4.1.4) 4.1.5) 4.1.6 (Section 4.1.7 Language Brightness Name Type Engineer Date 4.1.8) Date format... -
Page 71: Clock
RECORDER/CONTROLLER: USER GUIDE 4.1.1 Clock The up and down arrows are used to highlight ‘Date’ (default) or ‘Time’. To set the date, the scroll button is used to display the numeric keyboard described in Section 3.6.1. The up and down arrows are used to highlight the relevant numeral or separator (‘/’ or ‘:’) and the scroll key used to enter it into the display window. -
Page 72: Locale
RECORDER/CONTROLLER: USER GUIDE 4.1.2 Locale Instrument.Locale Language English Date Format DD/MM/YY Time Zone DST Enable Start Time 01:00 Start On Last Start Day Sunday Start Month March End Time 02:00 End On Last End day Sunday End Month October Figure 4.1.2 Typical Instrument configuration menu (expanded to show all fields) -
Page 73: Display Configuration
RECORDER/CONTROLLER: USER GUIDE 4.1.3 Display configuration This allows the user to set display brightnesses and screen saver details, to select a display mode as the ‘Home’ page, and to enable/ disable the various display modes. The normal ‘Select, Scroll, Enter’ editing technique is used as has been previously described. - Page 74 There is a new paramter been added to the Instrument. Display list - Number format. The options are to "Round" or "Truncate" values. On the previous firmware releases of the nanodac, numbers were truncated (in the same way as the 6000).
-
Page 75: Info Menu
RECORDER/CONTROLLER: USER GUIDE 4.1.4 Info menu Gives information about the recorder hardware and software, and allows the user to enter a descriptor for the instrument. The normal ‘Select, Scroll, Enter’ editing technique, previously described) is used to edit those fields that are not read only. -
Page 76: Upgrade
RECORDER/CONTROLLER: USER GUIDE 4.1.5 Upgrade Caution: 1. Power must not be removed from the unit whilst upgrade is in progress, as to do so will cause permanent damage to the unit. 2. For USB upgrades, the memory stick must not be removed whilst upgrade is in progress or the instrument will be permanently damaged. -
Page 77: Security Menu
RECORDER/CONTROLLER: USER GUIDE 4.1.6 Security menu This allows the user to enter passwords for all security levels (except logged out), and to enable/disable serial communications security. Instrument.Security Engineer Pass ********** Supervisor Pass Operator Pass Feature Pass 12345 Feature2 Pass... - Page 78 RECORDER/CONTROLLER: USER GUIDE Security Menu (Cont.) OEM Pass The configured pass phrase used to enable / disable the OEM security option. This field is editable whilst the OEM Status is ‘Unlocked’ and the user has ‘Engineer’ access. OEM entry To lock or unlock the OEM security feature, the user must enter the pass phrase entered in ‘OEM Pass’...
-
Page 79: I/O Fitted
RECORDER/CONTROLLER: USER GUIDE 4.1.7 I/O fitted This provides a read only display showing what type of input or output circuit is associated with each set of rear terminals. Instrument.I/O Fitted 1A1B (Dig.IO) 2A2B (Relay) LALC (Dig.In) 3A3B (Relay) LBLC (Dig.In) -
Page 80: Save/Restore
RECORDER/CONTROLLER: USER GUIDE 4.1.8 Save/Restore This allows the user to save and/or restore instrument clone configurations to a memory stick inserted into the USB connector at the rear of the unit. The format of the saved/restored files is iTools clone files (*.uic) Selecting ‘Restore’... -
Page 81: Input Adjust
RECORDER/CONTROLLER: USER GUIDE 4.1.9 Input adjust Note: 1. Input adjust cannot be applied to input channels with input type of ‘Digital’, ‘Test’ or ‘Off’. Note: 2. Input adjustments can be carried out only by users logged in as ‘Engineer’ (see Section 3.3.8). - Page 82 RECORDER/CONTROLLER: USER GUIDE Input Adjust (Cont.) ADJUSTMENT PROCEDURE (Cont.) Highlight the ‘Start IP ‘Adjust’ field and use the scroll and up/down arrow to select ‘Yes’. Use the scroll key again to enter the low value adjust page. Apply the known low value and wait for the value to stabilise. Enter the ‘Low Target Value’ (the value that the recorder is to read for the applied input).
- Page 83 RECORDER/CONTROLLER: USER GUIDE Input Adjust (Cont.) DUAL INPUT CHANNELS For the dual input channel option, input adjust is carried out as described above, except that for any channel where dual inputs are configured, the user must initiate adjustment to primary and secondary inputs separately.
-
Page 84: Output Adjust
RECORDER/CONTROLLER: USER GUIDE 4.1.10 Output adjust This item appears only if one or more of I/O type DC Output is fitted and allows the user to compensate for tolerance errors etc. in connected equipment. Instrument.Output Adjust 1A1B and 2A2B can be configured only as... -
Page 85: Network Menu
RECORDER/CONTROLLER: USER GUIDE NETWORK MENU Network Interface Archiving FTP Server Modbus (Section 4.2.1) (Section 4.2.2) (Section 4.2.3) (Section 4.2.4) MAC address Media size User name Prefmaster IP Media free Client Identifier Password Address Media duration IP type Input timeout... - Page 86 SNTP is a protocol that allows clients on a TCP/IP network to synchronise the instrument clock with that of a server - port number 123. nanodac can act only as a client. Servers such as Microsoft ‘TimeServ’ cannot be used with the nanodac because they are not SNTP servers.
-
Page 87: Archiving
RECORDER/CONTROLLER: USER GUIDE 4.2.2 Archiving This area of configuration is used to set up the parameters for use during unattended archiving. Some of the fields appear only if other fields are set to a particular value. For example, the CSV fields appear only if ‘File Format’... - Page 88 RECORDER/CONTROLLER: USER GUIDE Rate Allows the user to specify the frequency at which the contents of the Flash memory are archived to the USB port or, via FTP, to a pc. Scrollable settings are: None: Automatic archiving is disabled. Any archiving must be initiated by the user using Demand Archiving, as described in Section 3.3.7.
-
Page 89: Ftp Server
RECORDER/CONTROLLER: USER GUIDE Remote Path Left blank if the archive destination is the home folder. If the destination is to a subfolder within the home folder, then the name of the subfolder is entered here, preceded by a ‘/’... -
Page 90: Modbus Tcp
RECORDER/CONTROLLER: USER GUIDE 4.2.4 Modbus TCP This allows the user to configure the recorder so as to allow it to communicate using Modbus Transmission Con- trol Protocol. Network.Modbus PrefMaster IP 123.123.123.123 Address Input Timeout 0 sec Unit ID Enable... -
Page 91: Group Configuration
RECORDER/CONTROLLER: USER GUIDE GROUP CONFIGURATION Group configuration is separated into two areas, one which defines trending characteristics (for display chan- nels) the other defining the recording characteristics for saving data to the Flash memory ready for archiving. 4.3.1 Group Trend configuration This allows the user to define which points are to be traced on the display and at what interval, and also allows the number of chart divisions to be set up. -
Page 92: Group Recording Configuration
RECORDER/CONTROLLER: USER GUIDE 4.3.2 Group Recording configuration Similar to Trend configuration, above, but for saving the data to Flash memory history files. Each point can individually be enabled or disabled for recording, or recording can be disabled for the whole group. -
Page 93: Input Channel Configuration
RECORDER/CONTROLLER: USER GUIDE INPUT CHANNEL CONFIGURATION Channel N Select channel number Main Trend Alarm 1/2 (Section 4.4.1) Section 4.4.2) Section 4.4.3) Descriptor Colour Type Type Span low Status Span high Threshold Status Hysteresis IP adjust state Latch Resolution Block... -
Page 94: Channel Main
RECORDER/CONTROLLER: USER GUIDE 4.4.1 Channel Main This section describes all possible menu items, but it should be noted that some items are context dependent (e.g. Cold Junction settings appear only for Type = ‘Thermocouple’). Channels one to four in the configuration relate to An In 1 (terminals 1I, 1+ and 1-) to An In 4 (terminals 4I, 4+... - Page 95 RECORDER/CONTROLLER: USER GUIDE Channel Main (Cont.) Descriptor Allows a (20 character max.) descriptor to be entered for the channel. Some thought should be given to ensure that the descriptor is meaningful because in some display screens it is truncated. For example, ‘Furnace 1 area 1’ and ‘Furnace 1 area 2’ might both appear as ‘Furnace 1 a’...
- Page 96 RECORDER/CONTROLLER: USER GUIDE Note: * See Section 4.14 for details of the configuration of Range High/Low and Input High/Low when ‘Type’ = User 1 to User 4 Offset2 The nature of the secondary input results in an offset being introduced into the process variable value.
- Page 97 RECORDER/CONTROLLER: USER GUIDE Break Low Break High Range impedance Impedance 40mV ~5kΩ ~20kΩ 80mV ~5kΩ ~20kΩ ~12.5kΩ ~70kΩ ~12.5kΩ ~120kΩ Table 4.4.1 Minimum impedances for sensor break detection Note: Break High impedance values would be used typically for sensors which have a high nominal impedance when working normally Sensor Break type (Cont.)
-
Page 98: Channel Trend Configuration
RECORDER/CONTROLLER: USER GUIDE 4.4.2 Channel Trend configuration This area allows the configuration of channel colour and span. Channel.1.Colour Wheatgerm Channel.1.Trend Colour Wheatgerm Span Low 0.00 Span High 200.00 Figure 4.4.2a Channel Trend menu Figure 4.4.2b Colour selection Colour Allows a colour to be specified for the channel. The Scroll key is used to enter the colour swatch page. -
Page 99: Alarm 1 Menu
RECORDER/CONTROLLER: USER GUIDE 4.4.3 Alarm 1 menu Allows the alarm characteristics for Alarm 1 to be configured. The figure below shows a typical configuration page (expanded for clarity). Actual configuration parameters are context sensitive. Channel.1.Alarm1 Type Abs High Status... -
Page 100: Alarm 2 Menu
RECORDER/CONTROLLER: USER GUIDE Alarm 1 Menu (Cont.) Hysteresis For absolute and deviation alarms, this provides a means of preventing multiple alarm trig- gering, if the process value is drifting close to the trigger value. Amount For rate-of-change alarms only. The alarm becomes active if the process value rises (Rise ROC) or falls (Fall ROC) by more than the specified ‘Amount’... -
Page 101: Alarm Types
RECORDER/CONTROLLER: USER GUIDE 4.4.5 Alarm types The following figures attempt to show graphically the meanings of the alarm parameters which can be set for the various alarm types available. ABSOLUTE ALARMS Absolute high alarm definitions Absolute low alarm definitions... - Page 102 RECORDER/CONTROLLER: USER GUIDE Alarm Types (Cont.) RATE-OF-CHANGE ALARMS Rate-of-change alarm definitions Symbol Symbol Rate-of-change rise active Rate-of-change fall active ‘Change Time’ units Present (second, minute or hour) time A rate-of-change alarm is active if the monitored value changes by more than one ‘Amount’ in less than 1 ‘Change time’.
-
Page 103: Virtual Channel Configuration
RECORDER/CONTROLLER: USER GUIDE VIRTUAL CHANNEL CONFIGURATION This allows the configuration of maths channels, totalisers and counters. The configuration is divided into the following areas: ‘Main’, ‘Trend’, ‘Alarm 1*’ and ‘Alarm 2*’. Items appearing in the ‘Trend’, Alarm 1’ and ‘Alarm 2’... - Page 104 RECORDER/CONTROLLER: USER GUIDE Maths Channel Configuration (Cont.) MATHS FUNCTIONS Out = -9999; status = Off Out = Input1 + Input2 Subtract Out = Input1 - Input2 Multiply Out = Input1 x Input2 Divide Out = Input1 ¸ Input2. If Input2 = 0, Out = -9999; Status = ‘Bad’.
-
Page 105: Totaliser Configuration
The totaliser block in the Nanodac is intended to automate this process. It uses the built-in sampling rate of the nanodac (125mSec) as the sampling period for the totalisation process. In addition, it provides two separate parameters which can be used to adjust the results of the totalisation process so that the output from the block is scaled in the correct units. - Page 106 RECORDER/CONTROLLER: USER GUIDE Figure 4.5.2 shows a typical totaliser configuration page. Virtual Channel.1.Main Descriptor VirtualChan1 Type Totaliser Operation 180.3625 units Totaliser Status Good Input 1 Rollover Resolution 1 to 10 Units units Units Scaler Counter 1 Low Cut Off...
- Page 107 RECORDER/CONTROLLER: USER GUIDE it contributes to the total for any period during which it remains valid. Negative input val- ues are allowed and will cause the totaliser to decrease in value for negative values. The total increases with positive values.
- Page 108 RECORDER/CONTROLLER: USER GUIDE Disable Allows the user temporarily to suspend totalising action. The totaliser is toggled between being enabled (cross symbol) and disabled (tick symbol) by means of the scroll key. The output retains the pre-disabled value until the totaliser is re-enabled, when it resumes from that value, or until the value is changed using the Preset parameter mentioned above.
-
Page 109: Wiring Example Using A Counter In Combination With A Totaliser
RECORDER/CONTROLLER: USER GUIDE 4.5.3 Wiring Example using a counter in combination with a totaliser The diagram shows how a counter and totaliser can be linked in a real application using the internal (soft) wiring in iTools. See also Section 6.3. -
Page 110: Counter Configuration
RECORDER/CONTROLLER: USER GUIDE 4.5.4 Counter configuration This allows the user to set up a counter to count trigger inputs (or it may be incremented from the Configuration page. The Rollover Value of the counter is configurable (default 1,000,000). Counters can be cascaded by wiring from ‘Rollover’... - Page 111 RECORDER/CONTROLLER: USER GUIDE Rollover This is the rollover output which will be set for one execution cycle when the counter rolls over. This output can be used to expand the range of the cascade counters by wiring it to the Trigger input of the next counter.
-
Page 112: Loop Option Configuration
RECORDER/CONTROLLER: USER GUIDE LOOP OPTION CONFIGURATION This configuration area allows the user to set up two control loops. This description refers to temperature con- trol loops, but the configuration parameters apply equally to other types of control. For each loop, channel 1 is assumed to be a heating channel;... -
Page 113: Main Menu Parameters
RECORDER/CONTROLLER: USER GUIDE 4.6.1 Main menu parameters Auto/Manual Selects Auto(matic) or Manual operation. ‘Auto’ automatically controls output power in a closed loop configuration. In manual mode, the operator controls the output power. The Process Variable input value. The value can be entered by the user, but is most often ‘wired’... -
Page 114: Tune Menu Parameters
RECORDER/CONTROLLER: USER GUIDE Setup Menu Parameters (Cont.) Auto/Man Access As ‘Setpoint Access’ above, but for Auto/manual parameter. Man.Out Access As ‘Setpoint Access’ above, but configures the read/write access for the Manual Output parameter. Note: * ’PB Units’ and ‘Deriv Type’ appear only if at least one of Ch1 Control and Ch2 Control is set to ‘PID’, ‘VPU’... -
Page 115: Pid Menu Parameters
RECORDER/CONTROLLER: USER GUIDE 4.6.4 PID menu parameters Note: If control type is set to ‘Off’, or ‘OnOff’ in the Setup menu, the PID menu contains only the Loop Break time parameter ‘LBT’. Sched Type Selects the type of gain scheduling (section B2.3.7) to be applied. -
Page 116: Setpoint Menu Parameters
RECORDER/CONTROLLER: USER GUIDE 4.6.5 Setpoint menu parameters Range High/Low Range limits. Valid entries from 99999 to -99999. Range limits set absolute maxima and minima for control loop setpoints. If the proportional band is configured as a % span, the span is derived from the range limits. -
Page 117: Output Menu Items
RECORDER/CONTROLLER: USER GUIDE 4.6.6 Output menu items Appendix B section B2.6 contains details of the output functions. Output Low The minimum power, or the maximum ‘negative’ (i.e. cooling) power to be delivered by the system. The valid input range is -100% and Output High. - Page 118 RECORDER/CONTROLLER: USER GUIDE Output Menu Parameters (Cont.) SBrk Mode Defines the action to be taken in the event of a sensor break. Safe: The output adopts the value configured in ‘Sbrk OP’, below. Hold: The output remains at its current level.
-
Page 119: Loop Diagnostics
RECORDER/CONTROLLER: USER GUIDE 4.6.7 Loop diagnostics These ‘parameters’ are read only unless otherwise stated. Error The difference in value between the setpoint and the PV. Target Output The requested control output. The target of the active output if rate limiting is active. -
Page 120: Advanced Loop Configuration
RECORDER/CONTROLLER: USER GUIDE ADVANCED LOOP CONFIGURATION Similar to the Loop option described above, advanced loop includes the ability to run a cascade loop. Figure 4.7 is an overview of the configuration menu structure. Advanced Loop Main Setup Tune Master PID Slave PID (Section 4.7.1) -
Page 121: Advanced Loop Main Menu
RECORDER/CONTROLLER: USER GUIDE 4.7.1 Advanced Loop Main menu Advanced Loop.Main Master PV Master WSP 16.1 Target setpoint 16.1 Slave PV Slave WSP 32.2 Working Output 0.0% Cascade Mode Slave Inhibit Master Int.Hold Slave Int.Hold Figure 4.7.1 Main menu Master PV This is the process value for the outer (master) loop of cascade control, typically obtained from an analogue input. -
Page 122: Advanced Loop Setup Menu
RECORDER/CONTROLLER: USER GUIDE 4.7.2 Advanced Loop Setup menu Advanced Loop.Setup Master Name Master Slave Name SLave Master Loop Cascade Type Full Scale Slave Channel 1 Slave Channel 2 Setpoint Access Read/Write Read/Write Mode Access Read/Write Man.Out Access Figure 4.7.2 Advanced Loop Setup menu... -
Page 123: Advanced Loop Tune Menu
RECORDER/CONTROLLER: USER GUIDE 4.7.3 Advanced Loop Tune menu Advanced Loop.Tune Tune Type Master Tune Enable Tune Slave R2G Standard Tune High 1372.0 Tune Low Output High 100.0% Output Low 0.0% State Stage Reset Stage Time Diagnostics Hysteresis Band Timout... - Page 124 RECORDER/CONTROLLER: USER GUIDE Advanced Loop Tune Menu (Cont.) Tune High Sets the maximum value for the master loop setpoint during the tuning process. Tune Low Sets the minimum value for the master loop setpoint during the tuning process. Output High The maximum output power level which the controller may supply during the tuning pro- cess.
- Page 125 RECORDER/CONTROLLER: USER GUIDE Advanced Loop Tune Menu (Cont.) ModeMan This parameter is used by the master autotune algorithm to communicate with the master loop. Puts master controller into ‘Not-Auto’ mode This signal is generated within the master loop during the autotune oscillation. It is used only as an input to the calculations which generate the slave loop setpoint.
-
Page 126: Advanced Loop Master Pid Menu
RECORDER/CONTROLLER: USER GUIDE 4.7.4 Advanced Loop Master PID menu Advanced Loop.Master PID Control Action Reverse PB Units Engineering Derivative Type 20.0 360.0 60.0 Auto Auto Error limit 999999.0 Figure 4.7.4 Advanced Loop master PID menu Control Action Select ‘Reverse’ or ‘Direct’. -
Page 127: Advanced Loop Slave Pid Menu
RECORDER/CONTROLLER: USER GUIDE 4.7.5 Advanced Loop Slave PID menu Advanced Loop.Slave PID Control Action Reverse PB Units Engineering Derivative Type Error Sched Type Remote Number of Sets Remote Input Active Set Set3 Boundary 1-2 Boundary 2-3 20.0 Auto Auto 0.0%... - Page 128 RECORDER/CONTROLLER: USER GUIDE Advanced Loop Slave Pid Menu (Cont.) Sched Type Selects the type of Gain Scheduling (section B2.3.7) to be applied. Off. Gain Scheduling not active Set. The user selects the PID parameter set to be used. Setpoint. Transfer from one set to the next depends on the setpoint value PV.
-
Page 129: Advanced Loop Master Sp Menu
RECORDER/CONTROLLER: USER GUIDE 4.7.6 Advanced Loop Master SP menu Advanced Loop.Master.SP Range High 1372.0 Range Low -200 SP Select -0.9 SP High Limit 1372.0 SP Low Limit -200.0 Alt SP Enable Alt SP Rate Rate Done SP Rate Disable... - Page 130 RECORDER/CONTROLLER: USER GUIDE Advanced Loop Master Sp Menu (Cont.) SP Rate Disable Appears only if Rate is not ‘Off’. ‘Yes’ disables rate limiting; ‘No’ enables rate limiting. Servo To PV If ‘Rate’ is set to any value other than ‘Off’, and if ‘Servo to PV’ is set to ‘Yes’ then any change in the current setpoint value causes the working setpoint to servo to the current PV before ramping to the new setpoint value.
-
Page 131: Advanced Loop Slave Sp Menu
RECORDER/CONTROLLER: USER GUIDE 4.7.7 Advanced Loop Slave SP menu Advanced Loop.Slave.SP Range High 1372.0 Range Low -200 SP High Limit 1372.0 SP Low Limit -200 Local SP 1372.0 Trim Range High 100.0 Trim Range Low -100.0 Trim High Limit 100.0... - Page 132 RECORDER/CONTROLLER: USER GUIDE Advanced Loop Slave Sp Menu (Cont.) Sbrk Mode This defines the behaviour when the master loop process variable is bad, i.e. the sensor has failed. Sbrk SP The setpoint for the slave loop when the master sensor has gone into sensor break and...
-
Page 133: Advanced Loop Output Menu
RECORDER/CONTROLLER: USER GUIDE 4.7.8 Advanced Loop Output menu Appendix B section B2.6 contains details of the output functions. Advanced Loop.Output Output High Output Low -100 Ch1 Output Ch2 Output Ch2 Deadband Rate Rate Disable Ch1 Travel Time 22.0 Ch2 Travel Time 22.0... - Page 134 RECORDER/CONTROLLER: USER GUIDE Advanced Loop Output Menu (Cont.) Output High The maximum output power to be delivered by channels 1 and 2, where 100% is full pow- er. The valid input range is Output Low to 100.0%. Reducing this value reduces the rate of change of the process, but it also reduces the controller’s ability to react to perturbations...
- Page 135 RECORDER/CONTROLLER: USER GUIDE Advanced Loop Output Menu (Cont.) Manual Mode Selects the type of transition to occur when changing to manual cascade mode (Section 4.7.1): Track: Whilst in Auto mode, the manual output tracks the control output so that there is no change of output when manual mode is switched to.
-
Page 136: Advanced Loop Diagnostics Menu
RECORDER/CONTROLLER: USER GUIDE 4.7.9 Advanced Loop Diagnostics menu Master Error The difference in value between the setpoint and the PV for the Master (Read only). Slave Error The difference in value between the setpoint and the PV for the Slave (Read only). -
Page 137: Programmer Configuration
RECORDER/CONTROLLER: USER GUIDE PROGRAMMER CONFIGURATION The programmer option allows the user to configure a setpoint program with one or two channels, as required. The program can be run from the Programmer operator display page (Section 3.4.9) or can be controlled by inputs received from other parameters. -
Page 138: Programmer Features Menu
RECORDER/CONTROLLER: USER GUIDE 4.8.1 Programmer Features menu This menu allows the user to enable/disable some of the items presented to the user in the Programmer edit page described in Section 3.4.9. Features are enabled/disabled by using the up/down arrow keys to highlight the required item and then using the scroll button to toggle between enabled (tick) and disabled (cross). - Page 139 RECORDER/CONTROLLER: USER GUIDE Programmer Features Configuration (Cont.) Event Message Program Run <program_name>: Run Program End <program_name>: Complete Program Hold <program_name>: <segment_name>: Hold Program Resume <program_name>: <segment_name>: Resume Program Reset <program_name>: <segment_name>: Reset Segment Start <program_name>: <segment_name>: Segment Start Advance <program_name>: <segment_name>: Advanced...
-
Page 140: Programmer Ftp Menu
RECORDER/CONTROLLER: USER GUIDE 4.8.2 Programmer FTP menu Programmer.FTP IP Address 123.123.123.111 Username anonymous Password ********** Note: This menu item is accessible only if ‘FTP’ has been enabled in the Programmer features menu described above. Figure 4.8.2 Programmer FTP menu IP Address The IP address of the FTP server. -
Page 141: Programmer Setup Menu
RECORDER/CONTROLLER: USER GUIDE 4.8.3 Programmer Setup menu Programmer.Set Up Channels Prog Mode Access Operator Prog Edit Access Supervisor Prog Store Access Supervisor Rate Resolution Ch1 Units Deg C Ch1 Resolution Ch1 Servo To Ch1 PV Input 23.7 V Ch1 SP Input... - Page 142 RECORDER/CONTROLLER: USER GUIDE Programmer Set Up Menu (Cont.) Prog Edit Access Sets the minimum access level (Logged off, Operator, Supervisor, Engineer) for loading programs, and for allowing edits to the current program including permission to advance a segment. Prog Store Access Sets the minimum access level (Logged off, Operator, Supervisor, Engineer) that allows users to copy, store and delete programs.
- Page 143 RECORDER/CONTROLLER: USER GUIDE Programmer Set Up Menu (Cont.) Reset The input that causes the programmer to place the current program in Reset mode. Run Reset Dual functionality input, that causes the programmer to place the current program in Run or Reset mode.
-
Page 144: Programmer Run Menu
RECORDER/CONTROLLER: USER GUIDE 4.8.4 Programmer Run menu Programmer.Run Mode Status Running Ch1 PSP 43.3 V Ch2 PSP 42.9 V Segment Heat Init Segment Type Ramp Segment Time Left 00:00:33 00:01:17 Segment Time Run 00:18:48 Prog Time Left 00:00:33 Prog Time Spent... - Page 145 RECORDER/CONTROLLER: USER GUIDE Programmer Run Menu (Cont.) Prog Time Run The length of time the current program has been running. This value does not include time spent in Hold, Holdback or Waiting Duration For Dwell segments only, this is the dwell duration.
-
Page 146: Connecting The Programmer To A Loop
RECORDER/CONTROLLER: USER GUIDE 4.8.5 Connecting the programmer to a loop Below are some examples of how programmers and loops may be soft-wired together so that the programmer has access to the Loop PV and Loop setpoint. The examples are taken from iTools (Section 6), but may be carried out through User Wiring (Section 7) if more convenient. - Page 147 RECORDER/CONTROLLER: USER GUIDE Connecting The Programmer To A Loop (Cont.) Figure 4.8.5c Dual programmer to two loops basic wiring HA030554 Page 137 Issue 9 Mar 15...
-
Page 148: Configuration By Modbus Comms
RECORDER/CONTROLLER: USER GUIDE 4.8.6 Configuration by Modbus Comms It is possible to configure, store, delete, or load a program via Modbus comms by setting the Program and Seg- ment parameters using either their scaled integer or native modbus addresses (Section 5.3). -
Page 149: Modbus Master Configuration
RECORDER/CONTROLLER: USER GUIDE MODBUS MASTER CONFIGURATION Modbus master configuration is divided into two areas: a) setting up the slave(s), including diagnostics, and b) defining the locations of the parameters to be read. Figure 4.9 shows an overview. Section 3.4.12 shows the Modbus Master display page, and describes the configuration options available there. -
Page 150: Slave Main Menu
RECORDER/CONTROLLER: USER GUIDE 4.9.1 Slave Main menu This allows the IP address, Unit ID and other communications parameters to be entered for Slaves 1 and 2. Modbus Master.Slave.1.Main Descriptor nanodac Online Comms Failure IP Address 123.123.123.111 Unit ID Search Device... -
Page 151: Slave Diagnostics Menu
RECORDER/CONTROLLER: USER GUIDE Slave Main Menu (Cont.) PRIORITY LEVELS Three levels of update rate can be entered for use in data configuration (Section 4.9.3), to define how often a value is read or written. In order to optimise performance, it is recommended that the slowest rate consistent with requirements be selected. -
Page 152: Modbus Master Data Configuration
The parameters that appear in the ‘parameter List’ scroll menu depends on the slave model. EXAMPLE 1: TARGET SP1 WITH NANODAC SLAVE Select configuration menu Modbus Master.1.Data... - Page 153 This allows the user to enter a Modbus address (decimal) and a data type in order to read the value of a pa- rameter from or write a parameter value to the slave. Modbus address and data types must be obtained from the documentation supplied with the slave device. For convenience, this example uses a nanodac as the slave; table 5.3 of this document providing the required data.
- Page 154 RECORDER/CONTROLLER: USER GUIDE Modbus Master Data Configuration (Cont.) Status The status of the last transaction sent to the selected slave Success: The transaction was successfully actioned by the slave device Timeout: There was no response from the slave device to a given request within the configured time Illegal Address: The request to the slave device contained an invalid modbus address.
-
Page 155: Ethernet/Ip Configuration
RECORDER/CONTROLLER: USER GUIDE 4.10 ETHERNET/IP CONFIGURATION This area of configuration allows the ‘Client’ user to set up an EtherNet/IP communications link with up to two Server units. The ‘Server’ user has a more limited range of configurable items. Note: Implicit I/O is used for continuous real-time transfer of multiple data items from instrument to instrument. -
Page 156: Implicit Inputs/Outputs
Ethernet/ip Configuration Main Menu (Cont.) Net Status Code Network status (Server only) Offline: nanodac online but there are currently no CIP connections Online: nanodac online with at least 1 CIP connection Connection Timeout: The connection has timed out Duplicate IP: A duplicate IP address has been detected on the network... - Page 157 RECORDER/CONTROLLER: USER GUIDE Ethernet/ip Configuration (Cont.) Success. Service was successful Connection Failed. A connection in the path failed Invalid Parameter. A parameter associated with the request was invalid Memory Unavailable. No available resources in the server to service the request Path Segment Error.
-
Page 158: Web Server
RECORDER/CONTROLLER: USER GUIDE 4.11 WEB SERVER The Web Server has been added from firmware versions V5.00 onwards and provides the following features: • Up to four unique client connections • PC, Tablet and mobile phone client support (using appropriate browsers) •... -
Page 159: Digital I/O
RECORDER/CONTROLLER: USER GUIDE 4.12 DIGITAL I/O This area of configuration allows the digital I/O types to be selected. Note: 1. If 2A2B is set to ‘Valve Raise’, then 3A3B is set to ‘Valve Lower’. Similarly, if relay 4AC is set to ‘Valve Raise’, then relay 5AC is set to ‘Valve Lower’. -
Page 160: Digital Inputs
RECORDER/CONTROLLER: USER GUIDE Relay Outputs (Cont.) Inertia For Type = Valve Raise only, this allows a value to be entered (in seconds) to take into account valve run-on. Backlash For Type = Valve Raise only, this allows a value to be entered (in seconds) in order to compensate for backlash in the valve linkage. -
Page 161: Dc Output
RECORDER/CONTROLLER: USER GUIDE 4.13 DC OUTPUT This option provides a voltage (terminals 3A3B only) or mA output. Terminal location is shown in figure 2.2. Caution: There are no mechanical interlocks to prevent a chassis with the dc output option being fitted into a ‘sleeve’... -
Page 162: User Lin
RECORDER/CONTROLLER: USER GUIDE SCALING INFORMATION When PV = Scale Low, Output = output low value. When PV = Scale high, Output = output high value. The PV is mapped via the scale range onto the output range according to the equation: ... -
Page 163: Custom Messages
RECORDER/CONTROLLER: USER GUIDE 4.15 CUSTOM MESSAGES This feature allows the entry of up to 10 messages for sending to the history file, when triggered by a wired source (e.g. an alarm going active). The messages of up to 100 characters each are entered using either the virtual keyboard, described in Section 3.6, or by means of... -
Page 164: Configuration
RECORDER/CONTROLLER: USER GUIDE 4.16.2 Configuration The configuration parameters appear in one of three lists as shown in Figure 4.16.2a. Zirconia Gas Ref Clean Main CO Local Clean Frequency robe type CO Remote Clean Time Resolution CO Remote Enable Min Rcv Time... - Page 165 RECORDER/CONTROLLER: USER GUIDE Configuration (Cont.) MAIN PARAMETERS Probe Type Select from a variety of probe manufacturers. The subsequent parameter list depends on which manufacturer is selected. Resolution Enter the number of decimal places to be used for the value display Gas Reference Reference value for the hydrogen concentration in the atmosphere.
- Page 166 RECORDER/CONTROLLER: USER GUIDE Configuration (Cont.) GAS REFERENCES PARAMETERS CO Local Reference value for the carbon monoxide (CO) concentration in the atmosphere. CO Remote Remote reference value for the carbon monoxide concentration in the atmosphere. allows the value to be read remotely.
-
Page 167: Zirconia Probe Wiring
RECORDER/CONTROLLER: USER GUIDE 4.16.3 Zirconia Probe Wiring Figure 4.16.3 shows a typical wiring arrangement for a Zirconia probe. Cooling Outer electrode solenoid Zirconia Inner electrode pellet Screen Dilution Air Clean Probe Thermocouple Enrich- ment gas AI 1, AI 2 = analogue inputs... -
Page 168: Steriliser Option
RECORDER/CONTROLLER: USER GUIDE 4.17 STERILISER OPTION This block provides a means of recording complete sterilisation cycles, including for example, venting and pumping as well as the actual sterilising period. See Section 3.4.10 for display mode details. Data is stored in .uhh history files for viewing in Review software. - Page 169 RECORDER/CONTROLLER: USER GUIDE Configuration Parameters (Cont.) Remaining The sterilising time remaining for the current cycle Equilibration The equilibration time period for the current cycle Sterilising The time for which the load has currently been at sterilisation conditions Total Cycle...
-
Page 170: Humidity Block Option
RECORDER/CONTROLLER: USER GUIDE Configuration Parameters (Cont.) Failure Dwell A failure alarm is set if this input is out of band range for more than the Failure Dwell time. Scrollable value in hh:mm:ss format. Note: 1. n = 1 to 4, where typically, inputs 1 to 3 are temperature inputs and input 4 is a pressure input. -
Page 171: Bcd Input
RECORDER/CONTROLLER: USER GUIDE 4.19 BCD INPUT Part of the ‘Toolkit Blocks’ option, this block derives decimal and two-decade binary coded decimal (BCD) val- ues from eight discrete inputs, where input 1 is the least significant input (2 = 1) and input 8 is the most signif- icant (2 = 128). -
Page 172: Logic (2 Input) Block
RECORDER/CONTROLLER: USER GUIDE 4.20 LOGIC (2 INPUT) BLOCK Part of the ‘Toolkit Blocks’ option, this block allows a number of logic and comparison operations to be per- formed on a pair of inputs. For logic functions, the inputs can be inverted to allow, for example, a NOR function to be implemented by inverting the inputs to an AND function. -
Page 173: Logic (8 Input) Block
RECORDER/CONTROLLER: USER GUIDE 4.21 LOGIC (8 INPUT) BLOCK Part of the ‘Toolkit Blocks’ option, this block allows AND, OR and cascading* XOR logic operations to be carried out on up to eight inputs. *Cascading XOR example for inputs 1 to 4: (((Input1 ⊕ Input2) ⊕ Input3) ⊕ Input4). -
Page 174: Invert Input Decoding Table
RECORDER/CONTROLLER: USER GUIDE 4.21.3 Invert input decoding table Over a communications link, the inversion status is transmitted as a decimal value, which can be encoded/de- coded using the following table Input Input Input Input 8 7 6 5 4 3 2 1... -
Page 175: Multiplexer Block
RECORDER/CONTROLLER: USER GUIDE 4.22 Multiplexer block This ‘Toolkit’ option block selects one of eight analogue inputs to appear at its output. Multiplexer.1 High Limit 100000000.0 Low Limit -100000000.0 Fall Back Strategy Clip bad Fall Back Value Input Selector Input 1... -
Page 176: Math (2 Input)
RECORDER/CONTROLLER: USER GUIDE 4.23 MATH (2 INPUT) This ‘Toolkit’ option block allows one of a number of operations to be carried out using two input values which may be analogue or digital in nature. Either or both of the inputs can be scaled, using a ‘Multiplier’. -
Page 177: Sample And Hold Details
RECORDER/CONTROLLER: USER GUIDE Parameters (Cont.) Input 1(2) Multiplier The scaling factor for input 1(2). This multiplying factor is applied to the input of the function, but does not affect the displayed values of Input1 and Input 2 (below). Units... -
Page 178: Timer
RECORDER/CONTROLLER: USER GUIDE 4.24 TIMER This ‘Toolkit’ option allows the user to configure up to four timers as: ‘On Pulse’, ‘On Delay’, ‘One Shot’ or ‘Min On’ types. The different types are described in Section 4.24.2, below. Timer.1 Mode... - Page 179 RECORDER/CONTROLLER: USER GUIDE Timer Modes (Cont.) ON DELAY Provides a delay between the trigger point and the timer output becoming active. Rules After the trigger goes active, the output switches on after the delay time has elapsed, and stays on until the trigger goes inactive.
-
Page 180: User Values
RECORDER/CONTROLLER: USER GUIDE Timer Modes (Cont.) MIN ON This ‘Off delay’ function provides an output signal that goes ‘on’ when the trigger goes active and remains on for a specified period after the trigger goes inactive. If the trigger goes inactive, then active again before the time period has elapsed, then the elapsed time is reset to zero and the output remains on. -
Page 181: Alarm Summary
RECORDER/CONTROLLER: USER GUIDE 4.26 ALARM SUMMARY Allows the user to view the overall status of the unit’s alarms, and to carry out a global acknowledgement of active alarms if required. Global Ack Allows the user to acknowledge all applicable alarms simultaneously. ‘Manual’ alarms must be non-active before they can be acknowledged. -
Page 182: Real Time Event Configuration
RECORDER/CONTROLLER: USER GUIDE 4.27 REAL TIME EVENT CONFIGURATION This allows the user to configure up to two events to trigger at a specific time and date, or on a particular day, and to remain active for a configurable time, either measured as a duration, or as a specific ‘Off’ time. -
Page 183: Modbus Tcp Slave Comms
RECORDER/CONTROLLER: USER GUIDE MODBUS TCP SLAVE COMMS INSTALLATION The installation of the Modbus link consists of connecting a standard Ethernet cable between the RJ45 connec- tor at the rear of the unit to a host computer either directly or via a network. A ‘straight-through’ cable can be used in either case (i.e. -
Page 184: Data Types
RECORDER/CONTROLLER: USER GUIDE Function Codes (Cont.) EXCEPTION CODES MODBUS TCP provides reserved codes used for exceptions. These codes provide error information relating to failed requests. Exceptions are signalled by hex 80 being added to the function code of the request, followed by one of the codes listed in table 8.2.1b, below. - Page 185 RECORDER/CONTROLLER: USER GUIDE AdvancedLoop.MasterPID.ControlAction AdvancedLoop.SlaveSP.RangeHigh DigitalIO.2A2B.Inertia AdvancedLoop.MasterPID.CutbackHigh AdvancedLoop.SlaveSP.RangeLow DigitalIO.2A2B.Invert AdvancedLoop.MasterPID.CutbackLow AdvancedLoop.SlaveSP.SbrkSP DigitalIO.2A2B.MinOnTime AdvancedLoop.MasterPID.DerivativeTime AdvancedLoop.Tune.Band DigitalIO.2A2B.StandbyAction AdvancedLoop.MasterPID.DerivativeType AdvancedLoop.Tune.CycleNo DigitalIO.2A2B.Type AdvancedLoop.MasterPID.ErrorLimit AdvancedLoop.Tune.Hysteresis DigitalIO.3A3B.Backlash AdvancedLoop.MasterPID.IntegralTime AdvancedLoop.Tune.OutputHighLimit DigitalIO.3A3B.Inertia AdvancedLoop.MasterPID.LoopBreakTime AdvancedLoop.Tune.OutputLowLimit DigitalIO.3A3B.Invert AdvancedLoop.MasterPID.ManualReset AdvancedLoop.Tune.PBs DigitalIO.3A3B.MinOnTime AdvancedLoop.MasterPID.PBUnits AdvancedLoop.Tune.Settle DigitalIO.3A3B.StandbyAction AdvancedLoop.MasterPID.ProportionalBand AdvancedLoop.Tune.TDs DigitalIO.3A3B.Type AdvancedLoop.MasterSP.ManualTrack AdvancedLoop.Tune.Timeout DigitalIO.DI_LALC.Backlash AdvancedLoop.MasterSP.RangeHigh...
- Page 186 RECORDER/CONTROLLER: USER GUIDE Instrument.Display.Numeric Loop.N.Setup.PBUnits Network.Interface.Gateway Instrument.Display.Programmer Loop.N.Setup.SPAccess Network.Interface.IPaddress Instrument.Display.PromoteListView Loop.N.SP.ManualTrack Network.Interface.IPType Instrument.Display.ScreenSaverAfter Loop.N.SP.RangeHigh Network.Interface.SubnetMask Instrument.Display.ScreenSaverBrightness Loop.N.SP.RangeLow Network.Modbus.Address Instrument.Display.SteriliserPage Loop.N.SP.ServoToPV Network.Modbus.InputTimeout Instrument.Display.TrendBackground Loop.N.SP.SPHighLimit Network.Modbus.PrefMasterIP Instrument.Display.USBAutoScan Loop.N.SP.SPIntBal Network.Modbus.SerialMode Instrument.Display.VerticalBar Loop.N.SP.SPLowLimit Network.Modbus.TimeFormat Instrument.Display.VerticalTrend Loop.N.SP.SPTrack Network.Modbus.UnitIdEnable Instrument.Info.CloneState Loop.N.SP.SPTrimHighLimit Program.ChNHoldback Instrument.Info.Name Loop.N.SP.SPTrimLowLimit Program.ChNHoldbackVal Instrument.Locale.DateFormat...
- Page 187 RECORDER/CONTROLLER: USER GUIDE Steriliser.AutoCounter VirutalChannel.N.Main.RolloverValue Zirconia.GasRefs.CO_Ideal Steriliser.FailureDwellN VirtualChannel.N.Main.Type Zirconia.GasRefs.CO_Local Steriliser.FileByTag VirtualChannel.N.Main.Units Zirconia.GasRefs.CO_RemoteEn Steriliser.FileTag VirtualChannel.N.Main.UnitsScaler Zirconia.GasRefs.H2_Local Steriliser.InputNPV VirtualChannel.N.Trend.Colour Zirconia.GasRefs.H2_RemoteEn Steriliser.InputTypeN VirtualChannel.N.Trend.SpanHigh Zirconia.MaxRcovTime Steriliser.IP1BandHigh VirtualChannel.N.Trend.SpanLow Zirconia.MinCalTemp Steriliser.IP1BandLow WebServer.Enabled Zirconia.MinRcovTime Steriliser.IP1TargetSP WebServer.Password Zirconia.NumResolution Steriliser.IP2BandHigh WebServer.Port Zirconia.OxygenExp Steriliser.IP2BandLow WebServer.Security Zirconia.OxygenType Steriliser.IP2TargetSP WebServer.Username Zirconia.ProbeOffset Steriliser.IP3BandHigh...
-
Page 188: Parameter List
RECORDER/CONTROLLER: USER GUIDE PARAMETER LIST This list is arranged in alphabetical block order and gives the memory address for each parameter in both hex and decimal. The Modbus addresses, in the range 0x0001 - 0x3FFF, listed in the table below give access to the parameter values in a scaled integer format. - Page 189 RECORDER/CONTROLLER: USER GUIDE AdvancedLoop.Diag.CalcOP Calc OP float32 031f AdvancedLoop.Diag.HiSatLim HiSatLim float32 0320 AdvancedLoop.Diag.LoSatLim LoSatLim float32 0321 AdvancedLoop.Diag.MasterDerivativeOutContrib Master derivative output contribution float32 0312 AdvancedLoop.Diag.MasterError Master error float32 030d Same as AdvancedLoop.Main.MasterPV AdvancedLoop.Diag.MasterFB Master feedback float32 031e AdvancedLoop.Diag.MasterIntegralOutContrib Master integral output contribution...
- Page 190 RECORDER/CONTROLLER: USER GUIDE AdvancedLoop.Output.Ch2PotBreak Channel 2 potentiometer break (0 = Off; 1 = On) uint8 317b 12667 Not applicable AdvancedLoop.Output.Ch2PotPosition Channel 2 valve position float32 317a 12666 0dp AdvancedLoop.Output.Ch2TravelTime Channel 2 travel time float32 3175 12661 1dp AdvancedLoop.Output.CoolType Cooling algorithm type...
- Page 191 RECORDER/CONTROLLER: USER GUIDE AdvancedLoop.SlavePID.RelCh2Gain3 Relative cool/channel 2 gain 3 float32 314e 12622 1dp AdvancedLoop.SlavePID.RemoteInput Scheduler remote input float32 3137 12599 0dp AdvancedLoop.SlavePID.SchedulerType Scheduler type uint8 3135 12597 Not applicable 0 = Off 1 = Manually set 2 = Setpoint...
- Page 192 RECORDER/CONTROLLER: USER GUIDE 13 = Ch3;Al2 16 = Ch4;Al1 17 = Ch4;Al2 132 = VC1;Al1 133 = VC1;Al2 136 = VC2;Al1 137 = VC2;Al2 140 = VC3;Al1 141 = VC3;Al2 144 = VC4;Al1 145 = VC4;Al2 148 = VC5;Al1 149 = VC5;Al2...
- Page 193 RECORDER/CONTROLLER: USER GUIDE AlarmSummary.Channel.Alarm26Ack Acknowledge the 26th most recent channel alarm bool 11dd 4573 Not applicable AlarmSummary.Channel.Alarm26Num As Alarm1Num, but for 26th most recent alarm uint8 11db 4571 Not applicable AlarmSummary.Channel.Alarm26Status As Alarm1Status, but for 26th most recent alarm...
- Page 194 RECORDER/CONTROLLER: USER GUIDE 8 = FTP Archive slow 9 = FTP Primary server failure 10 = FTP Secondary server failure 11 = Insufficient non-volatile memory 12 = Maths channel failure 13 = Media archive file lost 14 = Media archive slow 15 = Network boot failure 16 = DC Output Cal.
- Page 195 RECORDER/CONTROLLER: USER GUIDE Channel.1.Alarm1.Hysteresis Alarm hysteresis float32 1844 6212 Same as Channel.1.Main.PV Channel.1.Alarm1.Inactive 1 = the alarm is safe and acknowledged bool 184e 6222 Not applicable Channel.1.Alarm1.Inhibit 1 = the alarm is inhibited bool 1851 6225 Not applicable Channel.1.Alarm1.Latch...
- Page 196 RECORDER/CONTROLLER: USER GUIDE Channel.1.Main.TestSignal Channel test waveform uint8 1802 6146 Not applicable 0 = Triangle 5hr 1 = Triangle 40 min 2 = Triangle 4 min 3 = Triangle 40 sec 4 = Sine 5 hr 5 = Sine 40 min...
- Page 197 RECORDER/CONTROLLER: USER GUIDE Channel.2.Main.PV The output (displayed) value of the channel. float32 0104 Set by Channel.2.Main.Resolution Channel.2.Main.PV2 The secondary input process variable (output) of the channel float32 0114 Set by Channel.2.Main.Resolution Channel.2.Main.RangeHigh Range high value float32 1888 6280 Set by Channel.2.Main.Resolution Channel.2.Main.RangeLow...
- Page 198 RECORDER/CONTROLLER: USER GUIDE Channel.3.Main.SensorBreakVal Sensor break value uint8 1911 6417 Not applicable Channel.3.Main.Shunt Shunt value in Ohms float32 1905 6405 Channel.3.Main.Status Channel status (as for Channel.1.Main.Status) uint8 0109 Not applicable Channel.3.Main.Status2 The secondary input PV (output) status uint8 0119 Not applicable Channel.3.Main.TestSignal...
- Page 199 RECORDER/CONTROLLER: USER GUIDE CustomMessage.Message1 Custom message No 1 string_t 5e00 24064 Not applicable CustomMessage.Message2 Custom message No 2 string_t 5e65 24165 Not applicable CustomMessage.Message3 Custom message No 3 string_t 5eca 24266 Not applicable CustomMessage.Message4 Custom message No 4 string_t...
- Page 200 RECORDER/CONTROLLER: USER GUIDE DigitalIO.3A3B.Backlash Valve positioning backlash compensation (seconds) float32 1538 5432 DigitalIO.3A3B.Inertia Inertia value for the valve float32 1537 5431 DigitalIO.3A3B.Invert 1 = Invert; 0 = Do not invert bool 1533 5427 Not applicable DigitalIO.3A3B.MinOnTime Time proportioned output minimum on time...
- Page 201 RECORDER/CONTROLLER: USER GUIDE EthernetIP.ImplicitInputs.Input35 See input 1 for details eint32 7eee 32494 Not applicable EthernetIP.ImplicitInputs.Input36 See input 1 for details eint32 7ef2 32498 Not applicable EthernetIP.ImplicitInputs.Input37 See input 1 for details eint32 7ef6 32502 Not applicable EthernetIP.ImplicitInputs.Input38 See input 1 for details...
- Page 202 RECORDER/CONTROLLER: USER GUIDE EthernetIP.ImplicitOutputs.Output18 See output 1 for details eint32 7f72 32626 Not applicable EthernetIP.ImplicitOutputs.Output19 See output 1 for details eint32 7f76 32630 Not applicable EthernetIP.ImplicitOutputs.Output20 See output 1 for details eint32 7f7a 32634 Not applicable EthernetIP.ImplicitOutputs.Output21 See output 1 for details...
- Page 203 RECORDER/CONTROLLER: USER GUIDE EthernetIP.InputTags.Input1 A read only input from a PLC device string_t 7838 30776 Not applicable EthernetIP.InputTags.Input2 See input 1 for details string_t 7839 30777 Not applicable EthernetIP.InputTags.Input3 See input 1 for details string_t 783a 30778 Not applicable EthernetIP.InputTags.Input4...
- Page 204 RECORDER/CONTROLLER: USER GUIDE EthernetIP.OutputTags.Output30 See output 1 for details string_t 789d 30877 Not applicable Group.Recording.Channel1En Channel 1 enable (0 = Disabled; 1 = Enabled) bool 1023 4131 Not applicable Group.Recording.Channel2En Channel 2 enable (0 = Disabled; 1 = Enabled)
- Page 205 RECORDER/CONTROLLER: USER GUIDE Humidity.PsychroConst Psychrometric Constant float32 2e7f 11903 2dp Humidity.RelHumid Calculated Relative Humidity float32 2e78 11896 Set by Humidity.Resolution Humidity.Resolution Result Resolution uint8 2e81 11905 Not applicable Humidity.SBrk Sensor Broken (0 = No; 1 = Yes) bool 2e7e 11902 Not applicable Humidity.WetOffset...
- Page 206 RECORDER/CONTROLLER: USER GUIDE Instrument.Locale.EndTime DST end time in hours, minutes, seconds and milliseconds time_t 10b8 4280 Set by Network.Modbus.TimeFormat Instrument.Locale.Language Language (0 = English) uint8 10b0 4272 Not applicable Instrument.Locale.StartDay DST start day. As Instrument.Locale.EndDay, above uint8 10b6 4278 Not applicable Instrument.Locale.StartMonth...
- Page 207 RECORDER/CONTROLLER: USER GUIDE Instrument.OEMConfigList.Parameter27 Parameter that is to be alterable eint32 124a 4682 Not applicable Instrument.OEMConfigList.Parameter28 Parameter that is to be alterable eint32 124b 4683 Not applicable Instrument.OEMConfigList.Parameter29 Parameter that is to be alterable eint32 124c 4684 Not applicable Instrument.OEMConfigList.Parameter30...
- Page 208 RECORDER/CONTROLLER: USER GUIDE Instrument.OEMSupervisorList.Parameter11 Parameter that is to be read only eint32 129e 4766 Not applicable Instrument.OEMSupervisorList.Parameter12 Parameter that is to be read only eint32 129f 4767 Not applicable Instrument.OEMSupervisorList.Parameter13 Parameter that is to be read only eint32 12a0...
- Page 209 RECORDER/CONTROLLER: USER GUIDE Instrument.OEMSupervisorList.Parameter96 Parameter that is to be read only eint32 12f3 4851 Not applicable Instrument.OEMSupervisorList.Parameter97 Parameter that is to be read only eint32 12f4 4852 Not applicable Instrument.OEMSupervisorList.Parameter98 Parameter that is to be read only eint32 12f5...
- Page 210 RECORDER/CONTROLLER: USER GUIDE Lgc2.7.Out The result of the logic operation (as Lgc2.1.Out) bool 2f27 12071 Not applicable Lgc2.7.OutputStatus Output Status (0 = Good; 1 = Bad) uint8 2f28 12072 Not applicable Lgc2.8.FallbackType Fallback Condition (as Lgc2.1.FallbackType) uint8 2f2c 12076 Not applicable Lgc2.8.In1...
- Page 211 RECORDER/CONTROLLER: USER GUIDE Loop.1.Diag.SchedMR The Scheduled Manual Reset float32 1697 5783 Loop.1.Diag.SchedOPHi The Scheduled Output High Limit float32 169a 5786 Loop.1.Diag.SchedOPLo The Scheduled Output Low Limit float32 169b 5787 Loop.1.Diag.SchedPB The Scheduled Proportional Band float32 1692 5778 Loop.1.Diag.SchedR2G The Scheduled Relative Cool Gain...
- Page 212 RECORDER/CONTROLLER: USER GUIDE Loop.1.PID.ProportionalBand Proportional band value for PID set 1 float32 163b 5691 Loop.1.PID.ProportionalBand2 Proportional band value for PID set 2 float32 1643 5699 Loop.1.PID.ProportionalBand3 Proportional band value for PID set 3 float32 164b 5707 Loop.1.PID.RelCh2Gain Channel 2 relative cool gain value for PID set 1...
- Page 213 RECORDER/CONTROLLER: USER GUIDE Loop.2.Diag.SchedMR The Scheduled Manual Reset float32 1797 6039 Loop.2.Diag.SchedOPHi The Scheduled Output High Limit float32 179a 6042 Loop.2.Diag.SchedOPLo The Scheduled Output Low Limit float32 179b 6043 Loop.2.Diag.SchedPB The Scheduled Proportional Band float32 1792 6034 Loop.2.Diag.SchedR2G The Scheduled Relative Cool Gain...
- Page 214 RECORDER/CONTROLLER: USER GUIDE Loop.2.PID.ProportionalBand Proportional band value for PID set 1 float32 173b 5947 Loop.2.PID.ProportionalBand2 Proportional band value for PID set 2 float32 1743 5955 Loop.2.PID.ProportionalBand3 Proportional band value for PID set 3 float32 174b 5963 Loop.2.PID.RelCh2Gain Channel 2 relative cool gain value for PID set 1...
- Page 215 RECORDER/CONTROLLER: USER GUIDE Math2.1.Oper Operation uint8 2faa 12202 Not applicable 0 = Off 1 = Add 2 = Subtract 3 = Multiply 4 =Divide 5 = Abs diff 6 = Select Max 7 = Select Min8 = Hot Swap 9 = Sample &...
- Page 216 RECORDER/CONTROLLER: USER GUIDE Math2.6.Select Select Between Input 1 and Input 2 bool 2ff1 12273 Not applicable Math2.6.Status Status. 0 = Good (OK); 7 = Bad (Error) uint8 2ff2 12274 Not applicable Math2.6.Units Output Units string_t 6962 26978 Not applicable Math2.7.Fallback...
- Page 217 RECORDER/CONTROLLER: USER GUIDE Math2.12.In2Mul Input 2 Scale float32 3037 12343 1dp Math2.12.LowLimit Output Low Limit float32 303c 12348 Same as Math2.12.Out Math2.12.Oper Operation (as Math2.1.Oper) uint8 3039 12345 Not applicable Math2.12.Out Output Value float32 303d 12349 Set by Math2.12.Resolution Math2.12.Resolution...
- Page 218 RECORDER/CONTROLLER: USER GUIDE 5.3 PARAMETER LIST (Cont.) ModbusMaster.3.Data.Value The value to be written to the slave device float32 7c46 31814 2dp Parameter path Description Type Resolution ModbusMaster.4.Data.AlarmStatus Alarm status (as for Modbus Master.1) uint8 7dbe 32190 Not applicable ModbusMaster.4.Data.BitPosition...
- Page 219 RECORDER/CONTROLLER: USER GUIDE ModbusMaster.8.Data.AlarmStatus Alarm status (as for Modbus Master.1) uint8 7dc2 32194 Not applicable ModbusMaster.8.Data.BitPosition Bit position of the bit of interest in a 16 bit data type uint8 7d56 32086 Not applicable ModbusMaster.8.Data.ChanAlarmStatus Channel alarm status (as for Modbus Master.1)
- Page 220 RECORDER/CONTROLLER: USER GUIDE ModbusMaster.12.Data.AlarmStatus Alarm status (as for Modbus Master.1) uint8 7dc6 32198 Not applicable ModbusMaster.12.Data.BitPosition Bit position of the bit of interest in a 16 bit data type uint8 7d5a 32090 Not applicable ModbusMaster.12.Data.ChanAlarmStatus Channel alarm status (as for Modbus Master.1)
- Page 221 RECORDER/CONTROLLER: USER GUIDE ModbusMaster.16.Data.BitPosition Bit position of the bit of interest in a 16 bit data type uint8 7d5e 32094 Not applicable ModbusMaster.16.Data.ChanAlarmStatus Channel alarm status (as for Modbus Master.1) uint8 7dea 32234 Not applicable ModbusMaster.16.Data.DataType Type of data being read/written (as for Modbus Master.1)
- Page 222 RECORDER/CONTROLLER: USER GUIDE ModbusMaster.20.Data.ChanAlarmStatus Channel alarm status (as for Modbus Master.1) uint8 7dee 32238 Not applicable ModbusMaster.20.Data.DataType Type of data being read/written (as for Modbus Master.1) uint8 7c19 31769 Not applicable ModbusMaster.20.Data.Descriptor Description for this data item string_t 6816 26646 Not applicable ModbusMaster.20.Data.Digital...
- Page 223 RECORDER/CONTROLLER: USER GUIDE ModbusMaster.24.Data.Descriptor Description for this data item string_t 686a 26730 Not applicable ModbusMaster.24.Data.Digital Digital status (0 = Off, 1 = On) bool 7e32 32306 Not applicable ModbusMaster.24.Data.FallBackValue Fall back value to be writen to the slave device...
- Page 224 RECORDER/CONTROLLER: USER GUIDE ModbusMaster.28.Data.Digital Digital status (0 = Off, 1 = On) bool 7e36 32310 Not applicable ModbusMaster.28.Data.FallBackValue Fall back value to be writen to the slave device float32 7cb4 31924 2dp ModbusMaster.28.Data.FunctionCode The modbus function code (as for Modbus Master.1)
- Page 225 RECORDER/CONTROLLER: USER GUIDE 0 = Success 1 = Illegal function 2 = Ilegal address 3 = Illegal value 6 = Slave busy 8 = Parity error 9 = Bad sub 10 = Bad gateway 11 = No response 12 = Idle...
- Page 226 RECORDER/CONTROLLER: USER GUIDE Mux8.1.Status Status. 0 = Good (OK); 7 = Bad (Error) bool 2f74 12148 Not applicable Mux8.2.Fallback Fallback Strategy (as Mux8.1.Fallback) uint8 2f76 12150 Not applicable Mux8.2.FallbackVal Fallback Value float32 2f77 12151 1dp Mux8.2.HighLimit High Limit float32...
- Page 227 RECORDER/CONTROLLER: USER GUIDE OR.1.Input5 OR Block 1, input 5. 0 = off; 1 = on bool 2d04 11524 Not applicable OR.1.Input6 OR Block 1, input 6. 0 = off; 1 = on bool 2d05 11525 Not applicable OR.1.Input7 OR Block 1, input 7. 0 = off; 1 = on...
- Page 228 RECORDER/CONTROLLER: USER GUIDE OR.10.Output OR Block 10, output. 0 = off; 1 = on bool 2d98 11672 Not applicable OR.11.Input1 OR Block 11, input 1. 0 = off; 1 = on bool 2da0 11680 Not applicable OR.11.Input2 OR Block 11, input 2. 0 = off; 1 = on...
- Page 229 RECORDER/CONTROLLER: USER GUIDE Programmer.FileList.Filename50 Filename string_t 7931 31025 Not applicable Programmer.FileList.Filename51 Filename string_t 7932 31026 Not applicable Programmer.FileList.Filename52 Filename string_t 7933 31027 Not applicable Programmer.FileList.Filename53 Filename string_t 7934 31028 Not applicable Programmer.FileList.Filename54 Filename string_t 7935 31029 Not applicable Programmer.FileList.Filename55...
- Page 230 RECORDER/CONTROLLER: USER GUIDE Programmer.Run.ProgTimeRunning Program time running time_t 3a70 14960 Set by Network.Modbus.TimeFormat Programmer.Run.ProgTimeSpent Program time spent time_t 3a58 14936 Set by Network.Modbus.TimeFormat Programmer.Run.Segment Segment string_t 6aa6 27302 Not applicable Programmer.Run.SegmentType Segment type uint8 3a52 14930 Not applicable 0 = End...
- Page 231 RECORDER/CONTROLLER: USER GUIDE RealTimeEvent.1.OnDay Sets the day on which event is to switch on (as ‘OffDay’, above) uint8 30e3 12515 Not applicable RealTimeEvent.1.OnMonth The month number when the event is to switch on uint8 30e1 12513 Not applicable RealTimeEvent.1.OnTime...
- Page 232 RECORDER/CONTROLLER: USER GUIDE Segment.2.Ch2PVEventUse Channel 2 PV event use bool 3b13 15123 Not applicable Segment.2.Ch2PVEventVal Channel 2 PV event value float32 3b07 15111 Same as Programmer.SetUp.Ch2PVInput Segment.2.Ch2Rate Channel 2 rate float32 3af7 15095 Set by Programmer.SetUp.RateResolution Segment.2.Ch2Time Channel 2 time...
- Page 233 RECORDER/CONTROLLER: USER GUIDE Segment.4.Cycles Cycles int16 3b63 15203 Not applicable Segment.4.Duration Duration time_t 3b51 15185 Set by Network.Modbus.TimeFormat Segment.4.EndType End type uint8 3b58 15192 Not applicable Segment.4.Event1 Event 1 bool 3b6a 15210 Not applicable Segment.4.Event2 Event 2 bool 3b6b 15211 Not applicable Segment.4.Event3...
- Page 234 RECORDER/CONTROLLER: USER GUIDE Segment.6.Event5 Event 5 bool 3bce 15310 Not applicable Segment.6.Event6 Event 6 bool 3bcf 15311 Not applicable Segment.6.Event7 Event 7 bool 3bd0 15312 Not applicable Segment.6.Event8 Event 8 bool 3bd1 15313 Not applicable Segment.6.GoBackTo Go back to...
- Page 235 RECORDER/CONTROLLER: USER GUIDE Segment.8.WaitFor Wait for uint8 3c1d 15389 Not applicable Segment 9 For parameter values and settings (enumerations) see Segment 1 Segment.9.Ch1Holdback Channel 1 holdback type uint8 3c49 15433 Not applicable Segment.9.Ch1HoldbackVal Channel 1 holdback value float32 3c4b 15435 Same as Programmer.SetUp.Ch1PVInput...
- Page 236 RECORDER/CONTROLLER: USER GUIDE Segment.11.Ch1PVEventVal Channel 1 PV event value float32 3cb6 15542 Same as Programmer.SetUp.Ch1PVInput 15526 Set by Programmer.SetUp.RateResolution Segment.11.Ch1Rate Channel 1 rate float32 3ca6 Segment.11.Ch1Time Channel 1 time time_t 3ca4 15524 Set by Network.Modbus.TimeFormat Segment.11.Ch1TSP Channel 1 target set-point...
- Page 237 RECORDER/CONTROLLER: USER GUIDE Segment.13.Ch2Holdback Channel 2 holdback type uint8 3d0a 15626 Not applicable Segment.13.Ch2HoldbackVal Channel 2 holdback value float32 3d0c 15628 Same as Programmer.SetUp.Ch2PVInput Segment.13.Ch2PVEvent Channel 2 PV event uint8 3d15 15637 Not applicable Segment.13.Ch2PVEventUse Channel 2 PV event use...
- Page 238 RECORDER/CONTROLLER: USER GUIDE Segment.15.Ch2TSP Channel 2 target set-point float32 3d63 15715 Same as Programmer.SetUp.Ch2PVInput 15737 Same as Programmer.SetUp.ResetCh2UserVal Segment.15.Ch2UserVal Channel 2 user value float32 3d79 Segment.15.Ch2Wait Channel 2 Wait uint8 3d6f 15727 Not applicable Segment.15.Ch2WaitVal Channel 2 wait value...
- Page 239 RECORDER/CONTROLLER: USER GUIDE Segment.17.Event1 Event 1 bool 3dda 15834 Not applicable Segment.17.Event2 Event 2 bool 3ddb 15835 Not applicable Segment.17.Event3 Event 3 bool 3ddc 15836 Not applicable Segment.17.Event4 Event 4 bool 3ddd 15837 Not applicable Segment.17.Event5 Event 5 bool...
- Page 240 RECORDER/CONTROLLER: USER GUIDE Segment.19.Event8 Event 8 bool 3e41 15937 Not applicable Segment.19.GoBackTo Go back to uint8 3e32 15922 Not applicable Segment.19.SegmentName Segment name string_t 6c4a 27722 Not applicable Segment.19.Type Type uint8 3e20 15904 Not applicable Segment.19.WaitFor Wait for uint8...
- Page 241 RECORDER/CONTROLLER: USER GUIDE Segment.22.Ch1Holdback Channel 1 holdback type uint8 3eb9 16057 Not applicable Segment.22.Ch1HoldbackVal Channel 1 holdback value float32 3ebb 16059 Same as Programmer.SetUp.Ch1PVInput Segment.22.Ch1PVEvent Channel 1 PV event uint8 3ec4 16068 Not applicable Segment.22.Ch1PVEventUse Channel 1 PV event use...
- Page 242 RECORDER/CONTROLLER: USER GUIDE Segment.24.Ch1TSP Channel 1 target set-point float32 3f12 16146 Same as Programmer.SetUp.Ch1PVInput 16168 Same as Programmer.SetUp.ResetCh1UserVal Segment.24.Ch1UserVal Channel 1 user value float32 3f28 Segment.24.Ch1Wait Channel 1 Wait uint8 3f1e 16158 Not applicable Segment.24.Ch1WaitVal Channel 1 wait value...
- Page 243 RECORDER/CONTROLLER: USER GUIDE Segment.26.Ch2PVEventUse Channel 2 PV event use bool 3f93 16275 Not applicable Segment.26.Ch2PVEventVal Channel 2 PV event value float32 3f87 16263 Same as Programmer.SetUp.Ch2PVInput Segment.26.Ch2Rate Channel 2 rate float32 3f77 16247 Set by Programmer.SetUp.RateResolution Segment.26.Ch2Time Channel 2 time...
- Page 244 RECORDER/CONTROLLER: USER GUIDE 0 = Disabled (off) 1 = On Pulse2 = On delay 3 = One shot 4 = Min on. Timer.2.ElapsedTime Elapsed Time time_t 2ee6 12006 Set by Network.Modbus.TimeFormat Timer.2.In Trigger/Gate input bool 2eeb 12011 Not applicable Timer.2.Out...
- Page 245 RECORDER/CONTROLLER: USER GUIDE UserLin.1.Y28 User linearisation table 1 ‘Y’ value 28 float32 2938 10552 2dp UserLin.1.Y29 User linearisation table 1 ‘Y’ value 29 float32 293a 10554 2dp UserLin.1.Y30 User linearisation table 1 ‘Y’ value 30 float32 293c 10556 2dp UserLin.1.Y31...
- Page 246 RECORDER/CONTROLLER: USER GUIDE UserLin.3.X13 User linearisation table 3 ‘X’ value 13 float32 2a99 10905 2dp UserLin.3.X14 User linearisation table 3 ‘X’ value 14 float32 2a9b 10907 2dp UserLin.3.X15 User linearisation table 3 ‘X’ value 15 float32 2a9d 10909 2dp UserLin.3.X16...
- Page 247 RECORDER/CONTROLLER: USER GUIDE UserLin.4.Y1 User linearisation table 4 ‘Y’ value 1 float32 2b42 11074 2dp UserLin.4.Y2 User linearisation table 4 ‘Y’ value 2 float32 2b44 11076 2dp UserLin.4.Y3 User linearisation table 4 ‘Y’ value 3 float32 2b46 11078 2dp UserLin.4.Y4...
- Page 248 RECORDER/CONTROLLER: USER GUIDE UsrVal.8.Status User Value 8 Status (0 = Good (OK); 7 = Bad (Error)) bool 2eb2 11954 Not applicable UsrVal.8.Units Units of the value string_t 6926 26918 Not applicable UsrVal.8.Val The User Value float32 2eb1 11953 Set by UsrVal.8.Resolution UsrVal.9.HighLimit...
- Page 249 RECORDER/CONTROLLER: USER GUIDE 4 = Multiply 5 = Divide 6 = Group avg 7 = Group min 8 = Group max 9 = Modbus i/p 11 = Copy 20 = Grp min latch 21 = Grp max latch 34 = Chan max...
- Page 250 RECORDER/CONTROLLER: USER GUIDE VirtualChannel.2.Main.Input2 Input 2 value float32 1c88 7304 Set by VirtualChannel.2.Main.Resolution VirtualChannel.2.Main.LowCutOff The lowest input value that will be totalised/counted float32 1c84 7300 Set by VirtualChannel.2.Main.Resolution VirtualChannel.2.Main.ModbusInput Modbus input value float32 1c86 7302 Set by VirtualChannel.2.Main.Resolution VirtualChannel.2.Main.Operation As VirtualChannel1.Main.Operation...
- Page 251 RECORDER/CONTROLLER: USER GUIDE VirtualChannel.4.Alarm1.Active 1 = alarm source active, or safe but not ack’d bool 1dcb 7627 Not applicable VirtualChannel.4.Alarm1.Amount Rate-of-change alarm ‘Amount’ float32 1dc8 7624 Same as VirtualChannel.4.Main.PV VirtualChannel.4.Alarm1.AverageTime Rate-of-change alarm ‘Average time’ time_t 1dca 7626 Set by Network.Modbus.TimeFormat VirtualChannel.4.Alarm1.Block...
- Page 252 RECORDER/CONTROLLER: USER GUIDE VirtualChannel.5.Alarm2.Dwell Alarm dwell time time_t 1e65 7781 Set by Network.Modbus.TimeFormat VirtualChannel.5.Alarm2.Hysteresis Alarm hysteresis value float32 1e64 7780 Same as VirtualChannel.5.Main.PV VirtualChannel.5.Alarm2.Inactive 1 = alarm source safe and ack’d (if necessary) bool 1e6e 7790 Not applicable VirtualChannel.5.Alarm2.Inhibit...
- Page 253 RECORDER/CONTROLLER: USER GUIDE VirtualChannel.6.Main.Resolution Number of decimal places (0 to 6) uint8 1e82 7810 Not applicable VirtualChannel.6.Main.Rollover A pulse signal to indicate PV (output) has just rolled over bool 1e91 7825 Not applicable VirtualChannel.6.Main.RolloverValue Rollover value float32 1e92 7826 Set by VirtualChannel.6.Main.Resolution...
- Page 254 RECORDER/CONTROLLER: USER GUIDE VirtualChannel.8.Alarm1.Inhibit 1 = alarm inhibited bool 1fd1 8145 Not applicable VirtualChannel.8.Alarm1.Latch As VirtualChannel1.Alarm1.Latch uint8 1fc1 8129 Not applicable VirtualChannel.8.Alarm1.NotAcknowledged 1 = alarm has not been acknowledged bool 1fcf 8143 Not applicable VirtualChannel.8.Alarm1.Reference Deviation alarm ‘Reference’ value...
- Page 255 RECORDER/CONTROLLER: USER GUIDE VirtualChannel.9.Alarm2.Threshold Alarm trigger threshold float32 2063 8291 Same as VirtualChannel.9.Main.PV VirtualChannel.9.Alarm2.Type As VirtualChannel1.Alarm1.Type uint8 2060 8288 Not applicable VirtualChannel.9.Main.Descriptor Virtual Channel descriptor string_t 4bd8 19416 Not applicable VirtualChannel.9.Main.Disable 1 = Virtual channel disabled bool 2023 8227 Not applicable VirtualChannel.9.Main.HighCutOff...
- Page 256 RECORDER/CONTROLLER: USER GUIDE VirtualChannel.10.Main.UnitsScaler Units scaler for totalisers float32 2083 8323 VirtualChannel.10.Trend.Colour As VirtualChannel1.Trend.Colour uint8 20a0 8352 Not applicable VirtualChannel.10.Trend.SpanHigh Specifies the highest PV (output value) to be displayed float32 20a2 8354 Same as VirtualChannel.10.Main.PV VirtualChannel.10.Trend.SpanLow Specifies the lowest PV (output value) to be displayed...
- Page 257 RECORDER/CONTROLLER: USER GUIDE VirtualChannel.12.Alarm2.Acknowledge 1 = acknowledge alarm bool 01d7 Not applicable VirtualChannel.12.Alarm2.Acknowledgement 1 = alarm acknowledged bool 21f0 8688 Not applicable VirtualChannel.12.Alarm2.Active 1 = alarm source active, or safe but not ack’d bool 21eb 8683 Not applicable VirtualChannel.12.Alarm2.Amount Rate-of-change alarm ‘Amount’...
- Page 258 RECORDER/CONTROLLER: USER GUIDE VirtualChannel.13.Main.LowCutOff The lowest input value that will be totalised/counted float32 2204 8708 Set by VirtualChannel.13.Main.Resolution VirtualChannel.13.Main.ModbusInput Modbus input value float32 2206 8710 Set by VirtualChannel.13.Main.Resolution VirtualChannel.13.Main.Operation As VirtualChannel1.Main.Operation uint8 2201 8705 Not applicable VirtualChannel.13.Main.Period The time period over which the calculation is made...
- Page 259 RECORDER/CONTROLLER: USER GUIDE VirtualChannel.15.Alarm1.Active 1 = alarm source active, or safe but not ack’d bool 234b 9035 Not applicable VirtualChannel.15.Alarm1.Amount Rate-of-change alarm ‘Amount’ float32 2348 9032 Same as VirtualChannel.15.Main.PV VirtualChannel.15.Alarm1.AverageTime Rate-of-change alarm ‘Average time’ time_t 234a 9034 Set by Network.Modbus.TimeFormat VirtualChannel.15.Alarm1.Block...
- Page 260 RECORDER/CONTROLLER: USER GUIDE VirtualChannel.17.Main.Descriptor Virtual Channel descriptor string_t 4cb1 19633 Not applicable VirtualChannel.17.Main.Disable 1 = Virtual channel disabled bool 23e3 9187 Not applicable VirtualChannel.17.Main.HighCutOff The highest input value that will be totalised/counted float32 23c5 9157 Set by VirtualChannel.17.Main.Resolution VirtualChannel.17.Main.Input1...
- Page 261 RECORDER/CONTROLLER: USER GUIDE VirtualChannel.20.Main.Operation Specifies the operation of the virtual channel uint8 2481 9345 Not applicable VirtualChannel.20.Main.Period The time period over which the calculation is made int32 248a 9354 Not applicable VirtualChannel.20.Main.Preset Initiate preset. 0 = No; 1 = Yes...
- Page 262 RECORDER/CONTROLLER: USER GUIDE VirtualChannel.23.Main.Rollover A pulse signal to indicate PV (output) has just rolled over bool 2551 9553 Not applicable VirtualChannel.23.Main.RolloverValue Rollover value float32 2552 9554 Set by VirtualChannel.23.Main.Resolution VirtualChannel.23.Main.Status As VirtualChannel1.Main.Status uint8 016b Not applicable VirtualChannel.23.Main.TimeRemaining Time remaining before the calculation is made...
- Page 263 RECORDER/CONTROLLER: USER GUIDE VirtualChannel.26.Main.UnitsScaler Units scaler for totalisers float32 2603 9731 VirtualChannel.26.Trend.Colour As VirtualChannel1.Trend.Colour uint8 2720 10016 Not applicable VirtualChannel.26.Trend.SpanHigh Specifies the highest PV (output value) to be displayed float32 2722 10018 Same as VirtualChannel.26.Main.PV VirtualChannel.26.Trend.SpanLow Specifies the lowest PV (output value) to be displayed...
- Page 264 RECORDER/CONTROLLER: USER GUIDE VirtualChannel.30.Main.Input1 Input 1 value float32 2707 9991 Set by VirtualChannel.30.Main.Resolution VirtualChannel.30.Main.Input2 Input 2 value float32 2708 9992 Set by VirtualChannel.30.Main.Resolution VirtualChannel.30.Main.LowCutOff The lowest input value that will be totalised/counted float32 2704 9988 Set by VirtualChannel.30.Main.Resolution VirtualChannel.30.Main.ModbusInput...
- Page 265 RECORDER/CONTROLLER: USER GUIDE 4 = Impedance recovery 5 = Not ready Zirconia.ProbeStatus Status of Probe uint8 289c 10396 Not applicable 0 = OK 1 = mVSbr 2 = TempSbr 3 = MincalcT Zirconia.ProbeType Type of Probe uint8 2880 10368 Not applicable...
-
Page 266: Itools
RECORDER/CONTROLLER: USER GUIDE iTOOLS iTools software running on a pc allows quick and easy access to the configuration of the unit. The parameters used are generally the same as those described in section 4 above, with the addition of various diagnostic pa- rameters. -
Page 267: Itools Connection
RECORDER/CONTROLLER: USER GUIDE iTools CONNECTION The following descriptions assume that iTools software has been correctly installed on the pc. 6.1.1 Ethernet (Modbus TCP) communications Note: The following description is based on windows XP. Windows ‘Vista’ is similar. It is first necessary to determine the IP address of the unit, as described under ‘Network.Interface’ in section 4.2.1. - Page 268 RECORDER/CONTROLLER: USER GUIDE Ethernet (TCP/IP) Communications (Cont.) To check that the pc can now communicate with the instrument, Click ‘Start’. ‘All Programs’, ‘Accessories’, ‘Command Prompt’ when the Command Prompt box appears, type in: Ping<Space>IP1.IP2.IP3.IP4<Enter> (where IP1 to IP4 are the IP address of the instrument).
-
Page 269: Direct Connection
RECORDER/CONTROLLER: USER GUIDE 6.1.2 Direct Connection This section describes how to connect a pc directly to the instrument. WIRING Connection is made from the Ethernet connector at the rear of the Instrument to an Ethernet RJ45 connector, usually located at the rear of the pc. The cable can be either a ‘cross-over’ or ‘straight through’... -
Page 270: Scanning For Instruments
RECORDER/CONTROLLER: USER GUIDE SCANNING FOR INSTRUMENTS Clicking on the ‘Scan’ toolbar icon causes a dialogue box (shown below) to appear. This allows the user to de- fine a search range of addresses. Note: 1. The relevant instrument address is that entered in the Network.Modbus configuration item (section 4.2.4, and it can take any value between 1 and 254 inclusive, as long as it is... -
Page 271: Graphical Wiring Editor
RECORDER/CONTROLLER: USER GUIDE GRAPHICAL WIRING EDITOR Clicking on the Graphical wiring Editor tool bar icon causes the Graphical wiring window for the current instru- ment configuration to open. Figure 6.3 Graphical wiring Editor The graphical wiring editor allows: Function blocks, notes, comments etc. to be ‘drag and dropped’ into the wiring diagram from the tree list (left pane). -
Page 272: Tool Bar
RECORDER/CONTROLLER: USER GUIDE 6.3.1 Tool bar Download wiring to instrument. Mouse select. Select normal mouse operation. Mutually exclusive with ‘Mouse Pan’ below. Mouse Pan. When active, this causes the mouse cursor to change to a hand-shaped icon. Allows the graphical wiring diagram to be click-dragged within the GWE window aperture. - Page 273 RECORDER/CONTROLLER: USER GUIDE Wiring Editor Operating Details (Cont.) FUNCTION BLOCKS A Function Block is an algorithm which may be wired to and from other function blocks to make a control strat- egy. Each function block has inputs and outputs. Any parameter may be wired from, but only parameters that are alterable in Operator Mode may we wired to.
- Page 274 RECORDER/CONTROLLER: USER GUIDE Wiring Editor Operating Details (Cont.) FUNCTION BLOCK CONTEXT MENU (Cont.) Hide unwanted connections Causes the display to include only wired items. Allows one or more selected items to be moved to the Clipboard ready for pasting into an- other diagram or compound, or for use in a Watch window, or OPC scope.
- Page 275 RECORDER/CONTROLLER: USER GUIDE Wiring Editor Operating Details (Cont.) WIRES To make a wire Drag two (or more) blocks onto the diagram from the func- tion block tree. Start a wire by either clicking on a recommended output or clicking on the ‘Click to Select output’ icon at the bottom right corner of the block to bring up the connection dia- logue, and clicking on the required parameter.
- Page 276 RECORDER/CONTROLLER: USER GUIDE Wiring Editor Operating Details (Cont.) Wire Colours Black Normal functioning wire The wire is connected to a non-changeable parameter. Values are rejected by the desti- nation block. Magenta A normal functioning wire is being hovered-over by the mouse cursor.
- Page 277 RECORDER/CONTROLLER: USER GUIDE Wiring Editor Operating Details (Cont.) MONITORS Monitor points are added to a wiring diagram by click-dragging them from the Function Block tree onto the dia- gram. A monitor shows the current value (updated at the iTools parameter list update rate) of the parameter to which it is linked.
- Page 278 RECORDER/CONTROLLER: USER GUIDE Wiring Editor Operating Details (Cont.) COLOURS Items on the diagram are coloured as follows: Items which totally or partially obscure other items and items which are totally or partially obscured by other items. Wires that are connected to unalterable or non-available param- eters.
- Page 279 RECORDER/CONTROLLER: USER GUIDE Wiring Editor Operating Details (Cont.) COMPOUNDS Compounds are used to simplify the top level wiring diagram, by allowing the placing of any number of function blocks within one ‘box’, the inputs and outputs of which operate in the same way as those of a normal function block.
-
Page 280: Parameter Explorer
RECORDER/CONTROLLER: USER GUIDE PARAMETER EXPLORER This view can be displayed: by clicking on the ‘Parameter Explorer’ toolbar icon, by double clicking on the relevant block in the tree pane or in the graphical wiring editor by selecting ‘Function Block View’ from the Function block context menu in the Graphical wiring Editor. -
Page 281: Parameter Explorer Detail
RECORDER/CONTROLLER: USER GUIDE Parameter Explorer (Cont.) Context menu Explorer menu Figure 6.4b Column enable/disable 6.4.1 Parameter explorer detail Figure 6.4.1a shows a typical parameter table. This particular parameter has a number of subfolders associated with it, and each of these is represented by a ‘tab’ across the top of the table. -
Page 282: Explorer Tools
RECORDER/CONTROLLER: USER GUIDE Parameter Explorer Detail (Cont.) Figure 6.4.1b Show/Hide parameters 6.4.2 Explorer tools A number of tool icons appear above the parameter list: Back to: and Forward to:. The parameter explorer contains a history buffer of up to 10 lists that have been browsed in the current instance of the window. -
Page 283: Watch/Recipe Editor
RECORDER/CONTROLLER: USER GUIDE WATCH/RECIPE EDITOR The watch/recipe editor is opened by clicking on the Watch/Recipe tool icon, by selecting ‘Watch/Recipe’ in the ‘Views’ menu or by using the short cut <Ctrl>+<A>. The window is in two parts: the left part containing the watch list;... -
Page 284: Watch Recipe Toolbar Icons
RECORDER/CONTROLLER: USER GUIDE Creating A Watch List (Cont.) DATA SET CREATION (Cont.) Individual data values can now be edited by typing directly into the grid cells. Data values can be left blank or cleared, in which case, no values will be written for those parameters at download. Data values are cleared by deleting all the characters in the cell then either moving to a different cell or typing <Enter>. -
Page 285: Programmer Option
RECORDER/CONTROLLER: USER GUIDE PROGRAMMER OPTION Clicking on the Programmer tool bar icon opens the programmer configuration window, displaying the program currently loaded in the instrument, in Segment Parameter view. If no program is loaded, the programmer display opens with just one segment, defined as an ‘End’ Segment. - Page 286 RECORDER/CONTROLLER: USER GUIDE Segment Editing (Cont.) GO BACK TO For GoBack segments only, this allows the user to enter a segment number for the program to return to. CYCLES For GoBack segments only, this allows the number of times the program returns to the ‘Go Back To’ segment, before continuing.
-
Page 287: Digital Event Display
RECORDER/CONTROLLER: USER GUIDE 6.6.2 Digital Event display Clicking on the ‘Digital Events Output’ tool bar icon produces a segment display, allowing the user to select the events on or off as required, for each segment. Figure 6.6.2 shows a programmer where the number of events is four. -
Page 288: Adding And Deleting Segments
RECORDER/CONTROLLER: USER GUIDE 6.6.4 Adding and deleting segments. INSERT SEGMENT As shown in figure 6.6.4, to insert a segment, click in the segment number field of the segment to the right of where the new segment is to be located. This causes the whole segment to highlight. Click on the blue down arrow tool icon to insert the new segment. -
Page 289: Loading And Saving Programs
RECORDER/CONTROLLER: USER GUIDE 6.6.5 Loading and Saving programs The four program operation keys at the top left of the programmer window allow the user to load a program from or save a program to either the currently connected instrument or to a pc. -
Page 290: Context Menus
RECORDER/CONTROLLER: USER GUIDE Toolbar Icons (Cont.) Figure 6.6.6 Logarithmic scale example 6.6.7 Context menus SEGMENT CONTEXT MENU Right-clicking when the mouse cursor is hovering over a segment in the ana- logue segment parameters view produces the segment context menu shown. -
Page 291: Programmer Menu
RECORDER/CONTROLLER: USER GUIDE 6.6.8 Programmer menu Clicking on the ‘Programmer’ menu item near the top of the iTools window causes the Programmer menu (figure 6.6.8) to appear. The items contained within this menu are described in the ‘Toolbar icons’ and ‘Context menu’... -
Page 292: Two Channel Programs
RECORDER/CONTROLLER: USER GUIDE 6.6.9 Two channel programs The display and editing of segment and program parameters for two-channel programmers is carried out in the same way as described above, for single channel programs. The major difference in apearance is that there are two sets of parameters for each segment, instead of one. -
Page 293: To Set Up Oem Security
RECORDER/CONTROLLER: USER GUIDE 6.6.10 To Set Up OEM Security This will be illustrated by the following two examples: EXAMPLE 1: Make the parameter Network.Modbus.TimeFormat read/write when OEM security is enabled and the instrument is in Engineer access level and leave the remaining parameters in this list as read only. - Page 294 RECORDER/CONTROLLER: USER GUIDE EXAMPLE 2: Make the parameter ‘Loop1.PID.ProportionalBand’ read only when OEM security is enabled and the instrument is in Supervisor access level and leave the remaining parameters in this list as read/write. Open ‘Loop1.PID list. Figure 6.6.10d Open Instrument.OEMSupervisor...
- Page 295 RECORDER/CONTROLLER: USER GUIDE TO ENABLE OEM SECURITY In ‘OEMEntry’ enter the security code. This is the same code as entered in Engineer level in ‘OEMPass’, Sec- tion 4.1.6. The ‘OEMStatus’ parameter will change to ‘Locked’. Figure 6.6.10f As in Figure 6.6.10f above, the parameter ‘TimeFormat’ is alterable in Engineer level and the parameter ‘Loop1 Proportional Band’...
-
Page 296: User Wiring
RECORDER/CONTROLLER: USER GUIDE USER WIRING User wiring, created from the instrument front panel, allows parameters to be wired together so that, for exam- ple, a counter can be configured to be incremented when an alarm goes active. This can be used as an alter- native to iTools. -
Page 297: User Wiring
RECORDER/CONTROLLER: USER GUIDE Drive Relay Example (Cont.) Highlight the ‘Active’ field, and press and hold the scroll button for User Wiring a few seconds, until the top level User Wiring page appears. Channel.2.Alarm1.Active To Destination The name of the selected parameter appears at the top of the Add new wire page. -
Page 298: Counter Example
RECORDER/CONTROLLER: USER GUIDE COUNTER EXAMPLE This example shows how to set up a counter to be incremented each time Channel 1 Alarm 1 becomes active, and reset each time channel 2, alarm 1 is acknowledged. For this example, Virtual Channel 3 will be configured as the counter, with a preset value of 0. - Page 299 RECORDER/CONTROLLER: USER GUIDE Counter Example (Cont.) Operate the Scroll key to highlight ‘Add new wire’, then again to display the top level parameter list. Use the down arrow button to highlight ‘Channel’ and operate the scroll button. 10. Operate the scroll button to select ‘1’.
- Page 300 RECORDER/CONTROLLER: USER GUIDE Counter Example (Cont.) 14. At Virtual Channel.3.Main, use the down arrow to select ‘Preset’. Press and hold the scroll key. The top level User Wiring page appears. 15. Use the up (or down) arrow button to select the ‘From Source’ tab, if not already selected.
-
Page 301: Usb Devices
RECORDER/CONTROLLER: USER GUIDE USB DEVICES The devices listed below can be plugged into the USB connector at the back of the instrument, providing that the maximum current required is less than 100 mA. Memory Stick Bar code reader Keyboard Note: 1. -
Page 302: Usb Keyboard
RECORDER/CONTROLLER: USER GUIDE USB KEYBOARD A QWERTY keyboard may be plugged into the rear USB port to act in parallel with the virtual keyboard. The editing keys listed below are supported in addition to the standard alpha-numeric characters. Left arrow Moves the cursor left-wards through the text string (stops at the start of the string). -
Page 303: A Technical Specification
RECORDER/CONTROLLER: USER GUIDE Appendix A: TECHNICAL SPECIFICATION A1 INSTALLATION CATEGORY AND POLLUTION DEGREE This product has been designed to conform to BS EN61010 installation category II and pollution degree 2, de- fined as follows: Installation category II The rated impulse voltage for equipment on nominal 230V mains is 2500V. -
Page 304: A2 Recorder Specification
RECORDER/CONTROLLER: USER GUIDE A2 RECORDER SPECIFICATION types Analogue i/p Four (eight if dual input option fitted) Digital i/p Default Digital (logic) o/p See table A2 for options Relay o/p See table A2 for options DC output See table A2 for options... -
Page 305: A3 Analogue Input Specification
RECORDER/CONTROLLER: USER GUIDE A2 RECORDER SPECIFICATION (Cont.) USB port Number of ports One at rear of instrument Standard USB1.1 Transmission speeds 1.5Mbits/sec (low speed device) Maximum current <100mA Peripherals supported Memory stick (8GB max), Bar code reader, QWERTY keyboard... - Page 306 RECORDER/CONTROLLER: USER GUIDE A3 ANALOGUE INPUT SPECIFICATION (Cont.) DC Input ranges (Cont.) 10V Range Range: -3V to +10V Resolution 500μV Measurement noise: 550μV peak-to-peak with 1.6s input filter Linearity error: 0.007% (best fit straight line) for zero source resistance. Add 0.003% for each 10Ω source and lead resistance Calibration error: ±1.5mV ±0.063% measurement at 25°C ambient...
-
Page 307: A4 Relay And Logic I/O Specification
RECORDER/CONTROLLER: USER GUIDE A4 RELAY AND LOGIC I/O SPECIFICATION OP1, OP2, OP3 logic input, logic output and relay specification. Active (current on) current sourcing logic output Voltage output across terminals +11V min; +13V max. Short circuit output current 6mA min. (steady state); 44mA max. (switch current) -
Page 308: A7.2 Application Blocks
RECORDER/CONTROLLER: USER GUIDE A7.2 APPLICATION BLOCKS Humidity Steriliser Zirconia Appendix A HA030554 Page 298 Issue 9 Mar 15... -
Page 309: B Control Loops
RECORDER/CONTROLLER: USER GUIDE Appendix B CONTROL LOOPS Note: See section 4.6 for Loop configuration details B.1 INTRODUCTION With this recorder, two control loops are available, each loop containing two outputs (Channel 1 and Channel 2) which can be individually configured for PID, On/Off or valve position. For temperature control, channel 1 is normally configured for heating and channel 2 for cooling. -
Page 310: B2.2 Types Of Control Loop
RECORDER/CONTROLLER: USER GUIDE B2.2 TYPES OF CONTROL LOOP B2.2.1 On/Off control This form of control turns heating power on when the process value is below the setpoint, and turns it off when it is above the setpoint (see also figure B2.6.9a). -
Page 311: Integral Term
RECORDER/CONTROLLER: USER GUIDE B2.2 TYPES OF CONTROL LOOP (Cont.) INTEGRAL TERM In a proportional only controller, as seen in the previous section, an error must exist between setpoint and PV in order for the controller to deliver power. Integral is used to achieve zero steady state control error. -
Page 312: Manual Mode
RECORDER/CONTROLLER: USER GUIDE B2.2 TYPES OF CONTROL LOOP (Cont.) Derivative should not be used to curb overshoot in situations when the output is saturated at Op High or Op Low for extended periods, such as process start up, since to do so degrades the steady state performance of the system. -
Page 313: B2.3 Loop Parameters
RECORDER/CONTROLLER: USER GUIDE B2.3 LOOP PARAMETERS B2.3.1 Relative cool gain (R2G) This is the gain of channel 2 control output, relative to the channel 1 control output and is used to compensate for the different quantities of power available to heat and to cool a process. For example, water cooling appli- cations might require a relative cool gain of 0.25 because cooling is 4 times greater than the heating process at... - Page 314 RECORDER/CONTROLLER: USER GUIDE B2.3 LOOP PARAMETERS (Cont.) B2.3.4 Integral Hold If ‘Integral Hold’ (Main menu) is set to ‘Yes’, the integral component of the PID calculation is frozen, that is, it holds its current value but does not integrate any disturbances in the plant. This is equivalent to switching into PD control with a manual reset value preconfigured.
-
Page 315: B2.4 Tuning
RECORDER/CONTROLLER: USER GUIDE B2.3.7 Gain Scheduling In some processes the tuned PID set may be different at low temperatures from that at high temperatures par- ticularly in control systems where the response to the cooling power is significantly different from that of the heating power, or when changes in the process have occurred. -
Page 316: Under Damped
RECORDER/CONTROLLER: USER GUIDE B2.4.2 Loop Response Ignoring loop oscillation, there are three categories of loop performance viz Under damped, Critically damped and Over damped: UNDER DAMPED In this situation the parameters are set to prevent oscillation but lead to an overshoot of the Process Value (PV) followed by decaying oscillation until the PV finally settles at the Setpoint. -
Page 317: Rate
RECORDER/CONTROLLER: USER GUIDE B2.4.3 INITIAL SETTINGS (Cont.) RATE Sets the maximum PID rate-of-change. The output rate limit is active during tuning and can affect the tuning results. Rate is useful in preventing rapid changes in output from damaging the process or heater elements. -
Page 318: Autotune And Sensor Break
RECORDER/CONTROLLER: USER GUIDE B2.4.5 AUTOTUNE (Cont.) Autotune can be performed at any time, but normally it is performed only once, during the initial commissioning of the process. However, if the process under control subsequently becomes unsatisfactory (because its char- acteristics have changed), it may be necessary to tune again for the new conditions. -
Page 319: Example 1: Autotune From Below Sp (Heat/Cool)
RECORDER/CONTROLLER: USER GUIDE B2.4.5 AUTOTUNE (Cont.) EXAMPLE 1: AUTOTUNE FROM BELOW SP (HEAT/COOL) The point at which Automatic tuning is performed (Tune Control Point) lies just below the setpoint at which the process is normally expected to operate (Target Setpoint). This ensures that the process is not significantly overheated or overcooled. -
Page 320: Example 2: Autotune From Below Sp (Heat Only)
RECORDER/CONTROLLER: USER GUIDE B2.4.5 AUTOTUNE (Cont.) EXAMPLE 2: AUTOTUNE FROM BELOW SP (HEAT ONLY) The sequence of operation for a heat only loop is the same as that described above for a heat/cool loop, except that the sequence ends at ‘F’ since there is no need to calculate ‘R2G’ (R2G is set to 1.0 for heat only process- es). -
Page 321: Example 3: Autotune At Sp (Heat /Cool)
RECORDER/CONTROLLER: USER GUIDE B2.4.5 AUTOTUNE (Cont.) EXAMPLE 3: AUTOTUNE AT SP (HEAT /COOL) It is sometimes necessary to tune at the actual setpoint being used as shown below. For a tune at setpoint, autotune does not calculate cutback since there was no initial start up response to the application of heating or cooling. -
Page 322: At.r2G
RECORDER/CONTROLLER: USER GUIDE B2.4.5 AUTOTUNE (Cont.) AT.R2G Some load types and process conditions can cause autotune to set an incorrect value for R2G resulting in an instability in the system after an autotune has completed, In such circumstances, the value of R2G should be checked, and if it is low (approaching 0.1) a manual entry should be made as follows:... -
Page 323: Failure Modes
RECORDER/CONTROLLER: USER GUIDE B2.4.5 AUTOTUNE (Cont.) FAILURE MODES The conditions for performing an autotune are monitored by the Tune menu parameter ‘State’. If autotune is not successful error conditions are read by this parameter as follows: Timeout Set if any one stage is not completed within an hour. Possible causes are the loop being open circuit, or not responding to the controller demands. -
Page 324: Example 4: When Tune R2G = R2Gpd, Autotune From Below Setpoint
RECORDER/CONTROLLER: USER GUIDE EXAMPLE 4: WHEN TUNE R2G = R2GPD, AUTOTUNE FROM BELOW SETPOINT Figure B2.4.6 Autotune from below setpoint Periods A-F are largely unchanged from the 'Standard' algorithm, example 2 in section B2.4.5 Autotune, with the following exception: - Changing the Target Setpoint during period A-B will not change the tuning setpoint. -
Page 325: Cutback Values
RECORDER/CONTROLLER: USER GUIDE Control type 2 × PB′ Proportional only 2.2 × PB′ 0.8 × T P + I 1.7 × PB′ 0.5 × T 0.12 × T P + I + D Table B2.4.7 Calculate parameter values Setpoint... -
Page 326: B2.5 Setpoint
RECORDER/CONTROLLER: USER GUIDE B2.4.7 MANUAL TUNING (Cont.) If overshoot is observed following the correct settings of the PID terms increase the value of ‘CBL’ by the value of the overshoot in display units. If undershoot is observed increase the value of the parameter ‘CBH’... - Page 327 RECORDER/CONTROLLER: USER GUIDE B2.5.1 Setpoint function block (Cont.) Figure B2.5.1, below, shows the function block schematic. PSP High Limit Programmer SP Prog PSP Low Limit Local SP High Limit SP Low Limit SP2 Enable Enable Rem SP SP High Limit...
- Page 328 RECORDER/CONTROLLER: USER GUIDE B2.5.2 Setpoint Limits The setpoint generator provides limits for each of the setpoint sources as well as an overall set of limits for the loop. These are summarised in figure 2.5.2, below. MaxDisp +Span Range High...
-
Page 329: Note
RECORDER/CONTROLLER: USER GUIDE B2.5.4 Setpoint Tracking The setpoint used by the controller may be derived from a number of sources. For example:- Local setpoints SP1 and SP2. These may be selected through the front panel using the parameter ‘SP Select’, through digital communications or by configuring a digital input which selects either SP1 or SP2. -
Page 330: B2.6 Output
RECORDER/CONTROLLER: USER GUIDE B2.6 OUTPUT B2.6.1 Introduction The output function block selects the correct output sources to be used, determines whether to heat or cool and then applies limits. Power feed forward and non-linear cooling are also applied. It is this block that manages the output in exception conditions such as start up and sensor break. -
Page 331: Safe
RECORDER/CONTROLLER: USER GUIDE B2.6.2 OUTPUT LIMITS (Cont.) Notes (Continued) Note: 3. The tightest limits (between Remote and PID) are connected to the output where an overall limit is applied using parameters ‘Output High’ and ‘Output Low’. Note: 4. ‘Working Out High’ and ‘Working Out low’ found in the Diagnostics list are read only parameters showing the overall working output limits. -
Page 332: Linear
‘Pff En’. It should also be disabled for any non-electric heating process. It is not necessary when Eurotherm analogue thyristor control is used since com- pensation for power changes is included in the thyristor driver. -
Page 333: Control Action
RECORDER/CONTROLLER: USER GUIDE B2.6.8 Feed forward Feed forward is a method of adding an extra scalable component to the PID output, before any limiting. It can be used, for example, in the implementation of cascade loops and constant head control or it can be used to pre-load the control signal with a value close to that which is required to achieve the setpoint, thus improving system response. - Page 334 RECORDER/CONTROLLER: USER GUIDE B2.6.9 EFFECT OF CONTROL ACTION, HYSTERESIS AND DEADBAND (Cont.) HYST.C Heating and cooling type both ‘On/Off’. HYST.H Setpoint = 300°C Control action = Rev Heating hysteresis = 8 °C HEATING HEATING Cooling hysteresis = 10°C COOLING...
- Page 335 RECORDER/CONTROLLER: USER GUIDE B2.6.10 Valve nudge For systems configured as Unbounded Valve Positioning (VPU) - set up in Loop Setup configuration Ch1(2) control), it is possible to move the valve in small increments towards the open position (Nudge Raise) or towards...
-
Page 336: B2.7 Diagnostics
RECORDER/CONTROLLER: USER GUIDE B2.6.11 Time Proportioning PID controllers somtimes use Time Proportioning to control the average power to the load. This is done by re- peatedly switching the output on for a period (T ) and then off for a period (T ). -
Page 337: C Reference
RECORDER/CONTROLLER: USER GUIDE Appendix C: REFERENCE C1 BATTERY This instrument is fitted with a battery which has a minimum life of 1 year unpowered and when stored in an ambient temperature of around 25 C. The battery life may be reduced if it is consistently operated in an ele- vated ambient temperature environment. -
Page 338: C2 Setting Up An Ftp Server Using Filezilla
RECORDER/CONTROLLER: USER GUIDE C2 SETTING UP AN FTP SERVER USING FILEZILLA C2.1 DOWNLOADING ‘FileZilla’ is a free download from the internet (search for ‘FileZilla server download’). Download the latest version, following the instructions on the screen. Answer ‘No’ to the question ‘Do you want to view only the webpage content that was delivered securely’. - Page 339 RECORDER/CONTROLLER: USER GUIDE C2.1 DOWNLOADING (Cont.) Choose the destination for the file Select startup settings Click on Close when Installation is complete. Click ‘OK’ in the ‘Connect to Server’ window. HA030554 Appendix C Issue 9 Mar 15 Page 329...
-
Page 340: C2.2 Server Setup
RECORDER/CONTROLLER: USER GUIDE C2.2 SERVER SETUP Create a new folder (directory) called, for this example, ‘Archive’ in a suitable location such as the C drive, or the desktop. In the Filezilla server window, click on ‘File’ and select ‘Connect to Server’. -
Page 341: C2.3 Pc Setup
RECORDER/CONTROLLER: USER GUIDE C2.3 PC SETUP Operate the ‘Start’ button, and select ‘Control Panel’ from the window that appears. Double click on ‘Windows Firewall’ Click on the ‘Exceptions’ tab in the window that appears, and check that both ‘FTPControl’ and ‘FTPData’ are enabled (ticked). If not, the user’s IT department should be contacted for advice. -
Page 342: C2.5 Archive Activity
RECORDER/CONTROLLER: USER GUIDE C2.5 ARCHIVE ACTIVITY Once a demand or unattended archive is initiated, the FileZilla Server page shows the activity status as the ar- chive progresses. Figure C2.5 shows a typical page. The top of the page shows the transaction details be- tween the server and any clients to which it is connected. -
Page 343: C3 Function Block Details
RECORDER/CONTROLLER: USER GUIDE C3 FUNCTION BLOCK DETAILS C3.1 EIGHT INPUT OR BLOCK An eight input logical OR block whose output is high (1, On) if any one or more inputs is high (1, On). If more than eight inputs are required, a second block is automatically introduced, as shown in figure C3.1a. The blocks in the figure are given the names ‘A’... -
Page 344: C4 Tcp Port Numbers
RECORDER/CONTROLLER: USER GUIDE C4 TCP PORT NUMBERS The following TCP ports are made use of by the instrument. Port Usage File Transfer protocol (FTP) data FTP control Modbus TCP communications C5 ISOLATION DIAGRAM Single (50V ac) Ethernet comms Double (300V ac) -
Page 345: D Configuration Menu Overview
RECORDER/CONTROLLER: USER GUIDE Appendix D: CONFIGURATION MENU OVERVIEW This appendix contains an overview of the configuration menus for the instrument, including all options as follows: Instrument - - - - - - Section D1 Network - - - - - - - - Section D2... -
Page 346: D1 Instrument Configuration Menus
RECORDER/CONTROLLER: USER GUIDE D1 INSTRUMENT CONFIGURATION MENUS Instrument.Clock Instrument.Locale Instrument.Display Instrument.Info Date Name Language English Brightness 100% nanodac Time Type nanodac Date Format DD/MM/YY Save After 10 min Version 2.10 Time Zone Saver Brightness Bootrom DST Enable Home Page V.Trend... -
Page 347: D2 Network Configuration Menus
RECORDER/CONTROLLER: USER GUIDE D2 NETWORK CONFIGURATION MENUS Network.Archive Network.Archive Media Size 123.99 Rate Monthly Destination Media Free 89.36 Network.Interface Media Duration 448.55 File Format Both Days 00:0A:8D:01:90:00 Rate None CSV Values Client Identifier nano_01:90:29 CSV Messages Destination FTP Server... -
Page 348: D3 Group Configuration Menu
RECORDER/CONTROLLER: USER GUIDE D3 GROUP CONFIGURATION MENU D4 CHANNEL CONFIGURATION MENU Channel 1 shown; other channels similar Select configuration menu Channel.1.Main Instrument Network Descriptor Channel 1 Type Thermocouple Group Channel 197.35 Virtual Channel Status Good IP Adjust State Adjusted Loop Group.Trend... -
Page 349: D5 Virtual Channel Configuration Menu
RECORDER/CONTROLLER: USER GUIDE D5 VIRTUAL CHANNEL CONFIGURATION MENU Virtual Channel.1.Main Virtual Channel.1.Main Descriptor Virtualchan 1 Select configuration menu Descriptor VirtualChan1 Type Math Type Totaliser Instrument Operation Operation Network 1803.625 Group units Status Status Good Channel Resolution Virtual Channel.1.Main Resolution... -
Page 350: D6 Loop Configuration Menus
RECORDER/CONTROLLER: USER GUIDE D6 LOOP CONFIGURATION MENUS Loop.1.Setup Loop.1.Tune Loop.1.PID Loop.1.Main Select configuration menu Tune Enable Sched Type Auto/Manual Manual Loop 1 Loop name Setpoint Instrument Low Output Number of Sets Ch1 Control -100% Network High Output Active Set... -
Page 351: D7 Advanced Loop Configuration Menus
RECORDER/CONTROLLER: USER GUIDE D7 ADVANCED LOOP CONFIGURATION MENUS Advanced Loop.Master PID Advanced Loop.Main Advanced Loop.Tune Control Action Reverse Advanced Loop.Setup Master PV Tune Type Master PB Units Engineering Master WSP 16.1 Master Name Master Tune Enable Derivative Type Slave Name... - Page 352 RECORDER/CONTROLLER: USER GUIDE D7 ADVANCED LOOP CONFIGURATION (Cont.) Select configuration menu Advanced Loop.Output Instrument Main Advanced Loop Output menu Output High Network (Section 4.7.8) Setup Output Low -100 Group Tune See Figure D7a for Ch1 Output Channel Master PID...
-
Page 353: D8 Programmer Configuration
RECORDER/CONTROLLER: USER GUIDE D8 PROGRAMMER CONFIGURATION Programmer.Features Programmer.FTP Programmer.Set Up Holdback IP Address 123.123.123.111 Channels PV Event Username anonymous Prog Mode Access Operator User Value Password ********** Prog Edit Access Supervisor Messages Prog Store Access Supervisor Programmer FTP menu... -
Page 354: D9 Modbus Master Configuration
RECORDER/CONTROLLER: USER GUIDE D9 MODBUS MASTER CONFIGURATION Modbus Master.Slave.1.Main Slave main menu (Section 4.9.1) Descriptor nanodac Online Comms Failure Select configuration menu Select configuration menu IP Address 123.123.123.111 Unit ID Programmer Programmer Main Slave 1 Search Device Modbus Master... -
Page 355: D10 Ethernet/Ip Configuration
RECORDER/CONTROLLER: USER GUIDE D10 ETHERNET/IP CONFIGURATION D11 WEB SERVER Web server menu (Section 4.14) EtherNet/IP.Main IO Status Code Online Web Server Implicit I/O 123.123.123.223 EtherNet/IP Main menu (Section 4.10.1) Explicit 1 No connection Status Ready Explicit 2 No Connection... -
Page 356: D12 Digital I/O Configuration Menus
RECORDER/CONTROLLER: USER GUIDE D12 DIGITAL I/O CONFIGURATION MENUS D14 USER LINEARISATION CONFIGURATION MENUS Digital I/O (Section 4.12) User Linearisation Tables (Section 4.14) Select configuration menu Select configuration menu Digital I/O.1A1B User Lin.1 Network Instrument 1A1B Module Ident Dig.IO Num. of Points... -
Page 357: D16 Zirconia Configuration Menus
RECORDER/CONTROLLER: USER GUIDE D16 ZIRCONIA CONFIGURATION MENUS Select configuration menu Zirconia.Main Channel Main Probe Type Virtual Chanel Gas References Resolution Loop Clean Min Calc Temp Zirconia Main Digital I/O Tolerance (Section 4.16.2) User Lin Process Factor 140.0 Oxygen Exp... -
Page 358: D17 Steriliser Configuration Menu
RECORDER/CONTROLLER: USER GUIDE D17 STERILISER CONFIGURATION MENU D18 HUMIDITY BLOCK CONFIGURATION MENU Steriliser Humidity block (Section 4.17) (Section 4.18) Select configuration menu Select configuration menu Humidity. Steriliser Loop Resolution Virtual Channel Cycle status Wait Start Didital I/O Loop Remaining... -
Page 359: D20 Logic 2 Input Block Confguration Menu
RECORDER/CONTROLLER: USER GUIDE D20 LOGIC 2 INPUT BLOCK CONFGURATION MENU D22 MULTIPLEX BLOCK CONFIGURATION MENU Multiplexer block Logic (2 Input) block (Section 4.22) (Section 4.20) Logic (2 input).1 Select configuration menu Select configuration menu Multiplexer.1 User Lin Zirconia Operation High Limit 100000000.0... -
Page 360: D24 Timer Configuration Menu
RECORDER/CONTROLLER: USER GUIDE D24 TIMER CONFIGURATION MENU D27 REAL TIME EVENTS CONFGURATION MENU Timer block (Section 4.24) Real Time Events Timer.1 Select configuration menu (Section 4.27) Humidity Mode Select configuration menu BCD Input Time 00:00:00 Logic (8 Input) Logic (2 Input) -
Page 361: E Web Server
• Internet Explorer V9.0 or greater • Mobile Safari (Apple Mobile technology running IOS 5.0 or greater) All files are uploaded from the nanodac device to the browser, where all JS and JQuery files are executed lo- cally. Browsers should be configured to allow cookies, and support for file caching should also be enabled. -
Page 362: E.1.4 Home
RECORDER/CONTROLLER: USER GUIDE E.1.4 Home Page The Home Page is the first page the user is directed to on comple- tion of a successful log in. If Security has been set to Yes in the instrument (page 148) it will be necessary to enter a User name and a Password. -
Page 363: E.1.6 Contact
RECORDER/CONTROLLER: USER GUIDE E.1.6 Contact Page This page contains links to the fol- lowing Eurotherm sites: • Accredited Service • Customer First & Technical Sup- port • Installation & Commisioning • Repair & Support Services Note: Links are only active if the browser has internet access. -
Page 364: E.1.7 Bar Graph
RECORDER/CONTROLLER: USER GUIDE E.1.7 Bar Graph Page The channels that have been con- figured to be trended on the nanod- ac instrument will automatically be displayed on this page. The current configuration data for those chan- nels will be used to render the val- ues on the graph. -
Page 365: E.1.8 Line Graph
RECORDER/CONTROLLER: USER GUIDE E.1.8 Line Graph Page The channels that have been con- figured to be trended on the nanod- ac will automatically be displayed on this page. The current configu- ration data for those channels will be used to render the values on the graph. -
Page 366: E.1.9 Numeric
RECORDER/CONTROLLER: USER GUIDE E.1.9 Numeric Page This page displays the process val- ue and channel descriptor. The process value (PV) will not be displayed if the channel is not in a good status. Instead the text for the channel status is displayed as one... -
Page 367: E.1.11 Message Summary
RECORDER/CONTROLLER: USER GUIDE E.1.11 Message Summary Page This page provides the last 30 messages in chronological order This page does not auto-refresh. To refresh this page press or go to another page and re-open the Message Summary page. E.1.12 Promote Page... -
Page 368: E.1.13 Historical Line
RECORDER/CONTROLLER: USER GUIDE E.1.13 Historical Line Page The channels that have been con- figured to be trended in the nanod- ac instrument will automatically be displayed on this page. The current configuration data for those chan- nels will be used to render the val- ues on the graph. -
Page 369: E.1.14 Status Icons
DHCP is managed in the web server in as much as the web server will not be allowed to come online until the nanodac has received a valid IP address. The server will continually monitor the IP address and, if at any point an invalid address is found, the server will shut down and re-start. - Page 370 RECORDER/CONTROLLER: USER GUIDE This page has been deliberately left blank. Appendix E HA030554 Page 360 Issue 9 Mar 15...
-
Page 371: F Labview Driver
The driver is designed to integrate with Labview, a graphical programming Environment developed by National Instruments. Labview allows users to create applications by wiring VI's from pre-existing libraries. VI's stands for Virtual Instruments and these are similar to function blocks found in Invensys Eurotherm products such as iTools or Lintools. - Page 372 RECORDER/CONTROLLER: USER GUIDE From the opening view, Figure F1; press Run Enter the IP address of the nanodac instrument. Enter the Modbus address of the nanodac instrument. This depends on the setting of the Unit ident ena- ble in the instrument;...
- Page 373 • Monitor alarms. The alarm beacon turns red when an alarm occurs. • Acknowledge alarms. Pressing the Acknowledge button acknowledges the selected alarm in the nanodac instrument. If the alarm is still active the alarm beacon remains red. If the alarm is no longer active the bea- con reverts to its dark colour.
-
Page 374: F.2 Application Example 2 - Program Load By Program Number
The "Program_LoadControl.vi" is an Application example which allows the user to load a program stored in the instrument using numbers, and to Run/Hold or Reset a preloaded Program. This feature has been added in the nanodac instrument from firmware versions 5.00 and above. To open and load this file, repeat the steps listed in Example 1. -
Page 375: F.3 Application Example 3 Steriliser
RECORDER/CONTROLLER: USER GUIDE Application Example 3 Steriliser The "Steriliser_Monitor.vi" is a Steriliser Application example allowing the user to control and monitor Sterilisa- tion process parameters. To open and load this file, repeat the steps listed in Example 1. Figure F3 Steriliser Application (showing Context Help) The following parameters may be monitored/adjusted: •... -
Page 376: F.5 Full Driver Capabilities List
RECORDER/CONTROLLER: USER GUIDE Full driver capabilities list As a general summary, with the nanodac Ethernet Labview Driver the user can: Configure SensorBreakType and Fault Response Configure Instrument Alarm Types Configure Alarm Parameters e.g. (Threshold, Hysteresis, Latching Mode, Blocking) Configure Channel Filter Time... -
Page 377: Index
RECORDER/CONTROLLER: USER GUIDE Index Symbols Analogue Input specification......295 Any Alarm/Channel Alarm/Sys Alarm ....171 (M) Deriv.Output . - Page 378 RECORDER/CONTROLLER: USER GUIDE ....... . . 272 Left/Right Change Time (Rate of change alarms) ....90 Line across chart.
- Page 379 RECORDER/CONTROLLER: USER GUIDE Channel trend selection ......88 New watch/recipe list ......274 Function blocks etc.
- Page 380 RECORDER/CONTROLLER: USER GUIDE Totaliser ........96 Destination.
- Page 381 RECORDER/CONTROLLER: USER GUIDE Multiplexer ........165 Gateway .
- Page 382 RECORDER/CONTROLLER: USER GUIDE Interval Recording ........82 I/O fitted .
- Page 383 RECORDER/CONTROLLER: USER GUIDE Name ........103 Temp .
- Page 384 RECORDER/CONTROLLER: USER GUIDE ......247 Virtual Channel 13 ......248 Virtual Channel 14 N.acknowledged .
- Page 385 RECORDER/CONTROLLER: USER GUIDE DIO ......... 149 Percent .
- Page 386 RECORDER/CONTROLLER: USER GUIDE Prop OP ......... 109 Recording Proportional band (PB) .
- Page 387 RECORDER/CONTROLLER: USER GUIDE Restoring ......... 70 Configuration.
- Page 388 RECORDER/CONTROLLER: USER GUIDE Slave Channel 2 ........112 Steriliser Slave Device .
- Page 389 RECORDER/CONTROLLER: USER GUIDE Ti ......... . . 116, 307 Manual .
- Page 390 RECORDER/CONTROLLER: USER GUIDE User Value........128 WSP .
- Page 392 Invensys Eurotherm Limited. Eurotherm Limited pursues a policy of continuous development and product improvement. The specifications in this document may therefore be changed without notice. The information in this document is given in good faith, but is intended for guidance only.
Need help?
Do you have a question about the Nanodac and is the answer not in the manual?
Questions and answers