
Related Manuals for Eurotherm EPack


Summary of Contents for Eurotherm EPack
- Page 1 EPack™ Controller User Guide EPack™ Power management and control units Versions 2.00 and later HA031414 issue 1 April 2013...
- Page 2 Restriction of Hazardous Substances (RoHS) Product group Epack Table listing restricted substances Chinese Epack SJ/T11363-2006 SJ/T11363-2006 English Restricted Materials Table Product Toxic and hazardous substances and elements Epack Cr(VI) PBDE Power Module 16-32A Power Module 40-63A Indicates that this toxic or hazardous substance contained in all of the homogeneous materials for...
- Page 3 EPACK CONTROLLER: USER GUIDE EPack Power Controller User Guide List of sections Section Page 1 Introduction ........... . .
-
Page 4: Table Of Contents
2.2.1 EPack supply voltage ........ - Page 5 EPACK CONTROLLER: USER GUIDE List of Contents (Cont.) Section Page 6.6 CONTROL CONFIGURATION ......... . 29 6.6.1 Control setup menu .
- Page 6 EPACK CONTROLLER: USER GUIDE List of Contents (Cont.) Section Page 6.17 NETWORK CONFIGURATION ......... . 56 6.17.1 Network Meas Menu .
- Page 7 EPACK CONTROLLER: USER GUIDE List of Contents (Cont.) Section Page 9.3 INDICATION ALARMS ..........89 9.3.1 Process Value Transfer active .
- Page 8 EPACK CONTROLLER: USER GUIDE This page is deliberately left blank HA031414 Page vi Issue 1 Apr 13...
-
Page 9: Safety Notes
Celsius. If operators are likely to come into contact with such heatsinks, adequate warnings and barriers must be put in place in order to prevent injury. EPack alarms protect thyristors and loads against abnormal operation, and provide the user with valuable information regarding the type of fault. Under no circumstances should these alarms be regarded as a replacement for proper personnel protection. -
Page 10: Selv
EPACK CONTROLLER: USER GUIDE SAFETY NOTES (Cont.) Signal and power voltage wiring must be kept separate from one another. Where this is impractical, shielded cables should be used for the signal wiring. If the equipment is used in a manner not specified by the manufacturer, the protection provided by the equipment might be impaired. -
Page 11: Introduction
EPACK CONTROLLER: USER GUIDE USER GUIDE 1 INTRODUCTION This document describes the installation, operation and configuration of an EPack unit. The Unit includes the following analogue and digital inputs and outputs, fitted as standard: Two digital inputs (contact closure or voltage level) One analogue input One change-over relay under software control, configurable by the user. - Page 12 EPACK CONTROLLER: USER GUIDE 2.1.1 MECHANICAL INSTALLATION (Cont.) EPack (auxiliary) supplypower (low voltage option shown) View on upper face 51mm (2.01 in) 46.7mm (1.84 in) Phase reference Load power input (neutral) Front view View on right- hand side 136.2mm (5.36 in)
- Page 13 EPACK CONTROLLER: USER GUIDE 2.1.1 MECHANICAL INSTALLATION (Cont.) EPack (auxiliary) supply power View on (low voltage option shown) upper face 72mm (2.83 in) 46.7mm (1.84 in) Phase reference Load power input (neutral) Front view View on right- hand side 158.2mm (6.23 in) Safety earth connection (M5 nut).
-
Page 14: Electrical Installation
2.2 ELECTRICAL INSTALLATION CAUTION It must be ensured that an effective strain relief mechanism (e.g. trunking) is in place for all EPack ca- bles. Failure to ensure this may result in the unintentional disconnection of one of more connectors resulting in unexpected and possibly dangerous lack of control. -
Page 15: Load Wiring
EPACK CONTROLLER: USER GUIDE 2.2.2 Load wiring The supply voltage for the load is connected at the terminal located in the centre of the upper side of the unit. The load is connected at the terminal located in the centre of the lower side of the unit. -
Page 16: Enable Input
1/2 cycles exceeds a threshold value (max. 5%), a Mains Frequency System Alarm is generated. The threshold value (FreqDriftThold) is defined in the Network.Setup menu described in section 6.17.2 Supply failure to Epack unit. Line under voltage (configurable between 2 and 15% of nominal voltage) (section 6.17.2). -
Page 17: Communications Pinouts
EPACK CONTROLLER: USER GUIDE 2.2.3 SIGNAL WIRING (Cont.) Digital inputs Contact inputs 500Ω to ∞ = open 0Ω to 150Ω = closed View on 150Ω to 500Ω = undefined lower face 4.4 to 30V = high -30V to +2.3V = low Relay output 2.3V to 4.4V = undefined... -
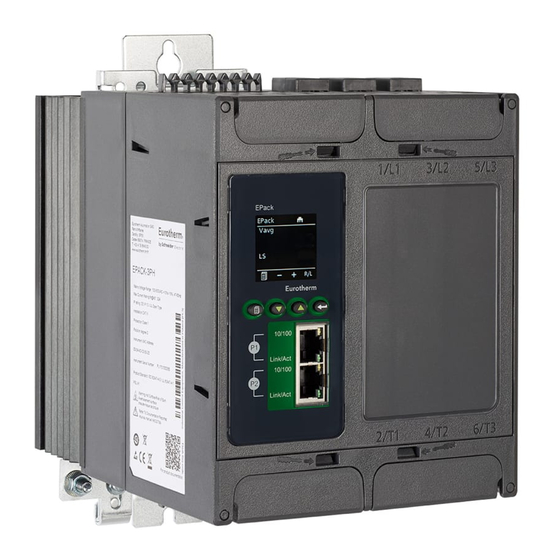
Page 18: Operator Interface
EPACK CONTROLLER: USER GUIDE 3 OPERATOR INTERFACE Located at the front of the Driver Module, the operator interface consists of a 26mm square display, and, four push-button switches. 3.1 DISPLAY The display is divided vertically into three areas, which for the purposes of this manual are called the status area at thetop, the data display, in the centre, and the softkeys at the bottom. -
Page 19: Pushbuttons
EPACK CONTROLLER: USER GUIDE 3.2 PUSHBUTTONS The functions of the four pushbuttons below the display depend on what is displayed in the softkey area. The leftmost pushbutton (Return) is associated with the leftmost softkey, the down arrow pushbutton is associated with the next softkey and so on. In the example above, the ‘Return’ key is used both to enter the Menu, and to return from it to the initial display. -
Page 20: Front Panel Event Indication
EPACK CONTROLLER: USER GUIDE 3.3 FRONT PANEL EVENT INDICATION A number of instrument alarms and events can occur, and these are indicated by icons appearing on the display screen. The events and alarms are listed below. See section 9 for a more details. -
Page 21: Quickcode
EPACK CONTROLLER: USER GUIDE 4 QUICKCODE At first switch-on, the Driver Module enters the ‘QuickCode’ menu which allows the user to configure the ma- jor parameters without having to enter the full configuration menu structure of the unit. Figure 4 shows an overview of a typical QuickCode menu. -
Page 22: Quickcode Menu Parameters
EPACK CONTROLLER: USER GUIDE 4 QUICKCODE MENU (Cont.) Notes: 1. If the unit has been fully configured at the factory, the Quickcode menu will be skipped, and the unit will go into operation mode at first switch on. 2. Once quit, the Quickcode menu can be returned to at any time from the Access menu (described... -
Page 23: Some Definitions
EPACK CONTROLLER: USER GUIDE 4.2 SOME DEFINITIONS 4.2.1 Firing modes LOGIC Power switches on, two or three zero crossings of the supply voltage after the logic input switches on. Power switches off two zero crossings of current after the logic input switches off. For resistive loads, voltage and current cross zero simultaneously. -
Page 24: Burst Variable Firing
EPACK CONTROLLER: USER GUIDE 4.2.1 FIRING MODES (Cont.) BURST VARIABLE FIRING Burst Firing Variable is the preferred mode for temperature control. Between 0 and 50% of setpoint, the on time is the ‘Min on’ time set in the modulator menu and the off time is varied to achieve control. Between 50% and 100%, the off time is the value set for ‘Min on’... -
Page 25: Feedback Type
EPACK CONTROLLER: USER GUIDE 4.2.1 FIRING MODES (Cont.) 33% DUTY CYCLE For duty cycles less than 50%, the firing time is one half-cycle. For a 33% duty cycle, firing time is one half cycle; the non-firing time is two half-cycles (figure 4.2.1f). -
Page 26: Transfer Mode
EPACK CONTROLLER: USER GUIDE 4.2.3 Transfer Mode The control system can use automatic transfer of certain feedback parameters. For example with loads with very low cold resistance, I feedback should be used to limit inrush current, but once the load has started to warm up, Power feedback should be used;... -
Page 27: Configuration From The Front Panel
EPACK CONTROLLER: USER GUIDE 5 CONFIGURATION FROM THE FRONT PANEL At power up or after quitting the Quickcode menu, the unit initialises and then enters the summary page (figure 5.1) showing the real-time values of the two parameters selected in Instrument Display configuration (section 6.10.2). -
Page 28: Comms Menu
EPACK CONTROLLER: USER GUIDE 5.1.1 Comms menu This allows the following communications parameters to be viewed or configured: Comms IP: Fixed Edit 111.112.113.1 IPMode Mask: 255.255.255.0 Fixed Select ‘Fixed’ or DHCP Menu Comms IPMode IP address SubNetMask Edit Edit address SubNetMask 111.112.113.1... -
Page 29: Config Menu
EPACK CONTROLLER: USER GUIDE 5.1.2 Config menu This menu allows a number of network and firing output parameters to be set up, as well as Analogue input and IP mode types Edit Enter nominal values VLine Nominal 230. Edit Edit... -
Page 30: Access Menu
EPACK CONTROLLER: USER GUIDE 5.1.3 Access menu Allows access to the Operator, Engineer, Configuration and Quick Code menus and allows passwords to be set up. Alarms can also be viewed in this menu. Edit Edit Goto Pass Code Select access... -
Page 31: Access To Menus
EPACK CONTROLLER: USER GUIDE 5.1.3 ACCESS MENU (Cont.) ACCESS TO MENUS Open the Access menu item. Open the Goto menu item and select the access level required. Enter the access code for the level required. If this access code is correct the relevant menu appears. -
Page 32: Configuration Using Itools
EPACK CONTROLLER: USER GUIDE 6 CONFIGURATION USING ITOOLS 6.1 INTRODUCTION Note: Section 6 contains descriptions of all the menus which can appear. If an option or a feature is not fitted and/or enabled, then it does not appear in the top level menu. -
Page 33: Access Menu
EPACK CONTROLLER: USER GUIDE 6.3 ACCESS MENU Figure 6.3 iTools Access menu Goto Select access level Passcode Select relevant pass code for the access level required. EngineerPasscode Passcode for Engineer level access ConfigurationPasscode Passcode for Configuration level access QuickCodePasscode Access code for Quickcode menu... -
Page 34: Alarm Configuration
EPACK CONTROLLER: USER GUIDE 6.4 ALARM CONFIGURATION Figure 6.4 Alarm configuration Main 'ExternIn' is the input of this block. When connected to digital input 2 (DI2) and DI2 connected to a fuse blown detection contact, this alarm is considerd as a ‘fuse blown’... -
Page 35: Communications Configuration
EPACK CONTROLLER: USER GUIDE 6.5 COMMUNICATIONS CONFIGURATION The communications menu allows the user to view, and in some cases, to edit communications parameters associated with the communications option. Figure 6.5b iTools comms page Host name The name of the device on the link-local network. - Page 36 EPACK CONTROLLER: USER GUIDE 6.5 COMMUNICATIONS MENU (Cont.) MAC12 First two Bytes of the MAC Address 11-22-33-44-55-66 MAC34 Second two Bytes of the MAC Address 11-22- 33-44-55-66 MAC56 Third two Bytes of the MAC Address 11-22-33-44- 55-66 Timeout Comms timeout value in ms. If no usercomms request arrives twithin the time specified in this parameter, the Fallback values will change.
-
Page 37: Control Configuration
EPACK CONTROLLER: USER GUIDE 6.6 CONTROL CONFIGURATION The control menu provides the control algorithm to perform power control and transfer, threshold limiting and phase angle reduction (in the case of burst firing). Figure 6.6, below, gives an overview of the menu, which is described in the following sections: 6.6.1... -
Page 38: Control Setup Menu
EPACK CONTROLLER: USER GUIDE 6.6.1 Control setup menu This contains parameters for setting the type of control to be performed. Figure 6.6.1 Control setup page PARAMETERS Standby If Yes (1), the controller enters Standby mode and zero % power is demanded. When removed from Standby (0) the unit returns to operating mode in a controlled manner. -
Page 39: Control Main Menu
EPACK CONTROLLER: USER GUIDE 6.6.2 Control Main menu This menu contains all the parameters associated with the Main control loop. Figure 6.6.2 Control ‘Main’ menu PARAMETERS Displays the main Controller Process Variable (PV). Wired to the measurement which it is to be controlled. For example, to perform V control. -
Page 40: Control Diagnostic Menu
EPACK CONTROLLER: USER GUIDE 6.6.4 Control diagnostic menu Figure 6.6.4b iTools diagnostic menu PARAMETERS Status Indicates the current operating state of the controller: Main PV The control strategy is using Main PV as the control input Transfr The transfer input us being used as the input to the control strategy. -
Page 41: Control Alarm Detection Parameters
EPACK CONTROLLER: USER GUIDE 6.6.6 Control Alarm detection parameters Indicates whether each alarm has been detected and whether or not it is currently active. Figure 6.6.6 Control Alarm detection page PARAMETERS Closed Loop Displays whether or not the closed loop alarm is currently active. -
Page 42: Control Alarm Latch Parameters
EPACK CONTROLLER: USER GUIDE 6.6.8 Control Alarm Latch parameters Allows each alarm to be configured as latching or not latching. Fig 6.6.8 Control Alarm latching page PARAMETERS Closed Loop Set the latching status of the alarm. PV Transfer As for Closed Loop, but for the ‘Transfer Active’ alarm. -
Page 43: Control Alarm Stop Parameters
EPACK CONTROLLER: USER GUIDE 6.6.10 Control Alarm Stop parameters Allows individual channels to be configured such that it will stop the associated power channel from firing whilst the alarm is active. This feature is activated by the signalling parameters, so the alarm stop may be latching. -
Page 44: Energy Configuration
EPACK CONTROLLER: USER GUIDE 6.7 ENERGY CONFIGURATION Provides a number of energy counters to totalise consumed energy. The power consumed can be displayed in one of number of units, ranging from W to GW. Figure 6.7 Energy configuration page PARAMETERS UsrUnit Allows a scaling units value to be entered for the energy display. -
Page 45: Resolution
EPACK CONTROLLER: USER GUIDE 6.7.1 Resolution The resolution of the stored energy value varies according to the totalised value, as shown in table 6.7.1 below. For example, for stored values between 33,554,432 watt-hours and 67,108,863 watt-hours, the value increases in 4 watt-hour increments. -
Page 46: Fault Detection Menu
EPACK CONTROLLER: USER GUIDE 6.8 FAULT DETECTION MENU This manages Alarm logging and provides an interface for the General Alarm Acknowledgement Figure 6.8 Fault detection menu page PARAMETERS Global Ack Performs a global acknowledgement of alarms. Latched alarms are cleared if their trig- ger sources are no longer in an alarm state. - Page 47 EPACK CONTROLLER: USER GUIDE 6.8 FAULT DETECTION MENU (Cont.) Value Description Value Description Missing mains Closed loop Thyristor short circuit Transfer active Over temp* Limit active Network dips Reserved Frequency fault Reserved Total Load Failure Reserved Chop off Reserved Partial load failure...
-
Page 48: Firing Output Menu
EPACK CONTROLLER: USER GUIDE 6.9 FIRING OUTPUT MENU This forms the link between the control strategy and the physical load. This block also supplies Phase-Angle Ramp (Soft start) and Safety Ramp. Figure 6.9b iTools configuration firing output page Mode Displays the current firing mode as Intelligent half cycle (IHC), Burst firing, Phase angle firing or no mode. -
Page 49: Examples
EPACK CONTROLLER: USER GUIDE 6.9.1 Examples Safety (Magnetisation) Ramp (4 cycles) Safety Ramp (10 cycles) Output voltage Output voltage Line supply Line Delayed trigger angle supply Resistive load Inductive load Figure 6.9.1a Safety ramp (burst firing) examples Soft start = 2... -
Page 50: Instrument Configuration Menu
EPACK CONTROLLER: USER GUIDE 6.10 INSTRUMENT CONFIGURATION MENU Instrument configuration is divided into the following sections: Display Section 6.10.1 Configuration Section 6.10.2 Options Section 6.10.3 Scaling Factor Section 6.10.4 Figure 6.10 Top level instrument configuration page HA031414 Page 42 Issue 1 Apr 13... -
Page 51: Instrument Display Configuration
EPACK CONTROLLER: USER GUIDE 6.10.1 Instrument display configuration Figure 6.10.1 Instrument display configuration page PARAMETERS Language Select required language for subsequent displays. Serial No Read only. Displays the factory-set Serial number of the unit. Dev Name The device name as it appears at the user display. -
Page 52: Instrument Options Configuration
EPACK CONTROLLER: USER GUIDE 6.10.3 Instrument options configuration Figure 6.10.3 Instrument options configuration page PARAMETERS Passcode1 (2)(3) Pass Code for Features Secure Word 1(2)(3). 6.10.4 Scaling Factor Allows scaling factors to be entered for a number of parameters. In iTools, the scaling factors are arranged in ‘tabs’... -
Page 53: Input/Output (Io) Configuration
EPACK CONTROLLER: USER GUIDE 6.11 INPUT/OUTPUT (IO) CONFIGURATION This area of configuration allows the user to configure the analogue and digital inputs and to view the status of the Relay output. The configuration is separated into the following areas: AI (analogue inputs) Section 6.11.1... -
Page 54: Analogue Input Configuration
EPACK CONTROLLER: USER GUIDE 6.11.1 Analogue input configuration The configuration for the analogue input is divided into a number of areas: Main, AlmDis, AlmDet, AlmSig, AlmLat, AlmAck, AlmStop. AI MAIN Figure 6.11.1b iTools analogue input page PARAMETERS Type Allows the type of input to be set as one of: 0 to 10V, 1 to 5V, 2 to 10V, 0 to 5V, 0 to 20mA, 4 to 20mA. -
Page 55: Almack
EPACK CONTROLLER: USER GUIDE 6.11.1 ANALOGUE INPUT CONFIGURATION (Cont) ALMACK Allows each individual alarm to be acknowledged. On an alarm being acknowledged the related signalling parameter (ALMSIG) is cleared. If the alarm is still active as shown by the detection parameter (ALMDET) the alarm may not be acknowledged. -
Page 56: Ip Monitor Configuration
EPACK CONTROLLER: USER GUIDE 6.12 IP MONITOR CONFIGURATION This monitors a wired parameter and records its maximum value, minimum value and the cumulative time that its value spends above a configurable threshold. An alarm can be set up to become active when the time-over-threshold exceeds a further threshold. -
Page 57: Lgc2 (Two Input Logic Operator) Menu
EPACK CONTROLLER: USER GUIDE 6.13 LGC2 (TWO INPUT LOGIC OPERATOR) MENU This logic operator block provides a number of two-input logic operations. The output is always a ‘Boolean’ (logic 0 or 1) no matter whether the inputs are analogue or digital. For analogue inputs, any value below 0.5 is deemed to be logic 0 (off). - Page 58 EPACK CONTROLLER: USER GUIDE 6.13.1 LGC2 PARAMETERS (Cont.) Status Shows the status of the output (‘Good’ or ‘Bad’). Hysteresis For comparison operators only (e.g. Greater than) this allows a hysteresis value to be entered. For example, if the operator is ‘Greater than’ and hysteresis is H, then the out- put goes high when In1 exceeds In2, and remains high until In1 falls to a value less than (In2 - H).
-
Page 59: Lgc8 (Eight-Input Logic Operator) Configuration
EPACK CONTROLLER: USER GUIDE 6.14 LGC8 (EIGHT-INPUT LOGIC OPERATOR) CONFIGURATION This allows between 2 and 8 inputs to be combined using an AND, OR or Exclusive OR (EXOR) logic function. The inputs may be individually inverted, and the output can also be inverted, thus allowing the full range of logic functions to be implemented. -
Page 60: Invert Input Decoding Table
EPACK CONTROLLER: USER GUIDE 6.14.3 Invert input decoding table The inversion status can be encoded/decoded using the following table Input Input Input Input 8 7 6 5 4 3 2 1 Hex Dec 8 7 6 5 4 3 2 1... -
Page 61: Math2 Menu
EPACK CONTROLLER: USER GUIDE 6.15 MATH2 MENU This feature allows a range of two-input mathematical functions to be performed. The available functions are listed below. Figure 6.15 Maths2 configuration page 6.15.1 Math 2 Parameters Note: For the sake of this description, ‘High’, ‘1’ and ‘True’ are synonymous, as are ‘Low’, ‘0’ and ‘False’. - Page 62 EPACK CONTROLLER: USER GUIDE 6.15 MATH2 PARAMETERS (Cont.) Oper (Cont.) Log base e: Output = {Log (In1)}. Input two is not used. Output = e (input one) . Input two is not used. (input one) 10_x Output = 10 . Input two is not used.
-
Page 63: Modulator Configuration
EPACK CONTROLLER: USER GUIDE 6.16 MODULATOR CONFIGURATION This function implements the modulation type firing modes such as fixed and variable period modulation. Note... For the sake of completeness, all Modulator parameters are shown in the figure below. Nor- mally, for the sake of clarity, non-relevant (shaded) parameters should be hidden using the ‘Options>Parameter Availablity Settings...>Hide Parameters and Lists when Not Relevant’... -
Page 64: Network Configuration
EPACK CONTROLLER: USER GUIDE 6.17 NETWORK CONFIGURATION This identifies the type of electrical network to be controlled, and this, in turn defines how the network’s electrical measurements are presented. The configuration is divided into a number of areas: Meas, Setup... -
Page 65: Network Meas Menu
EPACK CONTROLLER: USER GUIDE 6.17.1 Network Meas Menu Figure 6.17.1 Network Meas configuration page PARAMETERS This submenu presents power network measurements, according to the network type. All available measurements are listed below, but which values actually appear depends on the network configuration. -
Page 66: Network Setup Configuration
EPACK CONTROLLER: USER GUIDE 6.17.2 Network Setup configuration This displays the setup of the network and associated functions. Figure 6.17.2 Network setup menu page PARAMETERS NetType The type of network to which the unit can be connected. This is set at the factory and... - Page 67 EPACK CONTROLLER: USER GUIDE 6.17.2 NETWORK SETUP CONFIGURATION (Cont.) PARAMETERS (Cont.) Heatsink PreTemp Reserved for future development. PLFAdjustReq Partial load failure adjustment request. To make the Partial Load Failure (PLF) alarm op- erate correctly, the normal steady-state condition must be known to the instrument. This is done by activating the PLF Adjust Req once the controlled process has achieved a steady state condition.
-
Page 68: Network Alarms
EPACK CONTROLLER: USER GUIDE 6.17.3 Network alarms Figure 6.17.3 Network alarms page ALMDIS This menu allows individual network block alarms (listed below) to be enabled/disabled. Section 9 gives more details of these alarms. Missing Mains Mains frequency fault Total load failure... -
Page 69: Qcode
EPACK CONTROLLER: USER GUIDE 6.18 QCODE Quick code parameters, settable when in Quickcode configuration mode as well as here. Figuire 6.18 Quick code parameters 6.18.1 Parameters Firing Select firing mode from IHC (Intelligent half cycle), Burst firing (fixed or variable), Logic or Phase angle. -
Page 70: Setprov Configuration Menu
EPACK CONTROLLER: USER GUIDE 6.19 SETPROV CONFIGURATION MENU The Setpoint provider supplies one local and one remote setpoint. Figure 6.19 SetProv configuration page 6.19.1 Setpoint provider parameters SPSelect Allows the user to select between Remote or Local as the setpoint source. -
Page 71: User Value Configuration Menu
EPACK CONTROLLER: USER GUIDE 6.20 USER VALUE CONFIGURATION MENU This provides storage for up to four user-defined constants. Typical uses are as a sources for maths functions, or as storage for values written over the communications link. Figure 6.20 Top level UseVal page 6.20.1 User Value parameters... -
Page 72: Using Itools
The following descriptions assume that the latest version iTools software as been correctly installed on the For EPack units only (at time of publication), if the desktop/laptop and EPack are IP compatible (same subnet mask) then, Plug & Play allows easy connection as follows. - Page 73 EPACK CONTROLLER: USER GUIDE 7.1.2 ETHERNET (MODBUS TCP) COMMUNICATIONS (Cont.) Click on the TCP/IP tab in the Registry settings configuration. Click on Add... The ‘New TCP/IP Port’ dialogue box opens. Type-in a name for the port, then click Add... Type the IP address of the unit in the ‘Edit Host’ box which appears. Click OK.
- Page 74 EPACK CONTROLLER: USER GUIDE 7.1.2 ETHERNET (TCP/IP) COMMUNICATIONS (Cont.) To check that the pc can now communicate with the instrument, Click ‘Start’. ‘All Programs’, ‘Accessories’, ‘Command Prompt’ when the Command Prompt box appears, type in : Ping<Space>IP1.IP2.IP3.IP4<Enter> (where IP1 to IP4 are the IP address of the instrument).
-
Page 75: Direct Connection
EPACK CONTROLLER: USER GUIDE 7.1.3 Direct Connection This section describes how to connect a pc directly to a Driver Module which, for this purpose, must be fitted with the Ethernet communications option. WIRING Connection is made from the Ethernet connector on the front of the Driver Module to an Ethernet RJ45 connector, usually located at the rear of the pc. -
Page 76: Scanning For Instruments
EPACK CONTROLLER: USER GUIDE 7.2 SCANNING FOR INSTRUMENTS ’Clicking on the ‘Scan’ toolbar icon causes a dialogue box (shown below) to appear. This allows the user to define a search range of addresses. Notes: 1. Scanning is necessary only when the ‘Plug & Play is not available for the instrument type being searched for. -
Page 77: Graphical Wiring Editor
EPACK CONTROLLER: USER GUIDE 7.3 GRAPHICAL WIRING EDITOR Note... The Graphical wiring editor is a chargeable option, and the toolbar icon appears only if the option has been purchased and is enabled. Clicking on the Graphical Wiring Editor (GWE) toolbar icon causes the Graphical wiring window for the current instrument configuration to open. -
Page 78: Toolbar
EPACK CONTROLLER: USER GUIDE 7.3.1 Toolbar Download wiring to Instrument. Mouse Select. Select nor mal mouse operation. Mutually exclusive with ‘Pan’, below. Mouse Pan. When active, this causes the mouse cursor to become a hand-shaped icon. Allows the graphical wiring diagram to be click-dragged within the GWE window aperture. -
Page 79: Function Blocks
EPACK CONTROLLER: USER GUIDE 7.3.2 WIRING EDITOR OPERATING DETAILS (Cont.) FUNCTION BLOCKS A Function Block is an algorithm which may be wired to and from other function blocks to make a control strategy. Each function block has inputs and outputs. Any parameter may be wired from, but only parameters that are alterable in Operator Mode may we wired to. - Page 80 EPACK CONTROLLER: USER GUIDE 7.3.2 WIRING EDITOR OPERATING DETAILS (Cont.) FUNCTION BLOCK CONTEXT MENU (Cont.) Hide Unwired Connections Displays only those parameters which are wired. Allows one or more selected items to be moved to the Clipboard ready for pasting into another diagram or compound, or for use in a Watch window, or OPC scope.
-
Page 81: Wires
EPACK CONTROLLER: USER GUIDE 7.3.2 WIRING EDITOR OPERATING DETAILS (Cont.) WIRES To make a wire Drag two (or more) blocks onto the diagram from the function block tree. Start a wire by either clicking on a recommended output or clicking on the ‘Click to Select output’ icon at the... -
Page 82: Wire Colours
EPACK CONTROLLER: USER GUIDE 7.3.2 WIRING EDITOR OPERATING DETAILS (Cont.) WIRE COLOURS Black Normal functioning wire The wire is connected to a non-changeable parameter. Values are rejected by the destination block. Magenta A normal functioning wire is being hovered-over by the mouse cursor. - Page 83 EPACK CONTROLLER: USER GUIDE 7.3.2 WIRING EDITOR OPERATING DETAILS (Cont.) MONITORS Monitor points are added to a wiring diagram by click-dragging them from the Function Block tree onto the diagram. A monitor shows the current value (updated at the iTools parameter list update rate) of the parameter to which it is linked.
- Page 84 EPACK CONTROLLER: USER GUIDE 7.3.2 WIRING EDITOR OPERATING DETAILS (Cont.) COLOURS Items on the diagram are coloured as follows: Items which totally or partially obscure other items and items which are totally or partially obscured by other items. Wires that are connected to unalterable or non- available parameters.
-
Page 85: Compounds
EPACK CONTROLLER: USER GUIDE 7.3.2 WIRING EDITOR OPERATING DETAILS (Cont.) COMPOUNDS Compounds are used to simplify the top level wiring diagram, by allowing the placing of any number of function blocks within one ‘box’, the inputs and outputs of which operate in the same way as those of a normal function block. - Page 86 EPACK CONTROLLER: USER GUIDE 7.3.2 WIRING EDITOR OPERATING DETAILS (Cont.) TOOL TIPS Hovering the cursor over the block displays ‘tooltips’ describing that part of the block beneath the cursor. For function block parameters the tooltip shows the parameter description, its OPC name, and, if downloaded, its value.
-
Page 87: Parameter Explorer
EPACK CONTROLLER: USER GUIDE 7.4 PARAMETER EXPLORER This view is displayed: by clicking on the ‘Parameter Explorer’ toolbar icon, by double clicking on the relevant block in the tree pane or in the graphical wiring editor by selecting ‘Function Block View’ from the Function block context menu in the Graphical wiring Editor. -
Page 88: Figure 7.4.1 Parameter Explorer Detail
EPACK CONTROLLER: USER GUIDE 7.4 PARAMETER EXPLORER (Cont.) Context Menu Explorer Menu Figure 7.4b Column enable/disable Figure 7.4.1 Parameter explorer detail Figure 7.4.1a shows a typical parameter table. This particular parameter has a number of subfolders associated with it, and each of these is represented by a ‘tab’ across the top of the table. -
Page 89: Explorer Tools
EPACK CONTROLLER: USER GUIDE 7.4.1 PARAMETER EXPLORER DETAIL (Cont.) Figure 7.4.1b Show/Hide parameters 7.4.2 Explorer tools A number of tool icons appear above the parameter list: Back to: and Forward to:. The parameter explorer contains a history buffer of up to 10 lists that have been browsed in the current instance of the window. -
Page 90: Fieldbus Gateway
EPACK CONTROLLER: USER GUIDE 7.5 FIELDBUS GATEWAY EPack controller units contain a greatnumber of parameters, so it is necessary for the user to define which Input and Output parameters are to be available for block read and write. The Input/Output definitions are configured using the ‘Fieldbus I/O Gateway’. - Page 91 EPACK CONTROLLER: USER GUIDE 7.5 FIELDBUS GATEWAY(Cont.) When all the required parameters have been added to the lists, notes of how many ‘wired’ entries are included in the input and output areas should be made as this information is needed when setting up the Master.
-
Page 92: Watch/Recipe Editor
EPACK CONTROLLER: USER GUIDE 7.6 WATCH/RECIPE EDITOR The watch/recipe editor is opened by clicking on the Watch/Recipe tool icon, by selecting ‘Watch/Recipe’ in the ‘Views’ menu or by using the short cut <ctrl>+<A>. The window is in two parts: the left part containing the watch list;... -
Page 93: Watch Recipe Toolbar Icons
EPACK CONTROLLER: USER GUIDE 7.6.1 CREATING A WATCH LIST (Cont.) DATA SET CREATION (Cont.) Individual data values can now be edited by typing directly into the grid cells. Data values can be left blank or cleared, in which case, no values will be written for those parameters at download. Data values are cleared by deleting all the characters in the cell then either moving to a different cell or typing <Enter>. -
Page 94: Parameter Addresses (Modbus)
EPACK CONTROLLER: USER GUIDE 8 PARAMETER ADDRESSES (MODBUS) 8.1 INTRODUCTION The iTools address fields display each parameter’s Modbus address to be used when addressing integer values over the serial communications link. In order to access these values as IEEE floating point values, the calculation: IEEE address = {(Modbus address x 2) + hex 8000} should be used. -
Page 95: Alarms
EPACK CONTROLLER: USER GUIDE 9 ALARMS 9.1 SYSTEM ALARMS System alarms are considered to be ‘Major Events’ which prevent proper operation of the system, and the unit is placed in standby mode. The following subsections describe each of the possible system alarms. -
Page 96: Over Current Detection
EPACK CONTROLLER: USER GUIDE 9.2.4 Over current detection The analogue input over current detection alarm is active. 9.2.5 OverVoltage Alarm An ‘OverVoltThreshold’ can be configured in the Network.Setup area of configuration (section 6.17.2) as a percentage of VLineNominal. If the VLine voltage rises above this threshold the OverVoltage alarm is set. -
Page 97: Indication Alarms
EPACK CONTROLLER: USER GUIDE 9.3 INDICATION ALARMS Indication Alarms signal events for operator action if required. Indication alarms cannot be configured to stop power module firing, but they may be latched if required, and if latched, they must be acknowledged for the Signaling Status to return to the normal (non-alarm) state. -
Page 98: Maintenance
EPACK CONTROLLER: USER GUIDE 10 MAINTENANCE 10.1 SAFETY WARNING BRANCH-CIRCUIT PROTECTION AND SAFETY OVERLOAD PROTECTION This product does not contain any branch-circuit protection or internal safety overload protection. It is the responsibility of the user to add branch-circuit protection upstream of the unit. It is also the responsibility of the user to provide external or remote safety overload protection to the end instal- lation. -
Page 99: Fusing
EPACK CONTROLLER: USER GUIDE 10.3 FUSING It is recommended that in-line thyristor protection fuses are fitted, according to table 10.3a below. These should beused in conjunction with suitable fuse holders and contact kits (if required) as shown in table 10.3b. The coloured areas indicate which fuses use which fuse holders. - Page 100 EPACK CONTROLLER: USER GUIDE EPACK LICENCE NOTICE FreeRTOS Epack is powered by an original FreeRTOS from version v7.1.0 . FreeRTOS is available at http://www.freertos.org microutf8 /* microutf8.c Copyright (C) 2011 by Tomasz Konojacki Permission is hereby granted, free of charge, to any person obtaining a copy of this software and associated documentation files (the "Software"), to deal in the Software without restriction, including without limitation the rights to use, copy, modify,...
-
Page 101: Appendix A: Technical Specification
EPACK CONTROLLER: USER GUIDE Appendix A: TECHNICAL SPECIFICATION A1 STANDARDS STANDARDS The product is designed and produced to comply with EN60947-4-3 (Low voltage switch gear and control gear) and with UL60947-4-1A and CAN/CSA C22.2 . Other applicable standards are cited where appropriate. - Page 102 EPACK CONTROLLER: USER GUIDE A2 SPECIFICATION (Cont.) INPUTS/OUTPUTS All figures are with respect to 0V, unless otherwise stated. Number of inputs/outputs 1 Analogue input; 2 Digital inputs; 1 Relay output Update rate Twice the mains frequency. Defaults to 55 Hz (18 ms) if the supply frequency lies outside the range 47 to 6 3Hz.) Termination Removable 5-way connector.
- Page 103 EPACK CONTROLLER: USER GUIDE A2 SPECIFICATION (Cont.) DIGITAL Inputs Voltage inputs Active level (high) 4.4V<Vin<30V Non-active level (low) -30V<Vin<+2.3V Input impedance: 27k (typ.) for voltage input mode Contact closure inputs Source current: 10mA min; 15mA max Open contact (non active) resistance: >500...
- Page 104 EPACK CONTROLLER: USER GUIDE A2 SPECIFICATION (Cont.) MAINS NETWORK MEASUREMENTS All network measurements are calculated over a full mains cycle, but internally updated every half-cycle. For this reason, power control, current limits and alarms all run at the mains half-cycle rate. The calculations are based on waveform samples taken at a rate of 20kHz. The phase voltage referred to is the line voltage referenced to N/L2 input potential.
-
Page 105: Index
EPACK CONTROLLER: USER GUIDE INDEX Numerics Bulkhead mounting........3 Burst 10_x . - Page 106 EPACK CONTROLLER: USER GUIDE Configuration (Cont.) Monitor ........75 Wire context menu .
- Page 107 EPACK CONTROLLER: USER GUIDE Hold Energy counter....... . 36 Fall Host name.
- Page 108 EPACK CONTROLLER: USER GUIDE Limitation Network Alarm (Cont.) Active ........89 .
- Page 109 EPACK CONTROLLER: USER GUIDE PBurst..........57 Re-Route PF .
- Page 110 EPACK CONTROLLER: USER GUIDE Supply frequency fault ......8 Supply power wiring V .
- Page 112 Eurotherm Limited. Eurotherm Limited pursues a policy of continuous development and product improvement. The specifications in this document may therefore be changed without notice. The information in this document is given in good faith, but is intended for guidance only.
Need help?
Do you have a question about the EPack and is the answer not in the manual?
Questions and answers