
Related Manuals for SEWOO LK-B30


Summary of Contents for SEWOO LK-B30
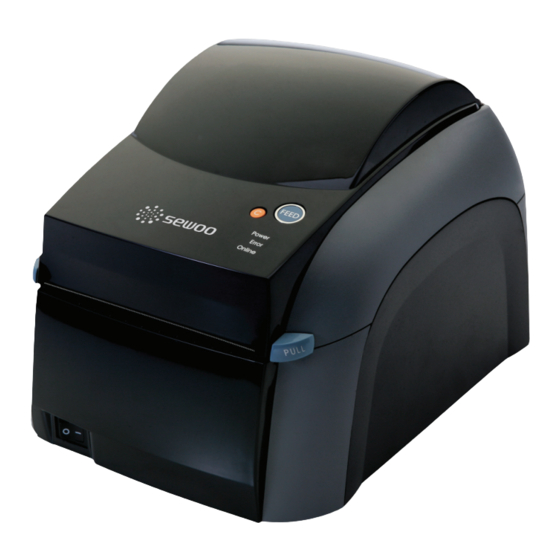
- Page 1 MODEL : LK-B30 4” DESKTOP LABEL PRINTER All specifications are subject to change without notice...
-
Page 3: Table Of Contents
Table of Contents 1. UNPACKINg 2. PRINTER IDENTIfICATION 3. CONNECTINg POwER SUPPLy 4. HOOKINg UP THE PRINTER AND COMPUTER 5. LOADINg THE MEDIA 6. THE TREATMENT wHEN yOU RUN SHORT Of PAPER AND ENCOUN- 7. SETTINg UP THE SENSORS 8. SELf TEST 9. -
Page 4: Unpacking
1. Unpacking Printer Interface cable (selected optionally) Power supply Power Cord(1EA) Quick Manual CD (Manual and Software) Paper Spindle... -
Page 5: Printer Identification
2. Printer identification Interface Connectors Power Connectors Printer Head Notch Sensor Paper width guide Black Mark Sensor Button Power Switch Upper Cover Knob... - Page 6 Opening the printer Open the upper cover by pushing the knob in the Make sure to be careful of the HOT head after direction of the arrow. using long time. **If the cover is not shut down completely, the printer may not work properly** Please make sure you hear the closing sound of the upper cover.
-
Page 7: Connecting Power Supply
3. Connecting power supply 220VAC Power Connectors 115VAC Please check the specification of the AC power Turn off the power of the printer and connect cord if it is correct with your power system. the power supply to the printer as shown above. Insert a plug into the electrical outlet Connect the AC power cord to the power supply... -
Page 8: Hooking Up The Printer And Computer
4. Hooking up the printer and computer -Printer- Serial Parallel -Computer- After making sure the printer is turned off, connect the printer to the PC. -
Page 9: Loading The Media
5. Loading the media Turn off the printer and open the upper cover by Please open the upper cover as shown above pushing the knob in the direction of the arrow Insert the roll paper to the paper spindle as shown in Open the paper width guides by pushing them to the the picture. - Page 10 Insert the paper roll into the printer Adjust the paper width guide to meet the paper width **Please cut the paper in upper direction** Close the upper cover completely and make sure you hear the closing sound. NOTE Paper fixing tap is only for 1 inch core roll paper and fan-fold paper. for 1.5”...
-
Page 11: The Treatment When You Run Short Of Paper And Encoun
The treatment when you run short of paper and encounter cutter jam problem while you are printing with continuous media, please press PULL lever to the direction of the arrow. **Installation of the new paper when **Remove of the paper seized by the printer is short of it ** paper jam** 닫음... -
Page 12: Setting Up The Sensors
7. Setting up the sensors Black Mark Sensor Notch Sensor Set Black Mark Sensor right to the size of roll paper Locate notch sensor on the same number point- as the black mark sensor is indicating on. **8 is the initialization number for sensor of the product.** If the thickness of paper with black mark is less than 0.1mm, it is recommended setting the black mark sensor and gap... -
Page 13: Self Test
8. Self Test Note Power switch sig Turn off the printer Press and hold the feed button while turning on the printer with power switch The printer prints information on the printer configuration and quality of the printing... -
Page 14: Auto Setup For Label Size
9. Auto setup for label size Note Power switch sig Turn off the printer while you are pressing and holding ‘C’ button, turn off the power of printer. Auto setup will not be applied on the continuous stock Printer sensor detects the size of the label, issuing the blank label. -
Page 15: Pause And Cancel Function
10. Pause and cancel function when you would pause on the printing process, press the ‘C’ key. when you would cancel printing, you should proceed the cancel on your PC at first. Over 2 seconds when you want cancel the printing, press and hold the “C” key for over 2 seconds. -
Page 16: Connector
11. Connector Interface Connectors Standard <USB “ B “ TyPE> <Centronics Parallel> <9 Pin Serial>... - Page 17 Centronics Parallel Interface Signal Description STROBE- Input Synchronize signal Data received DATA0~7 Input/Output Data bit Transmitted 0~7 ACK- Output Data receiving completed. BUSy Output Impossible to print of data receiving. Output Paper empty SELECT Output Printer status for ON/Off line AUTO fEED- Input Paper auto feed signal...
-
Page 18: Standard Roll Media Specification
12. Standard roll media specification Core Diameter(A) 25.4 or 38.1 mm Max. width 118 mm Roll Max.diameter(B) 127 mm Max.media width(C) 119 mm Min.media width(C) 18 mm Max.media thickness 0.15 mm Min.mdeia thickness 0.06 mm NOTE 1. If the label thickness is more than 0.18mm, adjust the printing speed to 127mm/s. 2. -
Page 19: Standard Label Specification
13. Standard label specification <-- a --> Media width (inch, liner) Maximum 118 mm Minimum 18 mm <-- b --> Label length Minimum 10 mm <-- c --> Label gap height Maximum 10 mm Minimum 2 mm Liner Opacity 50~75%... -
Page 20: Specification Of The Label With Through-Hole
14. Label specification with Through-hole Tag or strip width <-- a --> Maximum 118 mm Minimum 18 mm Tag length <-- b --> Minimum 10 mm Detection slot width <-- c --> Minimum 14 mm Detection slot height <-- d --> Maximum 10 mm Minimum... -
Page 21: Specification Of The Label With Black Mark
15. Label with Black Mark <-- a --> Tag or strip width Maximum 118 mm Minimum 18 mm <-- b --> Tag length Minimum 10 mm <-- c --> Black mark width Minimum 14 mm <-- d --> Black mark height Maximum 10 mm Minimum... -
Page 22: Continuous Paper Specification
16. Continuous stock specification The printer can use continuous paper without any detection gap or black marks. The printer must be set for continuous paper by the Q command. The length of each copy is decided by the size of the print image and any additional media feed is decided by the Q command. -
Page 23: Specification Of The Product
17. Specifications Product Specifications Print method Direct Thermal Print speed(max) 152mm/sec Print width(max) 104mm Print length(max) 630mm Resolution 203dpi, 8 dots/mm Paper width(min~max) 18~118mm Paper roll size(max) 127mm Paper thickness 0.06~0.18mm Paper Type Label , Tag, Continuous, fanfold Paper sensor Label gap, Notch, Black Mark Interface Standard... -
Page 24: Electrical Characteristics
Certification (1) fCC PART15 CLASS A CE EMCD (CE-EMCD Class B should use Parallel shield Cable complied with IEEE-1284 standards) (3) UL/cUL (UL 60950-1) Electrical Characteristics (1) Input Voltage DC 24V ± 10% (2) Current Consumption Operating: Approx. 2.9 A (at ASC∥ printing) Peak : Approx. -
Page 25: Control Commands
18. Command List Command Description ASCⅡ Text AUTOfR Automatic form Printing Bar Code RSS-14 Bar Code Data Matrix MaxiCode PDf417 Counter Cut Immediate Density Print Soft font Info. Delete Soft font User Definable Error Response Store Soft font Cut/Peel Position End form Store Print form Info. - Page 26 Command Description Options Select OEPL1 Set Line Mode Print Print Automatic Set form Length Transmissive(gap)Sensor Black Line Sensor Continuous Stock Set form width Set Double Buffer Mode Set Reference Point Speed Select Define Date Layout(& Print Date) Set Real Time Clock Define Time Layout(&...
- Page 27 SEwOO TECH CO.,LTD. Doosung BD, 689-20, geumjung-dong, gunpo-si, gyeonggi-do, 435-862 South Korea TEL : +82-31-459-8200 fAX : +82-31-459-8880 www.miniprinter.com Rev. 1.0...
Need help?
Do you have a question about the LK-B30 and is the answer not in the manual?
Questions and answers