Table of Contents

Related Manuals for CDA HN9626FR


Summary of Contents for CDA HN9626FR
- Page 1 Induction Hob Installation, Use and Maintenance Customer Care Department • The Group Ltd. • Harby Road • Langar • Nottinghamshire • NG13 9HY T : 01949 862 012 F : 01949 862 003 E : customer.care@cda.eu W : www.cda.eu www.cda.eu...
- Page 2 Appliance information: Please enter the details on the appliance rating plate below for reference, to assist CDA Customer Care in the event of a fault with your appliance and to register your appliance for guarantee purposes. Appliance Model...
- Page 3 (EMC) 2014/30/EU. Parts intended to come into contact with food conform to 1935/2004/EC. IMPORTANT INFORMATION FOR CORRECT DISPOSAL OF THE PRODUCT IN ACCORDANCE WITH EU DIRECTIVE 2012/19/EU. At the end of its working life, the product must be taken to a special local authority waste collection centre or to a dealer providing appliance recycling services.
- Page 4 • Do not place hot lids flat on the hob top. A “suction” effect could cause damage to the hob. • Do not drag cookware across the hob top: in the long term, this could cause damage to the hob. •...
- Page 5 To avoid interference between your hob and a pacemaker, your pacemaker must be designed and programmed in compliance with the regulations that apply to it. As such, CDA guarantee only that our product is compliant. With regard to the compliance of the pacemaker or any potential incompatibility, you should obtain information from the manufacturer or your attending physician.
- Page 6 Cooking on Induction The principle of induction cooking is based on magnetic effect. When you put your cookware on an induction zone and switch it on, the electronic boards in the hob produce induced currents in the base of the cookware and instantly raise its temperature. This heat is then transferred to the food inside the cookware.
-
Page 7: Using Your Hob
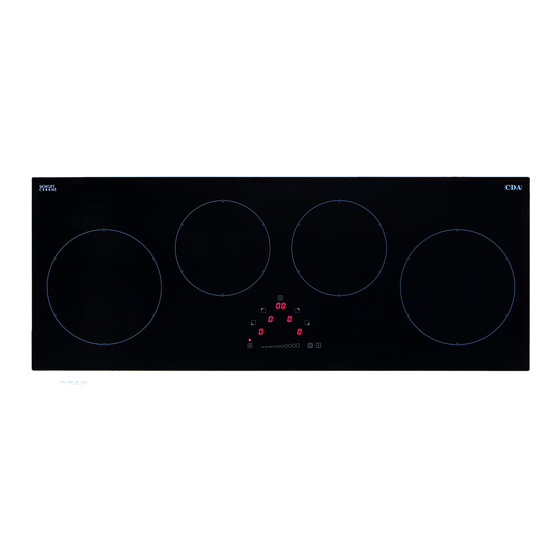
Using your hob Zones: 1. 2.3kW/3.0kW Ø220 mm 3. 1.2kW/1.4kW Ø 180 mm 2. 1.2kW/1.4kW Ø180 mm 4. 2.3kW/3.0kW Ø 220 mm fig. 1 fig. 2 Control panel: 1. On/off sensor with LED 5. Cooking zone displays 2. Power level slider 6. - Page 8 Using Your Hob To switch the hob on • To switch the power on, touch and hold the "On/off sensor" (1) for approximately two seconds. The hob will beep, all four cooking zone displays will show “0” and the timer display will show "CL". Please note: If a power level is not set within twenty seconds, the hob will switch off automatically.
- Page 9 • If switching off multiple zones, the above steps need to be taken for each zone. When all the zones are at "0", the hob will switch off automatically after approximately twenty seconds. • Alternatively, to switch off the hob immediately, touch and hold the "On/off sensor"...
- Page 10 Please note: If the appliance's electronic circuits or induction coils overheat whilst the booster function is in operation then the function will be automatically deactivated and the zone will continue to operate at its nominal power. The booster function will be available again once the internal components have been cooled sufficiently.
-
Page 11: Timer/Minute Minder
Operating time limiter durations Zone Power Level 180mm 220mm Maximum Operating Time 318 258 210 120 90 (minutes) Timer/Minute Minder The hob is equipped with a timer that allows a finish time to be set for the end of cooking on any zone, between a minimum of 1 minute and a maximum of 99 minutes. - Page 12 To set the timer • First switch on the hob if necessary and set the desired zone to the power level required. • With the display showing the ‘CL’ symbols, touch the timer sensor (7) to activate the timer. Use the heat setting slider sensor (2) to set the individual minutes.
- Page 13 To cancel the timer • Touch the timed zone’s display (5) so that the decimal point appears next to the set heat level (this indicates that control/adjustment is available). Then, simply touch the timer sensor (7) five times. Do this for each zone if necessary.
-
Page 14: Pause Function
Pause Function The hob is equipped with a pause function that allows the user to suspend the hob's operation for a brief period of time and to easily continue cooking when convenient from the previously assigned settings. This is particularly useful when your attention is drawn from the hob, i.e. -
Page 15: Keep Warm Function
Keep Warm Function Each zone is equipped with a keep warm function that is designed to keep food at a stable temperature. This allows the serving of food to be delayed and also for the melting of butter or chocolate. The "Keep warm"... -
Page 16: Safety Key Lock
Safety Key Lock To help prevent accidental use, the hob has a safety key lock which switches controls off temporarily or completely. The safety key lock can be activated when the hob is turned on but not when power has been switched off at, or the appliance disconnected from, the mains. -
Page 17: Efficient Use Of Your Hob
Efficient Use of Your Hob The hob is equipped with zones designed to accommodate most shapes and sizes of pan. For best results, only use pans with flat bottoms. The most efficient use of the hob is shown below, where the pan and zone are correctly chosen. -
Page 18: Care And Maintenance
Care and Maintenance Always disconnect the appliance from the power supply before undertaking any cleaning or maintenance. Important: • Steam cleaners must not be used when cleaning this appliance. • You should use a non-abrasive cleaner to clean the hob top. Any abrasive cleaner (including Cif) will scratch the surface and could erase the control panel markings. - Page 19 2. Check that the mains supply has not been switched off. 3. Check that the fuse in the spur has not blown. In the event of a fault with the hob please advise CDA Customer Care. Contact CDA Customer Care...
-
Page 20: Troubleshooting
The hob is not working and the The electronics touched too briefly (less again and for longer display shows a non-standard are not functioning Call CDA Customer Care than a second) graphic correctly Sensor fields do not The hob is not working and the... - Page 21 Should any error code show on the zone displays, or the above steps not resolve an issue, please contact CDA Customer Care for assistance. Contact details are on page 19. IMPORTANT - PLEASE NOTE: In the event of any breakage, crack or cracking –...
-
Page 22: Fitting The Hob
Fitting the hob Unpacking the hob: Installation above a cupboard unit Take care not to lose, drop or mishandle any parts. 25mm Fitting position of the hob: 35mm This appliance must be installed a 500 x 10mm minimum of 50mm from any back wall and a minimum of 55mm away from any adjacent vertical surfaces, e.g. - Page 23 If fitting a cooker hood above the hob: If a cooker hood is to be installed above the hob, the height of the hood above the hob must be at least 600mm (650mm is recommended) (Fig.6). If the instructions supplied with the hood dictate that the hood must be installed at a height greater than 600mm, Fig.6...
-
Page 24: How To Install The Hob
How to install the hob Overall dimensions of the hob: Width: 900 mm Depth: 350 mm Worktop cut-out dimensions: Width: 885 mm Depth: 340 mm 1 - Worktop 1. Make the required hole in the worktop. 2 - Hob seal 3 - Ceramic hob Before doing this, you must check the Fig.7... - Page 25 2. Make sure that the worktop is clean and dust free and insert the hob into the cut-out opening. Press the hob firmly into place so that the seal connects with the worktop (Fig. 7). If fitting the hob into a 28-40mm worktop: The four fixing clips supplied should be used.
-
Page 26: Mains Electricity Connection
Mains Electricity Connection Warning! This appliance must be earthed. We recommend that the appliance is connected by a qualified electrician, who is a member of the N.I.C.E.I.C. and who will comply with the I.E.T. and local regulations. Live L: BN - brown Neutral N: BU - blue Earth PE: GNYE -green/yellow This appliance is intended to be... - Page 27 • This appliance is intended to be connected to the mains supply with a cable of cross sectional area 4mm 2 . • The current rating of the fuse or circuit breaker protecting this appliance should be marked on the socket outlet. •...
- Page 28 Notes:...
- Page 29 Notes:...
- Page 30 Notes:...
- Page 31 Energy E ciency Information Attribute Symbol Value Units CDA model HN9626FR Type of hob Built in Number of cooking zones and/or areas Heating technology (induction cooking Induction zones and cooking areas, radiant cooking zones cooking zones, solid plates) For circular cooking zones or area: Ø...
- Page 32 Group Ltd. • Harby Road • Langar • Nottinghamshire • NG13 9HY T : 01949 862 012 F : 01949 862 003 E : customer.care@cda.eu W : www.cda.eu T : 01949 862 012 F : 01949 862 003 E : customer.care@cda.eu W : www.cda.eu www.cda.eu...
Need help?
Do you have a question about the HN9626FR and is the answer not in the manual?
Questions and answers