Table of Contents

Related Manuals for CDA hn9610


Summary of Contents for CDA hn9610
- Page 1 Induction Hob Manual for Installation, Use and Maintenance Customer Care Department • The Group Ltd. • Harby Road • Langar • Nottinghamshire • NG13 9HY T : 01949 862 012 F : 01949 862 003 E : service@cda.eu W : www.cda.eu...
- Page 2 Appliance information: Please enter the details on the appliance rating plate below for reference, to assist CDA Customer Care in the event of a fault with your appliance and to register your appliance for guarantee purposes. Appliance Model...
- Page 3 2004/108/EC. Parts intended to come into contact with food conform to 89/109/EC. IMPORTANT INFORMATION FOR CORRECT DISPOSAL OF THE PRODUCT IN ACCORDANCE WITH EC DIRECTIVE 2002/96/EC. At the end of its working life, the product must be taken to a special local authority waste collection centre or to a dealer providing appliance recycling services.
- Page 4 surface prior to use. • Do not modify the appliance in any way as this will invalidate the guarantee and is potentially dangerous. • The hob top is not designed for any use other than cooking: any other use (e.g. as a worktop) is potentially dangerous and will invalidate the guarantee.
- Page 5 capabilities or lack of experience and knowledge if they have been given supervision or instruction concerning use of the appliance in a safe way and understand the hazards involved. • Children shall not play with the appliance. • Cleaning and user maintenance shall not be made by children without supervision.
- Page 6 • Warning: If the ceramic glass is broken or cracked do not use the appliance, turn off the electricity supply to avoid the possibility of electric shock. Contact CDA Customer Support. • There are no user-serviceable parts inside the appliance; all repairs must be performed by a suitably qualified service engineer or similar.
- Page 7 To avoid interference between your hob and a pacemaker, your pacemaker must be designed and programmed in compliance with the regulations that apply to it. As such, CDA guarantee only that our product is compliant. With regard to the compliance of the pacemaker or any potential incompatibility, you should obtain information from the manufacturer or your attending physician.
-
Page 8: Using Your Hob
Using Your Hob Fig. 1 Zones: Front left 1.85kW (3.0kW boost) 180mm Back left 1.85kW (3.0kW boost) 180mm Back right 1.85kW (3.0kW boost) 180mm Front right 2.1kW (3.7kW boost) 210mm Centre 2.1kW (3.7kW boost) 210mm... -
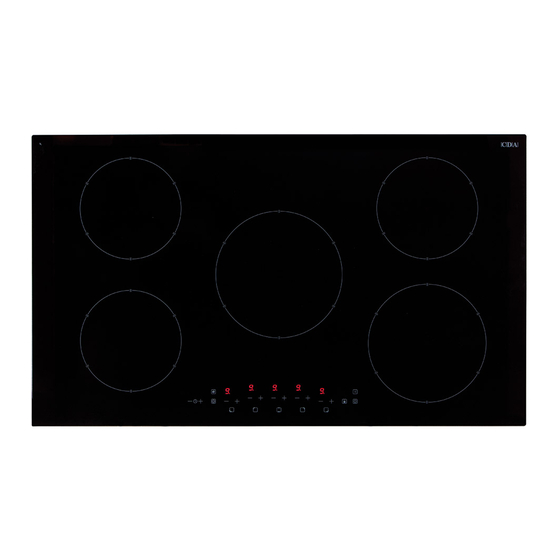
Page 9: Control Panel
Control Panel Fig. 2 Control panel Zone timer indicator Timer keys Timer display Booster key Special programmes key Zone indicators Zone displays Key lock Zone power level keys Power key Pause key Power level Type of cooking Switched off Melting (butter/chocolate) or keeping food warm Keeping food hot or to heat small quantities of liquid Heat larger quantities of liquid (sauces etc.) Slow boiling, e.g spaghetti, soups, stews, potatoes... - Page 10 Cooking on Induction The principle of induction cooking is based on magnetic effect. When you put your cookware on an induction zone and switch it on, the electronic boards in the hob produce induced currents in the base of the cookware and instantly raise its temperature. This heat is then transferred to the food inside the cookware.
- Page 11 Using Your Hob To switch the hob on To switch the power on, touch and hold the key for approximately two seconds. The hob will beep and all five zone displays will show zero. Please note: If a power level is not set within ten seconds, the hob will switch off automatically.
- Page 12 Special Programmes The hob has two optional preset programmed heating levels for each of the zones. 42°C setting • Touch the “Special Programmes” key so the special programmes control light illuminates. • Then touch either the “+” or “-” key for the zone you wish to maintain the 42°C temperature.
- Page 13 Level 2 twice so the booster control light • Touch the “Booster” key flashes. • Then touch either the “+” or “-” key for the zone you wish to boost. The display for that zone will show “ ” alternating with “ ”. To cancel the booster at any time, touch the “-”...
- Page 14 • To pause the hob, touch the “Pause” key , the hob displays “11” in all the zone displays. • To restart cooking, touch the “Pause” key again. Timer The hob is equipped with a timer that allows finish times to be set for the end of cooking on any combination of zones, between a minimum of one minute and a maximum of 99 minutes.
- Page 15 • After approximately five seconds, the “Zone timer indicator” will stop flashing and the countdown will start. • The timer display will show the minutes remaining. At the end of the timer, the selected zone will switch off and the hob will beep for approximately one minute.
-
Page 16: Key Lock
Key Lock The hob is equipped with a key lock to lock the controls. This can be used when the hob is off or during cooking. To switch on the key lock Touch the key for approximately two seconds until the LED above the key lock key illuminates and the hob beeps to confirm the key lock is switched on. - Page 17 Residual heat indicators The hob is equipped with residual heat indicators to warn when any of the zones are still hot to the touch after cooking. An “H” will show in the relevant zone display after cooking until the zone is at a safe temperature to touch.
-
Page 18: Efficient Use Of Your Hob
Efficient Use of Your Hob The hob is equipped with zones of different sizes, designed to accommodate most shapes and sizes of pan. For best results, only use pans with flat bottoms and choose an appropriate zone depending on the size of the pan. The most efficient use of the hob is shown below, where the pan and zone are correctly chosen. -
Page 19: Care And Maintenance
Care and Maintenance Always disconnect the appliance from the power supply before undertaking any cleaning or maintenance. Important: • Steam cleaners must not be used when cleaning this appliance. • You should use a non-abrasive cleaner to clean the hob top. Any abrasive cleaner (including Cif) will scratch the surface and could erase the control panel markings. -
Page 20: Troubleshooting
In the event of a fault with the hob, please advise CDA Customer Care of any fault code shown on the display Contact CDA Customer Care A: Customer Care Department, The CDA Group Ltd, Harby Road, Langar, Nottinghamshire, NG13 9HY... - Page 21 The bottom diameter of the pan Place a larger pan on the is too small. cooking zone. The electronic system is Contact CDA Customer Care for “E” shows on the zone display. defective. advice. “Er03” shows on the zone One or more control keys are Clear any objects and clean display.
-
Page 22: Fitting The Hob
Fitting the Hob Unpacking the hob: Take care not to lose or mishandle any parts. Fitting position of the hob: This appliance must be installed a minimum of 50mm from any back wall and a minimum of 180mm away from any adjacent vertical surfaces, e.g. - Page 23 If fitting a cooker hood above the hob: If a cooker hood is to be installed above the hob, the height of the hood above the hob must be at least 600mm (650mm is recommended) (Fig. 4). If the instructions supplied with the hood dictate that the hood must be installed at a height greater than 600mm, then that height is the minimum required.
-
Page 24: How To Install The Hob
How to Install the Hob Top rail removed to allow air to exit. Recommended 560mm x 6mm Overall dimensions of the hob: Width: 880 mm Depth: 520 mm Worktop cut-out dimensions: Width: 810 mm Depth: 490 mm 1. Make the required hole in the worktop. -
Page 25: Mains Electricity Connection
Mains Electricity Connection Warning! this appliance must be earthed We recommend that the appliance is connected by a qualified electrician, who is a member of the N.I.C.E.I.C. and who will comply with the I.E.T. and local regulations. This hob is intended to be connected to permanent, fixing wiring by a double pole switch, having a contact separation of at least 3mm in all poles. - Page 26 • The inlet cable must be positioned so that it does not touch any of the hot parts of the hob or oven. Caution • This appliance must only be connected to a 230V ~ 50Hz network. • Observe the connection diagram. •...
- Page 27 Any service call arising from incorrect installation may result in a charge. CDA and its representatives cannot be held responsible for any matters resulting from incorrect connection, or related to either the absense of an earth connection or a faulty earth connection.
- Page 28 Please contact our Customer Care Department for Service on the details below Customer Care Department • The Group Ltd. • Harby Road • Langar • Nottinghamshire • NG13 9HY T : 01949 862 012 F : 01949 862 003 E : service@cda.eu W : www.cda.eu...
Need help?
Do you have a question about the hn9610 and is the answer not in the manual?
Questions and answers