Siemens SINUMERIK 840D sl Manual
Hide thumbs
Also See for SINUMERIK 840D sl:
- Function manual (2184 pages) ,
- Programming manual (1334 pages) ,
- Commissioning manual (1102 pages)
Table of Contents
Advertisement
SINUMERIK
SINUMERIK 840D sl
NCU
Manual
Applicable to controller
SINUMERIK 840D sl/840DE sl
03/2010
6FC5397-0AP10-3BA0
Preface
Safety Information
System overview
Application Planning
Description
Operating and display
elements
Interfaces
Dimension drawings
Mounting
Connecting
Technical Data
Spare Parts/Accessories
Appendix
1
2
3
4
5
6
7
8
9
10
11
A
Advertisement
Table of Contents

Related Manuals for Siemens SINUMERIK 840D sl


Summary of Contents for Siemens SINUMERIK 840D sl
- Page 1 Preface Safety Information System overview SINUMERIK Application Planning SINUMERIK 840D sl Description Operating and display elements Manual Interfaces Dimension drawings Mounting Connecting Technical Data Spare Parts/Accessories Appendix Applicable to controller SINUMERIK 840D sl/840DE sl 03/2010 6FC5397-0AP10-3BA0...
- Page 2 Note the following: WARNING Siemens products may only be used for the applications described in the catalog and in the relevant technical documentation. If products and components from other manufacturers are used, these must be recommended or approved by Siemens. Proper transport, storage, installation, assembly, commissioning, operation and maintenance are required to ensure that the products operate safely and without any problems.
-
Page 3: Preface
● Researching documentation online Information on DOConCD and direct access to the publications in DOConWEB. ● Compiling individual documentation on the basis of Siemens contents with the My Documentation Manager (MDM), refer to http://www.siemens.com/mdm. My Documentation Manager provides you with a range of features for generating your own machine documentation ●... - Page 4 If you have any technical questions, please contact our hotline: Europe/Africa Phone +49 180 5050 222 +49 180 5050 223 0.14 €/min. from German landlines, max. 0.42 €/min for calls from a mobile phone Internet http://www.siemens.com/automation/support-request America Phone +1 423 262 2522 +1 423 262 2200 E-mail techsupport.sea@siemens.com...
- Page 5 The EC Declaration of Conformity for the EMC Directive can be found/obtained: ● On the Internet: http://support.automation.siemens.com under product/order number 15257461 ● From the relevant regional office of the I DT MC division of Siemens AG Convention Throughout this document, the term "Control Unit" is also used for product designations NCU 7x0, provided that the technical conditions described are applicable to all variants.
- Page 6 Preface Manual, 03/2010, 6FC5397-0AP10-3BA0...
-
Page 7: Table Of Contents
Table of contents Preface ..............................3 Safety Information............................ 11 Danger notices ..........................11 ESD notices ..........................13 System overview............................15 Application............................15 System configuration ........................16 Variants ............................17 Application Planning ..........................19 Secondary electrical conditions ....................19 3.1.1 Protective Separation as per EN 61800-5-1 ................19 3.1.2 Grounding concept........................20 3.1.3... - Page 8 Table of contents PROFINET interfaces, ports 1, 2 ....................45 PROFIBUS–DP/MPI interfaces X126, X136 ................47 Digital inputs/outputs X122 and X132..................48 6.7.1 Pin assignment..........................48 6.7.2 Technical data..........................50 Dimension drawings ..........................51 Dimension drawing........................51 Mounting..............................53 Safety information ........................53 Installation types .........................
- Page 9 Table of contents Technical Data............................85 Spare Parts/Accessories ......................... 87 11.1 Dual fan/ battery module......................87 11.1.1 Application............................87 11.1.2 Mounting ............................88 11.2 NX10/15 ............................90 11.2.1 Description ...........................90 11.2.2 Operating and display elements ....................92 11.2.3 Interfaces .............................93 11.2.4 Dimension drawing ........................97 11.2.5 Mounting ............................98 11.2.6 Port.............................100...
- Page 10 Table of contents Manual, 03/2010, 6FC5397-0AP10-3BA0...
-
Page 11: Safety Information
Safety Information Danger notices The following notices are intended firstly for your personal safety and secondly to prevent damage occurring to the product described or any connected devices and machines. Non- observance of the warnings can result in severe personal injury or property damage. DANGER Only appropriately qualified personnel may commission/start-up SINUMERIK equipment. - Page 12 Repairs to devices that have been supplied by our company may only be carried out by SIEMENS customer service or by repair centers authorized by SIEMENS. When replacing parts or components, only use those parts that are included in the spare parts list.
-
Page 13: Esd Notices
Safety Information 1.2 ESD notices ESD notices CAUTION The modules contain electrostatically sensitive devices. Discharge yourself of electrostatic energy before touching the components. The easiest way to do this is to touch a conduc- tive, grounded object immediately beforehand (for example, bare metal parts of control cabinet or the protective ground contact of a socket outlet). - Page 14 Safety Information 1.2 ESD notices Manual, 03/2010, 6FC5397-0AP10-3BA0...
-
Page 15: System Overview
Fields of application The SINUMERIK 840D sl can be used worldwide for turning, drilling, milling, grinding, laser machining, nibbling, punching, in tool and mold making, for high-speed cutting applications, for wood and glass processing, for handling operations, in transfer lines and rotary indexing machines, for mass production and JobShop production. -
Page 16: System Configuration
System overview 2.2 System configuration System configuration SINUMERIK 840D sl combines CNC, HMI, PLC, closed-loop control, and communication tasks within a single NCU (Numerical Control Unit). Components For operation, programming, and visualization purposes, the corresponding operating software is already integrated into the CNC software for the NCU and therefore runs on the high-performance NCU multi-processor module. -
Page 17: Variants
● Feed and main spindle motors – 1FT/1FK/1FN/1FW6/1FE1/2SP1 synchronous motors – 1PH/1PM asynchronous motors With the NCU 720.2 PN and NCU 730.2 PN, the SINUMERIK 840D sl is offering integrated PROFINET functionality for the first time. Supported: ● PROFINET CBA functionality... - Page 18 System overview 2.3 Variants The following table shows the essential features of the various Control Units: Table 2-1 Variants Property NCU 710 .2 NCU 720.2/.2 PN NCU 730.2/.2 PN DRIVE CLiQ ports Axes Up to 6 Up to 31 Up to 31 NX10/15 Up to 2 Up to 3/Up to 5...
-
Page 19: Application Planning
If necessary, these interfaces can be isolated safely using a supplementary adapter (insulation voltage 230 V AC). Although these adapters are not included in the Siemens scope of delivery, you can buy these parts from your local dealer, who will be happy to advise you. -
Page 20: Grounding Concept
3.1.2 Grounding concept Components The SINUMERIK 840D sl system consists of a number of individual components which have been designed so that the system complies with the appropriate EMC and safety standards. The individual system components are: ● Numerical Control Unit (NCU) ●... -
Page 21: Ri Suppression Measures
Application Planning 3.1 Secondary electrical conditions Shielded signal line with reference ground Motor Encoder Equipotential bonding conductor Protective conductor Figure 3-1 Grounding concept The following rules apply for external cable cross sections: ● Minimum PA cross section ≥ 10 mm ●... - Page 22 90°), but must never be laid close or parallel to one another. ● Only use cables approved by SIEMENS for the signal lines from and to the Control Unit. ● Signal cables may not be routed close to strong external magnetic fields (e.g., motors and transformers).
-
Page 23: Ambient Climatic And Mechanical Conditions
Application Planning 3.2 Ambient Climatic and Mechanical Conditions ● If signal lines cannot be routed a sufficient distance away from other cables, they must be installed in grounded cable ducts (metal). ● The clearance (interference injection area) between the following lines must be kept to a minimum: –... -
Page 24: Transport And Storage Conditions
Application Planning 3.2 Ambient Climatic and Mechanical Conditions Standard requirements The SINUMERIK 840D sl system components meet the following requirements in terms of standards: Long-term storage EN 60721-3-1 Transport EN 60721-3-2 Stationary operation EN 60721-3-3 Assistance and support Compliance with environmental requirements must be ensured during installation of the complete system. - Page 25 ● Do not open a battery. Replace a faulty battery only with the same type. ● Obtain replacement batteries from Siemens alone (see Ordering data (Page 107)). ● Always try to return low batteries to the manufacturer or deliver these to a registered recycling company.
-
Page 26: Operating Conditions
Application Planning 3.2 Ambient Climatic and Mechanical Conditions 3.2.3 Operating Conditions Climatic ambient conditions If the specified values cannot be maintained, then a heat exchanger or air conditioner must be provided. Table 3-3 Climatic environmental conditions to EN 60721-3-3, Class 3K5 Temperature range 0 ... - Page 27 The user must consider interference radiation for the complete system. Particular attention should be paid to cabling. Please contact your sales representative for assistance and support. If compliance with limit value class C2 is required, please contact your local Siemens sales partner. NOTICE Please see the relevant SINAMICS documentation for EMC notes on how to deal with line filters and reactors.
- Page 28 Application Planning 3.2 Ambient Climatic and Mechanical Conditions Manual, 03/2010, 6FC5397-0AP10-3BA0...
-
Page 29: Description
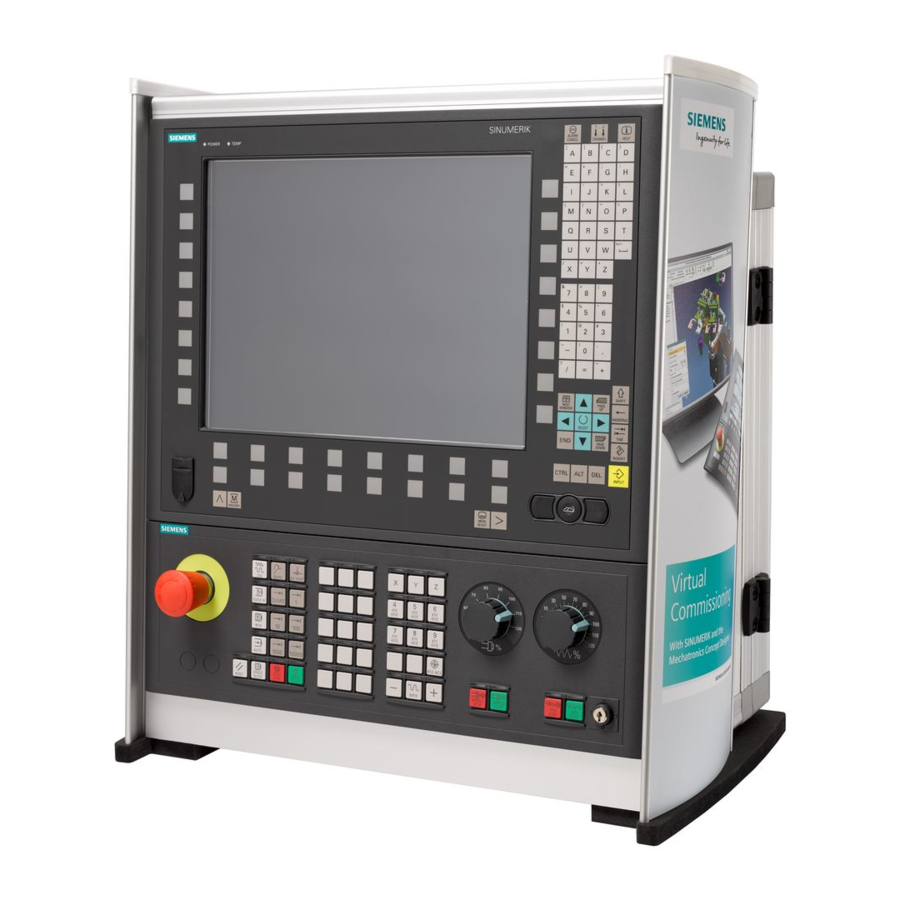
Description Features A Control Unit has the following elements: ● Battery-backed real-time clock ● Slot for a CompactFlash Card ● DRIVE-CLiQ interfaces for connecting to the drive ● Interfaces for operation behind a hinged front cover: – Ethernet ports – 2 PROFINET interfaces for NCU 720.2 PN and NCU 730.2 PN –... - Page 30 Description 4.2 Illustration Figure 4-1 Representation of the NCU 730.2 Manual, 03/2010, 6FC5397-0AP10-3BA0...
- Page 31 Description 4.2 Illustration Control Units with PROFINET The following figure shows an NCU 720.2 PN/730.2 PN with its interfaces and control and display elements (fault LEDs and status indicators). CAUTION The PROFINET interfaces of the integrated PLC 319-3 PN/DP are permanently assigned to the option slot on the "PN NCUs".
-
Page 32: Type Plate
Description 4.3 Type plate Type plate Side-mounted type plate The following figure shows you all the information included on the type plate located on the side of the unit. Figure 4-3 Type plate You might need to access the information provided on the side-mounted type plate after the equipment has been mounted. -
Page 33: Operating And Display Elements
Operating and display elements Overview of operating and display elements NCU 720.2 PN/730.2/730.2 PN Figure 5-1 Position of operator control and display elements Manual, 03/2010, 6FC5397-0AP10-3BA0... -
Page 34: Compactflash Card
Operating and display elements 5.2 CompactFlash Card NCU 710.2/720.2 Figure 5-2 Position of operator control and display elements CompactFlash Card 5.2.1 Properties Application The CompactFlash Card is delivered bootable. It is not supplied with the control unit and must be ordered as a separate component. The CompactFlash Card is inserted in the CF plug-in slot (X109 interface). -
Page 35: Inserting The Compactflash Card
Operating and display elements 5.2 CompactFlash Card As well as the basic software for SINUMERIK and the firmware for SINAMICS, the CompactFlash Card also contains: ● User data (programs, configuration data, parameter settings) ● Version info (serial number, version, type designation) ●... -
Page 36: Led Displays
Operating and display elements 5.3 LED displays LED displays Table 5-1 Meaning of LED states Name Function Status Meaning Ready There is at least one fault (e.g. RESET, watchdog monitoring etc. ) or the Control Unit is booting up. Flashing red/orange Error accessing CompactFlash Card (0.5 Hz) Orange... -
Page 37: Reset Button
Operating and display elements 5.4 RESET button Additional references ● You can find a detailed description of LED states during power-up in the "NCU Operating System (IM7)" section of the Basesoftware and Operating Software Commissioning Manual. ● For information on drive faults and alarms, see also: SINAMICS S120/S150 List Manual (LH1) RESET button Arrangement... -
Page 38: Start-Up And Mode Selector Switch
Operating and display elements 5.6 Start-up and mode selector switch Start-up and mode selector switch Layout The Control Unit has two coding switches in the lower section of the front panel. ● The left switch (labeled SIM/NCK) is the NCK startup switch. Setting during normal operation: "0"... -
Page 39: Interfaces
Interfaces Interface overview Interface overview Table 6-1 Overview of available external interfaces Interface Designation Plug-connector type DRIVE-CLiQ (0) X100 Spec. RJ45 socket DRIVE-CLiQ (1) X101 Spec. RJ45 socket DRIVE-CLiQ (2) X102 Spec. RJ45 socket DRIVE-CLiQ (3) X103 Spec. RJ45 socket DRIVE-CLiQ (4) X104 (only NCU 720/730) Spec. -
Page 40: Power Supply X124
Interfaces 6.2 Power supply X124 Power supply X124 This interface is provided exclusively for connection of the external power supply. See Requirements for the power supply (Page 65). Pin assignment Table 6-2 Power supply X124 Signal name Signal type Meaning Power supply 24 V Ground Signal type: VI = voltage input;VO = voltage output... -
Page 41: Drive-Cliq Interfaces X100 - X105
Interfaces 6.3 DRIVE-CLiQ interfaces X100 - X105 DRIVE-CLiQ interfaces X100 - X105 Properties ● Automatic detection of components ● 24 V/450 mA per DRIVE CLiQ interface is provided for the connection of encoders and measuring systems DRIVE-CliQ pin assignment Table 6-3 DRIVE-CLiQ interface (X100 - X103 or X100 –... -
Page 42: Ethernet Interfaces (X120, X130, X127)
Interfaces 6.4 Ethernet interfaces (X120, X130, X127) Ethernet interfaces (X120, X130, X127) Properties The interfaces are full duplex 10/100 Mbit Ethernet ports. Both ports are connected as an Ethernet terminal. Pin assignment Table 6-4 Ethernet interfaces X120, X130, X127 Signal name Signal type Meaning Output... - Page 43 Interfaces 6.4 Ethernet interfaces (X120, X130, X127) Position of connectors The following figure shows the mounting position and designation of the Ethernet connectors on the module. Figure 6-3 Position of the Ethernet interfaces Manual, 03/2010, 6FC5397-0AP10-3BA0...
- Page 44 Interfaces 6.4 Ethernet interfaces (X120, X130, X127) MAC addresses A type plate for the MAC addresses of the Ethernet interfaces is attached to the front panel of the Control Unit: Figure 6-4 MAC addresses of Ethernet interfaces X120, X130, X127 You can see this type plate when you open the front cover of the Control Units without PROFINET.
-
Page 45: Profinet Interfaces, Ports 1, 2
Interfaces 6.5 PROFINET interfaces, ports 1, 2 PROFINET interfaces, ports 1, 2 Properties The interfaces are full-duplex 100 Mbit Ethernet ports with an integrated 2-port switch and a TCP/IP address for the 2 ports. Figure 6-5 Representation of the PROFINET interfaces NOTICE NCU system software V2.6 with PLC software V2.7 Ports 1 and 2 are freely available for use, but ports 3 and 4 are deactivated. - Page 46 Interfaces 6.5 PROFINET interfaces, ports 1, 2 Position of the ports The 2 ports for the PROFINET connection are in the option slot of NCU 720.2 PN and NCU 730.2 PN. LED displays For diagnostic purposes, the RJ45 sockets are each equipped with a green and an orange LED.
-
Page 47: Profibus-Dp/Mpi Interfaces X126, X136
Interfaces 6.6 PROFIBUS–DP/MPI interfaces X126, X136 You can see this type plate when you open the front cover of the NCU 720.2 PN and NCU 730.2 PN. See also PROFINET cables (Page 70) PROFIBUS–DP/MPI interfaces X126, X136 Properties ● Isolated RS 485 interface ●... -
Page 48: Digital Inputs/Outputs X122 And X132
Interfaces 6.7 Digital inputs/outputs X122 and X132 Position of connectors The following figure shows the mounting position and designation of the connectors on the Control Unit. Figure 6-7 PROFIBUS DP/MPI interfaces Digital inputs/outputs X122 and X132 6.7.1 Pin assignment Position of connectors Figure 6-8 Digital inputs and digital inputs/outputs (interfaces X122 and X132) Manual, 03/2010, 6FC5397-0AP10-3BA0... - Page 49 Interfaces 6.7 Digital inputs/outputs X122 and X132 Pin assignment for X122 and X132 Table 6-9 X122 digital inputs/outputs Signal name Signal type Meaning Digital input 0 Digital input 1 Digital input 2 Digital input 3 Ground for DI0 - DI3 (functionally-separated relative to M) Ground DI/DO8...
-
Page 50: Technical Data
Interfaces 6.7 Digital inputs/outputs X122 and X132 6.7.2 Technical data Digital inputs on X122/X132 Table 6-11 Technical data of digital inputs X122/X132 Parameter Values Voltage -3 V to 30 V Typical power consumption 10 mA at 24 V DC Galvanic isolation Reference potential is terminal M1 or M2 Signal level (including ripple) High signal level: 15 V to 30 V... -
Page 51: Dimension Drawings
Dimension drawings Dimension drawing Figure 7-1 Dimension drawing of Control Unit (dimensions in mm) Manual, 03/2010, 6FC5397-0AP10-3BA0... - Page 52 Dimension drawings 7.1 Dimension drawing Manual, 03/2010, 6FC5397-0AP10-3BA0...
-
Page 53: Mounting
Mounting Safety information Open equipment These modules are open equipment. This means they may only be installed in housings, cabinets or in electrical service rooms that can be entered or accessed exclusively by means of a key or tool. Housings, cabinets, or electrical equipment rooms may only be accessed by trained or authorized personnel. -
Page 54: Installation Types
Mounting 8.2 Installation types Installation types Prerequisite The Control Unit is installed in a control cabinet along with the SINAMICS components. The following prerequisites must be met to install a Control Unit: ● The control cabinet has been installed and wired. ●... - Page 55 Mounting 8.2 Installation types Spacers for mounting on the rear wall of the control cabinet Lugs for mounting directly on the rear wall of the control cabinet (external heat dissipation) Cutouts for lateral mounting on SINAMICS drive group Figure 8-1 Mounting aids Mounting instructions A seal can be provided for segregated heat removal on the Control Unit (apart from...
-
Page 56: Mounting The Control Unit On The Rear Wall Of The Control Cabinet
Mounting 8.3 Mounting the control unit on the rear wall of the control cabinet Mounting the control unit on the rear wall of the control cabinet 8.3.1 Mounting control unit using spacers Introduction Spacers can be used to mount the control unit on a bare-metal highly-conductive rear wall of a control cabinet. - Page 57 Mounting 8.3 Mounting the control unit on the rear wall of the control cabinet 3. Tighten up the three screws on the clip again. 4. Mount the top and bottom of the Control Unit directly on the rear wall of the control cabinet with two M6 screws (6 Nm).
-
Page 58: Mounting The Control Unit For Segregated Heat Removal
Mounting 8.3 Mounting the control unit on the rear wall of the control cabinet 8.3.3 Mounting the Control Unit for segregated heat removal Introduction If you wish to perform segregated heat removal on the NCUs with cooling fins, the NCUs can be mounted directly on the rear wall of the control cabinet without spacers. - Page 59 Mounting 8.3 Mounting the control unit on the rear wall of the control cabinet Procedure 1. Remove the spacers. 2. Fit the seal around the cooling ribs of the Control Unit. 3. Loosen the three M3 screws (0.8 Nm) on the upper clip and push the clip up until the upper hole protrudes beyond the housing.
-
Page 60: Lateral Mounting Of Control Unit On The Sinamics Drive Line-Up
Mounting 8.4 Lateral mounting of Control Unit on the SINAMICS drive line-up Lateral mounting of Control Unit on the SINAMICS drive line-up Introduction The Control Unit can also be mounted laterally on the SINAMICS drive line-up, on the side panel of a SINAMIC S120 Line Module. The required mounting elements are supplied with the Line Module. -
Page 61: Connecting
The following overview shows an example of the various interfaces and their connection options. Note All devices in the SINUMERIK 840D sl and SINAMICS S120 product families appear in Catalog NC 61. SIMATIC products that can be connected to the Control Unit appear in Catalog PM 10. - Page 62 Connecting 9.1 Overview Figure 9-1 Connection options for a Control Unit Manual, 03/2010, 6FC5397-0AP10-3BA0...
-
Page 63: Safety Information For Wiring
Connecting 9.2 Safety information for wiring Safety information for wiring Note the following: Safety information DANGER The system power supply must be disconnected when you wire the control unit. NOTICE If your axis grouping contains a Smart Line Module without DRIVE-CliQ (5 kW or 10 kW), you must assign the Smart Line Module enable signal to digital output X122.1 on the control unit. - Page 64 Connecting 9.3 Opening the front cover Procedure 1. Disengage the release hook on the inside of the front cover (the front cover is open and in the up position). 2. Remove the front cover with a forward motion. Figure 9-2 Removing the front cover Note All cables must be routed vertically upwards to the fullest extent possible so that the front...
-
Page 65: Power Supply
Connecting 9.4 Power supply Power supply 9.4.1 Requirements for the power supply External 24 V power supply Power is supplied to the Control Unit by an external 24 V power supply (e.g., SITOP). The following power consumption values for the Control Units provide a configuration basis for calculating the 24 V DC power supply. -
Page 66: Connecting The Power Supply
Connecting 9.4 Power supply Table 9-2 Requirements of the DC supply Rated voltage According to EN 61131-2 24 VDC Voltage range (average value) 20.4 to 28.8 V DC Voltage ripple peak-to-peak 5 % (unfiltered 6-pulse rectification) Ramp-up time at power-on Non-periodic overvoltages ≤... -
Page 67: Drive Cliq Components
Connecting 9.5 DRIVE CLiQ components Use flexible cables with a cross section of 0.25 to 2.5 mm (or AWG 23 to AWG 13) for wiring the power supply. If you only use one wire per connection, a ferrule is not required. You can use ferrules without an insulating collar in accordance with DIN 46228, Form A long version. -
Page 68: Connectable Drive-Cliq Components
Connecting 9.5 DRIVE CLiQ components 9.5.2 Connectable DRIVE-CLiQ components Components As a rule, all SINAMICS components approved for SINUMERIK can be connected using the DRIVE-CLiQ interface. Table 9-5 Components with DRIVE-CLiQ Component Description Active/Smart Line Module, Line Modules provide the central power supply to the DC link. Booksize Single/Double Motor Motor Modules draw their power from the DC link to supply the... -
Page 69: Ethernet
A crossover cable is required for the direct link between the Control Unit and the TCU. PROFINET 9.7.1 Wiring PROFINET Prerequisite For SINUMERIK 840D sl, a PROFINET system can only be installed with the following Control Units: ● NCU 720.2 PN ● NCU 730.2 PN Manual, 03/2010, 6FC5397-0AP10-3BA0... -
Page 70: Profinet Cables
Connecting 9.7 PROFINET The following communication links can be established via PROFINET interfaces: ● PROFINET CBA: Communication between controllers as components in distributed systems ● PROFINET I/O incl. PROFINET IRTE-FLEX: Communication between the PLC used for control and the field devices (no NCK access to PROFINET I/O) Cable specification For PROFINET, you always require a data transmission rate of 100 Mbit/s (Fast Ethernet) in... -
Page 71: Preparing The Twisted Pair Cables
Connecting 9.7 PROFINET Table 9-8 Connector types for PROFINET Connector Designation Order number IE FC RJ45 plug 145 RJ45 PN connector with angled 6GK1 901-1BB30-0AA0/ exit 6GK1 901-1BB30-0AB0 Table 9-9 Cable types for PROFINET Cable Designation Order number IE FC Cable GP 2 (Type A) 4-wire, shielded TP installation cable for IE FC 6XV1 840-2AH10 RJ45... - Page 72 Connecting 9.7 PROFINET ① ② Strip the IE FC Cable 2x2 using a stripping tool and separate out the cores according to the color coding on the contact cover of the FC RJ45 plug. Open the case cover of the FC RJ45 plug and insert the strands into their respective end positions according to the color coding.
-
Page 73: Example Profinet Cba Configuration
Connecting 9.7 PROFINET Additional references For more information, please refer to: ● The Industry Mall ● The Catalog IK PI ● The manual titled "SIMATIC NET Twisted Pair and Fiber-Optic Networks" (entry ID: 8763736). 9.7.4 Example PROFINET CBA configuration The following figure shows a typical system configuration with PROFINET CBA. Figure 9-4 Example PROFINET CBA configuration Manual, 03/2010, 6FC5397-0AP10-3BA0... -
Page 74: Profibus / Mpi
Connecting 9.8 PROFIBUS / MPI Station name Module type Interface IP address Central NCU 730.2 PN X120 192.168.200.1 Port 1 192.168.200.2 PCU 50.3 X501 192.168.200.5 MPP 483 IE X20 DHCP server 192.168.200.50... Unit01 NCU 730.2 PN X120 192.168.200.11 Port 1 192.168.200.12 Unit02 CPU 319-3 PN/DP... - Page 75 Connecting 9.8 PROFIBUS / MPI Table 9-11 Technical data for PROFIBUS cables Characteristics Values Wave impedance Approximately 135 to 160 Ω (f = 3 to 20 MHz) Loop resistance ≤ 115 Ω/km Effective capacitance 30 nF/km Damping 0.9 dB/100 m (f = 200 kHz) Permissible conductor cross section 0.3 mm to 0.5 mm...
-
Page 76: Connection Components In Profibus
Connecting 9.8 PROFIBUS / MPI 9.8.3 Connection components in PROFIBUS Connection components Individual nodes are connected by means of bus connectors and PROFIBUS cables. Remember to provide a bus connector with a programming port at either end of the subnet. This will give you the option of expanding the subnet if required, for example, for a programming device. -
Page 77: Connecting Profibus Dp
Connecting 9.8 PROFIBUS / MPI Supplementary conditions During laying of the indoor bus cable, you must also consider the following supplementary conditions (d = outer diameter of the cable): Table 9-13 Supplementary conditions for the laying of PROFIBUS cables Features Supplementary conditions Bending radius for a single bend 80 mm (10xd... -
Page 78: Disconnecting Stations From The Profibus
Connecting 9.8 PROFIBUS / MPI 9.8.6 Disconnecting stations from the PROFIBUS Removing the bus connector You can remove the bus connector with a looped-through bus cable from the PROFIBUS DP interface at any time without interrupting data traffic on the bus. WARNING Data exchange on the bus can be interrupted! A bus segment must always be terminated with the terminating resistor at both ends. - Page 79 Connecting 9.8 PROFIBUS / MPI Connector features The bus connector is used to connect the MPI bus cable to the MPI (X136). This enables you to establish connections to additional nodes (e.g. PG or SIMATIC S7-CPU). Only bus connectors with a 35° cable outlet should be used in order to ensure that the front cover can be closed.
-
Page 80: Digital Inputs/Outputs
Connecting 9.9 Digital inputs/outputs Digital inputs/outputs 9.9.1 Application Connecting sensors and actuators Digital inputs and outputs can be used to connect various sensors and actuators to the two 12-pin connectors (X122 and X132) on the front panel. The following types of digital I/O are used: ●... - Page 81 Connecting 9.9 Digital inputs/outputs Block diagram The following figure shows the block diagram for the digital inputs/outputs of a Control Unit. Figure 9-6 Block diagram for digital inputs/outputs Manual, 03/2010, 6FC5397-0AP10-3BA0...
-
Page 82: Connecting Digital Inputs/Outputs
Connecting 9.9 Digital inputs/outputs 9.9.2 Connecting digital inputs/outputs Cable specification Table 9-14 Cable specification for X122 and X132 Characteristics Specification Connector type Screw-type terminals Connection option Up to 0.5 mm Current carrying capacity 4 A max. Connecting cables for digital inputs/outputs The following conditions apply to connecting cables: ●... -
Page 83: Usb
Connecting 9.10 USB Using a shield connection 1. Remove the fixing bracket. 2. Insert the cable and fasten the fixing bracket. This figure shows where to attach the cables to the front panel connector and where to apply the cable interference suppression using the shield connecting element. Figure 9-7 Using a shield connection 9.10... -
Page 84: Measuring Sockets
Connecting 9.11 Measuring sockets Figure 9-8 Position of USB interfaces 9.11 Measuring sockets Application The test sockets are used to output analog signals. Any interconnectable signal can be output to any test socket on the control unit. ● Max. output range of the test signal: 0 to 5 V ●... -
Page 85: Technical Data
Technical Data Table 10-1 General technical data Safety Protection class I (protective conductor) as per EN 61800-5-1 Degree of protection to EN 0529 IP20 or IPXXB with option slot cover or option module inserted Certifications CE, cULus Pollution degree Cooling Open-circuit-ventilated Mounting position Vertical... - Page 86 Technical Data Manual, 03/2010, 6FC5397-0AP10-3BA0...
-
Page 87: Spare Parts/Accessories
Spare Parts/Accessories 11.1 Dual fan/ battery module 11.1.1 Application Functions of the dual fan/battery module The dual fan/battery module can perform the following tasks: ● Cooling the CPU by means of two redundant fans. ● SRAM buffering if the SuperCap is insufficient. The Control Unit monitors the temperature inside the module and the functioning of the fan. -
Page 88: Mounting
Spare Parts/Accessories 11.1 Dual fan/ battery module Battery A 3 V lithium battery can be inserted in the dual fan/battery module. The battery is pre- assembled with an approximately 4 cm long cable with plug connector. The appropriate mating connector is attached to a small circuit board for connection in the dual fan/battery module. - Page 89 Spare Parts/Accessories 11.1 Dual fan/ battery module Proceed as follows Proceed as follows to replace the dual fan/battery module but only observe points 3 and 4 if you want to replace the battery as well: 1. Gently push the dual fan/battery module backwards (by pressing on the pressure point) to release the module from its front interlock (snap-in hooks).
-
Page 90: Description
Properties Using this module, you can expand the performance of an axis grouping of the SINUMERIK 840D sl CNC automation system. Each NX10 can control up to 3 additional axes and each NX15 can control up to 6 additional axes. - Page 91 Spare Parts/Accessories 11.2 NX10/15 Display Figure 11-3 Representation of NX10/15 (without cover) Type plate The NX10/15 module type plate contains basically the same information as the control unit type plate (see Section 4.4). Manual, 03/2010, 6FC5397-0AP10-3BA0...
-
Page 92: Operating And Display Elements
Spare Parts/Accessories 11.2 NX10/15 11.2.2 Operating and display elements LED displays Table 11-1 Description of LEDs on the NX10/15 Color Status Description Electronic power supply outside permissible tolerance range Steady-light signal NX10/15 is ready for operation RDY, Green Blinklight 2 Hz Writing to CompactFlash Card READY Continuous light... -
Page 93: Interfaces
Spare Parts/Accessories 11.2 NX10/15 11.2.3 Interfaces Power supply X124 Table 11-2 Pin assignment for X124 Terminal Function Technical specifications Electronics power supply Voltage: 24 V DC (20.4 V - 28.8 V) Current consumption: max. 0.8 A (without load) Electronics power supply Max. - Page 94 Spare Parts/Accessories 11.2 NX10/15 Table 11-4 Pin assignment for X100 - X103 Signal name Technical specifications Transmit data + Transmit data - Receive data + Reserved, do not use Reserved, do not use Receive data - Reserved, do not use Reserved, do not use + (24 V) Power supply...
- Page 95 Spare Parts/Accessories 11.2 NX10/15 Table 11-6 Pin assignment for X122 Terminal Designation Technical specifications DI 0 Voltage: -3 V to 30 V Typical current consumption: 10 mA at 24 V DC DI 1 Isolation: The reference potential is terminal M1 DI 2 Signal level (incl.
- Page 96 Spare Parts/Accessories 11.2 NX10/15 Figure 11-4 Block diagram for digital inputs/outputs Note The digital inputs/outputs are reserved by the system (terminal assignment). Manual, 03/2010, 6FC5397-0AP10-3BA0...
-
Page 97: Dimension Drawing
Spare Parts/Accessories 11.2 NX10/15 11.2.4 Dimension drawing Figure 11-5 NX10/15 dimension drawing Manual, 03/2010, 6FC5397-0AP10-3BA0... -
Page 98: Mounting
Spare Parts/Accessories 11.2 NX10/15 11.2.5 Mounting Mounting aids Figure 11-6 NX10/15 mounting aids Designs Basically, the NX10/15 is integrated into the SINAMICS drive line-up in exactly the same way as the Control Unit (see Chapter 8, Mounting). ● Lateral mounting of NX 10/15 on the SINAMICS drive line-up ●... - Page 99 Spare Parts/Accessories 11.2 NX10/15 Preferred call sequence: The NX modules should be inserted between the Line Module and the control unit. CAUTION The 80 mm ventilation spaces above and below the components must be observed. Mounting an NX10/15 on another NX10/15 Table 11-7 Mounting an NX10/15 on another NX10/15 Opening the cover.
-
Page 100: Port
Spare Parts/Accessories 11.2 NX10/15 Mounted bracket. Closing the cover. 11.2.6 Port NX10/15 DRIVE-CLiQ topology NX10/15 components can be connected to the control unit via DRIVE-CLiQ. The following rules apply to wiring of the NX10/15: ● Only one star topology is permitted between the NX10/15 and the control unit. This means that only one NX10/15 can be operated per DRIVE-CLiQ port on a control unit. - Page 101 Spare Parts/Accessories 11.2 NX10/15 Table 11-8 NX10/15 PROFIBUS addresses DRIVE-CLiQ port on the NCU Drive PROFIBUS addresses X105 X104 X103 X102 X101 The following figure shows a sample topology: Figure 11-7 NX10/15 topology Additional references For information on commissioning NX components, please refer to the "IBN CNC: NCK, PLC, drive Commissioning Manual".
-
Page 102: Technical Data
Spare Parts/Accessories 11.3 RS 232C (V.24) module COM01 11.2.7 Technical Data Table 11-9 Technical data Parameters Values Input voltage 24 V DC (20.4 – 28.8) Current (without DRIVE-CLiQ or digital outputs) 0.8 A PE/ground connection On housing with M5/3 Nm screw Dimensions (WxHxD) 24.5 x 396 x 226 mm Weight... -
Page 103: Operator Controls And Displays
Spare Parts/Accessories 11.3 RS 232C (V.24) module COM01 Representation of the RS 232C (V.24) module COM01 Figure 11-8 RS 232C (V.24) module COM01 11.3.2 Operator controls and displays LED displays LED H1 is located under the COM port. This can display the following operating states: Table 11-10 LED displays, H1 Color State... -
Page 104: Interfaces
Spare Parts/Accessories 11.3 RS 232C (V.24) module COM01 11.3.3 Interfaces The RS 232C (V.24) module has a standardized serial interface. Properties COM port X491 is opto-uncoupled. Cable specification Table 11-11 Cable specification for COM port X941 Characteristic Specification Connector type 9-pin SUB-D socket;... -
Page 105: Installation/Mounting
Spare Parts/Accessories 11.3 RS 232C (V.24) module COM01 11.3.4 Installation/Mounting CAUTION Option modules should only be inserted and removed when the Control Unit and option module are at zero current. CAUTION Option modules may only be operated by qualified personnel. The ESD notices must be observed. -
Page 106: Tm15 Terminal Module
Spare Parts/Accessories 11.4 TM15 Terminal Module 11.4 TM15 Terminal Module Properties Terminal Module TM15 provides drive-related digital inputs and outputs with short signal delay times. TM15 is connected by means of DRIVE-CLiQ. Each of the 24 isolated DI/O can be parameterized channel-by-channel as a digital input (DI), digital output (DO), measuring input, or output of the output cam. -
Page 107: Dme20 Drive-Cliq Hub Module
Spare Parts/Accessories 11.6 DME20 DRIVE-CLiQ Hub Module 11.6 DME20 DRIVE-CLiQ Hub Module Properties The DME20 DRIVE-CLiQ Hub Module is used to implement point-to-point distribution of a DRIVE-CLiQ line. With the DME20, an axis grouping can be expanded with 5 DRIVE-CLiQ sockets for additional subgroups. - Page 108 Spare Parts/Accessories 11.7 Ordering data Table 11-14 Ordering data for spare parts Spare parts Order numbers Battery 6FC5247-0AA18-0AA0 Seal for segregated heat removal 6FC5348-0AA07-0AA0 Spacer 6FC5348-0AA06-0AA0 Front cover 6FC5348-0AA00-0AA0 Blanking plate 6SL3064-3BB00-0AA0 Cover for optional guide frame 6SL3064-3CB00-0AA0 Blanking cover (50 pcs.) for DRIVE-CLiQ interfaces 6SL3066-4CA00-0AA0 PROFIBUS/MPI plug connector with terminating resistor 6ES7972-0BB41-0XA0...
-
Page 109: Appendix
Appendix Abbreviations American Wire Gauge BERO Proximity limit switch B-MPI Handheld unit with MPI connection CAT5 Quality class (category) for shielded twisted-pair cables. Class 5 states that these cables have a particularly low damping factor, making them suitable for 100 Mbit/s-FastEthernet networks. Component Based Automation: Component Based Automation Computerized Numerical Control Computerized numerical control Central Processing Unit Central processing unit... -
Page 110: Publication-Specific Information
This document will be continuously improved with regard to its quality and ease of use. Please help us with this task by sending your comments and suggestions for improvement via e-mail or fax to: E-mail: mailto:docu.motioncontrol@siemens.com Fax: +49 9131 - 98 2176 Please use the fax form on the back of this page. - Page 111 Appendix A.2 Publication-specific information Manual, 03/2010, 6FC5397-0AP10-3BA0...
-
Page 112: Overview
Appendix A.2 Publication-specific information A.2.2 Overview Manual, 03/2010, 6FC5397-0AP10-3BA0... -
Page 113: Index
Index DME20, 107 DRIVE-CLiQ Assignment, 41 Connectable components, 68 Active Line Module, 68 Dual fan/battery module Actuators, 61 Battery replacement, 89 Air-conditioning Properties, 87 Storage and transport, 24, 26 Ambient conditions, 23 Axes, 17 Axis expansion, 90, 99 EMC Directives, 73 Equipment Open, 53 Equipotential bonding, 21... - Page 114 Index Cable length, 75 Properties, 74 LED displays Rules for cabling, 76 CBE30, 103 PROFIBUS DP interfaces, 47 LEDs PROFINET, 17 Ethernet, 42 PROFINET cables, 70 PROFINET, 46 PROFINET CBA, example configuration, 73 License key, 35 PROFINET interfaces Long-term storage, 24 Pin assignment, 45 MAC addresses, 44, 46 RESET button, 37...
Need help?
Do you have a question about the SINUMERIK 840D sl and is the answer not in the manual?
Questions and answers