Kyosho Mini-z awd ma-010 Instruction Manual
Minimized rc racing car
Hide thumbs
Also See for Mini-z awd ma-010:
- Instruction sheet (2 pages) ,
- Instruction manual (38 pages) ,
- Instruction sheet (2 pages)
Table of Contents
Advertisement
Before beginning assembly, please read these instructions thoroughly.
Anleitung vor Inbetriebnahme aufmerksam lesen!
Veuillez attentivement lire les instructions avant lÕemploi.
Lea este manual de instrucciones antes de utilizar su modelo
Instruction Manual / Bedienungsanleitung / Manuel d'instructions / Manual de Instrucciones
Index / Inhaltsverzeichnis / Index / Indice /
/ PrŽcautions d'emploi / Consejos de Seguridad /
Items included / Inhalt
/ Outils necessaires (non inclus!) / Herramientas necesarias /
Glossary of ain Parts / †bersicht der Hauptteile
/ Glossaire. / Indice de piezas /
Before Operating / Bevor Sie beginnen
Let' s Drive! / Die Inbetriebnahme des odells
/ En piste! / Funcionamiento /
Operating Tips / Hinweise zur Bedienung
/ Conseils d' u tilisation. / Consejos pr‡cticos /
Changing Parts / Der Austausch von Teilen am odell
/ Changement de pieces / Cambio de piezas /
Spare Parts / Ersatzteile
/ Pieces detachees. / Repuestos /
/ EclatŽ / Despiece /
/
© 2005 KYOSHO CORPORATION
ZAWD010K-T11
AWD
MA-010
*Specifications are subject to change without prior notice!
*Technische €nderungen sind jederzeit mšglich!
*Les spŽcifications peuvent changer sans prŽavis!
*El fabricante se reserva el derecho de introducir modificaciones
en los kits sin previo aviso!
init-z I/B
Vol.1
2~5
6~8
9~10
11~12
13~17
18~22
23~24
25~31
32
32~33
34~35
39
40
R
HE FINES RADIO CON ROL MODELS
Advertisement
Table of Contents

Subscribe to Our Youtube Channel
Related Manuals for Kyosho Mini-z awd ma-010


Summary of Contents for Kyosho Mini-z awd ma-010
- Page 1 *Specifications are subject to change without prior notice! *Technische €nderungen sind jederzeit mšglich! *Les spŽcifications peuvent changer sans prŽavis! *El fabricante se reserva el derecho de introducir modificaciones en los kits sin previo aviso! HE FINES RADIO CON ROL MODELS © 2005 KYOSHO CORPORATION ZAWD010K-T11...
-
Page 2: Safety Precautions / Sicherheitshinweise
Lassen Sie das odell niemals auf šffentlichen Stra§en fahren. Prenez des prŽcautions lors de lÕutilisation. Vous seul tes responsable des Žvolutions de votre modle. La sociŽtŽ KYOSHO ou son distributeur ne peuvent en aucun cas tre tenus responsables des accidents pouvant survenir lors de lÕutilisation de ce modle! Tome las precauciones necesarias antes de empezar. - Page 3 As the product includes small and sharp parts, assemble and store this product only in places out of the reach of children. Nicht in KinderhŠnde gelangen lassen! L' a ssemblage de votre INI-Z doit tre fait ˆ l' Ž cart des jeunes enfants. Garder hors de portŽ...
- Page 4 SAFETY PRECAUTIONS / Sicherheitshinweise / PRECAUTIONS D'EMPLOIS / PRECAUCIONES DE SEGURIDAD When not using the model, always switch off the receiver and transmitter. Furthermore, disconnect the batteries and remove them from the model and the transmitter. The batteries might otherwise overheat or leak and damage your model. Nach dem Fahrbetrieb die Batterien / Akkus aus Sender und odell entfernen! Lorsque vous n'utilisez plus votre INI-Z Žteindre le...
- Page 5 Nunca utilice agua, alcohol ni otros productos abrasivos para limpiar la carrocer’a. Utilice un pa–o suave y limpio. Do NOT install any option parts not made by Kyosho for this model. To avoid causing irreparable damage, do NOT attempt any modifications.
-
Page 6: Contenu De Votre Valisette / Contenido
ITEM INCLUDED / Inhalt / CONTENU DE VOTRE VALISETTE / Contenido / Thank you for purchasing the Mini-Z AWD. The items included in this series are divided into the two types below. After checking the contents of the set you purchased, please read the instruction manual carefully. Vielen Dank fuer den Kauf des Mini-Z AWD. - Page 7 Ready Set Chassis Set *Mini-z AWD *Chassis *Das Chassis *Châssis seul *Chasis *Body is included. *Karosserie ist enthalten. *Carrosserie incluse. *Carrocería incluida. *Wheel Nut (Spare) *Pinion Gear Set *Radmutter (for replacement) *ECROU DE ROUES *Ersatz-Zahnräder *Tuerca rueda (repuesto) *Kit de pignon moteur *Piñones suplementarios *Motor Holder *Spring Spacer...
- Page 8 ITEM INCLUDED / Inhalt / CONTENU DE VOTRE KIT / Contenido / Chassis Set *Wheel Set *At time of shipment, chassis is fitted with four N-0 normal width wheels with 0 off-set. *Felgen Set *Das Modell ist seriemaeflig mit N-0 Felgen mit 0 Off-Set ausgestattet. *Jantes *D'origine, le châssis est équipé...
-
Page 9: Required Additional / Erforderliches Werkzeug
Required Additional / Erforderliches Werkzeug / OUTILS NECESSAIRES (NON INCLUS!) / Herramientas necesarias / Chassis Set Chassis Set *Crystal Set *Trannsmitter(Controller) *Quartz *Radiocommande *Juego de Cristales *Emisora for Transmitter for Receiver STE ERI NG TRIM Pour la RADIO Pour le RECEPTEUR para la Emisora para el Receptor TH. - Page 10 Required Additional / Erforderliches Werkzeug / OUTILS NECESSAIRES (NON INCLUS!) / Herramientas necesarias / *4-AAA sized Alkaline Dry Batteries or U -4 sized *AA Alkaline Dry Batteries 8 pieces Ni H (Nickel- etal Hydride) Batteries 4 pieces *8 St. AA Trockenbatterien *4 St.
- Page 11 GLOSSARY OF MAIN PAR S / †bersicht der Hauptteile Ready Set / GLOSSAIRE / INDICE DE PIEZAS / ransmitter / Sender / Radiocommande / Emisora / hrottle rim / rimmung fŸr Gas / rim de gaz / frein / rim Gas To precisely adjust the neutral position Zur Justierung der Neutrallage Permet d'ajuster avec prŽcision la position du neutre...
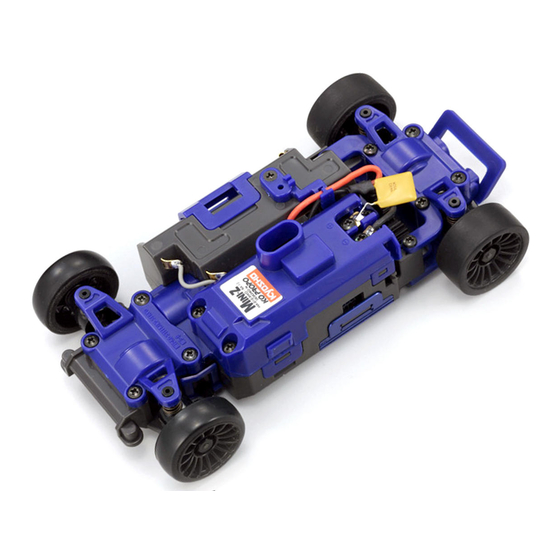
- Page 12 GLOSSARY OF MAIN PARTS / †bersicht der Hauptteile / GLOSSAIRE / INDICE DE PIEZAS / Crystal for Receiver Rear Tire EmpfŠngerquarz Reifen, hinten Quartz d'rŽcepteur Pneu arrire Cristal receptor Neum‡tico trasero Front Tire Reifen, vorn Pneu avant Neum‡tico delantero Chassis Das Chassis Chassis Chasis...
- Page 13 BEFORE OPERA ING / BEVOR SIE BEGINNEN / AVAN DE COMMENCER. / AN ES DE RODAR / Installation of Antenna / Montage der Antenne / Installation de l'antenne / Instalaci—n de la antena Transmitter Antenna enderantenne Antenne d'Žmission Antena emisora Ready Set TEER ING TRIM R MIN...
-
Page 14: Avant De Commencer. / Antes De Rodar
Tuningteilliste auf Seite 30. D'origine, l'empattement du ch‰ssis est "L" (Large). Pour changer l'empattement du ch‰ssis afin d'adapter d'autres carrosseries Kyosho, merci de se rŽfŽrer ˆ la liste des options et ˆ la page 30 sur le rŽglage de l'empattement. - Page 15 Changing Wheels & Tires / Radwechsel STEP3 / Changer de jantes et pneus / Cambio Llantas y Neum‡ticos Refer to Optional Parts List to change wheels and tires to suit the body type (as per P.25 Tires). Siehe Tuningteilliste (Seite 25) fuer passende Reifen und Felgen zu den jeweiligen Karossen. Pour changer de jantes et de pneus en fonction de la carrosserie, se rŽfŽrer ˆ...
- Page 16 BEFORE OPERATING / BEVOR SIE BEGINNEN / AVANT DE COMMENCER. / ANTES DE RODAR / Receiver Antenna EmpfŠngerantenne Antenne de rŽception Antena receptor Caution. Do not screw-in too much. x 5mm TP Screw Achtung, LK Treibschraube Schraube nicht zu stark anziehen! Vis TP x6mm Chassis Set Attention!
- Page 17 AAA Batteries, Notice the polarity to be installed. Loading Battery / DasLaden der Akkus AAA Batterien / Akkus, auf korrekte Polung achten! / Batteries radio / Instalación de las baterÌas Placer les batteries en respectant les polaritÈs. Baterías UM-4, respete la polaridad Battery Holder Akkuhalterung Pinion &...
- Page 18 LET'S RIVE! / IE INBETRIEBNAHME ES MO ELLS / EN PISTE ! / FUNCIONAMIENTO. urn the Power Switch ON. / Modell einschalten / Mettre l'interrupteur en position "ON". / Interruptores Chassis (Switch) Schalter fŸr Modell ransmitter (Switch) Chassis Schalter fŸr Fernsteuerung Antenna Chasis (Interruptor) Conectar Radiocommande...
- Page 19 Neutral How to Control Your Model. / Die Steuerung des Modells neutral / Comment piloter votre modle. / Manejo del modelo. Left Right Neutre links rechts Posici—n Neutral Gauche Droite Izquierda Derecha Steering Wheel / Lenkrad / Volant de direction / Volante Basic Controls Die Lenkung Fonctions ŽlŽmentaires...
- Page 20 LET'S RIVE! / IE INBETRIEBNAHME ES MO ELLS / EN PISTE ! / FUNCIONAMIENTO. Running in a Straight Line / Die Neutrallage der Lenkung / Rouler tout droit. / Para rodar en l’nea recta. Bring the steering wheel to Neutral position. hen, adjust the steering trim until the car moves in a straight line. Senderhebel fŸr die Lenkfunktion auf neutral stellen.
- Page 21 Switching Power OFF / Der Ausschaltvorgang / Mettre l'interrupteur sur "OFF" / Chassis (Switch) ransmitter (Switch) Schalter fŸr Modell Schalter fŸr Fernsteuerung Chassis Radiocommande POWER When switching power OFF, always switch car OFF first. Schalten Sie immer zuerst das Modell aus - dann den Sender! Toujours mettre sur OFF la voiture en premier, puis la radio.
- Page 22 LET'S RIVE! / IE INBETRIEBNAHME ES MO ELLS / EN PISTE ! / FUNCIONAMIENTO. Changing Batteries / Das Wechseln der Batterien / Changer les batteries. / Cambio de bater’as Replace the batteries when the yellow indicator light glows. Transmitter Wechseln Sie die Batterien, wenn die gelbe LED am Sender leuchtet. Sender Remplacer les piles lorsque l'indicateur de charge est JAUNE.
- Page 23 OPERATING TIPS / HINWEISE ZUR BE IENUNG / CONSEILS 'UTILISATION. / CONSEJOS PRACTICOS Hold your elbows in and keep the transmitter antenna pointing straight up. Lassen Sie die Arme leicht angewinkelt und halten Sie die Senderantenne etwa senkrecht nach oben. oujours faire attention ˆ...
- Page 24 OPERA ING IPS / HINWEISE ZUR BEDIENUNG / CONSEILS D'U ILISA ION. / CONSEJOS PRAC ICOS At first, set the teering D/R Adjuster for less response, as shown. teering angle will give teering angle will give you less steering. you more steering. tellen ie den Lenkausschlag zunŠchst so gering wie mšglich ein, Ausschlag kleiner Ausschlag grš§er...
- Page 25 Replacement for each part. / Austausch einzelner Baugruppen / REMONTAGE DE CHACUNE DES PIECES. / Changing Crystal / Quarzwechsel Changer sa fréquence / Cambio de cristales / By using the optional Crystal Set, you can run two or more Mini-Z cars at the same time. Durch den Einsatz unterschiedlicher Quarze, können mehrere Modelle gleichzeitig betrieben werden.
- Page 26 Replacement for each part. / Austausch einzelner Baugruppen / REMONTAGE DE CHACUNE DES PIECES. / Tie-Rod Holder / Spurstangenhalterung / SUPPORT DE BIELLETTES DE DIRECTION. / Soporte tirante / Install. Remove. Montieren, wie dargestellt. Entfernen ASSEMBLER RETIRER. Instalar Desmontar Tie-Rod Holder Spurstangenhalterung SUPPORT DE BIELLETTES DE DIRECTION.
- Page 27 Disassembling Front & Rear Suspension / Demontage der Achsen / DE ONTAGE DE LA SUSPENSION AVANT ET ARRIERE / Suspensi—n Delantera y Trasera Universal Swing Shaft Kardanwelle Rear Upper Cover Cardan homocinŽtique Hintere Abdeckung Palier cardan Protection supŽrieure arrire Soporte trasero superior Suspension Spring Front Upper Cover Feder...
- Page 28 Replacement for each part. / Austausch einzelner Baugruppen / REMONTAGE DE CHACUNE DES PIECES. / Remove a otor / Der Ausbau des otors / RETIRER LE OTEUR / Sustituci—n del motor / Remove batteries first. Allow motor to cool down before beginning any work. Zuerst die Zellen ausbauen.
- Page 29 Replacement of the Pinion Gear. / Der Wechsel des Motorritzels / CHANGEMENT DU PIGNON MOTEUR. / Sustitución del piñón / The rate of acceleration and maximum speed can be adjusted by changing the pinion and spur gears. Refer to the table below for Motor Holder, Pinion Gear &...
- Page 30 Replacing Parts / Austausch einzelner Baugruppen / REMONTAGE DE CHACUNE DES PIECES. / Adjustment of Wheelbase / Justierung des Radstandes Empattement ajsutable / Ajuste de la distancia entre ejes *It is possible to vary the motor mounting place according to the kind of shape of car-body. *Die Position des Motors kann je nach Karosserie verändert werden*Il est possible de varier la position du moteur.
- Page 31 How to complete the wiring. / Die Verkabelung / COMMENT CABLER LA MR015. / Colocación de los cables Connect the wires as shown in the drawing. Stellen Sie die Kabelverbindungen her, wie dargestellt. SUIVRE SCRUPULEUSEMENT LE SCHEMA DE CABLAGE. Coloque los cables tal y como muestra el dibujo Steering Servo Volume Wires Power Wires for Circuit Board (Red) Kabel des Lenkservos...
-
Page 32: Exploded View / Explosionszeichnung
Shield Bearing (6 x 10 x 3 mm) 2pcs. D004 1050 D003 BRG022 Servo Gear Set Z8-1 Servo Gear Shaft Set D003 Z8-3 Potentiometer Z8-4 Antenna Set D003 The optional parts should be used for the parts marked with © 2005 KYOSHO CORPORATION... - Page 33 When using Spare Parts Z10, bend it as illustrated and then install. Refer to the data table of the attached optional parts list Bei Verwendung von Z-10, for D size. D011 biegen wie dargestelllt und erst Siehe auch die Tuningteilliste dann montieren.
- Page 34 ROUBLE SHOO ING / Problembehandlung / EN CAS DE PROBLEME / GUIA DE PROBLEMAS / Problem / Problem Cause / Ursache Correction / Beheben des Fehlers Problme / Problema Cause / Causa Solution / Soluci—n Transmitter or chassis power switch is Switch power on as per Instruction not ON.
- Page 35 Problem / Problem Cause / Ursache Correction / Beheben des Fehlers Problme / Problema Cause / Causa Solution / Soluci—n ake adjustment as per Instruction Steering Trim is not adjusted correctly. anual P.20. Die Lenktrimmung ist nicht korrekt eingestellt. Bitte Lenktrimmung justieren, wie auf Seite Les trims de drirection de la radio sont 20 beschriebnen.
- Page 36 MEMO...
- Page 38 1999/5/CE qui lui sont applicables. La dŽclaration de conformitŽ peut tre consultŽe ˆ l'adresse suivante: www.kyosho.fr/rtte-doc.htm *Por medio de la presente KYOSHO declara que este producto cumple con los requisitos esenciales y cualesquiera otras disposiciones aplicables o exigibles de la Directiva 1999/5/CE.
Need help?
Do you have a question about the Mini-z awd ma-010 and is the answer not in the manual?
Questions and answers