Advertisement
Quick Links
Advertisement

Related Manuals for Kusam-meco 8010


Summary of Contents for Kusam-meco 8010
- Page 1 TEMPERATURE / HUMIDITY /DEW POINT METER Users Manual...
- Page 2 ■. Introduction Thank you for purchasing the temperature/humidity/dew point meter from us. Please take a few minutes to browse through this user manual before you begin to operate the meter to ensure that you are fully familiarized with how best to operate the meter as accurately and safely as possible.
- Page 3 1. Don't touch the humidity sensor. 2. Don't expose the sensor to direct light, this causes a false reading. 3. Never store the product together with solvents, acides or other aggressive substances. 1.1.2 Maintaining the product Do not measure at a high temperature places. ...
- Page 4 ■. Features 1. Display: 4 digits LCD Display 2. Parameters: ℃, ℉, %RH(relative humidity), td(dew point temperature) 3. Resolution: 0.1℃, 0.1℉, 0.1%RH 4. Range: -10 ~ +50℃, +14 ~ +122℉, 0 ~ +100%RH 5. Accuracy: ±1.0℃, ±1.8℉, ±3%RH(5~95%RH) 6. Sample rate: 1 time /sec 7.
- Page 5 11. Accessories: DC1.5V (AAA) x 3pcs String x 1pcs Users manual x 1pcs...
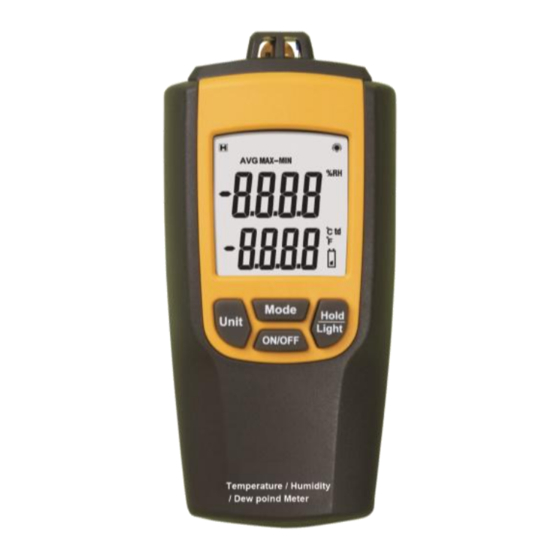
- Page 6 ■. Names of parts Instrument Familiarization 1. Sensor cover 2. Sensor 3. LCD display 4. Function key Mode Hold Unit Light ON/OFF Temperature/Humidity /Dew point Meter LCD Display...
- Page 7 The meaning of the symbols represented by the following: 1. Indicating it is now in the data-holding state 2. Indication to back light 3. Display zone 4. Display zone 5. Maximum / Minimize 6. Humidity units 7. Temperature units 8. Indication to low voltage of the batteries ■.
- Page 8 *NOTE: In order to ensure the accuracy of the measurement readings, all the interference sources which may affect the measurement results about temperature and humidity (such as the hand) must be away from the sensor. 1. Put the instrument with enough battery power in the hand, press the ON/OFF key to turn the power on and enter into the measuring mode.
- Page 9 When the meter is power on, press key >2sec. the back light will be turned on, and the icon will display on the LCD. Press the key once >2sec. the light will be turned off, and the icon will disappeared. If you still need more operations, please see the description of function keys.
- Page 10 ■. Function keys 1. ON/OFF key Press the key to turn the power ON and press the key once more >2sec. to turn the power OFF. 2. Mode key Press the key can select the state of MAX、MIN. LCD will display the max/min values since the instrument was last switched on or last reset.
- Page 11 readout held in. Press the key once more to cancel the hold function. Press the key >2sec. the back light will be turned on, and the icon will display on the LCD. Press the key once >2sec. the light will be turned off, and the icon will disappeared.
-
Page 12: Cleaning Instructions
1. CLEANING INSTRUCTIONS The meter may be wiped down with a wet sponge or cloth using a mild water based detergent or anti-bacterial soap and rinsed under a gentle stream of cold water. NOTE: This unit is not designed for complete submersion or washing in water. - Page 13 (AAA). Replace the battery cover.
Need help?
Do you have a question about the 8010 and is the answer not in the manual?
Questions and answers