
Related Manuals for Phottix Laso


Summary of Contents for Phottix Laso
- Page 1 Phottix Laso TTL Flash INSTRUCTION MANUAL Trigger for Canon INSTRUCTION MANUAL Laso 说明书 Simp 說明書 Trad...
- Page 2 The product is classified as Class 3R laser product, according to the following standards IEC/EN 60825-1 "Radiation Safety of Laser Products." Class 3R: A Class 3R laser is considered safe if handled carefully, with restricted beam viewing. With a class 3R laser, the MPE can be exceeded, but with a low risk of injury.
- Page 3 Thank you for purchasing a Phottix approaches including E-TTL II/E-TTL, Manual, MULTI, Ext.A and Linked Shooting. Product Note: Before using the Phottix Laso TTL Flash Trigger for Canon, please read this instruction Warnings manual carefully, while also referring to the 1.
- Page 4 (1) This device may not cause harmful interference, and (2) this device must 7. Interference: The Phottix Laso wireless accept any interference received, including trigger transmits radio signals at 2.4GHz. Its interference that may cause undesired performance can be affected by electrical operation.
- Page 5 INSTRUCTION MANUAL device, pursuant to Part 15 of the FCC equipment and Receiver. Rules. These limits are designed to provide -- Connect the equipment into an outlet on reasonable protection against harmful a circuit different from that to which the interference in a residential installation.
-
Page 6: Table Of Contents
Table of Contents I. Parts ----------------------------------------------------------------------------------------------------------------------8 II. Preparation Before Use ------------------------------------------------------------------------------------------10 III. The LCD Display---------------------------------------------------------------------------------------------------17 IV. Wireless Flash Shooting: Radio Transmission-----------------------------------------------------------21 1. Wireless Flash Setting-------------------------------------------------------------------------------------------22 2. ETTL: Fully Automatic Wireless Flash Shooting-----------------------------------------------------------27 3. Using Fully Automatic Wireless Flash-----------------------------------------------------------------------29 4. ETTL: Wireless Multiple Flash Shooting with Flash Ratio-----------------------------------------------33 5. - Page 7 INSTRUCTION MANUAL 7. Gr: Shooting with a Different Flash Mode for Each Group---------------------------------------------41 8. Linked Shooting --------------------------------------------------------------------------------------------------44 V. Setting Transmitter Functions with Camera Operations ---------------------------------------------47 VI. Customizing the Transmitter----------------------------------------------------------------------------------51 1.C.Fn: Setting Custom Functions-------------------------------------------------------------------------------52 2.P.Fn: Setting Personal Functions ------------------------------------------------------------------------------55 VII. Trouble Shooting Guide ---------------------------------------------------------------------------------------57 VIII.
-
Page 8: Parts
I. Parts 1. <LINK> indication light: Radio transmission confirmation lamp 2. LCD panel 3. Function Button 1 4. Function Button 2 5. Function Button 3 6. <MODE>: Flash mode button 7. < >: Charge lamp/Test flash button 8. < >: Select/Set button 9. - Page 9 INSTRUCTION MANUAL 13. < >: Linked shooting button 14. Power button 15. Flash exposure confirmation lamp 16. Lock-release button 17. USB port 18. Remote release terminal 19. Contacts 20. Mounting foot 21. Locking pin 22. AF assist light...
-
Page 10: Ii. Preparation Before Use
II. Preparation Before Use Installing the Batteries 1. Press the battery compartment cover and slide it left as shown to open the battery cover. (See Picture 1) Picture 2 2. Insert the batteries as shown. Make sure the “+” and“-”battery contacts are correctly oriented as shown. - Page 11 Attaching and Removing the Phottix Laso Transmitter Attaching the Phottix Laso Transmitter to the camera hot shoe: 1. Turn off the camera and Phottix Laso Transmitter 2. Align the Phottix Laso Transmitter hot shoe Picture 3 with camera’s hot shoe mount.
- Page 12 Checking the Version Info of the Phottix Laso Transmitter You can check the present firmware version Picture 4 information on Phottix Laso Transmitter: While pressing the power button to turn on the Transmitter, press the flash < > Turn on/off the Phottix Laso...
- Page 13 Laso Transmitter supports remote release for remote release. (remote control shooting) from a flash set or Phottix Laso Receiver as a slave unit. For Test Flash from a Slave Unit operations, see the flash or Phottix Laso Receiver’s instruction manual.
-
Page 14: Modeling Flash
1. Modeling Flash from a Master Unit AF Assist Light When the camera’s depth-of-view In low light/contrast situation, the Phottix Laso preview button is pressed, the flash will Transmitter’s built-in Auto Focus Assist Light fire continuously for 1 sec. This is called will illuminate to assist with AF. -
Page 15: Memory Function
Memory Function You can return the settings for wireless shooting to their default settings. Phottix Laso Transmitter supports memory Press function button 2 and 3 simultaneously function. You can save the wireless settings and for 2 seconds or longer, the Transmitter setting recall the setting later. -
Page 16: Menu Functions
MENU Functions FEB level ±3EV(in 1/3-stop increments) Flash exposure ±3EV(in 1/3-stop increments) compensation C.Fn function C.Fn 01~22, P.Fn 01~08 RATIO A:B C A:B ratio setting: RATIO A:B 1:8, in 1/2-stop ETTL RATIO OFF increments Flash ratio RATIO A:B:C M/Multi RATIO A:B RATIO OFF Scan the radio reception status and set the master Scan function... -
Page 17: The Lcd Display
1~100times, based on the frequency and flash output flash number III. LCD Display Phottix Laso Transmitter’s LCD display comes can switch the LCD to display LINKED SHOT. with five modes: ETTL, M, MULTI, Gr and Different display settings come to perform LINKED SHOT. - Page 18 1. ETTL/ETTL II Autoflash : High speed sync; : Sync E-TTL II/E-TTL autoflash speed warning : Radio transmission : Beep wireless shooting : Flash exposure : FEB compensation and flash and FEB exposure compensation sequence Ch: Channel; amount AUTO: Channel automatic setting RATIO: RATIO OFF,...
-
Page 19: En Instruction Manual
INSTRUCTION MANUAL 2. Manual Flash 3. Stroboscopic Flash MULTI: Multi (Stroboscopic) Flash frequency M: Manual Manual Flash Output Number of flashes... - Page 20 4. Group Firing 5. Linked Shooting LINKED SHOT: : SLAVE, Slave unit; Gr: Firing Group Linked Shooting MASTER, Master unit; Three flash modes optional: ETTL、M、Ext.A Note: 1) The display will show only the settings currently applied. 2) The functions displayed above...
-
Page 21: Wireless Flash Shooting: Radio Transmission
INSTRUCTION MANUAL Wireless Flash Shooting function buttons 1 to 4, such as , change according to the Using a Transmitter and Canon radio-enabled settings’ status. Speedlites makes it easy to shoot with 3) When a button or dial is operated, the advanced wireless multiple flash lighting, in the LCD panel illuminates. -
Page 22: Wireless Flash Setting
1. Master unit setting: Check that Note: is displayed. 1) When using the Phottix Laso Receiver as slave unit, restrictions will apply to parts of its 2. Slave unit setting: For the slave unit setting, functions and operations. For details, see the... - Page 23 INSTRUCTION MANUAL 3. Transmission Channel/Wireless Radio ID Settings: To avoid interference with wireless multiple flash systems using radio transmission that are used by other photographers or with other devices that use radio waves (wireless), you can change the transmission channel and wireless radio ID. Use the following procedures to set the master unit’s transmission channel and wireless radio ID.
- Page 24 4. Scanning the Master Unit Transmission Channels to Set > button to finish the setting. Phottix Laso Transmitter is able to scan the 3.3 Set wireless radio ID: Press function radio reception status and set the master button 2 corresponding to , turn <...
- Page 25 INSTRUCTION MANUAL 4.1 Scanning while “AUTO” is set: Press function button 4 to display and then function button 3 corresponding . The channel is reset to one 4.2 Scanning while Ch.1 to 15 is set: with a good reception signal. Press function button 4 to display and then function button 3 corresponding .
- Page 26 press< >button to return to shooting-ready state. The color of < >lamp changes depending on the transmission status of the master unit and the slave unit. Note: 1) If the transmission channels of the master unit and slave unit are different, the slave unit will not fire.
-
Page 27: Ettl: Fully Automatic Wireless Flash Shooting
1. Autoflash Shooting Using One Slave Unit unit. For slave units that use Phottix Laso 1.1 Set the flash as the slave unit: For the Receiver, flashes on the Receiver need not... - Page 28 When the flash that is set to wireless normal flash shooting. If a standard flash slave mode is ready, the AF-assist beam exposure was obtained, the flash exposure emitter blinks at 1-second intervals; confirmation lamp lights up (blue) for 2 sec.
-
Page 29: Using Fully Automatic Wireless Flash
INSTRUCTION MANUAL Using Fully Automatic Wireless Flash Flash exposure compensation and other settings set on the Phottix Laso Transmitter (master unit) will be automatically set in the flash (slave). You don’t need to operate the slave unit. 1. Flash Exposure Compensation... - Page 30 set to 1/2-stop increments, flash exposure is displayed and flash compensation will be up to ±stops in 1/2- compensation amount is highlighted. stop increments. 1.3 Set the flash compensation amount: Turn< > to set the flash compensation 2. FEB amount, and press < >button.
- Page 31 INSTRUCTION MANUAL 2.1 Press function button 4 until displayed. 2.2 Press function button 3 corresponding is displayed and the FEB level display is highlighted. 2.3 Set the FEB level: turn< > to set FEB level and press < > button. 2.4 ”0.3”indicates 1/3 stops, and”0.7”indicates 2/3 stops.
- Page 32 Note: 1) You can choose whether or not to cancel FEB automatically after shooting three shots with FEB by setting C.Fn03. 2) You can change the order of FEB sequence by setting C.Fn04. 3. High-speed Sync With the high-speed sync function, the flash can synchronize with all shutter speeds.
-
Page 33: Ettl: Wireless Multiple Flash Shooting With Flash Ratio
INSTRUCTION MANUAL 3.1 Press function button 4 until preparing multiple cameras with master units displayed. attached, you can shoot by changing cameras while keeping the same lighting (slave units). 3.2 Press function button 2 corresponding Note that when using two or more master will be displayed on the units, the color of the <... - Page 34 lighting balance (flash ratio). The exposure is controlled automatically so that the total flash output of firing group A and group B results in the standard exposure. 1.1 Set the firing group of the slave units Operate and set the slave unit group one by one.
- Page 35 INSTRUCTION MANUAL 1.3 Set the flash ratio: Press function button 3 corresponding to , and again press the function button 3 while it is corresponding to , turn < > to set the flash ratio and press < >button. Press function button 4 corresponding to to return to shooting-ready state.
- Page 36 method is the same as “Autoflash Shooting with Two Slave Groups”. At the ratio mode , group A and B can be set by flash ratio. Group C is independent with its flash output level assigned by the camera. 2.1 Set a flash as firing group C: For the slave unit settings, see the flash’s instruction manual.
- Page 37 INSTRUCTION MANUAL Press function button 3 corresponding to , turn < > and press function . Again button 3 corresponding to turn < > and press < > button to set the flash exposure compensation amount for group C. Press function button 4 corresponding to to return to shooting-ready state.
-
Page 38: M:wireless Multiple Flash Shooting With Manual Flash Output
Simply set an additional slave unit to the firing group (A, B or C)whose flash output you want to increase. You can increase the number of slave units up to 15 units in total. For example, if you set a firing group with three slave units to A, the three units are controlled as a single firing group A with a large flash output. - Page 39 INSTRUCTION MANUAL 1.Press < > button to set the flash mode to < >. 2.Set the number of firing group: While is displayed, press function button 2 corresponding to to set the groups to fire. The setting changes as follows each time pressing the button: 4.Set the flash output: Press function button 3 , turn ALL( A/B(...
-
Page 40: Multi
MULTI: Stroboscopic Flash Stroboscopic flash is an advanced manual flash shooting method. When using stroboscopic flash with a slow shutter speed, you can shoot multiple successive movements within a single picture, similar to stop-motion pictures. In stroboscopic flash, set the flash output, number of flashes, and flash frequency (number of flashes per second = HZ). -
Page 41: Gr: Shooting With A Different Flash Mode For Each Group
1) High speed sync function is not available a single group. The function is for advanced when using stroboscopic flash. users. 2) Phottix Laso Receiver does not support 1. Set the flash mode to < > MULTI mode. Press <... - Page 42 the slave units. For slave unit settings, see Repeat step 3 to set the flash mode. the flash or wireless Receiver’s instruction manual. 3. Set the flash mode Set the flash mode of each firing group by operating the master unit. While is displayed, press function button corresponding to...
- Page 43 INSTRUCTION MANUAL 4. Set the flash output or flash exposure compensation amount While a firing group is selected, press function button 3, turn < > to set the flash function corresponding to the flash mode, and press < > button. When using the <...
-
Page 44: Linked Shooting
This is convenient when you want to shoot a subject from multiple angles at the same time. To shoot with linked shooting, attach Phottix Laso Transmitters to the cameras. Besides, you can choose to use Canon Speedlites that... - Page 45 INSTRUCTION MANUAL Linked shooting setting 1. Set to linked shooting mode Press and hold linked shooting button until is displayed. Linked shooting mode’s “Slave unit” is set; Press linked shooting button again to set “Master unit” of linked shooting mode. 2.
- Page 46 When pressing linked shooting button to 3 corresponding to , turn < > change the setting of a unit from “Slave unit” to select the digit to be set, and press to “Master Unit”, the other Transmitter (or < > button. Again turn < >...
-
Page 47: Setting Transmitter Functions With Camera Operations
INSTRUCTION MANUAL < > lamp of slave unit briefly lights terminal EOS, shutter release cable will orange. be needed for linked shooting. 7. Press function button 1 corresponding to 2. Shooting with manual focus is on master unit will release the shutter recommended for the slave unit cameras. - Page 48 1.3 Select an item and set the function. (The manual. (Examples displayed are EOS 6D menu setting screen varies depending on the screen) camera) 1. Phottix Laso Transmitter Function Setting 2.Settings Available in [Flash function settings] 1.1 Select [External Speedlite control] or[Flash control].
- Page 49 INSTRUCTION MANUAL...
- Page 50 (*For EOS digital camera released since 2012). (setting) Clear Speedlite function You can restore Phottix Laso Transmitter to their default settings settings 3. Transmitter Custom Function Settings The displayed contents vary depending on the camera. If C.Fn-20 and 22 are not displayed, set them by operating the Transmitter.
-
Page 51: Customizing The Transmitter
INSTRUCTION MANUAL enable or disable Auto IDLE for Phottix Laso Transmitter by operating the Camera menu option. VI. Customizing the Transmitter 3.1 Select[Flash C.Fn settings]or[External flash C.Fn setting] Phottix Laso Transmitter supports Custom function (C.Fn) and Personal Function ( P.Fn) 3.2 Select the Custom Function number... -
Page 52: C.fn: Setting Custom Functions
C.Fn: Setting custom functions. custom function, press function button 2 corresponding to , and press function 1.Press function button 4 until button 1 corresponding to . To displayed on the screen. cancel the operation, press function button 4 2.Press and hold the function button 1 corresponding to corresponding to until Custom... - Page 53 Custom Functions Setting No. Setting and descriptions Function No. Enable Auto IDLE when the Phottix Laso Transmitter is not operated for 5min., C.Fn 01 : Auto IDLE Disable Auto IDLE when the Phottix Laso Transmitter is not operated for 5min., Press the camera’s depth-of-field...
-
Page 55: P.fn: Setting Personal Functions
INSTRUCTION MANUAL P.Fn: Setting personal functions 1. When Custom Function screen is displayed, function, set it in the same way as step 6 for press function button 1 corresponding to custom function. to display Personal Function screen. 2. Set the personal function in the same way as step 3 and 4 for the custom function. - Page 56 You can adjust the contrast of the LCD panel in 5 levels. P.Fn 01 display contrast When the Phottix Laso Transmitter is set as master unit(radio transmission wireless shooting, linked shooting), select green as color of the LCD panel illumination.
-
Page 57: Vii. Trouble Shooting Guide
INSTRUCTION MANUAL Upgrading firmware by USB 2.1 Check if the slave unit supports radio transmission wireless flash The firmware of the Phottix Laso Transmitter 2.2 Set the slave unit to < >< >. can be upgraded using the included USB 2.3 Set the transmission channels and... -
Page 58: Viii. Technical Specification
VIII. Technical Specification... - Page 59 INSTRUCTION MANUAL...
- Page 60 Please note: Product specifications and external design are subject to change without further notice.
- Page 61 INSTRUCTION MANUAL Accessory List Phottix Laso Transmitter 1 PC AA Battery 2 PCS USB Cable 1 PC Manual 1 PC Firmware Notice Card 1 PC Warranty Card 1 PC QC Certificate 1 PC *Please check the package according to the accessory list.
- Page 62 该产品属于 Class 3R 级激光产品,根据下 列标准 IEC 60825-1/GB 7247.1 “激光产 品的辐射安全”。 Class 3R: 该等级的激光不直接观测时是安 全的。该等级的激光可能超出 MPE,但一般 不会造成伤害。该等级的可见光连续波激光 器功率不能超过 5mW。...
- Page 63 说明书 Simp 感谢您购买 Phottix 产品 安全须知 注意:在使用 Phottix Laso 无线引闪器 For 1. 本产品属精密电子仪器, 请注意防潮防尘。 Canon 前,请务必通读本使用说明书和相机 2. 安装本产品时请务必关闭所有装置电源。 及闪光灯等相关设备的使用方法,以保证您 熟悉操作,正确使用。 3. 请勿摔落或碰撞本产品。 4. 请勿在易爆易燃或高温环境中使用本产品。 无线引闪器 For Canon/ 发射器 5. 请勿用化学或有机溶剂清洁机身 , 请用柔 软干净的布或镜头纸对其外表面进行擦拭。 Phottix Laso 发射器是无线闪光拍摄用信号 6. 长时间不使用引闪器时,请将电源关闭并 发射器,最多可以控制 5 个从属组(15 个单...
- Page 64 的影响。如果您的引闪器不能被触发,请稍 科学及医疗用电波辐射性电机设备之干扰。 微移动它的位置。 依据低功率电波辐射性电机管理办 法 : 第十二条经形式认证合格之低功率射频电机, 非经许可,公司、商号或用户均不得擅自变 更频率,加大功率或变更原设计之特性及功 能。 第十四条低功率射频电机之使用不得影响飞 航安全及干扰合法通信:经发现有干扰现象 时,应立即停用,并改善至无干扰时方得继 续使用。 前项合法通信,指依电信规定作业之无线电 信。 低功率射频电机须忍受合法通信或工业、...
- Page 65 说明书 Simp 目 录 一 . 部件名 -----------------------------------------------------------------------------67 二 . 使用前准备 ------------------------------------------------------------------------69 三 . 液晶屏显示内容 -------------------------------------------------------------------75 四 . 无线闪光拍摄:无线电传输 ------------------------------------------------ -------79 1. 无线设置 ------------------------------------------------------------------------80 2. ETTL:全自动无线闪光拍摄 ----------------------------------------------------84 3. 使用全自动无线闪光 ------------------------------------------------------------85 4. ETTL:使用闪光光比的无线多重闪光拍摄 --------------------------------------90 5. M:使用手动闪光输出的无线多重闪光拍摄 -------------------------------------93 6. MULTI:频闪闪光 --------------------------------------------------------------95...
- Page 66 7. Gr:为各组设定不同的闪光模式进行拍摄 --------------------------------------- 96 8. 联动拍摄 ------------------------------------------------------------------------99 五 . 相机操作设定无线引闪器功能 ------------------------------------------------------102 六 . 自定义信号发生器 -----------------------------------------------------------------106 1. C.Fn:设定自定义功能 ---------------------------------------------------------106 2. P.Fn:设定个性化功能 --------------------------------------------------------- 110 七 . 故障诊断 -------------------------------------------------------------------------- 112 八 . 规格参数 -------------------------------------------------------------------------- 113...
-
Page 67: 一 . 部件名
说明书 Simp 一 . 部件名称 1.<LINK> 指示灯 : 无线电传输确认指示灯 2. 液晶显示屏 3. 功能按钮 1 4. 功能按钮 2 5. 功能按钮 3 6. <MODE>:闪光模式按钮; 7. < >:充电指示灯 / 测试闪光按钮 8. < >:选择 / 设置按钮 9. < >: 选择拨盘 10. 固定座锁定杆 11. 电池仓 12. - Page 68 14. 电源按钮 15. 闪光曝光确认指示灯 16. 锁定释放按钮 17. USB 端口 18. 遥控释放端子 19. 电子触点 20. 固定座 21. 锁定销 22. 自动对焦辅助灯...
-
Page 69: 二 . 使用前准备
说明书 Simp 二 . 使用前准备 装入电池 1. 按住 Phottix Laso 发射器电池盖 , 依所示 方向打开电池盖。(如图一) 图二 2. 按图所示插入 AA 电池,注意确保电池 的 +/- 朝向正确(注:请使用两节 AA 型 碱性电池或 AA 型镍氢电池)。(如图二) 图一 3. 放回电池盖,并往后推至锁紧的位置。... - Page 70 钮的同时将锁定杆滑动到最左侧。 (如图四) 1. 关闭相机和 Phottix Laso 发射器。 2. 将 Phottix Laso 发射器滑出相机热靴 2. 将 Phottix Laso 发射器热靴与相机热靴 对准。 3. 滑动 Phottix Laso 发射器使其完全插入 相机热靴。 4. 滑动锁定杆到右侧直至发出咔哒声将 Phottix Laso 发射器锁定到位。(如图三) 图四 开启 / 关闭 Phottix Laso 发射器 1. 开启:长按电源按钮直至菜单界面出现 在液晶屏上。 图三...
- Page 71 试闪光 换电池。 从从属单元进行遥控释放 在 Phottix Laso 发射器上查询版本 信息 在无线拍摄期间,Phottix Laso 发射器支 持从从属单元进行遥控释放,可以从设为从 可以在 Phottix Laso 发射器查询当前的版本 属单元的闪光灯或 Phottix Laso 接收器进 信息 : 长按“电源按钮”开启 Phottix Laso 行遥控释放(遥控拍摄)。有关操作,请参 发射器的同时按下“< > 按钮”直至 见闪光灯或 Phottix Laso 接收器的使用说 液晶屏上显示版本信息。 明书。 当使用此功能拍摄时,根据相机的不同,可 < > 充电指示灯 / 测试闪光按钮...
- Page 72 2. 对于上述以外的兼容 E-TTL II/E-TTL 当按相机的景深预视按钮时,闪光灯连续闪 自动闪光并具有 N3 型遥控端子的 EOS 光 1 秒钟。此功能称为造型闪光。该功能 相机,则需要“快门线”(另售)才能 使您能够查看被摄体上的闪光灯光影效果 从从属单元进行遥控释放。 及照明平衡。此外,按 Phottix Laso 发射 器测试闪光按钮触发造型闪光(需在自定义 功能 C.Fn 02 预先设定)。 从从属单元进行测试闪光 2. 从从属单元进行造型闪光 在无线拍摄期间可以从设为从属单元的闪光 使用 2012 年开始发售的 EOS 数码相机时, 灯进行测试闪光。有关操作,请参见闪光灯 可以从从属单元的闪光灯进行造型闪光。有 的使用说明书。 关操作,请参考闪光灯的使用说明书。 注意:当两个或两个以上单元设为主控时, < > 指示灯以亮绿灯的主控单元进行...
- Page 73 说明书 Simp 清除 Phottix Laso 发射器设置 且此对焦辅助灯为激光灯, 定向性好, 衰减少 , 效果显著。自动对焦灯功能可以设置为开启 可以将 Phottix Laso 发射器设置恢复为其默 或关闭(在个性化功能 P. Fn 08 中设置)。 认设置,同时按功能按钮 2 和 3 约 2s 后, Phottix Laso 发射器设置被清除,拍摄模式 警告:采用小于 5mW 的安全激光灯。 恢复为 <ETTL> 闪光模式。即使清除设置后, 拍摄时请尽量避免对着人眼 , 以防伤害眼睛。 传输频道、无线电 ID、C.Fn 和 P.Fn 设置也...
- Page 74 MENU 功能介绍 闪光包围曝光步长 可以在±3EV进行调节(以1/3档为增量) 闪光曝光补偿 可以在±3EV进行调节(以1/3档为增量) 自定义功能 可以在C.Fn 01~22、P.Fn 01~08间进行设置 RATIO A:B C A:B比率比值: RATIO A:B 8:1~1:8, ETTL RATIO OFF 以1/2档为增量 闪光光比 RATIO A:B:C M/Multi RATIO A:B RATIO OFF 扫描功能 可以扫描无线电接收状态并自动或手动设定主控单元的传输频道 9999中设置 无线电ID 可以在0000 Ch.1 Ch.15 、Auto 传输频道 保存当前设置 载入已存储的设置 记忆功能...
-
Page 75: 三 . 液晶屏显示内容
说明书 Simp 开启高速同步 同步模式 无显示 前帘同步 闪光组 最多五组A、B、C、D、E(Gr模式下) 频闪闪光频率 可在1~500Hz设置 频闪闪光次数 可在1~100次设置,根据频率和闪光输出量对应输出次数 三 . 液晶显示屏显示 Phottix Laso 发射器显示屏共有五种显示模 式,不同的模式设置将实现不同的功能,五 式,即 ETTL、M、MULTI、Gr 和 LINKED 种模式的界面分别如下: SHOT。可以通过 MODE 键在“ETTL、M、 MULTI、Gr”四种模式下进行切换,还可以 长按联动拍摄按钮,进入 LINKED SHOT 模... - Page 76 1. ETTL/ETTL II 自动闪光模式显示: :高速同步; : 同步 E-TTLⅡ/E-TTL自动闪光 速度警告 : 无线电传输和 无线拍摄 :提示音 :闪光包 : 闪光曝光补偿, 围曝光,闪光 闪光曝光补偿量 包围曝光步长 : CH,频道; AUTO,频道自动 设置 RATIO:共有 三种闪光组数 : 自定义功能 量可供选择: RATIO OFF, RATIO A:B, : 从属闪光灯 RATIO A:B C 就绪 :个性化功能 :主控单元 闪光组...
- Page 77 说明书 Simp 2. M 手动闪光模式显示: 3. Multi 闪光模式显示: MULTI: 多重(频闪)闪光 闪光频率 M: 手动闪光 手动闪光输出 闪光次数...
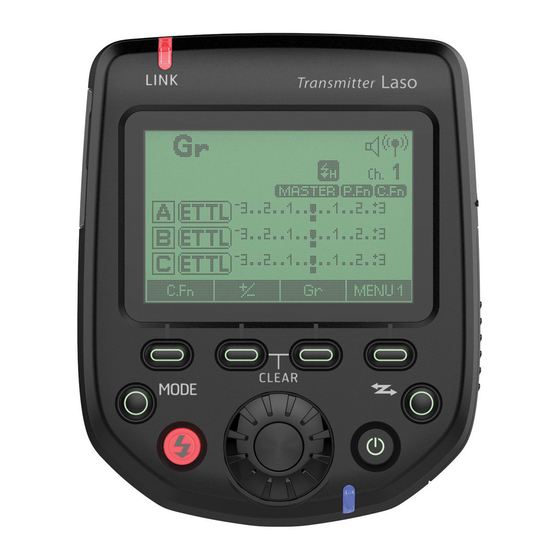
- Page 78 4.Gr 组闪光模式显示 5. LINKED SHOT 模式显示: :SLAVE,从属单元; Gr: 组闪光 MASTER,主控单元; 三种闪光模式可选:ETTL、M、Ext.A LINKED SHOT: 联动拍摄...
-
Page 79: 四 . 无线闪光拍摄:无线电传输
说明书 Simp 注意: 无线闪光拍摄 1). 显示屏只显示当前应用的设置。 使用兼容无线电传输拍摄的 Phottix Laso 发 2). 在功能按钮 1 至 4 上方显示的功能 (如 射器和佳能闪光灯,可按照与普通 E-TTL Ⅱ / 和 , )根据设置的状态发 E-TTL 自动闪光拍摄同样的方法,轻松利用 生变化。 高级无线多重闪光照明进行拍摄。 3). 当操作按钮或拨盘时,液晶显示屏点 安装在相机上的 Phottix Laso 发射器(主控) 亮。 的设置会自动反应在受无线控制的闪光灯 (从 属)上,因此,在拍摄期间不需要操作从属 单元。只要将主控单元设定为 <... -
Page 80: 无线设置
无线设置 的佳能 ETTL 闪光灯可以和 Phottix Laso 接 收器搭配使用,实现无线闪光拍摄。 要进行无线拍摄,用下列步骤设定 Phottix Laso 发射器(主控单元)和闪光灯(从属单 主控 从属 元)。 具有无线电从属功能的佳能闪光灯, 1. 主控单元设置:检查是否显示 例600EX-RT (从属模式) Phottix Laso 。 发射器 Phottix Laso接收器+佳能ETTL闪 2. 从属单元设置:有关从属单元设置,请 光灯(普通模式) 参见闪光灯或 Phottix Laso 接收器使用说 注意: 明书。 1) 使用 Phottix Laso 接收器的从属单元,在... - Page 81 说明书 Simp 无线电 ID,有关从属单元设置,请参见闪 3.1 按功能按钮 4 直至液晶屏显示 光灯或 Phottix Laso 接收器的使用说明书。 。 3.2 设定频道: 按 对应的功能 按钮 1,转动 < > 选择“AUTO” 或从频道 1 至 15 中选择频道,然后按 < > 按钮完成设定。 3.3 设定无线电 ID: 按 对应的 功能按钮 2,转动 < > 选择要设定...
- Page 82 3.5 当主控单元和从属单元之间建立传输 动重设为信号接收良好的频道。 时,< > 指示灯以绿色点亮。 4. 扫描要设定的主控单元传输频道 Phottix Laso 发射器可以扫描无线电接收 状态,并自动或手动设定主控单元的传输频 道。当频道设为“AUTO”时,会自动设定 接收信号的频道。当手动设定频道时,可以 在参考扫描结果的同时重新设定传输频道。 4.1 在设为“AUTO”期间扫描(如图): 4.2 在频道设为 1 至 15 期间扫描 (如图) : 按功能按钮 4 直至液晶屏显示 , 按 对应的功能按钮 3,频道被自 按功能按钮 4 直至液晶屏显示 ,...
- Page 83 说明书 Simp 按 . 对应的功能按钮 3,以图表显示无线电接收状态,图表中的频道峰值越高, 无线电接收信号越强。 转动 < > 从频道 1 至 15 中手动选择频道,按 < > 按钮设定频道并返回拍摄就 绪状态。 < > 指示灯的颜色根据主控单元和从属单元的状态发生变化。 注意: 1). 如果主控单元和从属单元的传输频道不同,从属单元不闪光。将两者设为相同的号码 或均设为“AUTO”。...
-
Page 84: Ettl:全自动无线闪光拍摄
不同,从属单元不闪光。 之间的距离不要超过无线电传输距离。 1.4 将闪光模式设为 < >:按主控 单元上的 < > 按钮并将闪光模式设 ETTL:全自动无线闪光拍摄 置为 < >,在经由主控单元控制的 拍摄期间,从属闪光灯自动设为 < 使用安装在相机上的 Phottix Laso 发射器 (主 >。 如从属单元使用 Phottix Laso 接收器, 控)和受无线控制的闪光灯(从属)时的基 接收器上的闪光灯无需设为从属模式, 本全自动无线拍摄。 但必须将手动闪光灯设置成 ETTL 模式。 1. 使用一个从属单元的自动闪光拍摄 1.5 检查传输状态和闪光灯是否已就绪: 1.1 将闪光灯设为从属单元:有关从属单 检查 <... -
Page 85: 使用全自动无线闪光
Simp 从属闪光灯就绪图标是否点亮; 摄”相同的步骤。将闪光组设为 A、B 或 C, 如果设为 D 或 E,闪光灯不会闪光。当增 当所有闪光灯单元的回电完毕时,主 加了从属单元的数量时,执行自动控制以使 控单元的充电指示灯点亮。 所有闪光灯以相同的闪光输出闪光并确保 总闪光输出能够达到标准曝光。 1.6 检查操作:按主控单元的测试闪光按 钮(充电指示灯),从属单元闪光,如 果从属单元不闪光,检查是否将其放置 使用全自动无线闪光 在操作范围内。 在 Phottix Laso 发射器(主控单元)上设定 1.7 拍摄照片:按照与使用普通闪光拍摄 的闪光曝光补偿和其他设置也会在闪光灯 (从 相同的方法设定相机并拍摄照片。如果 属单元)中自动设定,不需要操作从属单元。 获得了标准的闪光曝光,闪光曝光确认 指示灯将点亮(蓝色)2 秒。 2. 使用多个从属单元的自动闪光拍摄 当需要更大的闪光输出或想要更加轻松地 进行照明时,可以增加从属单元的数量并将 其作为单个闪光灯闪光。要添加从属单元, 使用与“使用一个从属单元的自动闪光拍... - Page 86 1. 闪光曝光补偿 可以像设定普通曝光补偿一样设定闪光曝 光补偿。可以在 ±3 档间以 1/3 档为增量设 定闪光曝光补偿量。设置方法如下: 1.1 按功能按钮 4 直至液晶屏显示 。 1.2 按 对应的功能按钮 2,液晶 屏显示 图标并且闪光曝光补偿量被 突出显示。 1.3 设定闪光曝光补偿量 : 转动 < > 设定闪光曝光补偿量并按下 < > 完 成设定。 1.4 “0.3” 表示 1/3 档, “0.7” 表示 2/3 档。 1.5 要取消闪光曝光补偿,将补偿量设...
- Page 87 说明书 Simp 注意: 1) 闪光曝光补偿量可以直接转动 < > 进行设定,无需操作功能按钮 2。此操 作需在自定义功能 C.Fn13 预先设定。 . 2)如相机的曝光补偿设定为 1/2 档增量, 将以 1/2 档为增量设定最大 ±3 的闪光曝 光补偿。 2. 闪光包围曝光 可以在自动改变闪光输出的同时拍摄三张 照片,这称为 FEB(闪光包围曝光)。以 1/3 档为增量,可设置的范围最大为 ±3 档。 设置方法如下:...
- Page 88 2.1 按功能按钮 4 直至液晶屏显示 2) 可以在自定义功能 C.Fn04 中,根据 个人需要设定 FEB 拍摄顺序。 。 2.2 按 对应的功能按钮 3,液晶 3. 高速同步 屏显示 并且 FEB 水平显示被突出 使用高速同步功能,可以在所有快门速度下 显示。 同步闪光。高速同步在想要使用光圈优先自 动曝光对人像被摄体进行填充闪光时较为 2.3 设定 FEB 水平: 转动 < > 设定 方便。只有从 2012 年开始发售的 EOS 数 FEB 水平,并按下 < >...
- Page 89 说明书 Simp 各个部分锁定正确的闪光曝光设置。通过操 作相机执行闪光曝光锁。有关操作,请参见 相机和闪光灯的使用说明书。 5. 关于主控单元 可以使用两个或以上主控单元(主控单元 + 从属单元 = 最多 16 个单元)。通过准备 多台装有主控单元的相机,可以在保持相 同照明(从属单元)期间更换相机进行拍 3.1 按功能按钮 4 直至液晶屏显示 摄。请注意当使用两个或以上主控单元时, 。 < > 指示灯的颜色根据打开电源的顺 3.2 按 对应的功能按钮 2,液晶 序而有所不同。第一个主控(主主控)为绿 屏上显示 。 色,第二个和之后的主控(副主控)为橙色。 3.3 再次按 对应的功能按钮 2, 即可关闭 4. 闪光曝光锁 使用...
-
Page 90: Ettl:使用闪光光比的无线多重闪光拍摄
ETTL:使用闪光光比的无线多重闪 光拍摄 1. 用两个从属组进行自动闪光拍摄 可以将从属单元分成两个闪光组 A 和 B 并 调整拍摄用照明平衡(闪光光比)。自动控 制曝光以使闪光组 A 和 B 的总闪光输出达 到标准曝光。闪光比设定方法如下: 1.1 逐一操作和设定从属单元,将一个单 元设为 < >,将另一个设为 < >。有 关从属单元设置,请参见闪光灯的使用 说明书。 1.2 设定主控单元闪光比模式:按主控 单元的功能按钮 4 以显示 ; 按 对应的功能按钮 2 并设为 < >;... - Page 91 说明书 Simp 1.3 设定闪光光比:按 对应的功 能按钮 3,再次按下此时对应 的 功能按钮 3,转动 < > 设定闪光光比 并按 < > 按钮,按 对应的 功能按钮 4 以返回拍摄就绪状态。 1.4 拍照时从属单元以设定的闪光光比闪 光。...
- Page 92 与 “用两个从属组进行自动闪光拍摄” 相同。 在 闪光比模式下 A 组和 B 组 的闪光输出可以通过闪光比进行设置。C 组 是独立设置的,它的闪光输出由相机决定。 2.1 将闪光灯设为闪光组 C:有关从属单 元设置,请参见闪光灯的使用说明书。 2.2 设定主控单元闪光比模式:按主控 单 元 的 功 能 按 钮 4 以 显 示 ; 按 对 应 的 功 能 按 钮 2 并 设 为 <...
-
Page 93: M:使用手动闪光输出的无线多重闪光拍摄
说明书 Simp 的功能按钮 4 以返回拍摄就绪状态。 B 或 C)中设定更多的从属单元。可以将 从属单元数量增加到最多 15 个单元。例 如,如果将具有 3 个从属单元的闪光组 设为 < >,3 个单元被作为具有较大闪光 输出的单个闪光组 A 控制。 M:使用手动闪光输出的无线多重 闪光拍摄 使用手动闪光的无线(多重闪光)拍摄,可 以为每个从属单元(闪光组)设定不同的闪 光输出进行拍摄,在主控单元上设定所有操 作。 3. 从属组控制 如果需要更大的闪光输出或希望进行更 完善的照明,可以增加从属单元数量。 只需在想要增加闪光输出的闪光组(A、... - Page 94 1. 按 键将闪光模式设为 < > 2. 在显示 期间,按 对 应的功能按钮 2,并设定要闪光组数 量。每次按该按钮,设置变化如下: ALL( A/B( A/B/C( 3. 按 对 应 的 功 能 按 钮 3, 转 动 < > 选择想要设定闪光输出的组并按 < > 按钮。...
-
Page 95: Multi: 频闪闪光
说明书 Simp 4. 按功能按钮 3,转动 < > 设定闪光输 出并按 < > 按钮,重复步骤 3 和 4 为 所有组设定闪光输出。 5. 拍照时各组以设定的闪光输出闪光。 MULTI: 频闪闪光 频闪闪光是高级手动闪光拍摄方法。以慢速 快门使用频闪闪光时,可以在一张照片上拍 摄类似于逐格拍摄动画的多个连贯动作。在 频闪闪光模式下,设定闪光输出、闪光次数 和闪光频率(每秒的闪光次数 =Hz)。... -
Page 96: Gr:为各组设定不同的闪光模式进行拍摄
4. 按 对 应 的 功 能 按 钮 3, 转 动 组控制曝光以获得主被摄体的标准曝光。此 < > 设定闪光频率并按 < > 按钮。 功能面向对照明非常熟知和有经验的高级用 户。 注意: 1. 将闪光模式设为 < >。 1. 频闪闪光期间不能使用高速同步。 按主控单元上的 < > 按钮并将闪光模 2. Phottix Laso 接收器不支持此闪光模 式设为 < >。 式。... - Page 97 说明书 Simp 2. 在从属单元上设定闪光组 逐一操作和设定从属单元,为所有的从属单 元设定闪光组(A/B/C/D/E),有关从属 单元设置,请参见闪光灯 / 接受器的使用说 明书。 3. 设定闪光模式 通过操作主控单元设定各闪光组的闪光模 式。在显示 期间,按 对应 的功能按钮 3 并转动 < > 以选中闪光组。 按功能按钮 2 并从 < >、< > 和 < > 中选择所选组的闪光模式。 要关闭所选组的闪光,按 对应的 功能按钮 1 将其设为 <OFF>。重复步骤 3 设定所有组的闪光模式。...
- Page 98 4. 设定闪光输出或闪光曝光补偿量 在选择了闪光组期间,按功能按钮 3,转 动 < > 根据闪光模式设定闪光功能并 按 < > 按钮。当使用 < > 模式 时,设定闪光输出,当使用 < > 或 < > 模式时,根据需要设定闪光曝 光补偿量。 如果在显示 时按 对应的功 能按钮 2,可以为所有闪光组设定设定闪光 曝光补偿。重复步骤 4 设定所有组的闪光 功能。...
-
Page 99: 联动拍摄
说明书 Simp 5. 拍摄照片 各从属单元按照为各组设定的闪光模式闪 光。 联动拍摄 联动拍摄是通过将从属单元相机链接到主控 单元相机,从而自动释放从属单元相机快门 的功能,可以对包括主控单元和从属单元在 内的最多 16 个单元使用联动拍摄进行拍摄。 想要同时从多个角度拍摄同一个被摄体,该 功能较为方便。 要使用联动拍摄进行拍摄时, 在相机上分别安装 Phottix Laso 发射器,此 外,还可以选用支持无线电传输无线拍摄的 1. 设为联动拍摄模式 佳能闪光灯或 ST-E3-RT 信号发射器。 长按联动拍摄按钮直到液晶屏上显示 , 联动拍摄模式的 “从属单元” 已设定,再次按联动拍摄按钮便可以将联动... - Page 100 拍摄模式设定为“主控单元”。 2. 设定频道和 ID 按 对应的功能按钮 2,并转动 < > 设定频道,按 < > 按钮完成设定。 (Phottix Laso 发射器可以扫描无线电接收 状态,并自动或手动设定主控单元的传输频 道,具体操作请参照上文无线设置 )。 按 对应的功能按钮 3,转动 < > 并按 < > 按钮选择需要设定的 ID 位 数,转动 < > 按钮选择需要设定的 ID 位数,转动 < > 进行 ID 设置,最后按...
- Page 101 说明书 Simp 3. 设定相机的拍摄功能 亮并拍摄照片,与主控单元相机配合释放从 属单元相机的快门,使用联动拍摄进行拍摄 4. 设定所有发射器 后,从属单元的 < > 指示灯短暂地 重复步骤 1 至 3 并将所有 Phottix Laso 发 以橙色点亮。 射器在联动拍摄模式下设为“主控单元”或 7. 按主控单元 对应的功能按钮 1, “从属单元”。以相同方法设定在联动拍摄 可以释放所有从属单元相机的快门。 中使用的闪光灯。当按联动拍摄按钮将一个 单元的设置从“从属单元”改变为“主控单 注意: 元”时,之前设为“主控单元”的其他发射 器(或闪光灯)会自动切换为“从属单元”。 1. 当使用联动拍摄功能时,根据相机的 不同, 从属单元的相机可能需要 “快门线” 5. 设置从属相机...
-
Page 102: 五 . 相机操作设定无线引闪器功能
1.1 选择 [ 外接闪光灯控制 ] 或 [ 闪光灯 控制 ]。 Laso 发射器功能 1.2 选择 [ 闪光灯功能设置 ] 或 [ 外接闪 当使用 2007 年以后发售的 EOS 数码相机时, 光灯功能设置 ],画面变成(外接)闪光 可以从相机的菜单画面设定闪光灯功能、无 灯功能设置画面。 线引闪器功能或自定义功能。 有关相机操作, 请参见相机的使用说明书。( 以下相机菜单界 1.3 根据相机的不同, 设置画面有所不同, 面以 EOS6D 相机为例 ) 选择项目并设定功能。 1. Phottix Laso 发射器功能设置... - Page 103 说明书 Simp 2.[ 闪光灯功能设置 ] 可利用相机的设置菜 单设置...
- Page 104 [启用] 可以进行无线闪光拍摄 闪光灯闪光 [关闭] 无法进行无线闪光拍摄 [评价] 普通曝光 闪光曝光将对相机测光的整个场景进行平均测光。根据场景的不 E-TTLⅡ闪光测试 [平均] 同,可能需要闪光曝光补偿。此设置面向高级用户。 光圈优先模式下 在光圈优先自动曝光(Av)模式下进行无线闪光拍摄时,可以设定闪光同步速度 的闪光同步速度 可以从[E-TTLⅡ]、[手动闪光]、[多次闪光]和[个别组控制]中选 闪光模式 择闪光模式以适合所需闪光拍摄。 快门同步 可以在[高速同步]和[前帘同步]之间切换 闪光曝光补偿 可以在±3档间以1/3档为增量设定闪光曝光补偿量。...
- Page 105 说明书 Simp 可以在自动改变闪光输出的同时拍摄三张照片。以1/3档为增量,可以设置的范围 闪光包围曝光 最大为±3档。 无线闪光功能 自动设定无线电传输无线闪光拍摄。(仅限自2012年以后的相机) (设置) 清除闪光灯(设置) 可以将Phottix Laso发射器设置恢复为其默认设置。 功能 3. Phottix Laso 发射器自定义功能设置 根据相机的不同,显示的内容会有所不 同。如果不显示 C.Fn-20 和 22,通过操作 Phottix Laso 发射器设定这些项目。...
-
Page 106: 六 . 自定义信号发生器
摄喜好自定义 Phottix Laso 发射器功能, 3.2 选择自定义功能编号并设定功能。 个性化功能是仅限于 Phottix Laso 发射器 的自定义功能。 3.3 要清除所有自定义功能设置,在步骤 1 中选择 [ 清除所有闪光灯自定义功能 ] 或 [ 清除外接闪光灯的自定义功能设置 ]。 C.Fn: 设定自定义功能 1. 按功能按钮 4,直至 出现在液晶 注意:[ 闪光灯自定义功能设置 ] 下 [ 自 屏菜单上。 动关闭电源 ] 对应 Phottix Laso 发射器... - Page 107 说明书 Simp 长按 的功能按钮 1 直至显示自定义 功能画面。 3. 转动拨盘 < > 以选择要设定的自定义 项目(编号),并按 < > 按钮进入所 选项目选择界面。 4. 转动 < > 选择需要的设置并按 < > 按钮即可改变设置。 5. 按 对应的功能按钮 4 返回上一级 界面。 6. 若需要将所有自定义功能设置恢复默 认,按 对应的功能按钮 2,然后按 对应的功能按钮 1 确认操作,取消 操作则按 对应的功能按钮...
- Page 108 自定义功能表 自定义功能 功能 设置编号 设置和说明 编号 启用: 当5分钟没有操作时,Phottix Laso发射器自动进入待 机模式(IDLE)。 : 自动待机 C.Fn 01 关闭:当5分钟没有操作时,不启用待机模式(IDLE)。 按相机的景深预览按钮进行造型闪光。 按Phottix Laso发射器的测试闪光按钮进行造型闪光。 按相机的景深预览按钮或Phottix Laso发射器的测试闪光按钮 C.Fn 02 造型闪光 进行造型闪光。 关闭造型闪光。 启用: 设定用FEB拍摄三张照片后自动取消FEB。 C.Fn 03 闪光包围曝光 自动取消 关闭: 设定用FEB拍摄三张照片后不取消FEB。...
- Page 109 说明书 Simp 设定FEB的顺序依次为 0:标准曝光 - :减弱曝光(较暗) + :增强曝光(较亮) :闪光包围 C.Fn 04 曝光顺序 设定FEB的顺序依次为 - :减弱曝光(较暗) 0:标准曝光 + :增强曝光(较亮) 设定在E-TTLⅡ/E-TTL自动闪光模式下进行测试闪光时,闪光 :用自 输出为1/32。 C.Fn 07 动闪光测试闪光 设定在E-TTLⅡ/E-TTL自动闪光模式下进行测试闪光时,闪光 输出为1/1。 可以转动< >并按 对应的功能 按钮进行闪光曝光补偿。 :闪光曝 C.Fn 13 光测光设置 直接转动< >进行闪光曝光补偿,而无 需操作 按钮。...
-
Page 110: P.fn:设定个性化功能
关闭:设定当从属单元完全充电时,Phottix Laso发射器不发 出提示音 : 回电提 C.Fn 20 开启:设定当从属单元完全充电时,Phottix Laso发射器发出 示音 提示音 照明12秒 : 液晶显 关闭显示屏照明 C.Fn 22 示屏照明 持续照明 P.Fn: 设定个性化功能 3. 按照与自定义功能的步骤 6 即可将所有 1. 在自定义功能画面,按 对应的功 个性化功能设置恢复默认 能按钮 1 显示个性化功能画面。 2. 按照与自定义功能的步骤 3 和 4 相同的 方法即可设定个性化功能。... - Page 111 说明书 Simp 个性化功能表 个性化功能 功能 设置编号 设置和说明 编号 : 液晶显示屏 可以以5个级别调整液晶显示屏的对比度 P.Fn 01 显示对比度 当Phottix Laso发射器设为主控单元(无线电传输闪光拍摄、 联动拍摄)时,液晶显示屏照明使用的颜色为绿 : 液晶 P.Fn 03 显示屏照明颜 当Phottix Laso发射器设为主控单元(无线电传输闪光拍摄、 色:主控闪光 联动拍摄)时,液晶显示屏照明的颜色为橙色 当Phottix Laso发射器设为从属单元(联动拍摄)时, 液晶显示屏照明的颜色为橙色 :液晶显 示屏照明颜色: P.Fn 04 当Phottix Laso发射器设为从属单元(联动拍摄)时, 从属闪光 液晶显示屏照明的颜色为绿色 启用自动辅助对焦灯 : 自动辅助...
-
Page 112: 七 . 故障诊断
发射器的固件是可以通过 USB 固件进行升 2.3 将主控单元和从属单元是传输频道和 级的。任何升级及说明都会发布在 Phottix 无线电 ID 设为相同的号码。 的博客上 ( journal.phottix.com)。 2.4 检查从属单元与主控单元的传输范 围。 七.故障诊断 2.5 如从属单元使用 Phottix Laso 接收 器 , 请参照接收器说明书检查从属单元设 1. 不能开启 Phottix Laso 发射器 置。 1.1 确认 Phottix Laso 发射器的电池是 3. 显示 < > 否已装好,极性是否有装错现象。... -
Page 113: 八 . 规格参数
说明书 Simp 八.规格参数 类型 机载闪光灯无线引闪器 兼容E-TTLⅡ/E-TTL自动闪光的A型EOS相机 兼容相机 E-TTLⅡ/E-TTL自动闪光、手动闪光、频闪闪光、自动外部闪光 曝光控制系统 测光(只在闪光模式设为<Gr>时) 频率 2405~2475Hz 主调制:OQPSK,二次调制:DS-SS 调制系统 自动,频道1~15 频道 0000~9999 无线电ID 最多5组(A/B/C/D/E),最多15个单元 从属单元控制 100m+ 传输距离 1:8~1:1~8:1,1/2档增量 闪光光比控制 以1/3档或1/2档为增量±3档 闪光曝光补偿... - Page 114 闪光包围曝光 以1/3档或1/2档为增量±3档(当与闪光曝光补偿配合使用时) 闪光曝光锁 按相机的<M-Fn>、<FEL>或<*>按钮 高速同步 具备,只有从2012年开始发售的EOS数码相机可以利用高速同步 手动闪光 1/1~1/128(1/3档增量) 频闪闪光 具备 1~500 Hz 主控单元液晶显示屏上的< >图标亮起,从属单元的自动对焦辅助光发 从属闪光灯电池检查 射器闪烁,并且充电指示灯亮起 闪光曝光确认 闪光曝光确认指示灯亮起 造型闪光 使用相机的景深预视按钮进行闪光 联动拍摄 具备 自定义功能 个性化功能...
- Page 115 说明书 Simp 镭射波长 650nm 输出功率 <5mW 自定辅助对焦灯 光点大小 投射距离1米处:长335mm 宽326mm(扇形角度约20º) 工作温度 -10℃~+40℃ 电源 2节AA型碱性电池或AA型镍氢电池 电池节能 五分钟无操作后进入IDLE待机模式 待机电流 70mA 休眠电流 ≤250uA 尺寸 (长×宽×高):(84.1×68.3×58.5)毫米 重量(约) 118 克(仅Phottix Laso发射器,不含电池) 注意:当产品的设计和规格有变化时,恕不另行通知。...
- Page 116 配件列表 Phottix Laso 发射器 1 PC 挂包 AA 电池 2 PCS USB 升级线 1 PC 说明书 1 PC 固件升级提示卡片 1 PC 保修卡 1 PC 合格证 1 PC * 请根据配件列表内容检查包装内配件。...
- Page 117 說明書 Trad 該產品屬於 Class 3R 級鐳射產品,根據下 列標準 IEC 60825-1/GB 7247.1 “鐳射產 品的輻射安全”。 Class 3R: 該等級的鐳射不直接觀測時是安 全的。該等級的鐳射可能超出 MPE,但一般 不會造成傷害。該等級的可見光連續波雷射 器功率不能超過 5mW。...
- Page 118 感謝您購買 Phottix 產品 安全須知 注意:在使用 Phottix Laso 無線引閃器 For 1. 本產品屬精密電子儀器, 請注意防潮防塵。 Canon 前,請務必通讀本使用說明書和相機 2. 安裝本產品時請務必關閉所有裝置電源。 及閃光燈等相關設備的使用方法,以保證您 熟悉操作,正確使用。 3. 請勿摔落或碰撞本產品。 4. 請勿在易爆易燃或高溫環境中使用本產品。 無線引閃器 For Canon/ 發射器 5. 請勿用化學或有機溶劑清潔機身 , 請用柔 軟乾淨的布或鏡頭紙對其外表面進行擦拭。 Phottix Laso 發射器是無線閃光拍攝用信號 6. 長時間不使用引閃器時,請將電源關閉並 發射器,最多可以控制 5 個從屬組(15 個單...
- Page 119 說明書 Trad 的影響。如果您的引閃器不能被觸發,請稍 科學及醫療用電波輻射性電機設備之干擾。 微移動它的位置。 依據低功率電波輻射性電機管理辦 法 : 第十二條經形式認證合格之低功率射頻電機, 非經許可,公司、商號或使用者均不得擅自 變更頻率,加大功率或變更原設計之特性及 功能。 第十四條低功率射頻電機之使用不得影響飛 航安全及干擾合法通信:經發現有干擾現象 時,應立即停用,並改善至無干擾時方得繼 續使用。 前項合法通信,指依電信規定作業之無線電 信。 低功率射頻電機須忍受合法通信或工業、...
- Page 120 目 錄 一 . 部件名 ----------------------------------------------------------------------------122 二 . 使用前準備 ------------------------------------------------------------------------124 三 . 液晶屏顯示內容 -------------------------------------------------------------------130 四 . 無線閃光拍攝:無線電傳輸 ------------------------------------------------ -------134 1. 無線設置 ------------------------------------------------------------------------135 2. ETTL:全自動無線閃光拍攝 ----------------------------------------------------139 3. 使用全自動無線閃光 ------------------------------------------------------------140 4. ETTL:使用閃光光比的無線多重閃光拍攝 --------------------------------------145 5. M:使用手動閃光輸出的無線多重閃光拍攝 -------------------------------------148 6. MULTI:頻閃閃光 --------------------------------------------------------------150...
- Page 121 說明書 Trad 7. Gr:為各組設定不同的閃光模式進行拍攝 ---------------------------------------151 8. 聯動拍攝 ------------------------------------------------------------------------154 五 . 相機操作設定無線引閃器功能 ------------------------------------------------------157 六 . 自訂信號發生器 -------------------------------------------------------------------161 1. C.Fn:設定自訂功能 -----------------------------------------------------------161 2. P.Fn:設定個性化功能 --------------------------------------------------------- 165 七 . 故障診斷 ------------------------------------------------------------------------- 167 八 . 規格參數 ------------------------------------------------------------------------- 168...
-
Page 122: 一 . 部件名
一 . 部件名称 1.<LINK> 指示燈 : 無線電傳輸確認指示燈 2. 液晶顯示幕 3. 功能按鈕 1 4. 功能按鈕 2 5. 功能按鈕 3 6. <MODE>:閃光模式按鈕; 7. < >:充電指示燈 / 測試閃光按鈕 8. < >:選擇 / 設置按鈕 9. < >: 選擇撥盤 10. 固定座鎖定杆 11. 電池倉 12. 功能按鈕 4 13. - Page 123 說明書 Trad 14. 電源按鈕 15. 閃光曝光確認指示燈 16. 鎖定釋放按鈕 17. USB 埠 18. 遙控釋放端子 19. 電子觸點 20. 固定座 21. 鎖定銷 22. 自動對焦輔助燈...
-
Page 124: 二 . 使用前準備
二 . 使用前準備 裝入電池 1. 按住 Phottix Laso 發射器電池蓋 , 依所示 方向打開電池蓋。(如圖一) 圖二 2. 按圖所示插入 AA 電池,注意確保電池 的 +/- 朝向正確(注:請使用兩節 AA 型 鹼性電池或 AA 型鎳氫電池)。(如圖二) 圖一 3. 放回電池蓋,並往後推至鎖緊的位置。... - Page 125 鈕的同時將鎖定杆滑動到最左側。 (如圖四) 1. 關閉相機和 Phottix Laso 發射器。 2. 將 Phottix Laso 發射器滑出相機熱靴 2. 將 Phottix Laso 發射器熱靴與相機熱靴 對準。 3. 滑動 Phottix Laso 發射器使其完全插入 相機熱靴。 4. 滑動鎖定杆到右側直至發出哢噠聲將 Phottix Laso 發射器鎖定到位。(如圖三) 圖四 開啟 / 關閉 Phottix Laso 發射器 1. 開啟:長按電源按鈕直至功能表介面出 現在液晶屏上。 圖三...
- Page 126 試閃光 換電池。 在 Phottix Laso 發射器上查詢版本 從從屬單元進行遙控釋放 資訊 在無線拍攝期間,Phottix Laso 發射器支 援從從屬單元進行遙控釋放,可以從設為從 可以在 Phottix Laso 發射器查詢當前的版本 屬單元的閃光燈或 Phottix Laso 接收器進 資訊 : 長按“電源按鈕”開啟 Phottix Laso 行遙控釋放(遙控拍攝)。有關操作,請參 發射器的同時按下“< > 按鈕”直至 見閃光燈或 Phottix Laso 接收器的使用說 液晶屏上顯示版本資訊。 明書。 當使用此功能拍攝時,根據相機的不同,可 < > 充電指示燈 / 測試閃光按鈕...
- Page 127 說明書 Trad 2. 對於上述以外的相容 E-TTL II/E-TTL 當按相機的景深預視按鈕時,閃光燈連續閃 自動閃光並具有 N3 型遙控端子的 EOS 光 1 秒鐘。此功能稱為造型閃光。該功能 相機,則需要“快門線”(另售)才能 使您能夠查看被攝體上的閃光燈光影效果 從從屬單元進行遙控釋放。 及照明平衡。此外,按 Phottix Laso 發射 器測試閃光按鈕觸發造型閃光(需在自訂功 能 C.Fn 02 預先設定)。 從從屬單元進行測試閃光 2. 從從屬單元進行造型閃光 在無線拍攝期間可以從設為從屬單元的閃光 使用 2012 年開始發售的 EOS 數碼相機時, 燈進行測試閃光。有關操作,請參見閃光燈 可以從從屬單元的閃光燈進行造型閃光。有 的使用說明書。 關操作,請參考閃光燈的使用說明書。 注意:當兩個或兩個以上單元設為主控時,...
- Page 128 清除 Phottix Laso 發射器設置 且此對焦輔助燈為鐳射燈, 定向性好, 衰減少 , 效果顯著。自動對焦燈功能可以設置為開啟 可以將 Phottix Laso 發射器設置恢復為其默 或關閉(在個性化功能 P. Fn 08 中設置)。 認設置,同時按功能按鈕 2 和 3 約 2s 後, Phottix Laso 發射器設置被清除,拍攝模式 警告:採用小於 5mW 的安全鐳射燈。 恢復為 <ETTL> 閃光模式。即使清除設置後, 拍攝時請儘量避免對著人眼 , 以防傷害眼睛。 傳輸頻道、無線電 ID、C.Fn 和 P.Fn 設置也...
- Page 129 說明書 Trad MENU 功能介紹 闪光包围曝光步长 可以在±3EV进行调节(以1/3档为增量) 闪光曝光补偿 可以在±3EV进行调节(以1/3档为增量) 自定义功能 可以在C.Fn 01~22、P.Fn 01~08间进行设置 RATIO A:B C A:B比率比值: RATIO A:B 8:1~1:8, ETTL RATIO OFF 以1/2档为增量 闪光光比 RATIO A:B:C M/Multi RATIO A:B RATIO OFF 扫描功能 可以扫描无线电接收状态并自动或手动设定主控单元的传输频道 9999中设置 无线电ID 可以在0000 Ch.1 Ch.15 、Auto 传输频道 保存当前设置...
-
Page 130: 三 . 液晶屏顯示內容
开启高速同步 同步模式 无显示 前帘同步 闪光组 最多五组A、B、C、D、E(Gr模式下) 频闪闪光频率 可在1~500Hz设置 频闪闪光次数 可在1~100次设置,根据频率和闪光输出量对应输出次数 三 . 液晶顯示幕顯示 Phottix Laso 發射器顯示幕共有五種顯示模 式,不同的模式設置將實現不同的功能,五 式,即 ETTL、M、MULTI、Gr 和 LINKED 種模式的介面分別如下: SHOT。可以通過 MODE 鍵在“ETTL、M、 MULTI、Gr”四種模式下進行切換,還可以 長按聯動拍攝按鈕,進入 LINKED SHOT 模... - Page 131 說明書 Trad 1. ETTL/ETTL II 自動閃光模式顯示: :高速同步; : 同步 E-TTLⅡ/E-TTL自動閃光 速度警告 : 無線電傳輸和 無線拍攝 :提示音 :閃光包 : 閃光曝光補償, 圍曝光,閃光 閃光曝光補償量 包圍曝光步長 : CH,頻道; AUTO,頻道自動 設置 RATIO:共有 三種閃光組數 : 自訂功能 量可供選擇: RATIO OFF, RATIO A:B, : 從屬閃光燈 RATIO A:B C 就緒 :個性化功能...
- Page 132 2. M 手動閃光模式顯示: 3. Multi 閃光模式顯示: MULTI: 多重(頻閃)閃光 閃光頻率 M: 手動閃光 手動閃光輸出 閃光次數...
- Page 133 說明書 Trad 4.Gr 組閃光模式顯示 5. LINKED SHOT 模式顯示: :SLAVE,從屬單元; Gr: 組閃光 MASTER,主控單元; 三種閃光模式可選:ETTL、M、Ext.A LINKED SHOT: 聯動拍攝...
-
Page 134: 四 . 無線閃光拍攝:無線電傳輸
注意: 無線閃光拍攝 1). 顯示幕只顯示當前應用的設置。 使用相容無線電傳輸拍攝的 Phottix Laso 發 2). 在功能按鈕 1 至 4 上方顯示的功能 (如 射器和佳能閃光燈,可按照與普通 E-TTL Ⅱ / E-TTL 自動閃光拍攝同樣的方法,輕鬆利用 ), 根據設置的狀態發 和 高級無線多重閃光照明進行拍攝。 生變化。 3). 當操作按鈕或撥盤時,液晶顯示幕點 安裝在相機上的 Phottix Laso 發射器(主控) 亮。 的設置會自動反應在受無線控制的閃光燈 (從 屬)上,因此,在拍攝期間不需要操作從屬 單元。只要將主控單元設定為 < > 就... -
Page 135: 無線設置
說明書 Trad 無線設置 的佳能 ETTL 閃光燈可以和 Phottix Laso 接 收器搭配使用,實現無線閃光拍攝。 要進行無線拍攝,用下列步驟設定 Phottix Laso 發射器(主控單元)和閃光燈(從屬單 主控 從屬 元)。 具有無線電從屬功能的佳能閃光燈, 1. 主控單元設置:檢查是否顯示 例600EX-RT (從屬模式) Phottix Laso 。 發射器 Phottix Laso接收器+佳能ETTL閃 2. 從屬單元設置:有關從屬單元設置,請 光燈(普通模式) 參見閃光燈或 Phottix Laso 接收器使用說 明書。 注意: 1) 使用 Phottix Laso 接收器的從屬單元,在... - Page 136 無線電 ID,有關從屬單元設置,請參見閃 3.1 按功能按鈕 4 直至液晶屏顯示 光燈或 Phottix Laso 接收器的使用說明書。 。 3.2 設定頻道: 按 對應的功能 按鈕 1,轉動 < > 選擇“AUTO” 或從頻道 1 至 15 中選擇頻道,然後按 < > 按鈕完成設定。 3.3 設定無線電 ID: 按 對應的 功能按鈕 2,轉動 < > 選擇要設定 的位置(位數)並按 <...
- Page 137 說明書 Trad 3.5 當主控單元和從屬單元之間建立傳輸 頻道被自動重設為信號接收良好的頻道。 時,< > 指示燈以綠色點亮。 4. 掃描要設定的主控單元傳輸頻道 Phottix Laso 發射器可以掃描無線電接收 狀態,並自動或手動設定主控單元的傳輸頻 道。當頻道設為“AUTO”時,會自動設定 接收信號的頻道。當手動設定頻道時,可以 在參考掃描結果的同時重新設定傳輸頻道。 4.1 在設為“AUTO”期間掃描(如圖): 4.2 在頻道設為 1 至 15 期間掃描 (如圖) : 按功能按鈕 4 直至液晶屏顯示 按功能按鈕 4 直至液晶屏顯示 , , 按 對應的功能按鈕 3,...
- Page 138 按 . 對應的功能按鈕 3,以圖表顯示無線電接收狀態,圖表中的頻道峰值越高, 無線電接收信號越強。 轉動 < > 從頻道 1 至 15 中手動選擇頻道,按 < > 按鈕設定頻道並返回拍攝就 緒狀態。 < > 指示燈的顏色根據主控單元和從屬單元的狀態發生變化。 顏色 狀態 說明 措施 點亮 傳輸證常 綠色 點亮 未连接 檢查頻道和ID 單元過多 主控單元+從屬單元=16個單元或更少 紅色 闪烁 錯誤 關閉電源後重新打開 注意: 1). 如果主控單元和從屬單元的傳輸頻道不同,從屬單元不閃光。將兩者設為相同的號碼...
-
Page 139: Ettl:全自動無線閃光拍攝
2). 如果主控單元和從屬單元的無線電 ID 不同,從屬單元不閃光。 1.3 定位相機和閃光燈: 相機和閃光燈之 間的距離不要超過無線電傳輸距離。 1.4 將閃光模式設為 < >:按主 ETTL:全自動無線閃光拍攝 控單元上的 < > 按鈕並將閃光模 式設置為 < >,在經由主控單元 使用安裝在相機上的 Phottix Laso 發射器 (主 控制的拍攝期間,從屬閃光燈自動設 控)和受無線控制的閃光燈(從屬)時的基 為 < >。如從屬單元使用 Phottix 本全自動無線拍攝。 Laso 接收器,接收器上的閃光燈無需設 1. 使用一個從屬單元的自動閃光拍攝 為從屬模式,但必須將手動閃光燈設置 成 ETTL 模式。 1.1 將閃光燈設為從屬單元:有關從屬單元... -
Page 140: 使用全自動無線閃光
其作為單個閃光燈閃光。要添加從屬單元, 檢查主控單元液晶顯示幕上的 < > 使用與“使用一個從屬單元的自動閃光拍 從屬閃光燈就緒圖示是否點亮; 攝”相同的步驟。將閃光組設為 A、B 或 C, 如果設為 D 或 E,閃光燈不會閃光。當增 當所有閃光燈單元的回電完畢時,主 加了從屬單元的數量時,執行自動控制以使 控單元的充電指示燈點亮。 所有閃光燈以相同的閃光輸出閃光並確保 總閃光輸出能夠達到標準曝光。 1.6 檢查操作:按主控單元的測試閃光按 鈕(充電指示燈),從屬單元閃光,如 果從屬單元不閃光,檢查是否將其放置 使用全自動無線閃光 在操作範圍內。 在 Phottix Laso 發射器(主控單元)上設定 1.7 拍攝照片:按照與使用普通閃光拍攝 的閃光曝光補償和其他設置也會在閃光燈 (從 相同的方法設定相機並拍攝照片。如果 屬單元)中自動設定,不需要操作從屬單元。 獲得了標準的閃光曝光,閃光曝光確認 指示燈將點亮(藍色)2 秒。 2. 使用多個從屬單元的自動閃光拍攝... - Page 141 說明書 Trad 1. 閃光曝光補償 可以像設定普通曝光補償一樣設定閃光曝 光補償。可以在 ±3 檔間以 1/3 檔為增量設 定閃光曝光補償量。設置方法如下: 1.1 按功能按鈕 4 直至液晶屏顯示 。 1.2 按 對應的功能按鈕 2,液晶 屏顯示 圖示並且閃光曝光補償量被 突出顯示。 1.3 設定閃光曝光補償量 : 轉動 < > 設定閃光曝光補償量並按下 < > 完 成設定。 1.4 “0.3” 表示 1/3 檔, “0.7” 表示 2/3 檔。 1.5 要取消閃光曝光補償,將補償量設...
- Page 142 注意: 1)閃光曝光補償量可以直接轉動 < > 進行設定,無需操作功能按鈕 2。此操作 需在自訂功能 C.Fn13 預先設定。 2)如相機的曝光補償設定為 1/2 檔增量, 將以 1/2 檔為增量設定最大 ±3 的閃光曝 光補償。 2. 閃光包圍曝光 可以在自動改變閃光輸出的同時拍攝三張 照片,這稱為 FEB(閃光包圍曝光)。以 1/3 檔為增量,可設置的範圍最大為 ±3 檔。 設置方法如下:...
- Page 143 說明書 Trad 2.1 按功能按鈕 4 直至液晶屏顯示 2) 可以在自訂功能 C.Fn04 中,根據個 人需要設定 FEB 拍攝順序。 。 2.2 按 對應的功能按鈕 3,液晶 3. 高速同步 屏顯示 並且 FEB 水準顯示被突出 使用高速同步功能,可以在所有快門速度下 顯示。 同步閃光。高速同步在想要使用光圈優先自 動曝光對人像被攝體進行填充閃光時較為 2.3 設定 FEB 水準: 轉動 < > 設定 方便。只有從 2012 年開始發售的 EOS 數 FEB 水準,並按下...
- Page 144 各個部分鎖定正確的閃光曝光設置。通過操 作相機執行閃光曝光鎖。有關操作,請參見 相機和閃光燈的使用說明書。 5. 關於主控單元 可以使用兩個或以上主控單元(主控單元 + 從屬單元 = 最多 16 個單元)。通過準備 多台裝有主控單元的相機,可以在保持相 3.1 按功能按鈕 4 直至液晶屏顯示 同照明(從屬單元)期間更換相機進行拍 。 攝。請注意當使用兩個或以上主控單元時, < > 指示燈的顏色根據打開電源的順 3.2 按 對應的功能按鈕 2,液晶 序而有所不同。第一個主控(主主控)為綠 屏上顯示 。 色,第二個和之後的主控(副主控)為橙色。 3.3 再次按 对应的功能按钮 2, 即可关闭 4. 閃光曝光鎖 使用 FE(閃光曝光)鎖,您可以為場景的...
-
Page 145: Ettl:使用閃光光比的無線多重閃光拍攝
說明書 Trad ETTL:使用閃光光比的無線多重閃 光拍攝 1. 用兩個從屬組進行自動閃光拍攝 可以將從屬單元分成兩個閃光組 A 和 B 並 調整拍攝用照明平衡(閃光光比)。自動控 制曝光以使閃光組 A 和 B 的總閃光輸出達 到標準曝光。閃光比設定方法如下: 1.1 逐一操作和設定從屬單元,將一個單 元設為 < >,將另一個設為 < >。有 關從屬單元設置,請參見閃光燈的使用 說明書。 1.2 設定主控單元閃光比模式:按主控 單元的功能按鈕 4 以顯示 ; 按 對應的功能按鈕 2 並設為 < >;... - Page 146 1.3 設定閃光光比:按 對應的功 能按鈕 3,再次按下此時對應 的 功能按鈕 3,轉動 < > 設定閃光光比 並按 < > 按鈕,按 對應的 功能按鈕 4 以返回拍攝就緒狀態。 1.4 拍照時從屬單元以設定的閃光光比閃 光。...
- Page 147 說明書 Trad 與 “用兩個從屬組進行自動閃光拍攝” 相同。 在 閃光比模式下 A 組和 B 組 的閃光輸出可以通過閃光比進行設置。C 組 是獨立設置的,它的閃光輸出由相機決定。 2.1 將閃光燈設為閃光組 C:有關從屬單 元設置,請參見閃光燈的使用說明書。 2.2 設定主控單元閃光比模式:按主控 單 元 的 功 能 按 鈕 4 以 顯 示 ; 按 對 應 的 功 能 按 鈕 2 並 設 為 <...
-
Page 148: M:使用手動閃光輸出的無線多重閃光拍攝
的功能按鈕 4 以返回拍攝就緒狀態。 B 或 C)中設定更多的從屬單元。可以將 從屬單元數量增加到最多 15 個單元。例 如,如果將具有 3 個從屬單元的閃光組 設為 < >,3 個單元被作為具有較大閃光 輸出的單個閃光組 A 控制。 M:使用手動閃光輸出的無線多重 閃光拍攝 使用手動閃光的無線(多重閃光)拍攝,可 以為每個從屬單元(閃光組)設定不同的閃 光輸出進行拍攝,在主控單元上設定所有操 作。 3. 從屬組控制 如果需要更大的閃光輸出或希望進行更 完善的照明,可以增加從屬單元數量。 只需在想要增加閃光輸出的閃光組(A、... - Page 149 說明書 Trad 1. 按 鍵將閃光模式設為 < > 2. 在顯示 期間,按 對 應的功能按鈕 2,並設定要閃光組數 量。每次按該按鈕,設置變化如下: ALL( A/B( A/B/C( 3. 按 對 應 的 功 能 按 鈕 3, 轉 動 < > 選擇想要設定閃光輸出的組並按 > 按鈕。 <...
-
Page 150: Multi: 頻閃閃光
4. 按功能按鈕 3,轉動 < > 設定閃光輸 出並按 < > 按鈕,重複步驟 3 和 4 為 所有組設定閃光輸出。 5. 拍照時各組以設定的閃光輸出閃光。 MULTI: 頻閃閃光 頻閃閃光是高級手動閃光拍攝方法。以慢速 快門使用頻閃閃光時,可以在一張照片上拍 攝類似於逐格拍攝動畫的多個連貫動作。在 頻閃閃光模式下,設定閃光輸出、閃光次數 和閃光頻率(每秒的閃光次數 =Hz)。... -
Page 151: Gr:為各組設定不同的閃光模式進行拍攝
對 應 的 功 能 按 鈕 3, 轉 動 光。當閃光模式為 或 時,作為單個 < > 設定閃光頻率並按 < > 按鈕。 組控制曝光以獲得主被攝體的標準曝光。此 功能面向對照明非常熟知和有經驗的高級用 注意: 戶。 1. 頻閃閃光期間不能使用高速同步。 1. 將閃光模式設為 < >。 2. Phottix Laso 接收器不支援此閃光模 按主控單元上的 < > 按鈕並將閃光模 式。 式設為 < >。... - Page 152 2. 在从属单元上设定闪光组 逐一操作和设定从属单元,为所有的从属单 元设定闪光组(A/B/C/D/E),有关从属 单元设置,请参见闪光灯 / 接受器的使用说 明书。 3. 设定闪光模式 通过操作主控单元设定各闪光组的闪光模 式。在显示 期間,按 對應 的功能按鈕 3 並轉動 < > 以選中閃光組。 按功能按鈕 2 並從 < >、< > 和 < > 中選擇所選組的閃光模式。 要關閉所選組的閃光,按 對應的 功能按鈕 1 將其設為 <OFF>。重複步驟 3 設定所有組的閃光模式。...
- Page 153 說明書 Trad 4. 設定閃光輸出或閃光曝光補償量 在選擇了閃光組期間,按功能按鈕 3,轉動 < > 根據閃光模式設定閃光功能並按 < > 按 鈕。 當 使 用 < > 模 式 時,設定閃光輸出,當使用 < > 或 < > 模式時,根據需要設定閃光曝 光補償量。 如果在顯示 時按 對應的功 能按鈕 2,可以為所有閃光組設定設定閃光 曝光補償。重複步驟 4 設定所有組的閃光 功能。...
-
Page 154: 聯動拍攝
5. 拍攝照片 各從屬單元按照為各組設定的閃光模式閃 光。 聯動拍攝 聯動拍攝是通過將從屬單元相機連結到主控 單元相機,從而自動釋放從屬單元相機快門 的功能,可以對包括主控單元和從屬單元在 內的最多 16 個單元使用聯動拍攝進行拍攝。 想要同時從多個角度拍攝同一個被攝體,該 功能較為方便。 要使用聯動拍攝進行拍攝時, 在相機上分別安裝 Phottix Laso 發射器,此 1. 设为联动拍摄模式 外,還可以選用支援無線電傳輸無線拍攝的 佳能閃光燈或 ST-E3-RT 信號發射器。 長按聯動拍攝按鈕直到液晶屏上顯示 , 聯動拍攝模式的 “從屬單元” 已設定,再次按聯動拍攝按鈕便可以將聯動... - Page 155 說明書 Trad 拍攝模式設定為“主控單元”。 2. 設定頻道和 ID 按 對應的功能按鈕 2,並轉動 < > 設定頻道,按 < > 按鈕完成設定。 (Phottix Laso 發射器可以掃描無線電接收 狀態,並自動或手動設定主控單元的傳輸頻 道,具體操作請參照上文無線設置 )。 按 對應的功能按鈕 3,轉動 < > 並按 < > 按鈕選擇需要設定的 ID 位 元數,轉動 < > 按鈕選擇需要設定的 ID 位元數,轉動 < > 進行 ID 設置,最...
- Page 156 4. 設定所有發射器 屬單元相機的快門,使用聯動拍攝進行拍攝 後,從屬單元的 <> 指示燈短暫地以橙色 重複步驟 1 至 3 並將所有 Phottix Laso 發 點亮。 射器在聯動拍攝模式下設為“主控單元”或 “從屬單元”。以相同方法設定在聯動拍攝 7. 按主控單元 對應的功能按鈕 1, 中使用的閃光燈。當按聯動拍攝按鈕將一個 可以釋放所有從屬單元相機的快門。 單元的設置從“從屬單元”改變為“主控單 注意: 元”時,之前設為“主控單元”的其他發射 1. 當使用聯動拍攝功能時,根據相機的 器(或閃光燈)會自動切換為“從屬單元”。 不同, 從屬單元的相機可能需要 “快門線” 5. 設置從屬相機 (另售) 檢查從屬單元的 < > 指示燈以綠色點 1) 除 EOS 1200D 外,對於 2012 亮,將所有從屬單元相機設置在距離主控單...
-
Page 157: 五 . 相機操作設定無線引閃器功能
1.1 選擇 [ 外接閃光燈控制 ] 或 [ 閃光燈 當使用 2007 年以後發售的 EOS 數碼相機時, 控制 ]。 可以從相機的功能表畫面設定閃光燈功能、 無線引閃器功能或自訂功能。 有關相機操作, 1.2 選擇 [ 閃光燈功能設置 ] 或 [ 外接閃 請參見相機的使用說明書。( 以下相機功能表 光燈功能設置 ],畫面變成(外接)閃光 介面以 EOS6D 相機為例 ) 燈功能設置畫面。 1. Phottix Laso 發射器功能設置 1.3 根據相機的不同, 設置畫面有所不同, 選擇專案並設定功能。... - Page 158 2.[ 闪光灯功能设置 ] 可利用相机的设置菜 单设置...
- Page 159 說明書 Trad [啟用] 可以進行無線閃光拍攝 閃光燈閃光 [關閉] 無法進行無線閃光拍攝 [評價] 普通曝光 閃光曝光將對相機測光的整個場景進行平均測光。根據場景的不 E-TTLⅡ闪光测试 [平均] 同,可能需要閃光曝光補償。此設置面向高級用戶。 光圈優先模式下 在光圈優先自動曝光(Av)模式下進行無線閃光拍攝時,可以設定閃光同步速度 的閃光同步速度 可以從[E-TTLⅡ]、[手動閃光]、[多次閃光]和[個別組控制]中選 閃光模式 擇閃光模式以適合所需閃光拍攝。 快門同步 可以在[高速同步]和[前簾同步]之間切換 閃光曝光補償 可以在±3檔間以1/3檔為增量設定閃光曝光補償量。...
- Page 160 可以在自動改變閃光輸出的同時拍攝三張照片。以1/3檔為增量,可以設置的範圍 閃光包圍曝光 最大為±3檔。 無線閃光功能 自動設定無線電傳輸無線閃光拍攝。(僅限自2012年以後的相機) (設置) 清除閃光燈(設置) 可以將Phottix Laso發射器設置恢復為其默認設置。 功能 3. Phottix Laso 發射器自訂功能設置 根據相機的不同,顯示的內容會有所不 同。如果不顯示 C.Fn-20 和 22,通過操作 Phottix Laso 發射器設定這些項目。...
-
Page 161: 六 . 自訂信號發生器
3.2 選擇自訂功能編號並設定功能。 僅限於 Phottix Laso 發射器的自訂功能。 3.3 要清除所有自訂功能設置,在步驟 1 中選擇 [ 清除所有閃光燈自訂功能 ] 或 [ 清 C.Fn: 設定自訂功能 除外接閃光燈的自訂功能設置 ]。 1. 按功能按鈕 4,直至 出現在液晶 屏菜單上。 注意:[ 閃光燈自訂功能設置 ] 下 [ 自動 關閉電源 ] 對應 Phottix Laso 發射器自 長按 的功能按鈕 1 直至顯示自訂功... - Page 162 能畫面。 3. 轉動撥盤 < > 以選擇要設定的自訂項 目(編號),並按 < > 按鈕進入所選 專案選擇介面。 4. 轉動 < > 選擇需要的設置並按 < > 按鈕即可改變設置。 5. 按 對應的功能按鈕 4 返回上一級 介面。 6. 若需要將所有自訂功能設置恢復默認, 按 對應的功能按鈕 2,然後按 對應的功能按鈕 1 確認操作,取消 操作則按 對應的功能按鈕 4。...
- Page 163 說明書 Trad 自訂功能表 自訂功能 功能 設置編號 设置和说明 編號 啟用: 當5分鐘沒有操作時,Phottix Laso發射器自動進入待 機模式(IDLE)。 : 自動待機 C.Fn 01 關閉:當5分鐘沒有操作時,不啟用待機模式(IDLE)。 按相機的景深預覽按鈕進行造型閃光。 按Phottix Laso發射器的測試閃光按鈕進行造型閃光。 按相機的景深預覽按鈕或Phottix Laso發射器的測試閃光按鈕 C.Fn 02 造型閃光 進行造型閃光。 關閉造型閃光。 啟用: 設定用FEB拍攝三張照片後自動取消FEB。 C.Fn 03 閃光包圍曝光 自動取消 關閉: 設定用FEB拍攝三張照片後不取消FEB。...
- Page 164 設定FEB的順序依次為 0:標準曝光 - :減弱曝光(較暗) + :增強曝光(較亮) :閃光包圍 C.Fn 04 曝光順序 設定FEB的順序依次為 - :減弱曝光(較暗) 0:標準曝光 + :增強曝光(較亮) 設定在E-TTLⅡ/E-TTL自動閃光模式下進行測試閃光時,閃光 :用自 輸出為1/32。 C.Fn 07 動閃光測試閃光 設定在E-TTLⅡ/E-TTL自動閃光模式下進行測試閃光時,閃光 輸出為1/1。 可以轉動< >並按 對應的功能 按鈕進行閃光曝光補償。 :閃光曝 C.Fn 13 光測光設置 直接轉動< >進行閃光曝光補償,而無 需操作 按鈕。...
-
Page 165: P.fn:設定個性化功能
說明書 Trad 關閉:設定當從屬單元完全充電時,Phottix Laso發射器不發 出提示音 : 回電提 C.Fn 20 開啟:設定當從屬單元完全充電時,Phottix Laso發射器發出 示音 提示音 照明12秒 關閉顯示幕照明 : 液晶顯 C.Fn 22 示屏照明 持續照明 P.Fn: 設定個性化功能 3. 按照與自訂功能的步驟 6 即可將所有個 1. 在自訂功能畫面,按 對應的功能 性化功能設置恢復默認。 按鈕 1 顯示個性化功能畫面。 2. 按照與自訂功能的步驟 3 和 4 相同的方... - Page 166 個性化功能表 個性化功能 功能 設置編號 設置和說明 編號 : 液晶顯示幕 可以以5個級別調整液晶顯示幕的對比度 P.Fn 01 顯示對比度 當Phottix Laso發射器設為主控單元(無線電傳輸閃光拍攝、 聯動拍攝)時,液晶顯示幕照明使用的顏色為綠 : 液晶 P.Fn 03 顯示幕照明顏 當Phottix Laso發射器設為主控單元(無線電傳輸閃光拍攝、 色:主控閃光 聯動拍攝)時,液晶顯示幕照明的顏色為橙色 當Phottix Laso發射器設為從屬單元(聯動拍攝)時, 液晶顯示幕照明的顏色為橙色 :液晶顯 示屏照明顏色: P.Fn 04 當Phottix Laso發射器設為從屬單元(聯動拍攝)時, 從屬閃光 液晶顯示幕照明的顏色為綠色 啟用自動輔助對焦燈 : 自動輔助 P.Fn 08 對焦燈...
-
Page 167: 七 . 故障診斷
發射器的固件是可以通過 USB 固件進行升 2.3 將主控單元和從屬單元是傳輸頻道和 級的。任何升級及說明都會發佈在 Phottix 無線電 ID 設為相同的號碼。 的博客上 ( journal.phottix.com)。 2.4 檢查從屬單元與主控單元的傳輸範 圍。 七.故障診斷 2.5 如從屬單元使用 Phottix Laso 接收 器 , 請參照接收器說明書檢查從屬單元設 1. 不能開啟 Phottix Laso 發射器 置。 1.1 確認 Phottix Laso 發射器的電池是 3. 顯示 < > 否已裝好,極性是否有裝錯現象。... -
Page 168: 八 . 規格參數
八.規格參數 類型 機載閃光燈無線引閃器 相容E-TTLⅡ/E-TTL自動閃光的A型EOS相機 兼容相机 E-TTLⅡ/E-TTL自動閃光、手動閃光、頻閃閃光、自動外部閃光 曝光控制系統 測光(只在閃光模式設為<Gr>時) 頻率 2405~2475Hz 主調製:OQPSK,二次調製:DS-SS 調製系統 自動,頻道1~15 頻道 0000~9999 無線電ID 最多5組(A/B/C/D/E),最多15個單元 從屬單元控制 100m+ 傳輸距離 1:8~1:1~8:1,1/2檔增量 閃光光比控制 以1/3檔或1/2檔為增量±3檔 閃光曝光補償... - Page 169 說明書 Trad 閃光包圍曝光 以1/3檔或1/2檔為增量±3檔(當與閃光曝光補償配合使用時) 閃光曝光鎖 按相機的<M-Fn>、<FEL>或<*>按鈕 高速同步 具備,只有從2012年開始發售的EOS數碼相機可以利用高速同步 手動閃光 1/1~1/128(1/3檔增量) 頻閃閃光 具備 1~500 Hz 主控單元液晶顯示幕上的< >圖示亮起,從屬單元的自動對焦輔助光發 從屬閃光燈電池檢查 射器閃爍,並且充電指示燈亮起 閃光曝光確認 閃光曝光確認指示燈亮起 造型閃光 使用相機的景深預視按鈕進行閃光 聯動拍攝 具備 自訂功能 個性化功能...
- Page 170 鐳射波長 650nm 輸出功率 <5mW 自定輔助對焦燈 光點大小 投射距離1米處:長335mm 寬326mm(扇形角度約20º) -10℃~+40℃ 工作溫度 電源 2節AA型鹼性電池或AA型鎳氫電池 電池節能 五分鐘無操作後進入IDLE待機模式 待機電流 70mA 休眠電流 ≤250uA 尺寸 (長×寬×高):(84.1×68.3×58.5)毫米 118 克(僅Phottix Laso發射器,不含電池) 重量(約) 注意:當產品的設計和規格有變化時,恕不另行通知。...
- Page 171 說明書 Trad 配件列表 Phottix Laso 發射器 1 PC 掛包 AA 電池 2 PCS USB 升級線 1 PC 說明書 1 PC 固件升級提示卡片 保修卡 1 PC 合格證 1 PC * 請根據配件清單內容檢查包裝內配件。...
Need help?
Do you have a question about the Laso and is the answer not in the manual?
Questions and answers