
Related Manuals for Phottix odin II TTL


Summary of Contents for Phottix odin II TTL
- Page 1 INSTRUCTION MANUAL Odin II TTL Flash Trigger for Canon INSTRUCTION MANUAL Simp 说明书 Trad 說明書...
-
Page 2: Table Of Contents
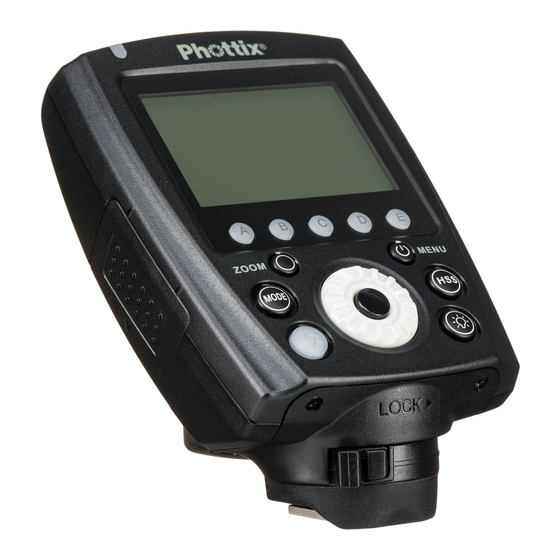
5. Test button/Exposure Confirmation Indicator 6. < >: Option/Confirm button The Odin II TTL Flash Trigger is based on the award-winning Odin TTL Flash 7. Locking Ring Trigger. This new generation of TTL triggering keeps the core features of the 8. -
Page 3: Before Using
2. Slide the flash into the receiver’s hot shoe mount. 1.When using Phottix Odin II TCU and Receiver the flash on the receiver must be in ETTL mode. It does NOT need to be in slave mode. The Odin II system will 3. -
Page 4: Display Content
INSTRUCTION MANUAL The Mixed TTL/M Mode(channels 1-4): D and E) of receivers which are set to the same channel, and have the same Digital ID setting. (Unless the group is set to OFF on the TCU). Channel: 01~04 Adjusting Channel, Group and Digital ID on the TCU The channel, group and ID number of the TCU can be set in Odin II Menu. - Page 5 This Modeling Light Button is designed to work with the modeling light on the zoom of 135mm zoom to 200mm. Phottix Indra Studio Light series. The Indra Modeling Light brightness can be adjusted from 0-9 with the Odin II TCU.
- Page 6 The firmware of the TCU and receivers can be upgraded using the included the Odin II Menu (see below). The default setting of the AF Assist Illuminator is USB cable. Any upgrades and full instructions will be announced on the Phottix being set to OFF.
-
Page 7: Menu Functions
Environmental objects, such as large buildings or walls, trees, fences, or cars can Batteries * If using a 5V DC Adapter remove batteries from the also affect performance. If your Phottix Odin receiver will not trigger move its receiver. location slightly. - Page 8 This equipment complies with FCC RF radiation exposure limits set forth for an Product name: Phottix Odin II TTL Flash Trigger Transmitter uncontrolled environment. This device and its antenna must not be co-located or Model No.: E0811...
- Page 9 注意:在使用 Odin II TTL 引闪器(佳能版),使用本产品前 3. 变焦按钮 请务必通读本使用说明书 , 相机和闪光灯的使用方法,以保证 4. 模式按钮 您熟悉操作,正确使用。 5. 测试按钮 / 曝光确认指示灯 Odin II TTL 引闪器是基于 Odin TTL 引闪器设计的新一代无 >:选择 / 确定按钮 6.< 线 TTL 引闪系统,保留远程功率控制和闪光灯变焦设置等核 7. 锁定环 心功能, 同时增加从属组、无线电频道数量、ID 设置、内置 8. 闪光组按钮 ( 从左到右依次为 A, B, C, D, E) 对焦辅助灯以及远程控制...
- Page 10 收器热靴上拔出即可。 16. 电池仓 通过连接线连接 Odin II 接收器和闪光灯 / 影楼灯 二 . 使用前准备 1. 关闭闪光灯 / 影楼灯和 Phottix Odin II 接收器。 请注意 : 2. 将 3.5mm 连接线的一端插入接收器上的 3.5 mm 端口。 1. 开启 Phottix Odin II 发射器控制单元和接收器,安装在 3. 将 3.5mm 连接线的另一端连接到闪光灯 / 影楼灯。...
- Page 11 说明书 Simp 三 . 液晶屏显示内容 接收器 发射器 接收器和闪光灯通讯状态 : 通讯中; 无线电ID: 0000-9999 无显示: 未通讯 发射器有两种工作模式:TTL/M 混合模式和比率模式。液 无线电频道:01-32 ..晶屏显示内容分别如下 TTL/M 混合模式(5-32 频道): 自动对焦辅助灯: : 启用高速同步; : 启用; 无显示:未启用高速同步 无显示:关闭 闪光曝光补偿 闪光组 电量指示 频道:5~32 电量指示 闪光组 四 . 功能和操作 闪光输出 工作模式设置 TTL/M 混合模式允许单独设置...
- Page 12 插在相机热靴上工作时慢,这是因为 Phottix Odin II 系统 单功能中设置为开启或关闭。 与闪光组和预闪有关 . 注: 测试按钮 / 曝光确认指示灯 ( ) 1. 高速连拍功能无法直接在 Phottix Odin II 发射器上设 置。 1. 空闲状态下, 测试按钮为红灯常亮显示。 按下此按钮, A、 B、 C、D、E 组的闪光灯将会同时被触发(关闭的组不会闪光)。 2. 请在相机上设置高速连拍功能,设置详情,请参阅相机 说明手册。 2. 在 A、 B 、C、D、E 五组闪光灯都为 M 模式时,按一下...
- Page 13 快捷键功能 2. 转动拨盘 以选择要设定项目,并按 按钮。 同时按住 和 约 2s 即可进入 IDLE 模式。 3. 此时转动 选择需要的设置并按 按钮即可改变设置。 4. 按 按钮退出菜单设定画面。 与 Phottix 闪光灯 / 触发器系列之间的兼容性 菜单设定 发射端 接收端 无线功率控制 接收器(佳能版) 支持 Phottix Odin TTL 接收器(佳能, 尼康和索尼版) 不支持 Phottix Strato 编号 功能...
- Page 14 说明书 Simp • 干扰:Phottix Odin II 以 2.4GHz 传送和接收无线电信号。 它在使用时可能受到电流,磁场和无线电信号、无线路由器、 移动电话以及其他电子设备的影响, 还诸如大型建筑或墙壁, 大树,栅栏或汽车等周边事物的影响。如果您的 Phottix Odin II 接收器不能被触发,请稍微移动它的位置。 该产品属于 Class 3R 级激光产品,根据下列标准 IEC 60825-1/GB 7247.1 “激光产品的辐射安全”。 Class 3R: 该等级的激光不直接观测时是安全的。该 等级的激光可能超出 MPE,但一般不会造成伤害。该 等级的可见光连续波激光器功率不能超过 5mW。 本产品的自动对焦辅助灯在菜单中默认设置为“OFF”。 依据低功率电波辐射性电机管理办法 : 第十二条经形式认证合格之低功率射频电机, 非经许可, 公司、 商号或用户均不得擅自变更频率,加大功率或变更原设计之 特性及功能。...
- Page 15 注意:在使用 Odin II TTL 引閃器(佳能版),使用本產品前 3. 變焦按鈕 請務必通讀本使用說明書 , 相機和閃光燈的使用方法,以保證 4. 模式按鈕 您熟悉操作,正確使用。 5. 測試按鈕 / 曝光確認指示燈 Odin II TTL 引閃器是基於 Odin TTL 引閃器設計的新一代無 6.< >:選擇 / 確定按鈕 線 TTL 引閃系統,保留遠端功率控制和閃光燈變焦設置等核 7. 鎖定環 心功能, 同時增加從屬組、無線電頻道數量、ID 設置、內置 8. 閃光組按鈕 ( 從左到右依次為 A, B, C, D, E) 對焦輔助燈以及遠端控制...
- Page 16 15. 5V DC 電源埠 16. 電池倉 通過連接線連接 Odin II 接收器和閃光燈 / 影樓燈 二 . 使用前準備 1. 關閉閃光燈 / 影樓燈和 Phottix Odin II 接收器。 2. 將 3.5mm 連接線的一端插入接收器上的 3.5 mm 埠。 請注意 : 3. 將 3.5mm 連接線的另一端連接到閃光燈 / 影樓燈。 1. 開啟 Phottix Odin II 發射器控制單元和接收器,安裝在...
- Page 17 說明書 Trad 三 . 液晶屏顯示內容 接收器 發射器 接收器和閃光燈通訊狀態 : 通訊中; 无线电ID: 0000-9999 無顯示: 未通訊 發射器有兩種工作模式:TTL/M 混合模式和比率模式。液 ..無線電頻道:01-32 晶屏顯示內容分別如下 TTL/M 混合模式(5-32 頻道): 自動對焦輔助燈: : 啟用高速同步; : 啟用; 無顯示:未啟用高速同步 無顯示:關閉 閃光組 電量指示 閃光曝光補償 頻道:5~32 電量指示 閃光組 四 . 功能和操作 閃光輸出 工作模式設置 TTL/M 混合模式允許單獨設置...
- Page 18 器 / 接收器就會自動熄滅。發射器的 LCD 背光燈可以在菜 插在相機熱靴上工作時慢,這是因為 Phottix Odin II 系統 單功能中設置為開啟或關閉。 與閃光組和預閃有關。 注: 測試按鈕 / 曝光確認指示燈( ) 1. 高速連拍功能無法直接在 Phottix Odin II 發射器上設 置。 1. 空閒狀態下, 測試按鈕為紅燈常亮顯示。 按下此按鈕, A、 B、 C、D、E 組的閃光燈將會同時被觸發(關閉的組不會閃光)。 2. 請在相機上設置高速連拍功能,設置詳情,請參閱相機 說明手冊。 在 A、 B 、C、D、E 五組閃光燈都為 M 模式時,按一下發...
- Page 19 2. 轉動撥盤 以選擇要設定專案,並按 按鈕。 同時按住 和 約 2s 即可進入 IDLE 模式。 3. 此時轉動 選擇需要的設置並按 按鈕即可改變 設置。 4. 按 按鈕退出菜單設定畫面。 與 Phottix 閃光燈 / 觸發器系列之間的相容性 發射端 接收端 無線功率控 菜單 接收器(佳能版) 支持 Phottix Odin TTL 接收器(佳能, 尼康和索尼版) Phottix Strato 不支持 编号 功能...
- Page 20 說明書 Trad • 干擾:Phottix Odin II 以 2.4GHz 傳送和接收無線電信號。 它在使用時可能受到電流,磁場和無線電信號、無線路由器、 行動電話以及其他電子設備的影響, 還諸如大型建築或牆壁, 大樹,柵欄或汽車等周邊事物的影響。如果您的 Phottix Odin II 接收器不能被觸發,請稍微移動它的位置。 該產品屬於 Class 3R 級鐳射產品,根據下列標準 IEC 60825-1/GB 7247.1 “鐳射產品的輻射安全”。 Class 3R: 該等級的鐳射不直接觀測時是安全的。該等級的 鐳射可能超出 MPE,但一般不會造成傷害。該等級的可見光 連續波雷射器功率不能超過 5mW。 本產品的鐳射對焦輔助燈在菜單中將默認為關閉。 依據低功率電波輻射性電機管理辦法 : 第十二條經形式認證合格之低功率射頻電機, 非經許可, 公司、 商號或用戶均不得擅自變更頻率,加大功率或變更原設計之 特性及功能。...
Need help?
Do you have a question about the odin II TTL and is the answer not in the manual?
Questions and answers