Table of Contents
Advertisement
Advertisement
Table of Contents

Related Manuals for Finlux FXVT 60

Summary of Contents for Finlux FXVT 60
- Page 1 FXVT 60 OPERATING AND INSTALLATION INSTRUCTIONS BUILT-IN VITROCERAMIC HOB...
-
Page 2: Table Of Contents
CONTENTS: DESCRIPTION OF THE HOB ......................... SAFETY INSTRUCTIONS INSTALLATON ................. Locating Your Built-in Hob ............Electrical Connection of Your Hob ..........USAGE .................... Turn On and Turn Off The Appliance ........... Select Heater .................. Turn on dual- and triple zones ............ -
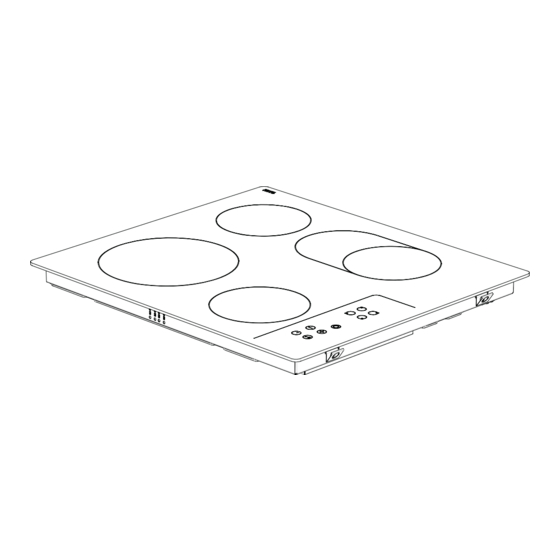
Page 3: Description Of The Hob
DESCRIPTION OF THE HOB OVAL ZONE HEATER FRAME VITROCERAMIC SINGLE ZONE SURFACE HEATER TOUCH CONTROL PANEL... - Page 4 PART 2 SAFETY WARNINGS READ THESE INSTRUCTIONS CAREFULLY AND COMPLETELY BEFORE USING YOUR APPLIANCE, AND KEEP IT IN A CONVENIENT PLACE FOR REFERENCE WHEN NECESSARY. THIS MANUAL IS PREPARED FOR MORE THAN ONE MODEL IN COMMON. YOUR APPLIANCE MAY NOT HAVE SOME OF THE FEATURES THAT ARE EXPLAINED IN THIS MANUAL. PAY ATTENTION TO THE EXPRESSIONS THAT HAVE FIGURES, WHILE YOU ARE READING THE OPERATING MANUAL.
- Page 5 - WARNING: If the surface is cracked, switch off the appliance to avoid the possibility of electric shock. - For hobs incorporating a lid, any spillage should be removed from the lid before opening. And also the hob surface should be allowed to cool before closing the lid.
- Page 6 Installation Warnings - Do not operate the appliance before it is fully installed. - The appliance must be installed by an authorized technician and put into use. The producer is not responsible for any damage that might be caused by defective placement and installation by unauthorized people.
-
Page 7: Locating Your Built-In Hob
INSTALLATION The electrical connection of this hob should be carried out by an authorised service personal or a qualified electrician, according to the instructions in this guide and in compliance with the current regulations. · · Locating your built-in hob ·... - Page 8 · · ·...
-
Page 9: Electrical Connection Of Your Hob
Electrical connection of your hob · · · · · ·... - Page 10 · * This appliance must be earthed. * For this connetion a power lead of wire type H05V V -F should be used. · · ·...
-
Page 11: Usage
USAGE Mode Descriptions... -
Page 12: Turn On And Turn Off The Appliance
Wait until `F' disappears for all zones,turn the hob on by touching and continue to use. Turn On and Turn Off The Appliance Stand-By-Mode, Operating-Mode On/Off Decimal Point Stand-By-Mode Operating-Mode S-Mode Heater Display Select Heater Active/Deactive Heater Button Decimal Point Heater Display Heat Setting Buttons... -
Page 13: Turn On Dual- And Triple Zones
Turn on dual- and triple zones (available only in some models) Dual Zone Indicator Dual Zone Indicator Triple Zone Indicator Set Cooking Level With and Without Heat Boost... -
Page 14: Turn Off Individual Heaters
Turn Off Individual Heaters · · · Active/Deactive Heater Button Decimal Point Heater Display Dual/Triple Zone Selection Cooking Zone Indicator Timer Function Timer Display Heater Display Decimal Point Heater Display, Cooking Zone Indicator Timer Display... -
Page 15: Timer Function
Dual/Triple Zone Indicator Timer Function (available only in some models) B-Mode Active/Deactive Timer Cooking Zone Indicator Cooking Zone Indicator Timer Display Cooking Zone Indicators Cooking Zone Indicator... - Page 16 Cooking Zone Indicator, Cooking Zone Indicator Cooking Zone Indicator Cooking Zone Indicator Cooking Zone Indicator Cooking Zone Indicator Cooking Zone Indicator Timer Display...
-
Page 17: Key Lock
S-Mode Operation Mode Timer Display. Timer Display. Key Lock Key Lock Key Lock Indicator Operating Mode Key Lock Indicator Key Lock Indicator... - Page 18 Child Lock Child lock functionality is foreseen to lock the appliance in a complicated Multi-Step process. Child locking and unlocking is only available in the S-Mode. First has to be pressed until the buzzer beeps, then the have to be pressed for at least 0,5 sec, but max 1 sec. simultaneously. Following ´L` is showed as a confirmation.
- Page 19 pressing until the beep, then the have to be pressed a confirmation for successful unlocking, ´L` symbol in the displays will be erased immediately.
-
Page 20: Touch Control Safety Functions
TOUCH CONTROL SAFETY FUNCTIONS The following safety functions are available to avoid unintended operations of the hob control. Sensor Safety Cut Off To prevent the appliance from unwanted, random sensor operation, a sensor monitoring is included. In case of one or more buttons are pressed longer than 12 sec, the sensor monitoring routine indicates acoustically that wrong operation (pot or other object placed on the button, sensor failure, etc.) and switches off the appliance. -
Page 21: Operating Time Limitations
To prevent the hob control unit from damage, the control monitors all the time the temperature and switches off in case of overheating emergency. It is indicated in the heater 4 heater display with the letter ´t` for all the time until the temperature decreases. -
Page 22: Residual Heat Functions
Residual Heat Functions... -
Page 23: Cleaning And Care
CLEANING AND CARE... - Page 25 FXVT 60...
- Page 28 2. ÓÊÀÇÀÍÈß ÇÀ ÁÅÇÎÏÀÑÍÎÑÒ ÏÐÎ×ÅÒÅÒÅ ÒÅÇÈ ÈÍÑÒÐÓÊÖÈÈ ÂÍÈÌÀÒÅËÍÎ È ÄÎÊÐÀÉ, ÏÐÅÄÈ ÄÀ ÇÀÏÎ×ÍÅÒÅ ÄÀ ÈÇÏÎËÇÂÀÒÅ ÂÀØÈß ÓÐÅÄ È ÃÈ ÄÐÚÆÒÅ ÍÀ ÓÄÎÁÍÎ ÌßÑÒÎ ÇÀ ÁÚÄÅÙÈ ÑÏÐÀÂÊÈ, ÀÊÎ Å ÍÅÎÁÕÎÄÈÌÎ. ÒÎÂÀ ÐÚÊÎÂÎÄÑÒÂÎ Å ÈÇÃÎÒÂÅÍÎ È ÇÀ ÄÐÓÃÈ ÓÐÅÄÈ Ñ ÁËÈÇÊÈ ÕÀÐÀÊÒÅÐÈÑÒÈÊÈ. ÓÐÅÄÚÒ...
- Page 29 -Àêî ïå÷êàòà å ñ êàïàê, îòñòðàíåòå âñè÷êî îò íåãî, ïðåäè äà ãî îòâîðèòå. Îñòàâåòå ïå÷êàòà äà èçñòèíå, ïðåäè äà çàòâîðèòå êàïàêà. -Óðåäúò íå å ïðåäíàçíà÷åí çà óïîòðåáà ñ âúíøíè òàéìåðè èëè îòäåëíà ñèñòåìà ñ äèñòàíöèîííî óïðàâëåíèå. -Íå èçïîëçâàéòå àãðåñèâíè àáðàçèâíè ñðåäñòâà çà ïî÷èñòâàíå...
- Page 30 -Ïàçåòå óðåäà îò àòìîñôåðíè âúçäåéñòâèÿ. Íå ãî îñòàâÿéòå ïîä ïðÿêî âúçäåéñòâèå íà ñëúíöå, äúæä, ñíÿã, ïðàõ è äð. -Îêîëíèòå ìàòåðèàëè íà óðåäà (êàáèíåò) òðÿáâà äà èçäúðæàò íà òåìïåðàòóðà îò ìèíèìóì 100°C. -Температурата на дъното на плочата може да се повиши по време на работа. За това, под продукта...
- Page 36 Изчакайте докато "F" изчезне за всички зони, включете котлона с докосване на и продължите с употребата.
- Page 48 Марка FXVT 60 Модел Тип на котлона Електричество Брой на зоните за готвене Нагревателна технология - 1 Лъчист Размер -1 Ø14,5 Енергоконсумация - 1 192,0 Wh/kg Нагревателна технология - 2 Лъчист Размер -2 Ø14,5 Енергоконсумация - 2 192,0 Wh/kg Нагревателна технология - 3 Лъчист...
Need help?
Do you have a question about the FXVT 60 and is the answer not in the manual?
Questions and answers