Table of Contents
Advertisement
A
技术要求
B
1.
2.
3.
4.
C
借 ( 通 ) 用件登记
描
图
描
校
旧底图总号
底图总号
处数
标记
设 计
签
字
审 核
工 艺
日
期
标准化
1
:
印刷颜色为
PANTONE BLACK C
该用户手册里的彩色图片也按黑白制作
规格为
A4
如果供应商的排版需要加空白页 请加在最后
签 名
更改文件号
校 对
审 定
批 准
日 期
1
英文用户手册
M12FDW09(9240AY)
MATSUI
日 期
阶 段 标 记
01
REV.
数
量
重
1
1
张
共
第
2
,
6710003314
英国
比 例
105G双铜
量
广东美的集团股份有限公司
美的洗涤电器制造有限公司
1
张
2
A
B
C
D
D
Advertisement
Table of Contents

Related Manuals for Matsui M12FDW09


Summary of Contents for Matsui M12FDW09
- Page 1 印刷颜色为 PANTONE BLACK C 该用户手册里的彩色图片也按黑白制作 规格为 如果供应商的排版需要加空白页 请加在最后 借 ( 通 ) 用件登记 描 图 描 校 英文用户手册 旧底图总号 6710003314 M12FDW09(9240AY) 英国 MATSUI 底图总号 处数 标记 签 名 日 期 阶 段 标 记 比 例 更改文件号 105G双铜 REV. 设 计...
-
Page 3: Table Of Contents
....1 Congratulations Congratulations on the purchase of your new Matsui Dishwasher. Before commencing the installation and set up, please check that you have all the items and familarise yourself with this Instruction Manual. - Page 4 This appliance must be earthed. In the event of a malfunction or breakdown, earthing will Improper connection of the equipment- reduce the risk of electric shock by providing a earthing conductor can result in a risk path of least resistance for electric current. This of electric shock.
- Page 5 To get the best performance from your dishwasher, read all operating instructions before using it for the first time. S TRO NG NO RMAL E CON OMY RI NS E RAP I D S OAK NOTE: 1 Pre-rinse light: illuminate when pre-rinse.
- Page 6 Pre-wash Pots, plates, casserole dishes. -wash( 0℃ Dishes that have been sitting Wash (50 ℃) Pre-wash(5 g) Strong with dried food on them for Rinse Main wash(25 g) awhile. Rinse (70 ℃) Drying Pre-wash Pots, plates, glasses and -wash Pre-wash(5 g) lightly soiled pans.
-
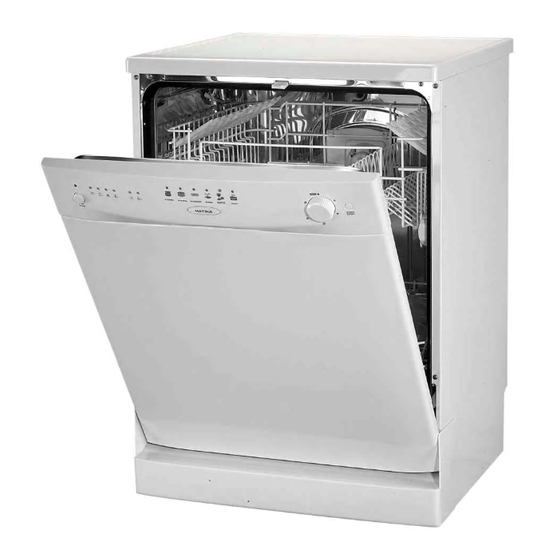
Page 7: Control Panel
Please follow the steps below to change the wash programme NOTE: If you open the dishwasher's door during the washing once the washing cycle has already started. cycle and then close it, the dishwasher will continue the current washing programme after 10 seconds. However, if the 1. -
Page 8: Wash Cycle Table
To optimise and customise the level of salt consumption, please follow the steps below to adjust the salt consumption. 1. Remove the lower basket and unscrew the reservoir cap. 2. There is an arrow shaped indicator in the reservoir, which allows you to turn. You may turn it to the "-"... - Page 9 Fig1 Rinse aid helps to ensure water does not cling and leave marks on crockery during the drying phase and helps crockery to dry faster after it has been washed. Only pour rinse aid that is for domestic dishwashers into the reservoir. This model is designed to use liquid rinse aids only. Please follow the steps below to pour the rinse aid into the storage reservoir, and the amount will dispense automatically.
- Page 10 Scrape off any large amounts of left-over food. It is not necessary to rinse the dishes under running water. Place objects in the dishwasher in the following way: 1.Items such as cups, glasses, pots/pans, etc. are placed upside down. 2.Curve items, or those with recesses, should be at a slant so that water can run off. 3.They are stacked securely and cannot tip over.
- Page 11 We suggest that you place large and difficult to clean items into the lower rack : such as pots, pans, lids, serving dishes and bowls, as shown in the figure below. It is preferable to place serving dishes and lids on the side of the rack in order to avoid blocking the rotati on of the top spray arm.
-
Page 12: Detergent
Cutlery should be placed in the cutlery basket with handles at the bottom. If the rack has side baskets, the spoon should be loaded individually into the appropriate slots, especially long utensils should be placed in the horizontal position at the front of the basket as shown. - Page 13 The filter prevent larger remnants of food or other objects from getting inside the pump. This residue can occasionally clog up the filters. The filter system consists of a coarse filter,a flat (Main filter) And a microfilter(Fine filter). Main filter Food and soil particles trapped by this filter are pulverized by a special jet on the lower spray arm and washed down the drain.
- Page 14 If your dishwasher is left in an unheated place over the winter, ask a service technician to: Reconnect the water inlet pipe to the Cut off electrical power to the dishwasher. water valve. Turn off the water supply and disconnect the water Remove the filter in the tub the bottom inlet pipe from the water valve.
- Page 15 Please see the rating label to know the rating voltage and connect the dishwasher to the appropriate power supply. Use required fuse 13 amp. Fused electrical supply is required-copper wire only. Time delay fuse or circuit breaker recommended and provide separate circuit serving only this appliance.
- Page 16 Position the appliance in the desired location. The back should rest against the wall behind it, and the sides, along the adjacent cabinets or wall. The dishwasher is equipped with water supply and drain hoses that can be positioned to the right or the left to facilitate proper installation.
- Page 17 Fuse blown, or the Replace fuse or reset circuit breaker. Remove any other circuit is disconnected appliances sharing the same circuit with the dishwasher Power supply is not Make sure the dishwasher is turned on and the door is turned on closed securely.
-
Page 18: Rinse Aid
Combination of soft Use less detergent if you have soft water and select a water and too much shorter cycle to wash the glassware. detergent Tea or coffee stains Using a solution of 1/2 cup of bleach and 3 cups warm water to remove the stains by hand. -
Page 19: Filtering System
RATED VOLTAGE: 230V / 50Hz RATED POWER: 1930W A RATED ENERGY EFFICIENCY A RATED WASH PERFORMANCE A RATED DRYING PERFORMANCE 12 PLACE SETTINGS 6 WASH PROGRAMMES TWO-SPRAY ARMS ELECTRONIC CONTROL HEIGHT ADJUSTABLE UPPER BASKET DIMENSION: 600X580X820(MM) Remedy Possible Causes Drying light flicker Rinse light flicker Wash light flicker * Water tap is not turned on.
Need help?
Do you have a question about the M12FDW09 and is the answer not in the manual?
Questions and answers