Table of Contents

Related Manuals for BlackVue DR490L-2CH


Summary of Contents for BlackVue DR490L-2CH
- Page 1 DR490L-2CH...
-
Page 2: Important Safety Information
Important safety information For user safety and to avoid property damage, read through this manual and follow these safety instructions to use the product correctly. y Do not disassemble, repair, or modify the product yourself. Doing so may cause fire, electric shock, or malfunction. For internal inspection and repair, contact the service center. -
Page 3: Fcc Compliance Information
FCC Compliance Information This equipment has been tested and found to comply with the limits for a Class A digital device, pursuant to Part 15 of the FCC Rules. These limits are designed to provide reasonable protection against harmful interference when the equipment is operated in a commercial environment. - Page 4 In the box Check the box for each of the following items before installing the BlackVue dashcam. Front camera Quick start guide Hardwire cable Power cord Bracket microSD Card microSD card adapter Rear camera Rear camera Pry tool connection cable...
-
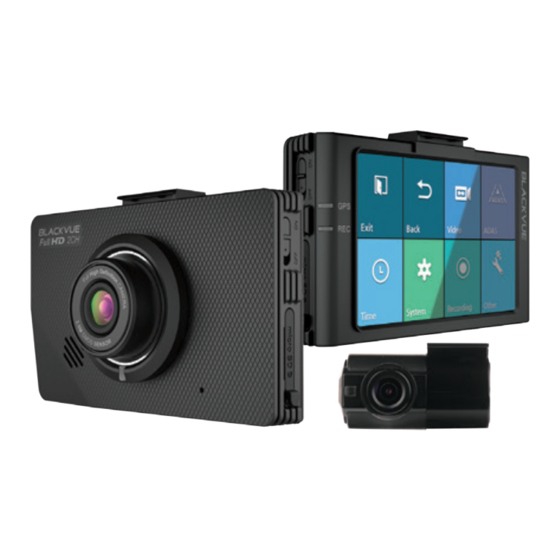
Page 5: Front Camera
At a glance The following diagrams explain each part of the BlackVue dashcam. Front camera 18.5 mm Power switch microSD card slot cover 31.8 mm Speaker Front security LED : Blinks white slowly in normal mode or event standby mode. - Page 6 Rear camera connection port DC in (power connector) GPS connection port GPS LED : Blue LED is on when GPS is on; blinks when there is no GPS signal. LED is off when no GPS is connected. 99.5 mm Recording LED : Red LED is on in normal mode, event standby mode and when saving a parking recording (motion detected).
-
Page 7: Rear Camera
Rear camera Rear security LED : Blue LED blinks when rear and front cameras are connected. Front camera Camera lens Mounting bracket connection port 51.3 mm 29.2 mm... - Page 8 STEP 1 Install and power up Install the front camera behind the rear view mirror. Install the rear camera at the top of the back windshield. Remove any foreign matter and clean and dry the windshield before installation. Warning y Do not install the product in a location where it can obstruct the driver's field of vision.
- Page 9 Peel off the plastic film from the lens. Peel off the protective film from the double- sided tape and attach the front camera to the windshield behind the rear-view mirror. Optional GPS receiver: Plug in the GPS receiver and attach it in a corner of the windshield.
- Page 10 Peel off the protective film from the double-sided tape and attach the rear camera to the rear windshield. Adjust the angle of the lens by rotating the body of the rear camera. Connect the front camera (‘R CAM’ port) and the rear camera using the rear camera connection cable.
- Page 11 To record in parking mode you must hardwire the dashcam to your car’s fuse panel using the hardwire cable. Normal mode and event mode will also be available while driving. Plug the hardwire cable into the DC-IN port on the front camera.
- Page 12 Connect the red [B +] wire to a Constant Power fuse. Identify a Constant Power (battery power) fuse in your fuse panel. Typical Constant Power fuses are the hazard light (emergency lamp), tail lights and interior light fuses. If your car has a “Battery Saver Function”...
- Page 13 Power cord Rear camera connection cable Turn on the engine and switch on the dashcam. The BlackVue dashcam will power up and start recording. Video files are stored on the microSD card. When the microSD card fills up, the newest video files will start to replace the oldest video files (called loop recording) –...
- Page 14 STEP 2 LCD main menu composition Tap the LCD screen anywhere when it is off to turn the LCD on. Tap to switch between the front camera view, rear camera view and picture-in-picture Tap the screen to access the Quick Menu. Current state Voice guidance Recording mode...
-
Page 15: Quick Menu
Quick menu Access the settings menu Turn audio recording on/off Exit Turn voice guidance on/off Go to the video list Turn the security LED (front camera) on/off Displays your current mode Turn the text overlay on/off (Normal mode or Parking mode) - Page 16 STEP 3 Playback Playing video files on the LCD screen Tap the N/E/P button to switch between normal, event and parking recordings y Select the List button from the Quick Menu. y Use the arrows to select a recording and press the Play button. Normal Normal mode recordings When the dashcam detects an impact while in normal or parking...
- Page 17 Playing video files on your computer You can play video files in BlackVue Viewer (available for Windows and macOS) on your computer. Remove the microSD card from the camera and use the included microSD card adapter to connect it to your computer.
- Page 18 STEP 4 Adjusting the time and other settings Adjusting the settings on the LCD screen Select Settings from the Quick Menu. The settings that can be adjusted include: y Video settings: Brightness, Saturation y Advanced Driver Assistance Systems (ADAS): Lane Departure Warning System (LDWS) activation speed, Warning alarm y Time settings: Manual time and time zone setting y System settings: Cut-off voltage, Screen timeout, Language, High temperature cut-off,...
- Page 19 Adjusting the time on the LCD screen Please backup any important recordings before adjusting the time. When you save the new time settings the dashcam will format the microSD card and delete all recordings stored on the card. If you do not connect the GPS receiver: To manually set the time select Settings from the Quick Menu and press the Time button.
-
Page 20: Tips For Optimal Performance
Tips for optimal performance Format the microSD card once a month, or when the BlackVue dashcam tells you the card needs maintenance. Formatting the card in the BlackVue: Tap the screen to turn the LCD on. Tap again to access the Quick Menu. Select Settings >... -
Page 21: Product Specifications
Product specifications Model Name DR490L-2CH Front: Black/Width 99.5 mm x Height 60.1 mm x Thickness 31.8 mm/93 g Color/Size/Weight Rear: Black/Width 51.3 mm x Height 29.7 mm x Thickness 29.2 mm/18 g Memory microSD Card (16 GB/32 GB/64 GB/128 GB) - Page 22 Low Voltage Cut-Off (24.0)/12.2 V (24.4)/12.4 V (24.8) Front: FCC, CE, RoHS Certifications Rear: FCC, CE, RoHS BlackVue Viewer Software * Windows XP or higher (Windows 8 supported) and Mac Yosemite OS X (10.10) or higher Advanced Driver Lane Departure Warning System (LDWS)
Need help?
Do you have a question about the DR490L-2CH and is the answer not in the manual?
Questions and answers