Table of Contents
Advertisement
Available languages
Available languages
Quick Links
Advertisement
Table of Contents

Related Manuals for BlackVue DR750X-1CH


Summary of Contents for BlackVue DR750X-1CH
- Page 1 DR750X-1CH ENGLISH/NEDERLANDS...
- Page 2 BLACKVUE DR750X-1CH For manuals, customer support and FAQs go to www.blackvue.com Voor handleidingen, Customer Support en Veelgestelde Vragen, ga naar www.blackvue.com...
-
Page 3: Important Safety Information
If the product is damaged or the power supply is cut due to an accident, video may not be recorded. y Do not remove the microSD card while the microSD card is saving or reading data. y The data can be damaged or malfunctions may occur. DR750X-1CH... -
Page 4: Fcc Compliance Information
This device complies with Part 15 of the FCC Rules. Operation is subject to the following two conditions: (1) This device may not cause harmful interference, and (2) This device must accept any interference received, including interference that may cause undesired operation of this device. FCC ID: YCK-DR750X-2CH BLACKVUE... - Page 5 Contact local authorities to learn about disposal and recycling options available in your area. 2. The correct disposal of your BlackVue dashcam will help prevent potential negative consequences for the environment and human health.
- Page 6 L’exploitation est autoriséee aux deux conditions suivantes: (1) l’appareil ne doit pas produire de brouillage, et (2) l ’utilisateur de l’appareil doit accepter tout brouillage radioélectrique subi, méme si le brouillage est susceptible d’encompromettre le fonctionnement. BLACKVUE...
-
Page 7: Declaration Of Conformity
Product: radio equipment/ dashcam Type: DR750X-1CH Declaration and applicable standards Hereby, TJM Supplies B.V. declares that the type of radio equipment DR750X-1CH conforms to: Directive EMC 2014/53/EU and the RoHS directive (2011/65/EU) on the restriction of the use of certain hazardous substances in electronic equipment by applying EN 50581: 2012 and IEC 62321-3-1: 2013. -
Page 8: Verklaring Van Overeenstemming
Product: radioapparatuur/ dashcam Model(len): DR750X-1CH Verklaring en toepasselijke normen Hierbij verklaart TJM Supplies B.V., dat het type radioapparatuur DR750X-1CH conform is met: Richtlijn EMC 2014/53/EU en de RoHS richtlijn (2011/65/EU) betreffende beperking van het gebruik van bepaalde gevaarlijke stoffen in elektronische apparatuur door toepassing van EN 50581:2012 en IEC 62321-3-1:2013. -
Page 9: Need Help
In the box Check the box for each of the following items before installing the BlackVue dashcam. Front camera Quick start guide Cigarette lighter Hardwiring power cable power cable Double-sided Cable clips tape for the (5 EA) Mounting Bracket microSD microSD Card... -
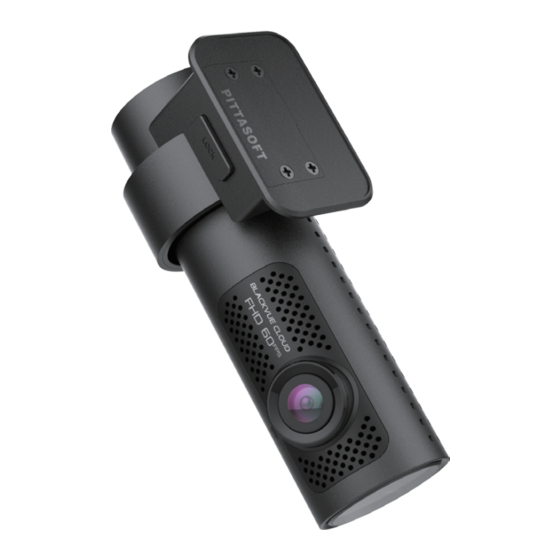
Page 10: Front Camera
At a glance The following diagrams explain each part of the BlackVue dashcam. Front camera 118.5 mm Lock button Camera lens Mounting bracket Front security LED : Lights on during (i) normal mode, (ii) an event is being recorded (impact detected), (iii) manual recording has started, or (iv) motion is detected in parking mode. - Page 11 : Lights red when (i) an event is being recorded (impact detected), or (ii) manual recording has started. : Lights green in parking mode when motion is detected. Connectivity details label: - Default Wi-Fi SSID - Default Wi-Fi password - Cloud code - QR code Serial number label DR750X-1CH 11...
- Page 12 Available options: - Turn on/off audio recording (default) - Manual recording trigger - Off Micro USB port Cover DC in (power connector) microSD card slot Wi-Fi button: - Press once to turn on/off Wi-Fi. 12 BLACKVUE...
- Page 13 Turn off the engine. Open the cover of the microSD card slot, gently push the card into the slot until it locks into place and close the cover. Peel off the protective film from the double-sided tape and attach the front camera to the windshield behind the rear-view mirror. DR750X-1CH 13...
- Page 14 A low voltage power cut-off function and a parking mode timer to protect the automotive battery from discharge is installed in the device. Settings can be changed in the BlackVue App or Viewer.
- Page 15 Connect the GND cable to metal ground bolt. Connect the power cable to the DC in terminal of the front camera. BlackVue will power up and start recording. Video files are stored on the microSD card.
- Page 16 When you run the dashcam for the first time the firmware is automatically loaded onto the microSD card. After the firmware has been loaded onto the microSD card you can customize settings using BlackVue Viewer on a computer. 16 BLACKVUE...
- Page 17 Playing video files on your (Android/iOS) Search for the BlackVue app in the Google Play Store or Apple App Store and install it on your smartphone. “Pair” your smartphone with the BlackVue dashcam via direct Wi-Fi: (i) Press the Wi-Fi button once to turn on Wi-Fi.
- Page 18 (v) Open the BlackVue app and select WI-FI. Select the video file you want to play from the video list. Note y Direct Wi-Fi lets you connect your smartphone to your dashcam via Wi-Fi within a range of 10m. y For quick playback and download of the recordings, you can select the “Quick play file”...
- Page 19 Remove the microSD card from the dashcam. Open side cover To remove Insert the card into the microSD card reader and connect it to a computer. Download BlackVue Viewer program from www.blackvue.com > Support > Downloads and install it on your computer. DR750X-1CH 19...
- Page 20 Run BlackVue Viewer. To play, select a video and click on the play button or double click the selected video. Windows/macOS Viewer Note y All images shown are for illustration purpose only. Actual program may differ from images shown. 20 BLACKVUE...
- Page 21 The dashcam's time zone is initially set to (GMT-11). To display the correct time please select your time zone. Using your smartphone (Android/iOS) “Pair” your smartphone with the BlackVue dashcam via direct Wi-Fi (for details see STEP 2 ‘Playing video files on your smartphone’). Open the BlackVue app and select WI-FI.
- Page 22 Settings that can be changed include Wi-Fi SSID & password, image quality, sensitivity settings, voice recording on/off, speed unit (km/h, MPH, off ), LEDs on/off, voice guidance volume, Cloud settings etc. Once settings are configured, tap and tap Save. 22 BLACKVUE...
- Page 23 (km/h, MPH, off ), LEDs on/off, voice guidance volume, Cloud settings etc. For more information about changing the settings in BlackVue Viewer, please download the manual from www.blackvue.com > Support > Downloads. DR750X-1CH 23...
-
Page 24: Connect To Blackvue Cloud (Optional)
STEP 4 Connect to BLACKVUE CLOUD (optional) If you don’t have a mobile Wi-Fi hotspot, Blackvue connectivity module or if you don’t want to use the BLACKVUE CLOUD service, you can skip this step. If you have a mobile Wi-Fi hotspot (also known as a portable Wi-Fi router), BlackVue... - Page 25 Register. Connect your BlackVue dashcam to a Wi-Fi hotspot for Cloud connectivity (i) Make sure your BlackVue dashcam and mobile Wi-Fi hotspot are on. (ii) “Pair” your smartphone with the BlackVue dashcam via direct Wi-Fi (for details see STEP 2 ‘Playing video files on your smartphone’) >...
- Page 26 (v) Choose your Wi-Fi hotspot from the list. Enter the password and tap OK. Note y Up to 3 Wi-Fi hotspot SSIDs can be saved (e.g. home, portable hotspot and work). y The BlackVue DR750X dashcam is not compatible with 5GHz wireless networks. 26 BLACKVUE...
- Page 27 Mount the SIM slot back in the connectivity module, then, screw the bolt to hold SIM slot cover. (ii) "Pair" your smartphone with the BlackVue dashcam via direct Wi-Fi. (iii) Open the BlackVue app and select WI-FI > DR750X-1CH 27...
- Page 28 For full details, refer to the "SIM activation guide" that is included in the CM100LTE package. y To use the BlackVue Cloud Service, SIM card must be properly activated for Internet access via LTE network. y When the dashcam is connected to internet, you can use BlackVue Cloud features such as remote Live View and Video playback, Real-time location, push notification, Auto-upload, remote Firmware update etc.
-
Page 29: Tips For Optimal Performance
Download BlackVue Windows Viewer from www.blackvue.com > Support > Downloads and install it on your computer. Insert the microSD card into the microSD card reader and connect the reader to your computer. Launch the copy of BlackVue Viewer that is installed on your computer. Click the Format button, select the card drive and click OK. -
Page 30: Product Specifications
Product specifications: Model Name DR750X-1CH Color/Size/Weight Black / Width 118.5 mm x Height 36 mm / 103 g Memory microSD Card (32 GB / 64 GB / 128 GB / 256 GB) Normal recording, Event recording (when impact is detected... - Page 31 -20 °C − 85 °C (-4 °F − 185 °F) Temperature Storage -20 °C − 90 °C (-4 °F − 194 °F ) Temperature High Temperature Approx. 85 °C (185 °F) Cut-Off Certifications FCC, CE, RoHS, Telec, WEEE, IC DR750X-1CH 31...
- Page 32 Software * Windows 7 or higher and Mac Yosemite OS X (10.10) or higher Application BlackVue Application (Android 5.0 or higher, iOS 9.0 or higher) Others Adaptive Format Free File Management System * STARVIS is a trademark of Sony Corporation.
-
Page 33: Hulp Nodig
In het vakje Vink het vakje aan voor elk van de volgende items voordat u de BlackVue-dashcam installeert. Camera voorzijde Snelstartgids Voedingskabel van de Bedrade sigarettenaansteker voedingskabel Dubbelzijdige tape voor de Kabelklemmen (5 EA) montagesteun microSD-kaart microSD-kaartlezer Wrikker Hulp nodig? Download de handleiding (inclusief Veelgestelde Vragen) en de nieuwste firmware vanaf www.blackvue.com... - Page 34 In een oogopslag De volgende diagrammen verklaren elk onderdeel van de BlackVue-dashcam. Camera voorzijde 118,5 mm Vergrendeltoets Cameralens Montagesteun Veiligheidslampje voorzijde : Licht op wanneer (i) in normale modus, (ii) een activiteit wordt opgenomen (botsing waargenomen), (iii) handmatige opname is gestart of (iv) beweging wordt gedetecteerd in parkeermodus.
- Page 35 : Licht rood op wanneer (i) een activiteit wordt opgenomen (botsing waargenomen) of (ii) handmatige opname is gestart. : Licht groen op in parkeermodus wanneer beweging wordt gedetecteerd. Label voor connectiviteitsgegevens: - Standaard Wi-Fi SSID - Standaard Wi-Fi-wachtwoord - Cloud-code - QR-code Label serienummer DR750X-1CH 35...
- Page 36 Beschikbare opties: - Audio-opname aan-/uitzetten (standaard) - Handmatige opname-activering - Uit Micro-USB-poort Aansluiting voor de stroominvoer microSD-kaartsleuf Wi-Fi-knop: - Druk hier één keer op om Wi-Fi aan of uit te zetten. 36 BLACKVUE...
- Page 37 Zet de motor uit. Open het klepje van de microSD-kaartsleuf, duw de kaart voorzichtig in de sleuf totdat hij vergrendeld zit en sluit het paneel. Haal het beschermfolie van de dubbelzijdige tape en bevestig de camera voorzijde aan de voorruit achter de achteruitkijkspiegel. DR750X-1CH 37...
- Page 38 Gebruik de wrikker om de hoeken van de afwerking van de voorruit op te tillen en duw het netsnoer eronder. Start de motor. De BlackVue dashcam zal aangaan en beginnen met opnemen. Videobestanden worden opgeslagen op de microSD-kaart. Zet de motor uit. De dashcam zal automatisch stoppen en uitschakelen. Om op te...
- Page 39 Raadpleeg de gebruikershandleiding van het voertuig voor meer informatie. Sluit de GND-kabel aan op de metalen aardingsbout. Sluit de voedingskabel aan op de DC-ingang van de camera voorzijde. BlackVue zal opstarten en beginnen met opnemen. Videobestanden worden opgeslagen op de microSD-kaart. DR750X-1CH 39...
- Page 40 Wanneer u de dashcam voor het eerst aanzet, zal de firmware automatisch op de microSD-kaart geïnstalleerd worden. Nadat de firmware op de microSD-kaart geïnstalleerd is, kunt u de instellingen aanpassen op een computer met behulp van BlackVue Viewer. 40 BLACKVUE...
- Page 41 Videobestanden afspelen op uw (Android/iOS) Zoek naar de BlackVue-app in de Google Play Store of Apple App Store en installeer deze op uw smartphone. “Koppel” uw smartphone met de BlackVue-dashcam via directe Wi-Fi: (i) Druk één keer op de Wi-Fi-toets om Wi-Fi aan te zetten.
- Page 42 (v) Open de BlackVue-app en selecteer WI-FI. Selecteer het videobestand dat u uit de videolijst wilt afspelen. Opmerking y Met directe Wi-Fi kunt u, binnen een bereik van 10m, uw smartphone verbinden met uw dashcam. y Voor het snel afspelen en downloaden van de opnames, kunt u de optie “Bestand snel afspelen”...
- Page 43 Verwijder de microSD-kaart uit de dashcam. Open het zijpaneel Om te verwijderen Steek de kaart in de microSD kaartlezer en verbind deze met een computer. Download het programma BlackVue Viewer vanaf www.blackvue.com > Support > Downloads en installeer het op uw computer. DR750X-1CH 43...
- Page 44 Start BlackVue Viewer. Selecteer een video en klik op de afspeeltoets of dubbelklik op de geselecteerde video om deze af te spelen. Windows/macOS Viewer Opmerking y Alle getoonde afbeeldingen zijn uitsluitend ter illustratie. Werkelijke programma kan afwijken van de weergegeven afbeeldingen.
- Page 45 De tijdzone van de dashcam staat aanvankelijk ingesteld op (GMT-11). Selecteer uw tijdzone om de juiste tijd weer te geven. Uw smartphone (Android/iOS) gebruiken “Koppel” uw smartphone met de BlackVue-dashcam via directe Wi-Fi (bekijke voor meer informatie STAP 2 ‘Videobestanden afspelen op uw smartphone’). Open de BlackVue-app en selecteer WI-FI.
- Page 46 Instellingen die kunnen worden gewijzigd zijn SSID en wachtwoord van Wi-Fi, beeldkwaliteit, gevoeligheidsinstellingen, spraakopname aan/uit, snelheidseenheid (km/u, MPU, uit), lampjes aan/uit, volume van gesproken begeleiding, Cloud-instellingen, etc. Zodra de instellingen zijn geconfigureerd, tikt u op en vervolgens op Opslaan. 46 BLACKVUE...
- Page 47 De tijdzone en andere firmware-instellingen van de dashcam computer wijzigen op uw (Windows/macOS) Start het programma BlackVue Viewer nadat u de microSD-kaart van de dashcam heeft aangesloten op uw computer. Klik op de -toets om het BlackVue-instellingenpaneel te openen. Instellingen...
- Page 48 Als u een mobiele Wi-Fi-hotspot (ook wel draagbare Wi-Fi-router of genoemd), BlackVue-connectiviteitsmodule (CM100LTE), ingebouwd draadloos internetnetwerk in de auto of een Wi-Fi-netwerk in de buurt van uw auto heeft, kunt u de BlackVue-app gebruiken om verbinding te maken met BLACKVUE CLOUD en zien waar uw auto zich op dat moment bevindt en live video van de dashcam bekijken.
- Page 49 Verbind uw BlackVue-dashcam met een Wi-Fi-hotspot voor Cloud-connectiviteit (i) Zorg ervoor dat uw BlackVue-dashcam en mobiel Wi-Fi-hotspot aanstaan. (ii) “Koppel” uw smartphone met de BlackVue-dashcam via directe Wi-Fi (bekijke voor meer informatie STAP 2 ‘Videobestanden afspelen op uw smartphone’) > Firmware-instellingen >...
- Page 50 (v) Kies uw Wi-Fi-hotspot uit de lijst. Voer het wachtwoord in en tik op OK. Opmerking y Er kunnen tot 3 Wi-Fi-hotspot-SSID’s opgeslagen worden (bijv. Thuis, draagbare hotspot en werk). y De BlackVue DR750X dashcam is niet compatibel met 5GHz draadloze netwerken. 50 BLACKVUE...
- Page 51 Steek de simkaart in de simkaartsleuf. Plaats de simkaartsleuf terug in de connectiviteitsmodule en schroef vervolgens de bout vast om de simkaartsleuf vast te zetten. (ii) “Koppel” uw smartphone met de BlackVue-dashcam via directe Wi-Fi. (iii) Open de BlackVue-app en selecteer WI-FI > DR750X-1CH 51...
- Page 52 Raadpleeg de "SIM-activeringshandleiding" in het CM100LTE-pakket voor meer informatie. y Om de BlackVue Cloud Service te gebruiken, moet de simkaart correct zijn geactiveerd voor internettoegang via het LTE-netwerk. y Wanneer de dashcam is verbonden met internet, kunt u BlackVue Cloud-functies (zoals live-weergave en video op afstand afspelen, realtime locatie, push-meldingen, auto-upload, externe firmware-update, enz.)
- Page 53 Download BlackVue Windows Viewer vanaf www.blackvue.com > Support > Downloads en installeer deze op uw computer. Steek de microSD-kaart in de microSD kaartlezer en verbind de lezer met uw computer. Start BlackVue Viewer vanaf uw computer. Klik op de Formatteer -toets, selecteer het kaartstation en klik op OK.
- Page 54 Productspecificaties: Modelnaam DR750X-1CH Kleur/Grootte/Gewicht Zwart/Breedte 118,5 mm x Hoogte 36 mm/103 g Geheugen microSD-kaart (32 GB/64 GB/128 GB/256 GB) Normale opname, Activiteitsopname (wanneer botsing wordt gedetecteerd in normale en parkeermodus), Handmatige opname en Parkeeropname (wanneer beweging wordt gedetecteerd) Opnamemodi * Wanneer u een bedrade voedingskabel gebruikt, zal ACC+ de parkeermodus activeren.
- Page 55 Bedrijfstemperatuur -20 °C − 85 °C (-4 °F − 185 °F) Opslagtemperatuur -20 °C − 90 °C (-4 °F − 194 °F) Onderbreking bij hoge Ca. 85 °C (185 °F) temperatuur Certificeringen FCC, CE, RoHS, Telec, WEEE, IC DR750X-1CH 55...
- Page 56 BlackVue Viewer Software * Windows 7 of nieuwer en Mac Yosemite OS X (10.10) of nieuwer BlackVue-applicatie (Android 5.0 of nieuwer, iOS 9.0 of Applicatie nieuwer) Overige Aangepast formaatvrij bestandsbeheersysteem * STARVIS is een handelsmerk van Sony Corporation. 56 BLACKVUE...
- Page 57 Notes...
- Page 58 Notes...
-
Page 59: Product Warranty
Product Warranty The term of this product warranty is 1 year from the purchase date. (Accessories such as an External Battery/microSD Card: 6 Months) We, PittaSoft Co., Ltd., provide the product warranty according to the Consumer Dispute Settlement Regulations (drawn up by the Fair Trade Commission). PittaSoft or designated partners will provide the warranty service upon request. Warranty Circumstances Within the... - Page 60 020-200097 FCC ID : YCK-DR750X-2CH / HVIN : DR750X-1CH / IC : 23402-DR750X2CH DR750X-1CH Address 4F ABN Tower, 331, Pangyo-ro, Bundang-gu, Seongnam-si, Gyeonggi-do, Republic of Korea, 13488 instagram.com/blackvueofficial © 2020...
Need help?
Do you have a question about the DR750X-1CH and is the answer not in the manual?
Questions and answers