Tait TM8105 User Manual
Hide thumbs
Also See for TM8105:
- User manual (32 pages) ,
- Service manual (578 pages) ,
- Applications manual (136 pages)
Table of Contents
Advertisement
Changes to this manual
In the interests of improving the performance, reliability or servicing of the
equipment, Tait Electronics Ltd reserves the right to update both the equip-
ment or this user's manual, without prior notice.
Website: For contact details and technical assistance, go to
http://www.taitworld.com/, and
http://support.taitworld.com/.
Mise à jour de ce guide
Dans le but d'améliorer la performance, la fiabilité et l'entretien, Tait
Electronics Ltd se réserve le droit de mettre à jour son équipement et/ou ce
guide de l'utilisateur sans notification préalable.
Site Web : pour nos coordonnées ou une assistance technique,
consultez http://www.taitworld.com/, et
http://support.taitworld.com/.
Actualización de esta guía
Con el fin de mejorar el rendimiento, la confiabilidad o el servicio del
equipamiento, Tait Electronics Ltd se reserva el derecho de actualizar tanto
el equipo como esta guía del usuario sin previo aviso.
Sitio en internet: Para obtener asistencia técnica y los datos acerca
de cómo comunicarse con nosotros, diríjase a
http://www.taitworld.com/, y
http://support.taitworld.com/.
更新本指南
更新本指南
更新本指南
更新本指南
为改善设备的性能、可靠性或维护,Tait 电子有限公司保留在
不事先通知的情况下更新本设备或用户指南的权利。
网址:有关联系详情和技术支持,请浏览
网址:
网址:
网址:
http://www.taitworld.com/,及
http://support.taitworld.com/。
MMA-00002-01 Issue 1
1
Advertisement
Chapters
Table of Contents

Related Manuals for Tait TM8105


Summary of Contents for Tait TM8105
- Page 1 Changes to this manual In the interests of improving the performance, reliability or servicing of the equipment, Tait Electronics Ltd reserves the right to update both the equip- ment or this user’s manual, without prior notice. Website: For contact details and technical assistance, go to http://www.taitworld.com/, and...
- Page 2 Directive 1999/5/EC Declaration of Conformity Dansk Français Undertegnede Tait Electronics Ltd erklærer Par la présente, Tait Electronics Ltd déclare herved, at følgende udstyr TMAB1A & que l'appareil TMAB1A & TMAH5A est TMAH5A overholder de væsentlige krav og conforme aux exigences essentielles et aux øvrige relevante krav i direktiv 1999/5/EF.
- Page 3 TM8100 User’s Guide © Tait Electronics Ltd September 2004. All rights reserved.
-
Page 5: About This Guide
Part 1 explains how the TM8110 and TM8115 radios oper- ate. The TM8105 radio has a control head without a user interface, so no TM8105 operating information is needed. Part 2 outlines the installation procedure for TM8105, TM8110 and TM8115 radios, and gives the pin alloca- tions for the TM8105 programming connector. -
Page 6: Copyright Information
Copyright information All information contained in this guide is the property of Tait Electronics Ltd. All rights are reserved. These guides may not, in whole or in part, be copied, photocopied, reproduced, translated, stored, or reduced to any electronic medium or machine-readable form, without prior written permission from Tait Electronics Ltd. - Page 7 Your radio’s settings Use the following table to list your radio’s programmed settings. Function key settings Channel list Description Description...
-
Page 9: Table Of Contents
Part 1: Radio operation About this guide ................5 Important safety information ............... 5 Safety warnings used in this guide .............. 5 Feedback about this guide ................5 Copyright information ................. 6 Disclaimer ....................6 Safety warnings ................. 10 Safe operation ..................10 EN 60950 requirements ................ -
Page 10: Safety Warnings
Safety warnings Safe operation Warning: Switch the radio off at petrol filling stations or near flammable liquids or gases. Warning: Switch the radio off in the vicinity of explosive devices and blasting zones. Warning: Using a handheld microphone or a radio while driving a vehicle may violate the laws and legisla- tion that apply in your country or state. -
Page 11: Radio Protection
This device must only be used with authorized accessories and antennas. The operator must ensure that the minimum safe distance of 0.9m (35 inches) between persons and the antenna is maintained during transmissions. This minimum safe distance is based on the assumption that there is a duty cycle of 50% transmit mode to stand- by or receive modes. -
Page 12: Getting Started
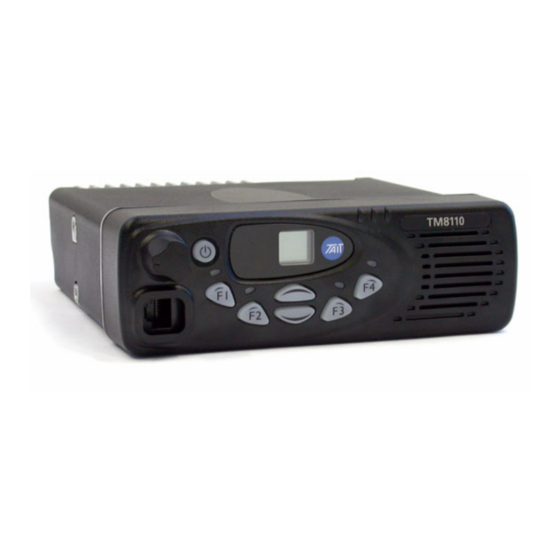
Getting started This section provides a brief description of your radio’s basic operation. If you need further information, contact your radio provider. Radio controls The radio controls are the PTT key, volume control, on/off key, channel selection keys and function keys. Some keys may have functions assigned to both short and long key presses: a short key press is defined as less than one second, and a long key press is more than one second. - Page 13 press-to-talk (PTT) key radio status LEDs microphone green speaker amber display on/off key volume control microphone socket channel function keys function keys selection keys 1 and 2 3 and 4 Symbol Name Function press and hold to transmit and release to listen volume control rotate to change the speaker volume...
-
Page 14: Radio Indicators
Radio indicators The LED indicators and the radio’s audible tones all combine to give you information about the state of your radio. Although the way these indicators behave is affected by the way your radio is programmed, the following sections describe the most common operation of the radio indicators. - Page 15 Tone type Meaning one short beep radio turned off: the radio is being powered off, or valid keypress: the action you have attempted is permitted, or function activated: a function key has been pressed and that function has been initiated one short, low- function de-activated: a function key has pitched beep...
-
Page 16: Basic Operation
Basic operation This section describes the basic operation of your radio, including turning the radio on and off, adjusting volume, selecting channels, making calls and receiving calls. Turning the radio on and off A long press of the on/off key turns the radio either on or off. -
Page 17: Receiving A Call
Transmit timer Your radio may have a transmit timer that limits the amount of time you can transmit continuously. When the transmit timer is about to expire, the red LED flashes and the radio gives three beeps. You must release the PTT before you can transmit again. -
Page 18: Monitor
Squelch The radio’s squelch allows the radio to unmute only when the strength of the incoming signal is above a predetermined threshold. This means that only signals of reasonable intelli- gibility are made audible. Monitor The monitor function is used to check that the channel is clear before you make a call. -
Page 19: Voting
radio unmutes and you can hear the call. Scanning resumes when the channel is no longer busy or the signalling is no longer valid. One or two priority scan channels may be set. These channels are scanned more often than other channels and are scanned periodically when a non-priority channel is busy. -
Page 20: Troubleshooting
Troubleshooting When your radio won’t turn on If the red, green and amber LEDs on the control head do not light up when the radio is turned on, it is likely that no power is reaching the radio. Check the following: Is the power connector firmly plugged into the rear of the radio? Are the in-line fuses in good condition? -
Page 21: Describing The Radio's Audible Tones
Describing the radio’s audible tones The following table summarizes the radio’s audible tones. Tone type Meaning two short beeps radio turned on: the radio is powered on and ready to use one short beep radio locked: you need to enter your PIN after the power- (personal identity number) before you can up beeps... - Page 22 Tone type Meaning one short, high- radio is stunned: the radio has been made pitched beep inoperable by your service provider two low-pitched radio's temperature is high: the radio's beeps temperature is in the high-temperature range, but the radio will continue to operate two high-pitched radio's temperature is very high: the radio's...
- Page 23 Installing the power cable ..............32 Mounting the U-bracket ..............34 Installing the radio in the U-bracket ............ 35 TM8105 programming connector ............36 Checking the installation ..............37 Other installation options ..............37 Tait general software licence agreement ......... 38 Radio installation procedures 23...
-
Page 24: Installation Warnings
Installation warnings The following topics are covered in this section: safe radio mounting interference with vehicular electronics preparation when drilling holes vehicles powered by liquefied petroleum gas (LPG) radio installation in gas or fuel tankers non-standard radio installations negative ground supply. -
Page 25: Preparation When Drilling Holes
Radio installation in gas or fuel tankers Special conditions must be observed when installing a radio in gas and fuel tankers. Consult your radio provider or Tait-accredited service centre for more details. Non-standard radio installations The installation U-bracket described in this guide has been designed so that there is enough airflow around the radio to provide cooling. -
Page 26: Negative Ground Supply
If a non-standard installation method is used, care must be taken that sufficient heat can be dissipated from the radio heatsink fins and the bottom surface of the radio chassis. 10mm (3/8 inch) mounting surface For this to be achieved, there must be a gap of more than 10mm (3/8 inch) between the bottom surface of the radio chassis and the mounting surface. -
Page 27: Installation Planning
Installation planning The procedures outlined in this and the following sections are for installing a TM8100 radio in a vehicle, using a standard U-bracket. The following topics are covered in this section: MPT 1362 code of practice checking equipment installation tools selecting the mounting position. -
Page 28: Installation Tools
— fuse holders — receptacles for a remote speaker (speaker not included) — BNC or mini-UHF antenna plug. Installation tools The following installation tools may be required: portable drill and drill bit Pozidriv screwdriver 8mm (5/16 inch) socket (or Pozidriv screwdriver) BNC or mini-UHF crimp tool fuse crimp tool in-line RF power meter capable of measuring forward and... -
Page 29: Radio Installation
U-bracket installing the radio in the U-bracket TM8105 programming connector checking the installation other installation options. Installing and removing the control head Caution: The control head contains devices which can be damaged by static discharges. - Page 30 Removing the control head Caution: During this procedure, take care that the control- head seal is not damaged. Damage to this seal reduces environmental protection. On the underside of the radio, insert a 5mm (3/16 inch) flat-bladed screwdriver between the control head and the control-head seal, in either position Insertion points are lever points and are indi-...
-
Page 31: Installing The Microphone
Installing the microphone A microphone and microphone clip are only used for radios with a user interface. Connecting the microphone Caution: The microphone grommet must be installed when- ever the microphone is plugged into the micro- phone socket. When installed, the grommet has two functions: to prevent damage to the microphone socket when there is movement of the microphone cord, and... -
Page 32: Installing The Antenna
Installing the antenna Install the external antenna according to the supplier’s instructions. Good quality 50 ohm coaxial cable must be used, such as RG58 or UR76. Caution: The cable should be routed in a manner that mini- mizes coupling into the electronic control systems of the vehicle. - Page 33 Installing the power cable One end of the power cable is connected to the vehicle battery and the other end plugs into the radio’s power connector. Power connector The power connector on 25W radios is different to the power connector on 40W/50W radios. The following tables explain the pin allocations for each power connector.
- Page 34 Battery supply voltage This radio is designed to operate from a nominal 12V negative ground supply and may draw up to 8A of current (25W radios) or 15A of current (40W/50W radios). The radio will tolerate a supply voltage range of 10.8V to 16.0V at the radio. Caution: In vehicles with a supply voltage greater than 16.0V, such as many trucks, it is essential to...
-
Page 35: Mounting The U-Bracket
Cut the negative and the positive wires where the in-line fuse holders will be placed (as close to the battery as possible). Caution: Do not install the fuses until the installation is ready to be checked. Insert each end of the negative wire into one of the in- line fuse holders and crimp them to force the metal contacts onto the wires. -
Page 36: Installing The Radio In The U-Bracket
the self-drilling screws. Reduce the hole size in metal that is less than 1mm (1/32 inch) thick. Installing the radio in the U-bracket Connect the antenna and power cables to the rear of the radio. Position the radio in the U-bracket so that the holes in the U-bracket line up with the holes in the radio chassis. -
Page 37: Tm8105 Programming Connector
TM8105 programming connector The TM8105 has a 9-way D-range plug on the control head, for remote connection. The pin allocations of the programming connector are shown in the following diagram and table. programming connector Pin Signal Description RX_AUD receive audio output (after volume... -
Page 38: Checking The Installation
Checking the installation Insert the fuses into the power leads. Switch on the radio to confirm that it is operational. Caution: Do not transmit yet. Connect an in-line power meter between the radio and the antenna. Transmit and measure the forward and reflected power levels. -
Page 39: Tait General Software Licence Agreement
AND THE LICENSEE THIS IS THE COMPLETE AND EXCLUSIVE STATEMENT OF LICENCE WILL BE TERMINATED AUTOMATICALLY AND WITHOUT NOTICE THE AGREEMENT BETWEEN IT AND TAIT IN RELATION TO THE SOFTWARE OR FROM TAIT IN THE EVENT THAT THE LICENSEE FAILS TO COMPLY WITH...
Need help?
Do you have a question about the TM8105 and is the answer not in the manual?
Questions and answers