Fronius Ohmpilot Operating Instruction
Battery charging system
Hide thumbs
Also See for Ohmpilot:
- Operating instructions manual (200 pages) ,
- Operating instructions manual (60 pages) ,
- Operating instructions manual (60 pages)
Table of Contents
Advertisement
Quick Links
- 1 1-Phase Heater
- 2 Application Example 1: 1-Phase Heating Element up to 3 Kw
- 3 Application Example 4: 1-Phase Heating Element up to 3 Kw and External Source (E.g. Gas-Fired Heating) 28 Application Example 5: Two Heating Elements - 3-Phase and 1-Phase
- 4 Establishing the Data Connection
- Download this manual
Advertisement
Table of Contents

Subscribe to Our Youtube Channel
Related Manuals for Fronius Ohmpilot


Summary of Contents for Fronius Ohmpilot
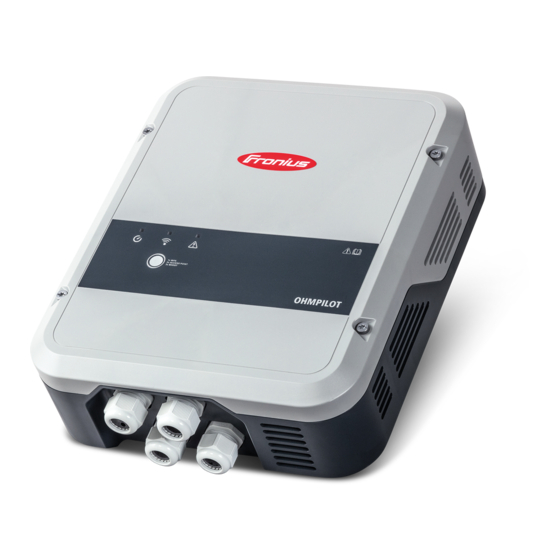
- Page 1 / Battery Charging Systems / Welding Technology / Solar Electronics Operating Instructions Fronius Ohmpilot Accessories 42,0410,2141,EN 001-14062017...
-
Page 3: Safety Rules
Fronius product. These instructions will help you to familiar- ise yourself with the product. By reading the instructions carefully, you will learn about the diverse possibilities offered by your Fronius product. Only by doing so will you be able to make the best possible use of its benefits. -
Page 5: Table Of Contents
Selecting Wall Plugs and Screws ......................15 Recommended Screws ..........................15 Installation Instructions ..........................15 Fronius Smart Meter ............................16 Integrating the Fronius Smart Meter......................16 Indications/Controls on the Device ......................... 17 Selection of Heater ............................18 1-Phase Heater ............................18 3-Phase Heater ............................ -
Page 7: Safety Rules
Safety Rules General Remarks The device has been manufactured in accordance with the state of the art and the recognised safety rules. However, incorrect operation or misuse may result in: Injury or death to the operator or third parties Damage to the device and other property of the operator Inefficient operation of the device All persons involved in commissioning, maintaining and servicing the device must:... -
Page 8: Choice Of Location
The Ohmpilot corresponds to protection class IP 54 and is protected against spray water from all sides. In order to keep warming of the Ohmpilot to a minimum, do not expose it to direct sunlight. Install the Ohmpilot in a protected position. The Ohmpilot must only be installed and operated at an ambient tempera- ture of 0-40°C. -
Page 9: Explanation Of Symbols - Installation Position
The Ohmpilot is designed to be installed vertically on a vertical wall. Explanation of Symbols - Installation Position Do not install the Ohmpilot horizontally. Do not install the Ohmpilot on a sloping surface. Do not install the Ohmpilot on a sloping surface with its connection sockets facing upwards. -
Page 10: Choice Of Location - General Remarks
The direction of air flow within the Ohmpilot is from the bottom to the top If the Ohmpilot is installed in an enclosed space, then forced-air ventilation must be pro- vided to ensure adequate heat dissipation. IMPORTANT! The maximum cable length from the output of the Ohmpilot to the load... -
Page 11: Qualified Personnel
Qualified The information on servicing contained in these operating instructions is Personnel only intended for qualified personnel. An electric shock can be fatal. Do not carry out any activities other than those listed in the documentation. This also applies even if you are qualified to do so. All cables and leads must be secure, undamaged, insulated and adequately dimensioned. -
Page 12: General Remarks
Ohmpilot activates phase 2 in addition and phase 1 can again control the surplus in a continuously variable manner between 3 - 6 kW. If the available power is greater than 6 kW, the Ohmpilot adds phase 3 and phase 1 again controls the surplus between 6 and 9 kW in a continuously variable manner. - Page 13 (e.g. fan heater) will lead to destruction of the load. WARNING! No electronic thermostats may be used in the loads. The use of electronic thermostats will lead to destruction of the Ohmpilot and/or the load. Mechanical temperature switches must be used.
-
Page 14: Warning Notices On The Device
Warning Notices Warning notices and safety symbols are located on the left-hand side of the Ohmpilot. on the Device These warning notices and safety symbols must not be removed or painted over. The notices and symbols warn of incorrect operation that could result in serious injury and damage to property. -
Page 15: Wall Mounting
IMPORTANT! Depending on the surface, different types of fixings are required for Plugs and mounting the Ohmpilot. The fixings are therefore not included in the scope of supply for Screws the Ohmpilot. The fitter is personally responsible for selecting the correct fixings. The Ohmpilot must be mounted with four screws. -
Page 16: Fronius Smart Meter
Fronius Smart Meter Integrating the A Fronius Smart Meter is required for operation of the Ohmpilot, so that the surplus Fronius Smart energy can be measured. For integration of the Fronius Smart Meter, an inverter with Meter Datamanager 2.0 and software version V3.8.1-x or higher and/or a Datamanager Box (from software version 3.8.1-x) is necessary. -
Page 17: Indications/Controls On The Device
Ohmpilot. Press 2x WLAN access point is activated for 30 minutes so that settings can be implement- ed on the Ohmpilot via the Fronius Solar web app. Press 3x Boost mode - dimmer level is activated for 4 hours at 100%, L2 and L3 are switched through. -
Page 18: Selection Of Heater
Neutral conductor must be implemented (this can generally also be retrofitted) NOTE! A mechanical temperature switch simplifies commissioning and use. If no mechanical temperature switch is available, a temperature sensor can also be connected to the Ohmpilot in order to limit the maximum temperature. (See "Temperature limitation") Example for... -
Page 19: Wiring Diagram
Wiring Diagram D+ D- - NO OUT N Green LED INPUT - grid supply 1x 230 V or 3x 230 V Spring balancer 1.5 - 1.5 mm NOTE! Phase and neutral conductors Blue LED must not be mixed up. Residual cur- rent-operated circuit breaker is triggered. -
Page 20: Stripping Lengths
IMPORTANT! On the output side, it must be ensured that only purely resistive loads are connected. IMPORTANT! The maximum cable length from the output of the Ohmpilot to the load (heating element) must not exceed 5 m on EMC grounds. -
Page 21: Application Example 1: 1-Phase Heating Element Up To 3 Kw
1-Phase Heating Element up to 3 kW Application Example 1 D+D- - L1 L2 NC W NO OUT 1 3 5 7 2 4 6 8 IMPORTANT! Plug & Play - With this application, no further settings are necessary fol- lowing successful connection to the inverter. - Page 22 This may result in electricity being sourced from the grid. The maximum temperature must be set on the heating element thermostat. If the heating element does not have a thermostat, the Ohmpilot can also carry out this task as an alternative (see "Optional Settings" section).
-
Page 23: Application Example 2: 3-Phase Heating Element 900 W Up To 9 Kw
3-Phase Heating Element 900 W up to 9 kW Application Example 2 D+D- - L1 L2 NC W NO OUT 1 3 5 7 2 4 6 8 IMPORTANT! Plug & Play - With this application, no further settings are necessary fol- lowing successful connection to the inverter. - Page 24 This may result in electricity being sourced from the grid. The maximum temperature must be set on the heating element thermostat. If the heating element does not have a thermostat, the Ohmpilot can also carry out this task as an alternative (see "Optional Settings" section).
-
Page 25: Application Example 3: 1-Phase Heating Element Up To 3 Kw With Heat Pump Control
1-Phase Heating Element up to 3kW with Heat Pump Control Application Example 3 D+D- - L1 L2 NC W NO OUT 1 3 5 7 2 4 6 8... - Page 26 Datamanager. By controlling the Ohmpilot, the Datamanager adjusts any sur- plus energy that is available to zero. In detail, this takes place by continuously adjusting the heating element connected to the Ohmpilot and by targeted switching on of the heat pump.
- Page 27 If the heating element does not have a thermostat, the Ohmpilot can also carry out this task as an alternative (see "Optional Settings" section). NOTE! This function can also be combined with a 3-phase heating element. 1. The section "Establishing the Data Connection" describes how you can access the Ohmpilot website.
- Page 28 1-Phase Heating Element up to 3 kW and External source Application Example 4 D+D- - L1 L2 NC W NO OUT 1 3 5 7 2 4 6 8...
- Page 29 The maximum temperature must be set on the heating element thermostat. If the heating element does not have a thermostat, the Ohmpilot can also carry out this task as an alternative (see "Optional Settings" section).
- Page 30 1. The section "Establishing the Data Connection" describes how you can access the Ohmpilot website. 2. Highlight the field "Temperature sensor present" 3. Highlight the field "Adapt day curve" 4. Under "Time from", enter the time from which the minimum temperature should be adjusted, and the specific minimum temperature.
-
Page 31: Application Example 4: 1-Phase Heating Element Up To 3 Kw And External Source (E.g. Gas-Fired Heating) 28 Application Example 5: Two Heating Elements - 3-Phase And 1-Phase
Two Heating Elements - 3-Phase and 1-Phase Application Example 5 D+D- - L1 L2 NC W NO OUT 1 3 5 7 2 4 6 8... - Page 32 As with thermal photovoltaic systems, the Ohmpilot is also capable of heating the hot water boiler first and then the buffer, so that the maximum amount of photovoltaic surplus energy can be stored.
- Page 33 (e.g. gas-fired heating) must ensure the minimum temperature. As an alternative, the Ohmpilot can also ensure the minimum temperature. This may re- sult in electricity being sourced from the grid. The maximum temperature must be set on the heating element thermostat.
-
Page 34: Application Example 6: Two 3-Phase Heating Elements Up To 9 Kw
Two 3-Phase Heating Elements up to 9 kW Application Example 6 D+D- - L1 L2 NC W NO OUT 1 3 5 7 2 4 6 8... - Page 35 As with thermal photovoltaic systems, the Ohmpilot is also capable of heating the hot water boiler first and then the buffer, so that the maximum amount of photovoltaic surplus energy can be stored.
- Page 36 The maximum temperature must be set on the heating element thermostat. If heating element 1 (10) does not have a thermostat, the Ohmpilot can also carry out this task as an alternative (see "Optional settings" section). However, it is imperative that heating element 2 (12) has a thermostat.
-
Page 37: Establishing The Data Connection
Possible The data connection is primarily required so that the inverter or Datamanager can share Communication default values with the Ohmpilot. For some applications, however, it is also necessary to Channels implement settings via the Ohmpilot website. There are 3 possible communication channels:... -
Page 38: Establishing A Connection Via Modbus Rtu
Establishing a 1. Connect the bus cabling (B) to the Ohmpilot. (The bus cabling is carried out in parallel Connection via via the TX+, TX- and GND cables with the Fronius Smart Meter and the Fronius Modbus RTU inverter or Datamanager 2.0). -
Page 39: Establishing A Connection Via Lan
The inverter automatically searches for the Ohmpilot, with the search process taking up to 5 minutes. If the red LED is unlit and the green LED is flashing, the Ohmpilot is work- ing correctly. -
Page 40: Establishing A Connection Via Wlan
4. The inverter automatically searches for the Ohmpilot, with the search process taking up to 5 minutes. If the red LED is unlit and the green LED is flashing, the Ohmpilot is working correctly. Connecting via access point and manual configuration of the WLAN Settings 1. - Page 41 IMPORTANT! When the access point is opened, it is not possible to scan the WLAN networks. A static IP address can be assigned to the Ohmpilot via the web interface. The Ohmpilot can then be reached at http://ohmpilotW.local or at the fixed IP address assigned.
-
Page 42: Status Indication On Web Interface
Legionella heating is active. Heater 1 is heating at 100%. VENTION BOOST The Ohmpilot has been switched to boost mode manually. Heater 1 is heating at 100%. An error has been detected. More information should be read off from ERROR Solar Web. -
Page 43: Optional Settings
3. Enter the power of the load in Watts. NOTE! In the case of applications with a 1-phase and a 3-phase heating element, it is not possible for the Ohmpilot to measure heating element 1 automatically due to the cabling. In this case, the configuration must be carried out manually. -
Page 44: Adapting The Day Curve
1. Highlight the field "Temperature sensor present" 2. Highlight the field "Adapt day curve" 3. Under "Time from", enter the time from which the Ohmpilot should start to heat to the new target temperature. This target temperature is valid until the next entry. -
Page 45: Error List
ES could not achieve target ES switched off/faulty. ES not con- Switch on ES. Connect ES temperature within 5 hours. nected to Ohmpilot. TS incorrectly to relay 1. Install TS above installed. Heating system incor- the heat battery of the ES. - Page 46 No connection to inverter No connection between inverter Check connection. Switch and Ohmpilot. Inverter switched on inverter. Update software. off. Even at night, the Ohmpilot Switch Ohmpilot and inverter needs a connection to the inverter. off and on again. Router switched off/faulty/reconfig- The night switch-off function ured.
-
Page 47: Input Data
Detailed, country-specific warranty terms are available on the internet: turer's Warranty www.fronius.com/solar/warranty Disposal If you decide in the future to replace your Ohmpilot, Fronius will take back the old device and arrange for it to be recycled in an appropriate manner. Applicable CE mark... -
Page 48: Technical Data
Technical Data Input Data Frequency 50 Hz Nominal voltage 230 V / 400 V Max. input current 1 X 16 A / 3 x 16 A Interfaces Modbus RTU RS 485, max. 1000 m, screened and twisted Ethernet at least CAT5, screened WLAN IEEE 802.11 b/g/n Temperature sensor... - Page 49 Inspection / Specifications Inspection / Specifications according to EN60730 Section 1 Table 7.2 Construction Electronic RS 2.5.5 independently mounted RS Screwless Terminal 2.10.6.1 mounting method type Y RS Classification, to Protect Against Protection class I 6.8.3 Electric Shock Section 6.8 Type of Disconnection or Interruption Micro interruption according to 2.4.4.
-
Page 52: Fronius Worldwide
Fronius International GmbH Fronius USA LLC Solar Electronics Division 4600 Wels, Froniusplatz 1, Austria 6797 Fronius Drive, Portage, IN 46368 E-mail: pv-sales@fronius.com E-mail: pv-us@fronius.com http://www.fronius.com http://www.fronius-usa.com The addresses of all our sales branches and partner companies can be found at http://www.fronius.com/addresses.
Need help?
Do you have a question about the Ohmpilot and is the answer not in the manual?
Questions and answers