Table of Contents
Advertisement
Quick Links
Navigation
Module
Owner's Record
The model and serial numbers are located on the
bottom of the unit.
Record the serial number in the space provided below.
Refer to these numbers whenever you call upon your
Sony dealer regarding this product.
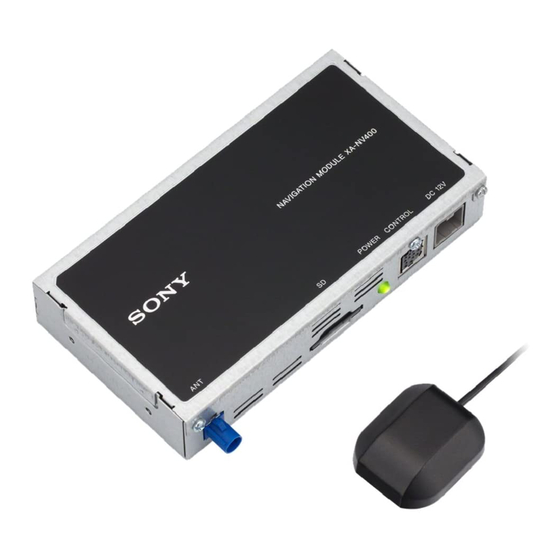
Model No. XA-NV400
Serial No.
©2016 Sony Corporation Printed in China
XA-NV400
4-688-316-11(1)
Instructions
Instrucciones
Istruzioni
Instructions
Anleitung
Instructies
GB
ES
IT
FR
DE
NL
Advertisement
Table of Contents

Related Manuals for Sony XA-NV400


Summary of Contents for Sony XA-NV400
- Page 1 The model and serial numbers are located on the bottom of the unit. Record the serial number in the space provided below. Refer to these numbers whenever you call upon your Sony dealer regarding this product. Model No. XA-NV400 Serial No. ©2016 Sony Corporation Printed in China XA-NV400...
- Page 2 The chemical replacement, there may be an internal malfunction. In symbols for mercury (Hg) or lead (Pb) are added if the such a case, consult your nearest Sony dealer. battery contains more than 0.0005% mercury or 0.004% lead.
- Page 3 ×2...
- Page 4 Car audio unit (AV Receiver) Unidad de audio del vehículo (Sistema multimedia) Unità audio dell’auto (ricevitore AV) Autoradio (Centre AV) Autoanlage (AV-Receiver) Audio-apparatuur voor de auto (AV Receiver) DC 12V Red/Rojo/Rosso/ Rouge/Rot/Rood FUSE 2A BATTERY Yellow/Amarillo/Giallo/ Jaune/Gelb/Geel Black/Negro/Nero/ Noir/Schwarz/Zwart...
- Page 5 Operate the car audio unit (AV Receiver) to use the below: navigation function. Customers in the United States/Canada: To select the navigation function http://esupport.sony.com/ Press HOME, then touch [Navigation]. Customers in Europe: http://www.sony.eu/support For further details on navigation operation, visit the Customers in Asia Pacific: support site and refer to the manual provided.
- Page 6 Loop fastener Cierre de lazo Striscia a occhiello Bande auto-agrippante (velours) Hook fastener Klettband mit Schlaufen Cierre de gancho Zijde met lusjes Striscia a gancio Bande auto-agrippante (crochets) Klettband mit Widerhaken Zijde met haakjes...
- Page 7 Unit: mm (in) Unidad: mm Unità: mm Unité : mm (po) Einheit: mm Eenheid: mm 140 (5 75.6 (3) 9.9 ( 27 (1...
-
Page 8: Important Notice
− Connect the equipment into an outlet on a circuit different from that to which the receiver is connected. − Consult the dealer or an experienced radio/TV technician for help. You are cautioned that any changes or modifications not expressly approved in this manual could void your authority to operate this equipment. http://www.sony.net/ Made in China... - Page 9 TomTom Navigation App User Manual v1.0...
-
Page 10: Table Of Contents
Contents Welcome to navigation with TomTom Get going GPS reception ...................... 5 What's on the screen The map view....................... 6 The guidance view ....................8 The route bar ..................... 10 Distances and the route bar ................11 The quick menu ....................11 Navigation buttons.................... - Page 11 Reordering stops on a route ................... 46 My Routes About My Routes ....................47 Saving a route ....................47 Navigating using a saved route ................48 Adding a stop to a saved route using the map .............. 49 Deleting a route or a track from My Routes ..............50 Safety cameras About safety cameras ...................
-
Page 12: Welcome To Navigation With Tomtom
Welcome to navigation with TomTom This User Manual explains all you need to know about your new TomTom Navigation App. If you want a quick read of the essentials, we recommend that you read the Whats on the screen chapter. This covers the most important screens and buttons. After that, you will probably want to learn more about Using Quick Search Planning a... -
Page 13: Get Going
Get going GPS reception When you first start your TomTom Navigation App, it may need a few minutes to determine your position. In future, your position will be found much faster. -
Page 14: What's On The Screen
What's on the screen The map view The map view is shown when you have no planned route. Your actual location is shown as soon as your TomTom Navigation App has found your GPS location. You can use map view in the same way as you might look at a traditional paper map. You can move around the map using gestures, and zoom using the zoom buttons. - Page 15 If you have not planned a route the map is zoomed out to show the area around your location. If you have planned a route, your complete route is shown on the map. You can add stops to your route directly from the map.
-
Page 16: The Guidance View
stop on your route. A location saved in Places. When a search for POIs near destination is done and the results are shown on the map, less important POIs are shown as black pins with white crosses. Select a map symbol to open the pop-up menu, then select the menu button to see a list of actions you can take. - Page 17 Tip: When you have planned a route and the 3D guidance view is shown, select the switch view button to change to the map view and use the interactive features. 1. Switch view button. Select the switch view button to change between the map view and the guidance view.
-
Page 18: The Route Bar
The name of the street you are driving on. 6. Current location. This symbol shows your current location. Select the symbol or the speed panel to open the quick menu. Note: If your TomTom Navigation App cannot find your location the symbol appears grey. 7. -
Page 19: Distances And The Route Bar
Distances and the route bar The distance ahead shown on the route bar depends on the length of your route, or the distance remaining on your route. For remaining distances longer than 50 km (31 miles), only the next 50 km (31 miles) is shown. ... -
Page 20: Other Buttons
Select this button to drive to your work location. If this button is not Drive to Work included in your main menu, go to My Places to set up your work location. Select this button to open the list of your recent destinations. Select a Recent Destination recent destination to plan a route to that destination. - Page 21 The following buttons are available in the Main Menu screen, in addition to the navigation buttons: Select this button to open the Settings Menu. Select this button to open the Help Menu. The Help Menu contains help for using Voice control if supported by your device, together with other information about your TomTom Navigation App.
-
Page 22: Volume Control
Volume control On the map or guidance view, select the Main Menu button to open the Main Menu. Select and slide the volume control to change the volume of voice instructions and warnings. If the voice instructions are switched off, the volume control will still change the volume of the warnings. Using gestures You use gestures to control your TomTom Navigation App. - Page 23 Tip: Alternatively, select the Edit button in the Main Menu. The menu button is shown with left and right arrows. 3. Press the left or right arrow on the menu button to move the button to a new position in the menu.
-
Page 24: Using Quick Search
Using Quick Search About search You use search to find a wide range of places and then navigate to them. You can search for the following: A specific address, for example, type in 123 Oxford Street, London. A partial address, for example, type in Oxford st Lon. A type of place, for example, type in gas station or restaurant. - Page 25 3. Use the keyboard to enter the name of the place you want to plan a route to. You can search for a POI (Point of Interest) type, such as a restaurant or tourist attraction. Alternatively, you can search for a specific POI, for example "Rosie's Pizzeria". Note: When searching, the whole map is searched.
- Page 26 6. To see more information about the POI, select the POI on the map and then select the pop-up menu button. Select More Information on the pop-up menu. You see more information about the POI such as the phone number, full address and email. 7.
-
Page 27: Entering Search Terms
Entering search terms Select Search in the Main menu to start searching for addresses and POIs. The search screen opens showing the keyboard and the following buttons: 1. Back button. Select this button to go back to the previous screen. 2. -
Page 28: Working With Search Results
In town or city Select this option to use a town or city as the centre for your search. You need to enter the town or city name using the keyboard. When you have selected the town or city from the results list, you can search for an address or POI in that city. - Page 29 Tip: You can switch between seeing the results on the map or in a list by selecting the list/map button: When you select an address from the list of search results, you can choose to show it on the map, add a crossroad or plan a route to that chosen location.
-
Page 30: About Postcodes
Note: The best search results are shown on the map. When you zoom in, the lower ranked search results are gradually shown. About postcodes When searching using a postcode, your results depend on the type of postcode used in the country that you are searching in. - Page 31 Court house Cash dispenser Legal - Solicitors Financial institution Legal - other services Food services Convenience store Fast food restaurant Restaurant Chinese restaurant Accommodation Hotel or motel Luxury hotel Camping ground Economy chain hotel Emergency services Hospital or polyclinic Dentist Police station Veterinarian Doctor...
- Page 32 Rental car facility Electrical car charging point(s) Rental car parking Car repair facility Other services Embassy Pet services Government office Telecommunication Company Community service Post office Pharmacy Shopping centre Beauty services Tourist information office Shop Education College or university School Library Convention centre Leisure...
- Page 33 Concert hall Amusement park Museum Exhibition centre Opera Cultural centre Nightlife Leisure centre Children's Farm Sport Playing field Swimming pool Mountain peak Water sports Beach Tennis court Park or recreation area Ice skating rink Yacht basin or marina Sports centre Stadium Golf course Religion...
- Page 34 Railway station Mountain pass Airport Scenic or panoramic view Ferry terminal Postcode Note: Not used in all countries. Border crossing Residential area Bus station City centre Toll gate Electrical car charging stations Rest area Truck stop...
-
Page 35: Planning A Route
Planning a route Planning a route to an address using search Important: In the interest of safety and to avoid distractions while you are driving, you should always plan a route before you start driving. To plan a route to an address using search, do the following: 1. - Page 36 Tip: You can switch between seeing the results on the map or in a list by selecting the list/map button: 5. Select an address suggestion. 6. Enter the house number if you have one and haven't entered it already. Tip: If you enter a house number that is not found, then the number appears red. The nearest house number that is found is shown in the Drive button.
-
Page 37: Planning A Route To A City Centre
Planning a route to a city centre Important: In the interest of safety and to avoid distractions while you are driving, you should always plan a route before you start driving. To plan a route to a city centre using search, do the following: 1. -
Page 38: Planning A Route Using The Map
The city name is shown in the right side of the search input box, and the city centre POI is shown below in the right-hand column. 6. Select the city centre POI. The city centre location is shown on the map. 7. - Page 39 Tip: You can also select a map symbol to open the pop-up menu, then select the Drive/Ride button to plan a route to that location. 2. When you have found your destination on the map, select it by pressing and holding the screen for about one second.
-
Page 40: Planning A Route Using My Places
Tip: If your destination is in a different time zone, you see a plus (+) or a minus (-) sign and the time difference in hours and half hours in the arrival information panel. The estimated time of arrival is the local time at your destination. Tip: You can add a stop to a route that you have already planned. -
Page 41: Planning A Route Using Coordinates
4. To plan a route to this destination, select Drive/Ride depending on which device you are using. A route is planned and then guidance to your destination begins. As soon as you start driving, the guidance view is shown automatically. Tip: If your destination is in a different time zone, you see a plus (+) or a minus (-) sign and the time difference in hours and half hours in the arrival information... -
Page 42: Planning A Route Using A Mapcode
Tip: You can switch between seeing the results on the map or in a list by selecting the list/map button: 7. Select a suggestion for your destination. The location is shown on the map. 8. To plan a route to this destination, select Drive/Ride depending on which device you are using. A route is planned and then guidance to your destination begins. -
Page 43: Finding An Alternative Route
Tip: You can switch between seeing the results on the map or in a list by selecting the list/map button: 5. Select a suggestion for your destination. 6. To plan a route to this destination, select Drive/Ride depending on which device you are using. A route is planned and then guidance to your destination begins. -
Page 44: Planning A Route In Advance
Planning a route in advance You can plan a route in advance before you drive it. You can save the route as part of your Routes list. To plan a route in advance, do the following: 1. Select the Main Menu button to open the Main Menu. 2. -
Page 45: Finding A Car Park
Changing the starting point to be your current location 1. Select the starting point of the route in the map view. 2. Select the pop-up menu button. A pop-up menu shows a list of options. 3. Select Remove Starting Point. Your route is replanned with your current location as the starting point. - Page 46 1. Select the Main Menu button to open the Main Menu. 2. Select Parking. The map opens showing the locations of car parks. If a route is planned, the map shows car parks near your destination. If a route isn't planned, the map shows car parks near your current location.
-
Page 47: Finding A Gas Station
If you want to change how the search is done, select the button to the right of the search box. You can then change where the search is carried out, for example, to search near you or the whole map. 3. - Page 48 2. Select Gas Station. The map opens showing the locations of gas stations. If a route is planned, the map shows gas stations along your route. If a route isn't planned, the map shows gas stations near your current location. You can change the screen to show a list of gas stations by pressing this button: You can select a gas station from the list to locate it on the map.
- Page 49 If you want to change how the search is done, select the button to the right of the search box. You can then change where the search is carried out, for example, to search near you or the whole map. 3.
-
Page 50: Changing Your Route
Changing your route The Current Route Menu When you have planned a route, select the Current Route button in the Main Menu to open the Current Route Menu. The following buttons are available in the menu: Clear Route Select this button to clear the currently planned route. The Current Route Menu closes and you return to the view. - Page 51 An instruction description. The distance between two consecutive instructions. Exit number. Tip: Select an instruction to see a preview of that section of the route in the map view. You can also select the instruction panel in the guidance view to see turn-by-turn text instructions.
-
Page 52: Avoiding A Blocked Road
Avoiding a blocked road If there is a blocked road on your route you can change your route to avoid it. 1. In the guidance view, select the current location symbol or the speed panel. Tip: The speed panel is only shown when you have started driving on your route. 2. -
Page 53: Types Of Route
Types of route Select Change Route Type to change the type of route planned to your current destination. Your route is recalculated using the new route type. You can select the following types of route: Fastest route - the fastest route to your destination. Your route is constantly checked taking ... -
Page 54: Deleting A Stop From Your Route
5. Select Add to Current Route. Your route is recalculated to include your stop. Deleting a stop from your route 1. Press the switch view button to show the map. Your complete route is shown on the map. 2. In the route bar, press the stop you want to delete. -
Page 55: My Routes
My Routes About My Routes My Routes provides an easy way to save and retrieve routes and tracks. You may want to use My Routes in one or more of the following situations: While working - Your job involves driving several routes with multiple stops on a daily basis. ... -
Page 56: Navigating Using A Saved Route
3. Select the pop-up menu button to open the menu. 4. Select Manage Route, then Add to My Routes. The name of the route is shown in the edit screen. 5. Edit the name of the route so that you can easily recognise it. 6. -
Page 57: Adding A Stop To A Saved Route Using The Map
The starting point of the saved route is converted to your first stop and then the route is planned. Guidance to your destination begins from your current location. As soon as you start driving, the guidance view is shown automatically. Tip: There are two other ways to navigate using a saved route: Select the starting point of the route. -
Page 58: Deleting A Route Or A Track From My Routes
Your route is recalculated to include your stop. Tip: To update the saved route in your My Routes list with the changes, select the route om the map then select Save Changes to Route in the pop-up menu. Deleting a route or a track from My Routes 1. -
Page 59: Safety Cameras
Safety cameras About safety cameras Important: The Safety cameras service is only available in Australia. The Safety cameras service warns you about the following camera locations: Fixed cameras. Speed traps. Speed trap hotspots. Average speed zones. Speed enforcement zones. -
Page 60: Changing The Way You Are Warned
Symbol shown on Symbol shown in Description route bar Fixed camera - this type of camera checks the speed of passing vehicles and is fixed in one place. Average speed zones - these types of cameras measure your average speed between two points. - Page 61 You can then set how you want to be warned for the different types of cameras and safety hazards. You can change settings for whether you want to be warned, never warned or warned only if you are speeding. For example, to change how you are warned when you approach a fixed camera, do the following: 1.
-
Page 62: My Places
My Places About My Places My Places provides an easy way to select a location without the need to search for the location each time. You can use My Places to create a collection of useful or favourite addresses. Tip: The terms "favourite" and "place" mean the same thing - favourites are places that you go to often. -
Page 63: Changing Your Home Location
Setting your home or work location using the map 1. In the View, move the map and zoom in until you can see your home or work location. 2. Press and hold to select the location. A pop-up menu shows the nearest address. 1. -
Page 64: Adding A Location From My Places
Adding a location from My Places 1. In the Main Menu, select My Places. 2. Select Add a new place. 3. To select a location, do one of the following: Zoom in on the map at the location you want to select. Press and hold to select the loca- ... -
Page 65: Adding A Location To My Places By Marking
5. Select Add to My Places. The name of the location appears in the edit screen. 6. Edit the name of the location so you can easily recognise it. 7. Select Done to save your location in the My Places list. Adding a location to My Places by marking To mark a location and temporarily add it to My Places, do the following: 1. -
Page 66: Settings
Settings Appearance Select Settings in the Main Menu, then select Appearance. On this screen, you can change these settings: Display Select Display to change the appearance of the display. Route bar Select Route bar to change the information you see in the route bar. Guidance view ... -
Page 67: Route Bar
Route Bar Select Settings in the Main Menu, then select Appearance. Select Arrival information to change the arrival information you see in the route bar. Select Route information to change the route information you see on the route bar. Show wide route bar if possible The wide route bar is not shown by default. -
Page 68: Guidance View
Route Information You can choose to see any of the following in the route bar: Parking Select this setting to see car parks and parking. Gas stations Select this setting to see gas stations on your route. Stops ... -
Page 69: Maps
Choosing a voice Select Choose a voice to change the voice that gives spoken directions and other route instructions. A wide range of voices are available. There are recorded voices which have been recorded by actors. Instruction settings Read early instructions out loud ... -
Page 70: Sounds And Warnings
Avoid on every route You can choose to avoid ferries and car shuttle trains, toll roads, carpool lanes, and unpaved roads. Set how your TomTom Navigation App should manage each of these road features when the device calculates a route. Carpool lanes are sometimes known as High Occupancy Vehicle Lanes (HOV) and are not present in every country. -
Page 71: Language And Units
Danger zones A danger zone is a zone specified by French law. This type of warning is given in France at the start and end of the danger zone. Accident hotspots This type of warning is given for a place where road traffic accidents have historically been concentrated. -
Page 72: Getting Help
Getting Help Help Select Help from the Main Menu. On this screen, you can see the following information and change one setting: Map version Device serial number and legal information Reset Select this setting to delete all your saved places and settings and restore the standard factory settings to your TomTom Navigation App. -
Page 73: Addendum
Addendum Important Safety Notices and Warnings Global Positioning System (GPS) and Global Navigation Satellite System (GLONASS) The Global Positioning System (GPS) and Global Navigation Satellite System (GLONASS) systems are satellite-based systems that provide location and timing information around the globe. GPS is operated and controlled by the Government of the United States of America, which is solely responsible for its availability and accuracy. - Page 74 This document Great care was taken in preparing this document. Constant product development may mean that some information is not entirely up to date. The information in this document is subject to change without notice. TomTom shall not be liable for technical or editorial errors or omissions contained herein, nor for incidental or consequential damages resulting from the performance or use of this document.
-
Page 75: Copyright Notices
Copyright notices © 2016. All rights reserved. This material is proprietary and the subject of copyright protection, database right protection and other intellectual property rights owned by TomTom or its suppliers. The use of this material is subject to the terms of a license agreement. Any unauthorized copying or disclosure of this material will lead to criminal and civil liabilities. - Page 76 © 2001 – 2016 TomTom. All rights reserved. This material is proprietary and the subject of copyright protection and other intellectual property rights owned or licensed to TomTom. The product includes information copied with permission from Canadian authorities, including © Canada Post Corporation, All rights reserved.
- Page 77 Easy to set up Turn your Sony AV receivers into a touch screen navigation solution powered by TomTom. Use our plug-in module kit to get the latest offline navigation for smarter journeys, and enjoy intuitive operation with an easy-to-use touch screen interface.
-
Page 78: Specifications
1. Speed limit availability varies depending on road and region. ©2017 Sony Electronics, Inc. All rights reserved. Reproduction in whole or in part without written permission is prohibited. Sony and the Sony logo are registered trademarks of Sony Corporation. TomTom is a trademark of TomTom International All other trademarks are trademarks of their respective owners. Features and specifications are subject to change without...
Need help?
Do you have a question about the XA-NV400 and is the answer not in the manual?
Questions and answers