Table of Contents

Related Manuals for Kurtz Ersa Ersa i-CON 2


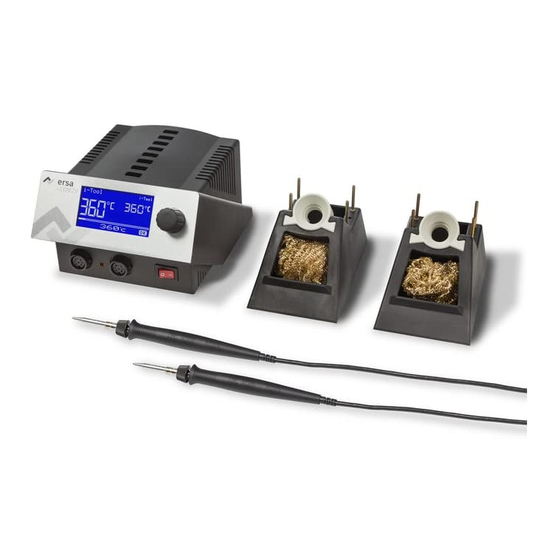
Summary of Contents for Kurtz Ersa Ersa i-CON 2
- Page 1 Ersa i-CON 2 & i-CON 2V Soldering station Quick guide Ersa GmbH Phone +49 9342/800-147 Leonhard-Karl-Str. 24 Fax +49 9342/800-252 97877 Wertheim/Germany Cell +49 171 2418468 (Hotline 24 h) www.ersa.com service.tools@kurtzersa.de...
-
Page 2: Table Of Contents
Table of contents 1. Introduction ......................3 1.1 Meanings of symbols ......................3 2. Commissioning ......................3 2.1 Unpacking the soldering station ..................... 3 2.2 Positioning the soldering station .................... 4 2.3 Connect compression unit C100 ..................... 5 3. Description of operation ..................6 3.1 Use ............................ -
Page 3: Introduction
Introduction/Commissioning Introduction This quick guide can be consulted during i-CON 2 operation. This quick guide does not replace the operating instructions contained in the CD supplied with the product! Read the operating instructions carefully before using the device for the first time. -
Page 4: Positioning The Soldering Station
Commissioning Positioning the soldering station ■ Position the soldering station in a dry location, on a flat surface. Set the tool holder up next to the soldering station. ■ Before switching it on, make sure the mains voltage matches the value on the plate. -
Page 5: Connect Compression Unit C100
Commissioning ■ Connect the soldering iron to the station . For this ❶ purpose, insert the male connector into the female connector and lock them shut. Place the soldering iron on the soldering stand. ■ Ensure that the male connector is inserted correctly into the female connector. -
Page 6: Description Of Operation
Description of the functions Description of operation The soldering station is turned on/off from the switch installed on the front . When the soldering station is on, ① the switch lights up red. The soldering station is controlled by a rotary transducer with key function (i.e. -
Page 7: Selecting The Soldering Iron
Description of the functions ■ Select [Change] by turning the i-OP. ■ Select the item from the [Language] menu. ■ Press the i-OP. ■ Select the required language by turning the i-OP. ■ Press the i-OP. ■ Select the item from the [** END **] menu and then press the i-OP. -
Page 8: Operating Modes
Operating modes Operating modes Work mode When the station is switched on, an activation dialogue will appear for approximately 2 seconds. The i-CON 2 station identification ① and software version ② will be dis- played. Lastly, the station will automatically switch to work mode. -
Page 9: Contrast
Operating modes Contrast Do the following to adjust the display contrast individually based on the work environment: ■ Turn the station on and immediately turn the i-OP. This will activate the contrast mode: ♪! 0,5 s The buzzer tells you that the contrast mode is on. ■... -
Page 10: Troubleshooting
Troubleshooting Troubleshooting General errors If the soldering station does not perform according to expectations, check the following points: • Is there power from the mains? Connect the power cable to the device and to the power outlet correctly. • Is the fuse faulty? The fuse is at the back of the device, in the mains connection socket. -
Page 11: I-Tool
i-Tool i-Tool Replacing the hot tip of the soldering iron ① ② ③ 72°F 40°C ④ ⑤ ⑥ Replacing the cold tip of the soldering iron 72°F 40°C ① ② ③ ④ ⑤ ⑥ 3BA00221 • 2014-09-18 • Rev. 5 ersa i-CON2 &... -
Page 12: Warranty
Warranty Warranty © 08/2014, Ersa GmbH, 3BA00168 Heating and tips for soldering and unsoldering are subject to wear and are not covered by warranty. Faults relative to materials or manufacturing must be reported in writing, along with proof of purchase, before any return of goods, which must be authorised. Ersa has taken great care in preparing this operating manual.
Need help?
Do you have a question about the Ersa i-CON 2 and is the answer not in the manual?
Questions and answers