Table of Contents
Advertisement
Advertisement
Table of Contents

Related Manuals for Kurtz Ersa HR 100 A


Summary of Contents for Kurtz Ersa HR 100 A
- Page 1 Ersa Rework System Operating Instructions HR 100 A...
-
Page 2: Table Of Contents
Contents Introduction 2. Technical data Concerning your safety Explanations on pictograms and symbols Intended use Target group of readers Safety notes Transport, storage and waste disposal 5. Start-up Scope of delivery 5.1.1 Hybrid Rework System HR100A (0IRHR100A) 5.1.2 Hybrid Rework System HR100A with heating plate (0IRHR100A-HP) Control elements, displays and connections 5.2.1 Front view of base station... - Page 3 Contents 6.1.4 The expert program AD0 6.1.4.1 Heating time Hybrid Tool and heating plate 6.1.4.2 Heating plate energy level 6.1.4.3 Energy level Hybrid Tool 6.1.4.4 Blower speed Hybrid Tool 6.1.4.5 Selecting the temperature sensor 6.1.4.6 Heating power rise speed 6.1.4.7 Temperature monitoring Hybrid Tool Changing a Hybrid adaptor Working with the Hybrid Tool...
-
Page 4: Introduction
Introduction We would like to thank you for purchasing this high quality Rework System. With the HR 100A Ersa offers a microprocessor controlled cutting edge handheld rework system for standard and lead-free rework applications. It is intended for use in industrial manufacturing, repairs and laboratory applications. -
Page 5: Technical Data
Technical data Hybrid Rework-System HR 100A, base station Designation Value Unit Mains voltage 220-240 Mains frequency 50-60 Fuse (slow blow) Mains voltage 110-120 Mains frequency 50-60 Fuse (slow blow) Secondary voltage Maximum heating power Safety class Permissible ambient temperature 0-40 °C Temperature range at outlet 30-550... - Page 6 Technical data Hybrid Tool Length of supply cable 1,35 Dimensions WxHxD 230x25x25 mm approx. Weight Laser Class Wavelength 660-680 Output max. 1 3BA00174 • 2014-02-06 • Rev. 5 HR 100 1 / 6...
- Page 7 Technical data Heating plate IRHP100A Designation Value Unit Mains voltage 220-240 Mains frequency 50-60 Fuse (slow blow) Mains voltage 110-120 Mains frequency 50-60 Fuse (slow blow) Control voltage Maximum heating power Safety class Miscellaneous Supply cable 2m, PVC, with appliance connector, control cable with RCA (Cinch) connector. Antistatic surface, suitable for use in ESD-environment, EMC-tested.
-
Page 8: Concerning Your Safety
Concerning your safety Ersa products are developed, manufactured and tested in compliance with general requirements concerning health and safety. However, residual risk do remain! You should therefore read this instruction manual before you start to operate the device for the first time. It will help you to learn the functions of the device and to use it in the most optimal way. -
Page 9: Intended Use
Concerning your safety In addition to the hierarchically structured warning notes described above, we use the following symbols: Used to highlight any texts containing explanations, information or hints. ■ This symbol identifies - action that is strictly required, or - instructions that must be strictly complied with. Intended use Thermal tools from Ersa must only be used for the processing of soft solder. -
Page 10: Safety Notes
Concerning your safety Safety notes Attention! Check all components before each use. Have damaged parts only repaired by a specialist or the manufacturer. Unprofessional repairs cause a risk of accident. Always use original Ersa spare parts for possible repairs. Attention! Thermal tools get very hot. Before heating up the device check whether the tool insert (e.g. - Page 11 Concerning your safety Attention! Lead containing solders are toxic. Lead containing solders entering into the organism will have a toxic effect. Eating, drinking and smoking is therefore strictly prohibited. For the reasons mentioned above you should always wash your hands thoroughly after having worked with lead containing solder.
- Page 12 Concerning your safety Attention! Laser beam! The device contains a class II laser radiation source. Do not look into the direct laser beam and do not direct the laser beam towards the eyes of other people! Attention! Physically and/or mentally handicapped persons must only use the device under the supervision of trained expert personnel! Children are not allowed to play with the device! National and international health and safety regulations as well as occupational health and...
-
Page 13: Transport, Storage And Waste Disposal
Transport, storage and waste disposal The device is delivered in a sturdy cardboard box. Please use only the original packaging for transportation and intermediate storage. Strictly avoid jerky movements, impacts or putting down. The device must be adequately protected against weather influences like rain, fog or sea air, etc. -
Page 14: Start-Up
Start-up Before start-up: Please check the contents in the package for completeness. Should any of the listed components be damaged or incomplete, you should immediately consult the supplier. Scope of delivery 5.1.1 Hybrid Rework System HR100A (0IRHR100A) • HR 100A digital control unit with power supply cable, vacuum pipette with suction ele- ments, these operating instructions •... -
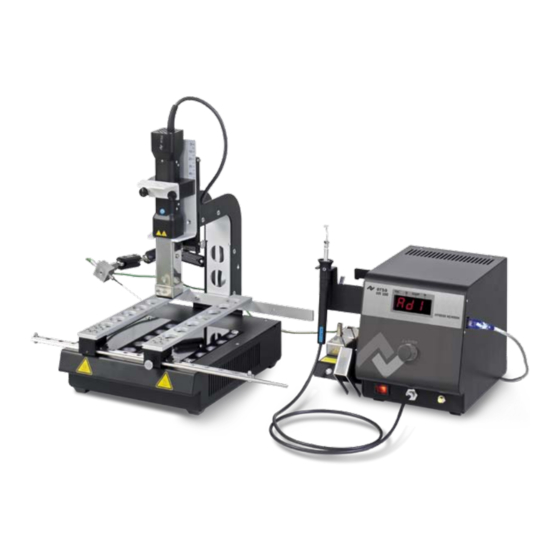
Page 15: Control Elements, Displays And Connections
Start-up Control elements, displays and connections 5.2.1 Front view of base station The base station contains the following control and display elements: a Mains switch b Display c Connection for vacuum pipette d Rotary encoder with momentary contact function RAMP e Vacuum pipette f Switch for vacuum pump 2x PUSH... -
Page 16: Rear View Of Base Station
Start-up 5.2.2 Rear view of base station The following connections and the mains fuse are arranged on the back of the device: h Connection for Hybrid Tool i Connection for Accu TC thermocouple j Connection for Rework heating plate k Fuse holder with mains fuse TOOL IRHP Fuse... -
Page 17: The Hybrid Tool
Start-up 5.2.3 The Hybrid Tool The Hybrid Tool is equipped with a control and display element: r Start / Stop button s LED as operation indicator (orange) The following Hybrid adapters are included in the scope of delivery: o Hybrid adaptor AD1 p Hybrid adaptor AD2 q Hybrid adaptor AD3 Placing and connecting the device... -
Page 18: Switching On
Start-up Switching on ■ Before switching on, make sure that the mains voltage complies with the value specified on the type plate. ■ Switch off the base station by the mains switch a. ■ Connect the power supply cable with the base station and the mains supply socket. ■... -
Page 19: Description Of Function
Description of function Notes on operation 6.1.1 Base station The base station is operated by a rotary encoder with momentary contact function: ■ In order to select a program after switching on, turn the rotary encoder clockwise or anti- clockwise, until the desired program is displayed by flashing. -
Page 20: Hybrid Tool
Description of function 6.1.2 Hybrid tool The Hybrid Tool is operated by the Start / Stop button in the handle. ■ Press the Start / Stop button to start the heating process - during the heating phase the LED in the handle lights or flashes orange. ■... -
Page 21: The Three Programs Ad1, Ad2, Ad3
Description of function 6.1.3 The three programs AD1, AD2, AD3 The scope of delivery includes three Hybrid adaptors, AD1, AD2 and AD3. Depending on the application and the size of the parts, you will use these Hybrid adaptors, whereby a suitable program is available for any of the adaptors. -
Page 22: Heating Time Hybrid Tool And Heating Plate
Description of function 6.1.3.1 Heating time Hybrid Tool and heating plate Parameter [Run time] ■ In this level you can set the maximum heating time for the Hybrid Tool. If a Rework heating plate (option) is connected, it will also be heated over the set time. Press the rotary enco- der to open the parameter [Run time] The connected heating plate is only switched on if the energy level for the heating plate has been set to ≥... -
Page 23: Heating Plate Energy Level
Description of function 6.1.3.2 Heating plate energy level Parameter [Energy Level IRHP100A] ■ In this level you can set the energy level for a connected Rework heating plate (option). Press the rotary encoder to open the parameter [Energy Level] ■ The setting range is . -
Page 24: The Expert Program Ad0
Description of function 6.1.4 The expert program AD0 This program enables you to match the working mode of the station exactly to your requirements. Caution! You should only make adjustments if you have sufficient knowledge in the field of Reflow Soldering. Incorrect settings may cause overheating and lead to poor working results. -
Page 25: Heating Plate Energy Level
Description of function 6.1.4.2 Heating plate energy level Parameter [Energy Level IRHP100A] This function is only possible, when the Rework heating plate HP100A (option) is connected. ■ In this level you can set the energy level for a connected Rework heating plate. Press the rotary encoder to open the parameter [Energy Level IRHP100A] ■... - Page 26 Description of function ■ As soon as an energy level ≥ 1 has been set, the heating plate can also be switched on RAMP manually by quickly pressing the rotary encoder twice. During the heating phase, the LED a in the display is lit. Press the rotary encoder again to switch off the heating plate. If an energy level >...
-
Page 27: Energy Level Hybrid Tool
Description of function 6.1.4.3 Energy level Hybrid Tool Parameter [Energy Level Tool] ■ In this level you can set the energy level for the Hybrid Tool. Press the rotary encoder to open the parameter [Energy Level Tool] ■ The setting range is . -
Page 28: Selecting The Temperature Sensor
Description of function 6.1.4.5 Selecting the temperature sensor Parameter [Alternative sensor] The temperature sensors are needed for the following functions: • For the temperature monitoring, read also section 6.1.4.7. • For the [Ramp] function, read also section 6.1.4.6. ■ In this level you can select the connected sensor to evaluate the process temperature. Press the rotary encoder to open the parameter [Alternative sensor] ■... -
Page 29: Heating Power Rise Speed
Description of function 6.1.4.6 Heating power rise speed Parameter [Ramp] The following prerequisites must be met to be able to use this function: • Either the thermocouple or the IR sensor must be connected to the base station. • The connected sensor must be set in parameter [Alternative sensor] •... - Page 30 Description of function (°C) 420 t (sec) Example 1: If you set the value 2.0K/sec. at an end temperature of T = 220°C, heating will take place at a rate of 2K per second and the end temperature is in this case reached after approx.
- Page 31 Description of function If the resulting heating up time is longer than the heating time set in the parameter [Run time] , the heating time will automatically expanded accordingly. ■ As soon as a value > 0 has been set for the ramp function, the LED [RAMP] a is lit in the RAMP display.
-
Page 32: Temperature Monitoring Hybrid Tool
Description of function 6.1.4.7 Temperature monitoring Hybrid Tool Parameter [End temperature] This function is only possible when thermocouple or IR sensor are connected, otherwise this level cannot be accessed. ■ In this level you can set the temperature monitoring of the Hybrid Tool. Press the rotary encoder to open the parameter [End temperature] ■... -
Page 33: Changing A Hybrid Adaptor
Description of function Changing a Hybrid adaptor ■ Press the button on the Hybrid Tool to switch off the heating, the orange LED goes out. ■ Wait for about ten seconds, until the Tool has sufficiently cooled down. 10 s ■... - Page 34 Description of function ■ Plug another Hybrid adaptor onto the adaptor changer. Check correct fit of adaptor and position of bore. ■ Slide the adaptor over the Hybrid Tool, until the lobe engages in the bore. ■ Use the rotary encoder to select the program matching the adaptor. Then press the but- ton on the Hybrid Tool to switch on the heating.
-
Page 35: Working With The Hybrid Tool
Description of function Working with the Hybrid Tool For lead-free processes we recommend the additional use of the optionally available Rework heating plate IRHR100A. If the thermocouple or the IR sensor is used for processing monitoring purposes, position the sensor in the working range of the Hybrid Tool. - Page 36 Description of function ■ Desoldering: Hold the Hybrid Tool over the component to be desoldered (distance 5...20mm), until the desired area is illuminated by the laser beam. ■ Once the solder has melted, remove the component with a suitable tool or a vacuum pi- pette.
-
Page 37: Using The Vacuum Pipette
Description of function 6.3.2 Using the vacuum pipette The vacuum pipette is delivered with two types of suction elements: • Black, plastic a, not heat resistant. To be used with cold components, not suitable for use in the effective range of the Hybrid Tool. •... -
Page 38: Working With Tool Holder
Description of function Working with tool holder 6.4.1 Soldering and desoldering ■ Fasten the Hybrid Tool to the tool holder, for this purpose loosen the knurled screws a and open the mounting angle b. Push the Hybrid Tool into the receptacle c. The housing of the Hybrid Tool must rest on the area d. -
Page 39: Connecting A Pc
Description of function ■ Press the Start / Stop button on the Hybrid Tool. The set time is started and the Tool is heated up. The display will first show the reading , followed by the elapsed heating time, e.g. . -
Page 40: Sensitive Components
Description of function Sensitive components Some components may suffer damage when being exposed to electrostatic discharge (please follow the warnings on the packages or ask the manufacturer or supplier). An ESD-safe (ESD = Electrostatic Discharge) workplace provides sufficient protection for such components. The station can be easily integrated into such an environment. -
Page 41: Brief Instructions
Description of function Brief instructions During basic mode: Switch on or off the bottom heater IRHP100A Return to basic mode During parameter setting: At run time: Free change display parameters between for all time or temp. adaptors adaptor Change to parameter Change to Set value... -
Page 42: Treatment Of Faults
Treatment of faults General faults If the station does not operate as expected, check the following items: • Is main voltage present? Correctly connect the mains lead to the device and socket. • Is the fuse defective? The fuse can be found at the rear side of the device in the mains connecting socket. -
Page 43: Table Of Error Codes
Treatment of faults Table of error codes Error code Display Cause Remedy When ramp function activated: Thermo Check connection or replace couple defective, not connected or open thermo couple Switch the station off and then on EEPROM - values damaged again. If the error occures again, change the control board. 3BA00174 • 2014-02-06 • Rev. 5 HR 100 1 / 43... -
Page 44: Factory Settings [Default]
Treatment of faults Factory settings [Default] The following table contains information about the settings of the base station upon delivery. You can restore this delivery state: ■ Press and hold the rotary encoder before switching on ■ Switch on the station, hold the rotary encoder depressed for approx. two seconds. The current firmware version appears in the display, e.g. -
Page 45: Maintenance, Repair
Maintenance, repair Important service tasks The following points must be complied with to achieve a long lifetime of the station: Only used original consumables and spare parts from Ersa, to keep up the safe and reliable function and warranty! Warning! Dangerous electric voltage! There are no serviceable parts inside the device! Occasionally clean the device with a damp, soft cloth. -
Page 46: Spare Parts And Accessories
Spare parts and Accessories Base station HR 100 A Designation Article number VacPen (Vacuum pipette) 0VP020 Suction cups for vacuum pipette, not heat resistant 0SVP13A Suction cup, Silicone, 7mm, transparent, heat resistant, for vacuum 0SVP07S pipette Rework heating plate IRHP100A... -
Page 47: Warranty
Warranty Heater, Hybrid adaptor or vacuum pipette are wear items which are not covered under warranty. Any return of goods must be accompanied by a written description of the material or construction fault that has occurred as well as a confirmed purchase invoice. Ersa created these operating instructions with greatest care and attention to detail.
Need help?
Do you have a question about the HR 100 A and is the answer not in the manual?
Questions and answers