Table of Contents
Advertisement
Quick Links
6200 Series
Art. 6276
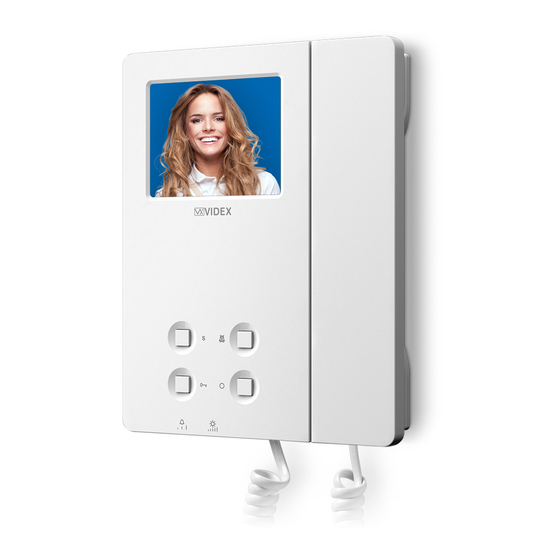
3.5" colour display videophone
27 mm
Fig. 1
ART. 6276 VX2200 6200 SERIES VIDEOPHONE FOR SYSTEMS
USING COMPOSITE VIDEO SIGNAL (COAX) OR BALANCED
(TWISTED PAIR)
DESCRIPTION
Surface mount videophone incorporating a 3.5" Hi-Res full col-
our active matrix LCD monitor, with "camera recall", "door open/
concierge call", "service" and "privacy" button.
2 LED's one for generic use (door opening usually) and one to
indicate privacy service enabled.
Programmable settings: privacy duration, video mode (coax or
balanced), melody and number of rings.
Adjustments: call tone volume (3 levels), microphone volume,
picture hue, contrast and brightness.
PUSH BUTTONS
Service button
When pressed, shorts terminal SW to SW (Max 24 Vdc 50mA).
Privacy service
Press to enable the privacy service. The LED
ton or when the programmed time expires.
Door Open Push Button
• During a conversation, operation of this button will release the door from where the call originated. This will be
confirmed by an acoustic tone. If terminal DOL is connected, the "door open" LED under the symbol
illuminate.
• When the system is in stand-by, picking up the handset and pressing the buttons will book a call to the concierge
(If available).
Camera recall
When the system is in standby (no calls on the system), pick up the handset then press this button to open the
SPEECH/VIDEO to the door station. Press as many time as the ID value of the door panel to connect to.
Art. 6276 - Installation instructions
144 mm
F
Fig. 2
LEGEND
A
Connection terminals
B
8 Way dip switch bank to set videophone address
C
4 Way dip switch bank to set video mode
D
Contrast adjustment trimmer
E
Hue adjustment trimmer
F
Microphone volume adjustment trimmer
G
Brightness control sliding wheel
H
Call tone volume switch
I
RJ-45 connector
turns on. The service is deactivated by pressing again the same but-
1
ENG
A
D
E
PT1 PT2
G
PT3
H
VR1
SW2
66251125-EN - V1.2 - 31/10/16
I
B
C
will also
Advertisement
Table of Contents

Related Manuals for Videx 6276


Summary of Contents for Videx 6276
- Page 1 27 mm 144 mm PT1 PT2 Fig. 1 Fig. 2 LEGEND ART. 6276 VX2200 6200 SERIES VIDEOPHONE FOR SYSTEMS USING COMPOSITE VIDEO SIGNAL (COAX) OR BALANCED Connection terminals (TWISTED PAIR) 8 Way dip switch bank to set videophone address DESCRIPTION 4 Way dip switch bank to set video mode Surface mount videophone incorporating a 3.5”...
- Page 2 2. Make a short between terminals GNDV and LB on the connector; 3. Plug the connector in and wait for a beep before removing the short; 4. To go back to 6 rings, do the same but two “beeps” will be emitted. Art. 6276 - Installation instructions 66251125-EN - V1.2 - 31/10/16...
- Page 3 Local bell input (active low) Alarm input (active low) DOL 12Vdc input to supply Aux LED EXTC Call tone output for extension sounder (Art. 512A) Max 24 Vdc Service button connection 50mA Art. 6276 - Installation instructions 66251125-EN - V1.2 - 31/10/16...
- Page 4 ALUMINIUM (CCA) CAN NOT BE USED ON THE SYSTEM. MEMORY BOARD This device is also available in the version with memory board (Art. 6276/VM). If you have that version, please refer to the “6200, 6300, 6400 and 6700 Series Memory Board” user manual for installation and use.
- Page 5 6200 Series Art. 6276 3.5" colour display videophone Art. 6276 - Installation instructions 66251125-EN - V1.2 - 31/10/16...
- Page 6 20/10/2016 Videx Electronics S.p.A. Notes: Autore: Marco@videx.it Via del Lavoro, 1 - 63846 Monte Giberto (FM) Note: Cod.File: Phone: +39 0734 631669 - Fax +39 0734 631669 224KVD139A.dwg www.videx.it - info@videx.it Art. 6276 - Installation instructions 66251125-EN - V1.2 - 31/10/16...
- Page 7 Art.6276 Address N. 7 Address N. 8 Art.6276 Art.6276 Address N. 5 Address N. 6 L - + - V1 V2 L - + - V1 V2 A = MAX 40mt Art. 6276 - Installation instructions 66251125-EN - V1.2 - 31/10/16...
- Page 8 Fig. 5: first hook it on the bottom then push in the top until you hear the clip. 6. Reconnect the handset and hang it as shown in Fig. 6. Art. 6276 - Installation instructions 66251125-EN - V1.2 - 31/10/16...
Need help?
Do you have a question about the 6276 and is the answer not in the manual?
Questions and answers