Videx 6700 Series Manual
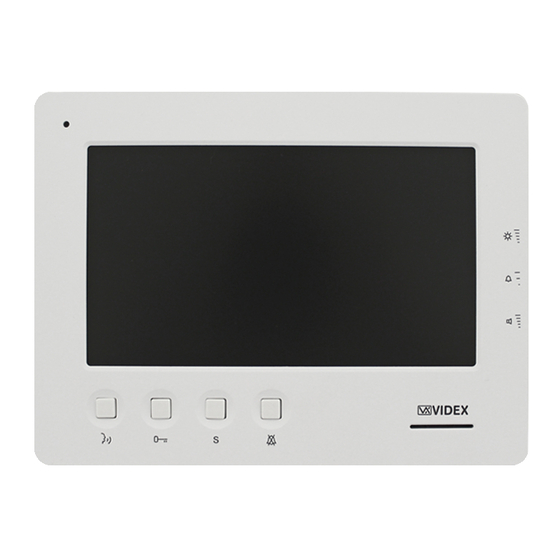
7" hands free colour display digital videophone
Hide thumbs
Also See for 6700 Series:
- Manual (37 pages) ,
- Quick manual (2 pages) ,
- User manual (29 pages)
Advertisement
Available languages
Available languages
Quick Links
6700 Series
Art. 6788
7" hands free colour display digital videophone
200mm
Fig. 1
DESCRIPTION
Surface mount hands free intelligent Videophone using 7" full
colour active matrix LCD monitor for VX2300.
Including 4 buttons: Service, Privacy/Bus relay activation/Cam-
era switch/Call reject, Door-open/Intercommunicating call,
Answer/OFF/Camera recall/Push to talk plus 3 LED's for visual
indication of privacy, door open services enabled and functions
activated.
Adjustments & programmable options: call tone volume on 3
levels (low, medium, high), speech volume, call tone melody,
number of rings, and privacy duration .
Also includes a local bell function.
PUSH BUTTONS
Service push button.
When pressed it links internally the terminals C and NO on the connection terminals.
Privacy ON-OFF push button.
To enable the function press this button when the videophone is in stand-by. The service is automatically disabled when
the programmed time expires (the privacy duration time can be programmed) or manually by pressing again the button.
Activate bus relay board Art. 2305 push button.
To activate a bus relay, during a conversation, press this button quickly as many times as the address value of the relay.
Camera switch push button.
If the door station uses the Art. 4303N combined with Art. 4330N and Art. 4302V, pressing this button during a conversation
switches the video signal coming from the internal camera module to the video signal coming from the camera module
input for external camera. During the conversation, press and keep pressed the button until the camera switches. Repeat
the operation to switch back to internal camera.
Call Reject Button.
During an incoming call, press this button to reject the call. The visitor doesn't receive any warning of the call rejected.
Door open push button.
Press this button to open the door when you are in conversation or you are receiving a call.
Intercommunication push button.
For an intercommunicating call, press as many times as the extension or address value to call (see SW3 Intercommunica-
tion Settings).
Art. 6788 - Installation instructions
D
27mm
PT3 PT2
G
PT1
H
SW2
F
PT4
Fig. 2
LEGEND
Connection terminals
A
8 Way dip switch bank
B
4 Way dip switch bank
C
Contrast adjustment trimmer
D
Hue adjustment trimmer
E
Speech volume control sliding wheel
F
Brightness control sliding wheel
G
Call tone volume switch
H
Bus termination switch
I
- 1 -
E
A
I
JP1
ON
1 2 3
4
5
6 7 8
SW1
66251155 - V2.0 - 15/05/18
B
C
ON
1 2 3 4
SW3
Advertisement

Related Manuals for Videx 6700 Series


Summary of Contents for Videx 6700 Series
- Page 1 6700 Series Art. 6788 7" hands free colour display digital videophone 27mm 200mm PT3 PT2 1 2 3 6 7 8 1 2 3 4 Fig. 2 Fig. 1 DESCRIPTION LEGEND Surface mount hands free intelligent Videophone using 7” full Connection terminals colour active matrix LCD monitor for VX2300.
-
Page 2: Push Buttons
6700 Series Art. 6788 7" hands free colour display digital videophone PUSH BUTTONS Answer push button. On an incoming call, operation of this button allows the user to answer and converse with the visitor. The relevant LED will illuminate. Switch off button. - Page 3 6700 Series Art. 6788 7" hands free colour display digital videophone PRIVACY DURATION • Keep pressed the button until the two LEDs are switched on. • Press the button for the number of times corresponding to the required privacy duration to set. Each time the button is pressed, the duration is increased by 15 minutes: i.e.
-
Page 4: Technical Specification
MEMORY BOARD This device is also available in the version with memory board (Art. 6788/VM). If you have that version, please refer to the “6200, 6300, 6400 and 6700 Series Memory Board” user manual (in English and Italian) for installation and use. - Page 5 6700 Series 6700 Series Wall mounting instructions Fig. 1 Fig. 2 Fig. 3 Fig. 4 Fig. 5 Fig. 6 Fig. 7 1. In order to install the videophone, it is necessary to remove the cover, which contains all the electronics, from the base: then rotate clockwise until you listen a “CLICK!”.
- Page 6 Serie 6700 Art. 6788 Videocitofono vivavoce digitale 7" a colori 27mm 200mm PT3 PT2 1 2 3 6 7 8 1 2 3 4 Fig. 2 Fig. 1 DESCRIZIONE LEGENDA Videocitofono vivavoce intelligente montaggio da superficie con Morsettiera di connessione monitor a colori alta risoluzione LCD TFT da 7” per sistema VX2300. Dip-switch ad 8 vie 4 pulsanti: Servizio, Privacy/Attivazione relé...
- Page 7 Serie 6700 Art. 6788 Videocitofono vivavoce digitale 7" a colori PULSANTI Pulsante di risposta. All’arrivo di una chiamata, premere questo pulsante per rispondere e avviare la comunicazione. Pulsante di chiusura. Con il monitor acceso e la conversazione in corso, la rapida pressione di questo pulsante spegne il sistema. Lo spegnimen- to avviene comunque a tempo allo scadere del tempo di conversazione.
- Page 8 Serie 6700 Art. 6788 Videocitofono vivavoce digitale 7" a colori SUONERIA • Tenere premuto il pulsante fino a quando i due LED non si accendono. Il videocitofono emette la suoneria corrente. • Premere e tenere premuto il pulsante per ascoltare la suoneria successiva. Ripetere l’ o perazione fino a selezionare la melodia desiderata. •...
-
Page 9: Specifiche Tecniche
Serie 6700 Art. 6788 Videocitofono vivavoce digitale 7" a colori MODO ACCENSIONE SLAVE - SW3.4 Questa impostazione è legata al modo di risposta dei videocitofoni quando ci sono più unità in parallelo (stesso indi- rizzo ma diversi interni). OFF (impostazione di fabbrica) = solo il videocitofono con interno uguale a 1 (master) mostra SW3.4 il video proveniente dal posto esterno all’arrivo della chiamata. - Page 10 Serie 6700 Serie 6700 Istruzioni di installazione a parete Fig. 1 Fig. 2 Fig. 3 Fig. 4 Fig. 5 Fig. 6 Fig. 7 1. Per installare il videocitofono è necessario aprirlo separando la base dal coperchio che ospita tutta l’elettronica dello stesso: dopodiché...
- Page 11 (power off then power on). Title: Data creazione: Foglio 28/09/2016 Titolo: Data modifica: 28/09/2016 Videx Electronics S.p.A. Notes: Autore: Marco@videx.it Via del Lavoro, 1 - 63846 Monte Giberto (FM) Note: Cod.File: Phone: +39 0734 631669 - Fax +39 0734 631669 23KVD003E.dwg www.videx.it - info@videx.it...
- Page 12 Art.4845 12Vac Title: Data creazione: Foglio 28/09/2016 Titolo: Data modifica: 28/09/2016 Videx Electronics S.p.A. Notes: Autore: Marco@videx.it Via del Lavoro, 1 - 63846 Monte Giberto (FM) Note: Cod.File: Phone: +39 0734 631669 - Fax +39 0734 631669 23KVD003F.dwg www.videx.it - info@videx.it - 12 - 66251155 - V2.0 - 15/05/18...
- Page 13 - 13 - 66251155 - V2.0 - 15/05/18...
- Page 14 - 14 - 66251155 - V2.0 - 15/05/18...
- Page 15 - 15 - 66251155 - V2.0 - 15/05/18...
- Page 16 MANUFACTURER VIDEX ELECTRONICS S.P.A. FABBRICANTE Via del Lavoro, 1 FABRICANT 63846 Monte Giberto (FM) Italy FABRICANTE Tel (+39) 0734 631669 FABRIKANT Fax (+39) 0734 632475 www.videx.it - info@videx.it CUSTOMER SUPPORT VIDEX ELECTRONICS S.P.A. UK Customers only: SUPPORTO CLIENTI VIDEX SECURITY LTD www.videx.it - technical@videx.it...
Need help?
Do you have a question about the 6700 Series and is the answer not in the manual?
Questions and answers