
Related Manuals for Hilti DS WS15


Summary of Contents for Hilti DS WS15
- Page 1 DS WS15 Operating instructions Printed: 08.07.2013 | Doc-Nr: PUB / 5069750 / 000 / 01...
-
Page 2: Table Of Contents
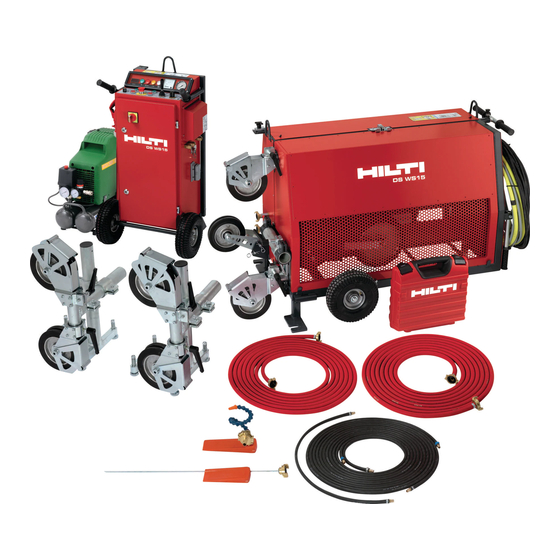
ORIGINAL OPERATING INSTRUCTIONS DS WS15 3×480V electric wire saw Contents Page It is essential that the operating instructions are read before the machine is operated for the first time. 1. General safety rules Always keep these operating instructions together with the machine. - Page 3 Drive and storage unit Control unit Air compressor Pressure hoses 2×23 ft, 1x3.3 ft (2×7 m, 1×1 m) Single pair pulley (2 pcs) Water supply – long Water supply – flexible Water hose 2×33 ft (2×10 m) Tool set DS-WS UL Extension cord 33 ft (10 m) Wire guard set DSW-WG Printed: 08.07.2013 | Doc-Nr: PUB / 5069750 / 000 / 01...
-
Page 4: General Safety Rules
General safety rules 1. General safety rules Personal Safety Stay alert, watch what you are doing and use com- WARNING! Read and understand all instructions. mon sense when operating a power tool. Do not use Failure to follow all instructions listed below may result a tool while tired or under the influence of drugs, al- in electric shock, fire and/or serious personal injury. - Page 5 General safety rules Store idle tools out of reach of children and other un- trained persons. Tools are dangerous in the hands of untrained users. Maintain tools with care. Keep cutting tools sharp and clean. Properly maintained tools with sharp cutting edges are less likely to bind and are easier to control.
-
Page 6: Specific Safety Rules And Symbols
Specific safety rules and symbols 2. Specific safety rules and symbols k) In cooperation with the site engineer or architect, ensure that no gas, water, electricity or other supply lines are located in the cutting area. Any supply pipes or cables located close to the cutting area which could, for example, be damaged by falling objects, must be specially protected and, if necessary, switched WARNING... - Page 7 Specific safety rules and symbols the wire is running (shown in gray). The danger area tension side. The operator is responsible for cordon- cannot be limited unless suitable means of protection ing off the area and restricting access. The hazardous are employed (protective walls, curtains or wire guards area may be entered only when the EMERGENCY STOP etc.).
- Page 8 Damaged or faulty switches must be replaced at a in use. Hilti service center. Do not use the machine if it can- not be switched on and off correctly. Safety during operation...
- Page 9 Specific safety rules and symbols Sawing may begin only once the wire saw and pulley workplace. Do not operate the wire saw if your full con- stands have been securely fastened to a solid base centration is not on the job! material.
- Page 10 Specific safety rules and symbols Safety instructions for transporting the wire Avoid lifting and carrying heavy objects. Use suitable lift- ing equipment and means of transport and share heavy loads between several people. Use the handles provided for transportation. Ensure that the handles are always kept clean and free of grease.
- Page 11 Specific safety rules and symbols Warning Caution: High voltage Warning: avoid hand Warning: Cutting hazard, injuries sharp edges Wear protective gloves Wear protective goggles Wear a safety helmet Wear protective footwear Wear respiratory protec- Read the operating tion instructions before use water in <...
- Page 12 Other information flow into the sewerage system. In these operating instructions, the DS WS15 electric wire saw is referred to as “the machine”. Location of identifying data on the machine The type designation, item number, serial number, year of manufacture and technical status can be found on the rating plate on the machine.
-
Page 13: Functional Description
Areas of application The wire guard stops the wire lashing out in the event The DS WS15 is an electrically-powered wire saw which, of wire breakage and prevents objects or fragments by means of its diamond wires, is capable of sawing... - Page 14 Functional description T–shaped transportation handle, pull-out type Folding transportation handle Transportation or lifting lever for raising the wheels Lifting points for transportation by crane 2 water connections for cooling water supply to the diamond wire 2 baseplates for securing the drive unit to the floor or ground Cable and hose storage compartment Electric cables for drive motors...
- Page 15 Functional description Wire clamping vice Drive wheel 1, 280 mm dia., fixed Drive wheel 2, 280 mm dia., moving Storage pulleys, 280 mm dia., moving Storage pulleys, 200 mm dia., fixed Compressed air cylinder stop piece Tension-side guide pulley, adjustable in direction and position Diamond wire lead-in guide Slack-side guide pulley –...
- Page 16 Functional description Side cover securing latch 3.3.1 Operating controls Control unit DS EB-WS15 Ventilation grille Socket, supply to the drive motors 24 V control circuit socket for the drive unit Compressed air supply, supply from the compressor 2 compressed air connections, supply to the drive unit Transportation and lifting bars Transportation handles...
- Page 17 12 13 Control unit cover lock Regulator for wire drive speed (controls cutting speed, Key for control unit cover lock DS WS15 main power switch Drive ON, green light Digital display for wire cutting speed in m/s Drive OFF, red button Green “Ready for operation”...
- Page 18 Functional description Drive principle The wire is driven by 2 electric motors fitted with drive tem are designed to achieve high initial torque and work- wheels. The diamond wire is fed around the drive wheels ing torque. in the form of a figure eight to ensure optimum grip. The The wire speed can be infinitely adjusted within the 0–89 motors’...
- Page 19 Functional description Wire guidance Guide pulleys are fitted on the wire tension side and on the return side (slack side). The wire is guided to the object being sawn by way of these guide pulleys which can be adjusted in any direction. Wire guides in the form of single-stands, plunge pulleys etc., are mounted at the start and end of the cut.
- Page 20 Compressed air supply pressure 87–116 psi 6–8 bar Compressed air flow rating 26 gallon/min min. 100 l/min Technical data for the DS WS15 drive unit DS WS15 2 × 10 hp 2 × 7.5 kW Motor power S1** Cooling water temperature at 5l/min.
- Page 21 Functional description 3.10 Type plates = Engineering number = Spare parts list index = Serial number = Year of manufacture Printed: 08.07.2013 | Doc-Nr: PUB / 5069750 / 000 / 01...
-
Page 22: Assembly
Assembly 4. Assembly 4.1.2 Wire pressure Planning the wire guidance system ■ Before installing the wire saw, you must carefully α0 =90αα study the situation and plan the wire guides, the drilling of through-holes, the sequence of the work and the α1 =70αα... - Page 23 ■ The DS WS15 drive unit can be easily moved on sol- 3 × 480 V Voltage version...
- Page 24 NOTE Hilti HDI 1/2" metal expansion anchors are usually sui- Connecting the electric power, water and table for fastening diamond core drilling equipment compressed air to uncracked concrete. Under certain conditions it may be necessary to use an alternative fastening Please also refer to Section 2, “Description of the saw...
- Page 25 ■ The DS WS15 drive unit has to be cooled even when side (wire return side) of the drive unit used for dry cutting applications (the diamond wire may not have to be cooled when cutting brickwork).
- Page 26 Assembly ■ Move the drive motor on the carriage manually into the desired position. Before this can be done, the two compressed air connections located at the rear of the drive must be connected, or coupled together (so that the air in the pressure cylinders can circulate). ■...
- Page 27 Assembly ■ If necessary, e.g. when an extremely soft material is being cut, tighten the compressed air cylinder lock at the cylinder. This prevents the wire from sticking in soft material when the saw is started (fig. ■ Fit the wire guard (side cover) once the wire is ten- Warning: avoid hand Wear protective gloves injuries...
- Page 28 Assembly 4.10 4.11 Setting up the wire cooling system Basic applications ■ Ideally, hoses should be 4.11.1 Standard vertical cut led from the 2 water con- ■ Illustration: Using a single-pair pulley stand nections with valves at (DS-WS-SPP) the front of the control ■...
- Page 29 50% complete, i.e. the wire then also effectively involved in cutting process, ranges from begins to cut from below. approximately 6–26 ft for the DS WS15 wire saw. ■ Provided the operator remains outside the danger This enables the operator to achieve the greatest effi- zone, this can be done while sawing continues by ciency, and also ensures good service life of the wire.
- Page 30 Assembly ■ Guide pulley tube attached directly to the baseplate 4.11.6 Flush horizontal cut ■ The pulley stand should be mounted so that the piv- oting guide pulley (on bearings), with the clamping screw at the rear, is almost in contact with the sur- face along which the flush cut is to be made.
- Page 31 Assembly ■ In so-called "external plunge” applications, the plunge pulleys are mounted on the outside of the object being cut. Cross-type tube clamps are used to mount the plunge pulleys on single-pair pulley stands. The time- consuming job of drilling through the object to be cut is thus no longer necessary.
-
Page 32: Operation
■ The yellow warning lamp ➜I lights and the machine ■ Switch on the drive (green “DS WS15 Drive Unit” switches off. The drive carriage has reached the end of its travel, i. e. is at the advance end stop. Press the dri- push-button). - Page 33 The DS WS15 then saws automatically. ■ Reduce the speed of the wire considerably during the ■ Monitor the sawing operation. If the saw wire vibrates final cutting phase.
-
Page 34: Maintenance
Maintenance 6. Maintenance Cleaning the wire saw CAUTION Disconnect the supply cord plug from the power outlet. CAUTION Keep the machine, especially its grip surfaces, clean and free from oil and grease. Do not use cleaning agents which contain silicone. ■... - Page 35 ■ Check the condition of the air filter occasionally . It ted on-site by the operator himself or by a Hilti dia- is located in the top right-hand section of the control mond systems specialist or Hilti mechanic.
- Page 36 Maintenance Electrical circuit diagram – Wire saw system DS WS15 Printed: 08.07.2013 | Doc-Nr: PUB / 5069750 / 000 / 01...
- Page 37 Maintenance Pneumatic circuit diagram – drive unit Printed: 08.07.2013 | Doc-Nr: PUB / 5069750 / 000 / 01...
-
Page 38: Accessories
■ Observe the wire and wire connector manufacturer’s Hilti sawing wires and accessories instructions when connecting sawing wires and, as far as possible, use only one wire connector in each Safety precautions and instructions for use ■... - Page 39 20% steel 100% steel per/m 376 635 376 634 377 830 377 781 377 782 1m = 3.28 ft Accessories for connecting Hilti diamond wires Designation Package Ordering designation Item no. contents Crimping pliers DS-WSTHY 235845 For crimping connectors / repair sleeves...
- Page 40 Accessories DS-WRSW DSW-PW Plunge wheel assembly Item no. 315834 Item no. 365428 / 247620 The release pulley is used to reduce the length of wire For plunge applications of all kinds. At least 2 pulleys are in contact or to increase the radius of the arc followed required.
- Page 41 Water connection nipple 356700 Water supply GK seal 356701 Water seal for 356700 Steel wedge 41910 Securing concrete blocks Accessories and wearing parts for Hilti wire saw systems Ordering designation Quantity Item no. Flush anchor HDI " Fastening Water supply, long 339307...
-
Page 42: Troubleshooting
8. Troubleshooting Problems or faults concerning the diamond wire ■ The DS WS15 cannot start movement of the wire Possible cause Solution / measures Edges of the concrete are too sharp. – Use a Hilti combihammer to round the edges and pull the diamond wire back and forward by hand before starting. - Page 43 Incorrectly adjusted crimping pliers Check how the crimping pliers are set. Insufficient pressure applied to the crimping pliers – Minimum crimping pressure is 7 t (Hilti crimping pliers = 8 t) Incorrect or worn crimping jaws – Check the crimping jaws and replace if necessary.
- Page 44 Troubleshooting ■ The diamond wire wears too quickly Possible cause Solution / measures Drive speed is too low and wire cutting speed is thus also – Increase drive speed or, respectively, cutting speed. too low. Inadequate cooling of the diamond wire –...
- Page 45 Troubleshooting Remedying DS WS15 wire saw system malfunctions ■ The saw doesn't start. The main switch is in the ON position but the green “ready for operation” lamp doesn't light. Possible cause Solution / measures No power supplied by the cable.
- Page 46 The EMERGENCY OFF button is – Release the EMERGENCY OFF pressed in. button. ■ The DS WS15 cuts out while running and cannot be restarted. The green “ready for operation” lamp lights together with the yel- low “pneumatic advance” lamp. Possible cause...
- Page 47 Troubleshooting ■ High current input (more than 40 A) or the converter is overloaded. Possible cause Solution / measures Wire tension is too high. – Reduce the tension by adjusting the air pressure regulating valve One phase is missing. – Check the mains supply. Printed: 08.07.2013 | Doc-Nr: PUB / 5069750 / 000 / 01...
-
Page 48: Manufacturer's Warranty – Tools
Manufacturer's warranty – tools / Disposal 9. Manufacturer's warranty – tools 10. Diposal Hilti warrants that the tool supplied is free of defects Return waste material for recycling in material and workmanship. This warranty is valid so long as the tool is operated and handled correctly,... - Page 49 Printed: 08.07.2013 | Doc-Nr: PUB / 5069750 / 000 / 01...
- Page 50 Printed: 08.07.2013 | Doc-Nr: PUB / 5069750 / 000 / 01...
- Page 51 Printed: 08.07.2013 | Doc-Nr: PUB / 5069750 / 000 / 01...
- Page 52 Tel.: +423 / 234 21 11 Fax: +423 / 234 29 65 www.hilti.com Hilti = registered trademark of Hilti Corp., Schaan W 2557 I 1212 I 1-en_USA I 1 Printed in Liechtenstein © 2012 Right of technical and programme changes reserved S. E. & O.
Need help?
Do you have a question about the DS WS15 and is the answer not in the manual?
Questions and answers