
Related Manuals for bioMerieux mini VIDAS


Summary of Contents for bioMerieux mini VIDAS
- Page 1 User Manual Industry Use - US version bioMérieux SA 376 Chemin de l’Orme 69280 Marcy-l’Etoile - France Tél: 33 (0)4 78 87 20 00 Fax: 33 (0)4 78 87 20 90 www.biomerieux.com...
- Page 2 (when applicable), and precautions are strictly followed as detailed in the instructions for use (IFU). Except as expressly set forth above, bioMerieux hereby disclaims all warranties, including any implied warranties of merchantability and fitness for a particular purpose or use, and disclaims all liability, whether direct, indirect or consequential, for any use of the reagent, software, instrument and disposables (the “System”) other than as set forth in the IFU.
-
Page 3: Table Of Contents
® mini VIDAS analyzer Description ......... . . 3-1 Screen and Keypad . - Page 4 Selecting a Menu Option ..........3-30 ® 161150-849 - A mini VIDAS...
- Page 5 ® Configuring the mini VIDAS analyzer ........4-5 Selecting a Language .
- Page 6 Assigning a Dilution Factor ..........5-26 ® 161150-849 - A mini VIDAS...
- Page 7 ® Printing the mini VIDAS Assay List ......... 6-12 Miscellaneous Operations ..................
- Page 8 Error Messages ............B-8 ® 161150-849 - A mini VIDAS...
- Page 9 ® Example of a mini VIDAS Upload ........D-3 ®...
- Page 10 Table of Contents ® Appendix - Technical Data and Specifications (previous versions of mini VIDAS analyzers) ........................E-1 Dimensions............. .E-1 Weight .
-
Page 11: Introduction To The System
VIDAS Industry analyzer or system. ® Note: Some information in this user manual may only apply to mini VIDAS for a clinical application. Information specific for clinical use will mention "for clinical use only" and will not be taken into ®... -
Page 12: Warning And Safety Messages
IMPORTANT: An Important statement relates to content presented in the user documentation. It is used to reinforce the user’s understanding of selected information. Note: A Note statement supplies additional information about a topic. ® 161150-849 - A mini VIDAS... -
Page 13: General Statements
It is recommended to evaluate the electromagnetic environment before starting the device. WARNING Only modify the software configuration parameters you are authorized to modify and which are described in the user documentation. ® 161150-849 - A mini VIDAS... - Page 14 IMPORTANT: Electrical or other connections should only be made using the accessories supplied with the equipment. IMPORTANT: It is important to follow all the restrictions on use, particularly concerning temperature, storage, installation and voltage, which are indicated on the product label or in the user documentation. ® 161150-849 - A mini VIDAS...
- Page 15 IMPORTANT: It is recommended to keep the original packaging materials in case the equipment needs to be moved. Any damage directly or indirectly resulting from the transport of the equipment without adequate containers will not be covered by the warranty. ® 161150-849 - A mini VIDAS...
-
Page 16: Standard Symbols
Do not stack Caution, consult accompanying documents Contains sufficient for <n> tests Do not reuse Keep dry Keep away from light Fragile, handle with care Humidity limitation Keep away from magnetic field Temperature limitations ® 161150-849 - A mini VIDAS... - Page 17 Sterile Positive control Negative control Biological risk Electric shock warning Radiation warning Hot surface Potential pinch-point warning Laser beam Shearing hazard High temperature Hazardous magnetic field Potential tip-over/crush hazard Acute toxicity Corrosives Sodium azide ® 161150-849 - A mini VIDAS...
- Page 18 ON (only for a component of the system OFF (supply) equipment) Equipment protected throughout by OFF (only for a component of the system double insulation or reinforced insulation equipment) (Equivalent to Class II of IEC 536) Ethernet port ® 161150-849 - A mini VIDAS...
-
Page 19: Safety Information
Class 1 devices are not considered to be hazardous when used for their intended purpose. CAUTION: Use of controls, adjustments or performance of procedure other than those specified in the user’s manual may result in hazardous LED/laser light exposure. ® 161150-849 - A mini VIDAS... -
Page 20: Instrument Labels
SPR block. This label reads: WARNING - DO NOT APPLY PRESSURE IN ORDER TO SEAT SPRS. INADVERTENT EJECTION OF SPR MAY RESULT. ® Figure 2-1: SPR Block Label Figure 2-2: Position of the label ® 161150-849 - A mini VIDAS... -
Page 21: Reagent Strip Tray
Instrument Labels Safety Information Reagent Strip Tray When you pull out the reagent strip tray, the biological risk label appears. Figure 2-3: Reagent strip tray label (Biohazard) Figure 2-4: Position of label ® 161150-849 - A mini VIDAS... -
Page 22: Strip Section
French and English. This label reads: CAUTION: BIOHAZARD MATERIAL. SEE MANUAL FOR DECONTAMINATING INSTRUMENT Figure 2-5: Strip section label Figure 2-6: Position of label ® 161150-849 - A mini VIDAS... -
Page 23: Rear Panel
Instrument Labels Safety Information Rear Panel ® The label is positioned on the rear panel of the mini VIDAS analyzer. This label reads: WARNING - FOR CONTINUED PROTECTION AGAINST RISK OF FIRE, REPLACE ONLY WITH FUSE OF THE SPECIFIED TYPE AND CURRENT RATING. -
Page 24: Safety Precautions
Components should be moved slowly to prevent the buildup of electricity. Failure to comply may result in injury to personnel or damage to the instrument. ® 161150-849 - A mini VIDAS... - Page 25 WARNING All power switches should be off when connecting or disconnecting cables to power outlets to reduce the risk of electrical shock. ® 161150-849 - A mini VIDAS...
- Page 26 ® Never connect the mini VIDAS analyzer to the same power supply as devices which generate high current surges (centrifuges) or which, due to frequent start-ups, generate interferences if they are ill-protected (freezers, water baths etc.).
- Page 27 Hot surfaces can cause injury. WARNING ® After replacement or recalibration of the scanner head of the mini VIDAS analyzer, reperform a calibration for each assay used. CAUTION: Any liquid spilled on the system may result in system malfunctioning. If liquid is spilled on the system, wipe it up immediately using decontamination wipes.
- Page 28 Powderless gloves, a lab coat and safety glasses or goggles must be worn when performing maintenance operations. Always use personal protective equipment, including powderless gloves, a lab coat and safety glasses or goggles when handling reagents. ® 161150-849 - A 2-10 mini VIDAS...
-
Page 29: Precautions For Use Of Reagents
® Check that each SPR dot on top has a hole. ® Reject SPR s with no hole in the center of the dot. ® 161150-849 - A 2-11 mini VIDAS... -
Page 30: Precautions For Samples
Check that the dot is not adhered to the SPR® block or the SPR seal and if it has, remove it. ® • Repeat the assay for the defective SPR • Contact bioMérieux Technical Assistance or your local bioMérieux representative. ® 161150-849 - A 2-12 mini VIDAS... -
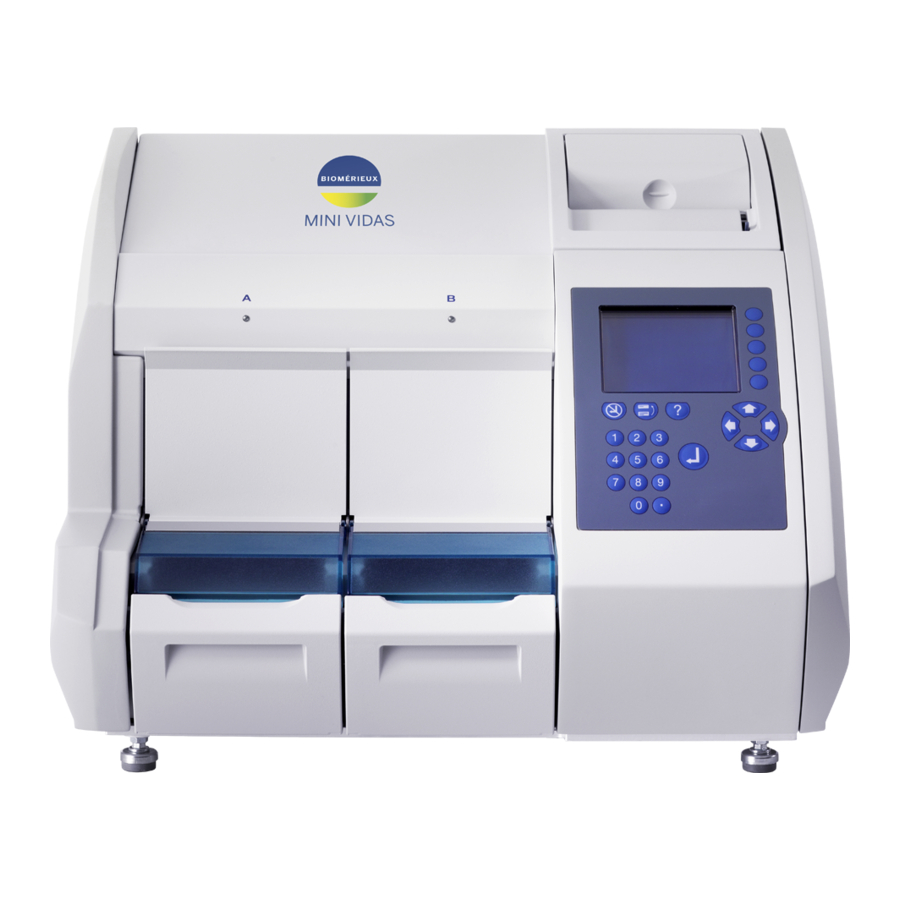
Page 31: System Description And Basic Operations
6 — Thermal printer 7 — External bar code reader ® Note: Previous versions of the mini VIDAS analyzer may not have a strip preparation tray. CAUTION: Never use material other than that specified by bioMérieux. ® 161150-849 - A... -
Page 32: Screen And Keypad
® mini VIDAS analyzer Description System Description and Basic Operations Screen and Keypad ® Figure 3-2: mini VIDAS screen and keypad 1 — Liquid crystal display screen 2 — Selection keys Used to select one of up to five options that can appear on the display screen. The options are displayed on the screen opposite the keys used to select them. -
Page 33: Internal Printer
® This slot is for the mini VIDAS software update cards. 2 — Diagnostic port ® Used by bioMérieux Field Service Engineers to troubleshoot the mini VIDAS analyzer. Also used external bar code reader. 3 — Computer port ® Used to connect the mini VIDAS analyzer to a computer.... -
Page 34: Bar Code Readers
Bar Code Readers There are two types of bar code readers: ® 1. A hand-held bar code reader is included in the mini VIDAS configuration. It is used to: • read the bar codes of certain reagents before they are used. -
Page 35: Technical Data And Specifications
Technical Data and Specifications System Description and Basic Operations Technical Data and Specifications ® Technical data and specifications are given for the latest version of the mini VIDAS analyzer (analyzer with transparent blue section covers). ® For previous versions of the mini VIDAS... -
Page 36: Electrical Specifications
Environmental Conditions Specification Value Type of Installation For indoor use only Installation category Pollution degree ® The mini VIDAS analyzer is compliant with the environmental safety requirements in IEC 61010-1, section 1.4. ® 161150-849 - A mini VIDAS... -
Page 37: Temperature
Up to 30 tests/hour depending on the type of assay used (see test duration in the package ® insert for each VIDAS assay). Motors • Automatic control by stepper motors. Pumping • 2 pumps; one for each section • Mixing, diluting, and transferring of liquids ® 161150-849 - A mini VIDAS... -
Page 38: Temperature Control
40 to 40 000 nmol of 4MU (4-Methyl Umbelliferone) Automatic checking Automatically checks the optic system every 12 hours against a reference standard (named "solid standard"); automatic calibration if the difference with the solid standard is > 0.6 % ® 161150-849 - A mini VIDAS... -
Page 39: Optional Hardware
Figure 3-4: VIDAS Heat and Go instrument ® Contact bioMérieux or your local bioMérieux representative to purchase the VIDAS Heat and Go instrument. ® Refer to the VIDAS Heat and Go user's manual for further instructions. ® 161150-849 - A mini VIDAS... -
Page 40: Assay Kit Specifications
The strip is sealed by a foil to ensure that no evaporation will occur that may compromise the reagents. The substrate well is made of a plastic that complies with the appropriate optical qualities. ® 161150-849 - A 3-10 mini VIDAS... -
Page 41: Reagents
Eight reagent wells (conjugate, diluent, wash buffer) 3 — the last well is the optical cuvette in which the fluorescence of the substrate is measured. 4 — Tab ensures that the strip is correctly positioned in its channel guides. ® 161150-849 - A 3-11 mini VIDAS... -
Page 42: Single Reagent Strip For Immuno-Concentration (For Industry Use Only)
The sample test strip contains a reagent which is not included in the sample reference strip. A comparison of the measurements from the two strips determines the test result. Dual strips fit in the reagent strip tray exactly like single strips, but they require two channels. ® 161150-849 - A 3-12 mini VIDAS... -
Page 43: Reagent Strip Label
This corresponds to the expiration date of the reagent lot. ® When the bar code reader reads this date, the mini VIDAS analyzer compares it to the date stored in its memory to ensure that the lot has not passed its expiration date. -
Page 44: Spr
The reagent strip tray then moves in and out to allow liquids to be transferred from one well to another. ® 161150-849 - A 3-14 mini VIDAS... -
Page 45: Standards / Calibrators And Controls
System Description and Basic Operations Standards / Calibrators and Controls ® The standards/calibrators, which are used to calibrate the mini VIDAS analyzer to each lot, are available in the reagent kit at one or more concentrations levels depending on the test. -
Page 46: System Basics
The mini VIDAS analyzer is a compact, multiparametric, automated immunoanalyzer. ® After the samples have been dispensed, the mini VIDAS analyzer automatically performs the different stages of analysis, including report printing. The software processes the reagents using the strips bar codes and can send the results to a Laboratory Information System (uni-directional interface). -
Page 47: Analysis Methods
System Basics System Description and Basic Operations Analysis Methods ® The mini VIDAS analyzer uses several different methods to calculate results. Three basic categories of analysis methods are: Calculation method Description Test sample to Standard A comparison of the Relative Fluorescence Value (RFV) of the test sample to that of a standard. -
Page 48: Qualitative Assays (Dual Reagent Strips)
For assays that use the P/N method, the test value is calculated from the ratio of the sample RFV to that of the reference RFV. • RFV (tested sample) = 2158 • RFV (reference) = 2177 • Test value (VT) = 2158/2177 = 0.99 ® 161150-849 - A 3-18 mini VIDAS... -
Page 49: Quantitative Assays
Note: Although standards/calibrators can be run after analyses have completed, it is recommended that they be run either before or with analyses from the same assay kit lot. If an assay has two standards/calibrators, both must be run at the same time. ® 161150-849 - A 3-19 mini VIDAS... -
Page 50: Principles Of Calibration / Recalibration
Recalibration should be performed every 14 days or 28 days depending on reagents. Qualitative The result is interpreted by comparing the «Test Value» to one or two threshold ® mini VIDAS values entered into the software. Calibration Theoretical Principle for Quantitative Assays The principle consists of determining the mathematical equation which represents the calibration curve, i.e. - Page 51 System Basics System Description and Basic Operations ® Principle Applied to the mini VIDAS analyzer ® For the mini VIDAS analyzer, calibration is performed during the production of each new lot ® of SPR s and reagents. The number of standards/calibrators varies between 5 and 11 depending on the biological assay.
-
Page 52: Recalibration
Before use, it must be readjusted to compensate for any minor variations in assay signal ® between the mini VIDAS modules and any possible alteration of the reagent kit. This readjustment is called recalibration. It may affect the master curve defined at the factory as well as the calibrator's RFV. - Page 53 To avoid any deviation, the master lot curve is the one set in the factory and not the last curve readjusted. The software can perfectly manage simultaneous use of several master curves corresponding to different lots for a given assay. Figure 3-12: Master curves ® 161150-849 - A 3-23 mini VIDAS...
- Page 54 4 points. The levels of concentration of these 4 standards are known to the ® mini VIDAS software and are specific for each assay. ® The mini VIDAS software replots the total curve using the 4 pairs of concentrations and RFVs (master lot data). The remaining information includes: • the assay code, ®...
-
Page 55: Overview Of Operation Elements
Strip and SPR Sections ® The mini VIDAS analyzer contains two compartments called “sections”. Each section (labeled A and B) can process six single, or three dual, reagent strips for a maximum capacity of twelve single or six dual tests. - Page 56 When the section is running a test, the light is on; when the light is off, the section is idle. A flashing light indicates that the tests in that section are completed, and that the reagent ® strips and SPR s should be removed. ® 161150-849 - A 3-26 mini VIDAS...
-
Page 57: Strip Preparation Tray
System Description and Basic Operations Strip Preparation Tray A retractable strip preparation tray is located under each reagent strip tray. ® Note: Previous versions of the mini VIDAS analyzer may not have a strip preparation tray. Figure 3-15: Strip preparation tray ®... -
Page 58: Microprocessor
System Description and Basic Operations Microprocessor ® In addition to the central processing unit, each mini VIDAS section contains its own microprocessor. This unit is responsible for storing and operating the assay protocols. A protocol is a series of commands including all necessary operations for an analysis to be ®... -
Page 59: Software Basics
Software Basics System Description and Basic Operations Software Basics Menu Structure ® The Main Menu is the entry point into the mini VIDAS software. It also serves as the pathway ® to the other mini VIDAS menus. ® Figure 3-17: mini VIDAS menu structure A menu accessed from another menu is called a submenu. -
Page 60: Selecting A Menu Option
System Description and Basic Operations Selecting a Menu Option ® Five selection keys on the right of the screen enable you to select options in mini VIDAS menus. Since not all displays use all five selection keys, the boxed selections and lines indicate the active keys. -
Page 61: The Status Screen
System Description and Basic Operations The Status Screen ® The Status Screen display is used to indicate the current status of the two mini VIDAS sections and to assign assays to them. ® It is also used to display the temperature of each section’s tray and SPR block. -
Page 62: The Second Status Screen
Use it to stop the processing. The Third Status Screen The third status screen is accessed by selecting Display temperatures from the first status screen. See Displaying and Printing Instrument Temperatures on page B-18 ® 161150-849 - A 3-32 mini VIDAS... -
Page 63: Online Help
3 — Information: displays the first help screen. ® 4 — Assay compatibility list: displays a list of the mini VIDAS assay codes classified according to compatibility. Compatible assays are assays with the same protocol = assays which can be run simultaneously in the same section. -
Page 64: Screen Paging
System Description and Basic Operations Screen Paging Using the Arrow Keys ® As some of the mini VIDAS displays are too long for one screen, you can page the screen display using the <> and <> arrow keys. Figure 3-22: Screen paging Paging Bar ®... -
Page 65: System Installation And Configuration
40 kg. Before moving any of the equipment, it is imperative that you contact bioMérieux Technical Assistance or your local bioMérieux representative. ® Users are trained during installation of the mini VIDAS analyzer so that they are able to derive the best performance from it. Unpacking ®... -
Page 66: Storage Conditions
IMPORTANT: All the equipment, disposables, reagents, etc., must be stored at the temperatures and in the conditions described in their respective documentation. ® Note: The storage temperatures and conditions for the mini VIDAS analyzer are indicated in Environmental Conditions on page 3-6. -
Page 67: Starting The System
® The mini VIDAS Main Menu appears. ® Note: If the room temperature is too low when the mini VIDAS analyzer is turned on, error 160 will appear after the initialization phase or when the instrument is restarted (see Instrument Errors on page B-7). -
Page 68: Shutting Down The System
1. Make sure that no analyses are in progress. 2. Make sure that all results have been printed and/or transmitted to the LIS. ® 3. Turn the mini VIDAS analyzer power switch to OFF. 4. Disconnect the power cord from the power outlet. -
Page 69: Configuring The Mini Vidas ® Analyzer
Make sure that modifications are necessary and justified. Selecting a Language ® Menus, messages and other information displayed on the mini VIDAS screen can be displayed in two different languages, one of which is English. The display language is selected at the time of installation. -
Page 70: Setting Dose Units
® Configuring the mini VIDAS analyzer System Installation and Configuration Setting Dose Units ® This option is used to set the standard units applicable to results for the quantitative VIDAS assays. Caution: After selecting a new unit for an assay, the results for assays run after this change are automatically calculated with this new unit.... - Page 71 ® Configuring the mini VIDAS analyzer System Installation and Configuration Note: The dose unit currently set is indicated by an arrow. 5. Select the dose unit desired for this assay. The Configuration Menu appears. 6. Select another assay to set the dose units.
-
Page 72: Setting User Ids
® Configuring the mini VIDAS analyzer System Installation and Configuration S e t t i n g U s e r I D s This option is used to enter user IDs (up to nine). These IDs will appear automatically on all reports.... -
Page 73: Setting The Report Header
® Configuring the mini VIDAS analyzer System Installation and Configuration 8. Repeat this procedure to enter another user, Press to return to the Configuration Menu. Setting the Report Header This option is used to define a line of up to 32 characters. This line appears in the header information of the assay report. -
Page 74: Setting The Date And Time
S e t t i n g t h e D a t e a n d T i m e ® This option is used to set the date and time for the mini VIDAS analyzer. These values appear on the assay report and all other places in the software where the date or time of day is used. -
Page 75: Setting Display Contrast
Caution: Too much contrast could reduce the life span of your monitor. ® analyzer for several days with It is recommended that you use your mini VIDAS the original setting before modifying the contrast. 1. Select Set Display Contrast in the Configuration Menu. -
Page 76: Selecting The Printer
® Configuring the mini VIDAS analyzer System Installation and Configuration S e l e c t i n g t h e P r i n t e r This option lets you select the internal thermal printer or an external matrix parallel printer. -
Page 77: Setting The Date/Time Format
® Configuring the mini VIDAS analyzer System Installation and Configuration S e t t i n g t h e D a t e / t i m e F o r m a t To set the format of the date and time used on the reports: 1. -
Page 78: Defining The Sample Id Character Sets
® Configuring the mini VIDAS analyzer System Installation and Configuration Defining the Sample ID Character Sets This option enables you to define two separate ID sets with three characters. Use one or both of these sets to input repetitive characters for sample IDs. -
Page 79: Changing The Keyclick Volume
® Configuring the mini VIDAS analyzer System Installation and Configuration Changing the Keyclick Volume When you press any key on the keypad, there is an audible tone that confirms the keystroke. 1. Select Sound Menu in the Configuration Menu. 2. Select Keyclick Volume in the Sound Menu. -
Page 80: Changing The Beep Volume
® Configuring the mini VIDAS analyzer System Installation and Configuration Changing the Beep Volume The beep is the tone you hear when you press a key that is inactive (it should not be pressed on the particular screen you are viewing). -
Page 81: Error Beeps
System Installation and Configuration Error Beeps ® When an error occurs, the mini VIDAS analyzer begins to beep. The beep grows louder over a 5 minute period. You can set the initial and final volume of this error beep. -
Page 82: Setting The Final Error Volume
® Configuring the mini VIDAS analyzer System Installation and Configuration Setting the Final Error Volume 1. Select Sound Menu in the Configuration Menu. 2. Select Final Error Volume in the Sound Menu. 3. Press the arrow keys to adjust the final error beep volume. -
Page 83: Enabling Display Blinking
® Configuring the mini VIDAS analyzer System Installation and Configuration Enabling Display Blinking A blinking display is associated with the error beep since it only occurs when an error happens. When enabled, it causes the display to blink when an error occurs. -
Page 84: Miscellaneous Items
® Configuring the mini VIDAS analyzer System Installation and Configuration Miscellaneous Items This option is used to configure various warnings concerning Master Lot data and standards. Note: In the default configuration, all of the miscellaneous options are enabled except the two for: ... -
Page 85: Autoprint Errors
® Configuring the mini VIDAS analyzer System Installation and Configuration Autoprint Errors 1. Select Misc. Items in the Configuration Menu. 2. Select Autoprint Errors. ® The mini VIDAS analyzer will generate a printout when an error occurs. You will still need to view the error on screen to stop the blinking and beeping. -
Page 86: Show All Assays
3. Deselect Show all assays to display only the assays for which Master Lot data have been entered. ® Note: A change to this option does not take effect until the mini VIDAS analyzer is restarted. Beep After Printing 1. Select Misc. Items in the Configuration Menu. -
Page 87: Lis User Options
System Installation and Configuration LIS User Options ® This option is used if your mini VIDAS analyzer is connected to a Laboratory Information System (LIS). Before results can be sent to the LIS, the LIS upload function must be enabled. -
Page 88: Creating Normal Ranges For Assays
C r e a t i n g N o r m a l R a n g e s f o r A s s a y s ® You can create up to 8 lines of free text for any mini VIDAS assay. -
Page 89: Installing Paper In The Internal Printer
5. Retrieve the paper spindle from its slots and put it through the core of the paper roll. ® Note: If you have just unpacked the mini VIDAS analyzer, there may be a piece of tape holding the spindle. Remove and discard this tape. -
Page 90: Print Screen
® Configuring the mini VIDAS analyzer System Installation and Configuration Print Screen 1. Display the page you want to print. 2. Press the key twice. 3. Select Print Screen to start printing. 4. Press the key to go back to the previous screen. -
Page 91: Workflow And Instructional Procedures
Workflow and Instructional Procedures Routine Workflow ® 161150-849 - A mini VIDAS... -
Page 92: Planning A Run
® The assay requests have to be created directly on the mini VIDAS analyzer. You need to manage tube prioritization and allocation of the assays to be run depending on the samples to be analyzed. -
Page 93: Defining The Standards/Calibrators And Controls To Be Used
CAUTION: To obtain a result, it is important to use a valid standard/calibrator. Standards/calibrators All single strip reagent assays require that a standard/calibrator assay result be stored in the ® mini VIDAS analyzer. A standard/calibrator must be included in a run when: •... -
Page 94: Running Assays
Master Lot Entry (MLE) data. The master lot data only needs to be entered once for each lot. ® Master Lot data can be entered into the mini VIDAS analyzer automatically using: • the Master Lot Entry (MLE) data printed on the reagent kit label.... -
Page 95: Scanning Master Lot Data On The Reagent Kit Label
• if the kit contains the Master Lot Entry (MLE) card, perform the manual data entry procedure (see Manually Entering Master Lot Data Using the Master Lot Entry (MLE) card. on page 5-7). ® 161150-849 - A mini VIDAS... -
Page 96: Automatically Entering Master Lot Data Using The Master Lot Entry (Mle) Card
Entering the Master Lot Data is now complete and a report showing the main characteristics of the lot is automatically printed. ® If the instrument is unable to read all the data on the card, the mini VIDAS analyzer beeps and an error message is generated. -
Page 97: Manually Entering Master Lot Data Using The Master Lot Entry (Mle) Card
Scanning Master Lot Data on the Reagent Kit Label There are two reasons for manually entering Master Lot data: ® • when you want to correct bar codes read incorrectly by the mini VIDAS analyzer (see Correcting Bar codes Manually on page 5-7), •... - Page 98 Note: "O" and "I" are letters. " " and "1" are the digits zero and one. Ø 11. Press when the bar code entry is complete. ® The mini VIDAS analyzer checks the bar code. ® 161150-849 - A mini VIDAS...
- Page 99 12. Select Yes to continue the entry process. The manual bar code entry screen appears again. The digits, indicating the bar code number from 1 to 16, are displayed. 13. Repeat this procedure to correct other bar code(s) if necessary. ® 161150-849 - A mini VIDAS...
- Page 100 3. Enter the first bar code on the Master Lot Entry (MLE) card by typing the characters of the bar code manually. 4. Press the arrow keys to highlight the appropriate character in the character box. ® 161150-849 - A 5-10 mini VIDAS...
- Page 101 12. Repeat this procedure for the following bar codes. 13. Press after having entered the last bar code (entry zone 16/16). ® The mini VIDAS analyzer checks the bar codes. The Master Lot Data report is printed automatically. ® 161150-849 - A...
-
Page 102: Running Assays In «Load And Go» Mode
3. Slide the strip into the section channel. CAUTION: Make sure the strip is firmly placed by sliding it all the way until you feel the strip lock into the section channel. ® 4. Open the SPR block door. ® 161150-849 - A 5-12 mini VIDAS... -
Page 103: Starting A «Load And Go» Run
® placed in the SPR block and that the dot on top has a hole. ® ® The mini VIDAS analyzer cannot detect the type of SPR used nor the absence ® or presence of an SPR ® 6. Repeat this procedure for other strips and SPR s to be loaded. - Page 104 Note: The Sample ID, standard(s)/calibrator(s) or control(s), dilution factor can be entered after the run has been started. ® ® 5. After the assays are completed, remove the SPR s and strips from the mini VIDAS analyzer. ® 6. Dispose of the used SPR s and strips into an appropriate receptacle.
-
Page 105: Running Assays In «Defined» Mode
Note: Dual reagent strips MUST be placed in positions 1 & 2, 3 & 4, or 5 & 6. Placing one in positions 2 & 3, for example, causes an error. 4. Select Assay. ® 161150-849 - A 5-15 mini VIDAS... - Page 106 6. Scroll the list using the arrow keys to select the assay code. The Position screen appears with the assay code now included. ® 161150-849 - A 5-16 mini VIDAS...
-
Page 107: Assigning Standards/Calibrators For Assays With One Standard/Calibrator
S1 or S2 is created automatically and appears on the screen. 6. Press 7. Repeat steps 4 to 6 if the standard/calibrator must be run in duplicate (S1 S1) or in triplicate (S1 S1 S1). ® 161150-849 - A 5-17 mini VIDAS... -
Page 108: Assigning Standards/Calibrators For Assays With Two Standards/Calibrators (S1 And S2)
11. Repeat the steps 8 to 10 if S2 must be run in duplicate or in triplicate Note: Multiple standards/calibrators with the same ID number are considered to be replicates by the ® mini VIDAS analyzer. The number of replicates to be performed for each standard/calibrator is indicated in the reagent package insert. -
Page 109: Assigning Controls To A Position
3. Press the <Number Key> for the position where you want to place a reagent strip. 4. Select C on the Position screen. ® Note: If your mini VIDAS analyzer has been configured to run internal quality controls and to send them to a web application for statistical processing, the Position screen will display Controls instead of C. -
Page 110: Assigning Sample Ids To A Position Using A Bar Code Reader
The sample ID now appears on the screen. 6. Repeat the whole procedure to enter other sample IDs. 7. After identification of the last sample, press until the work list for the section is displayed on the screen ® 161150-849 - A 5-20 mini VIDAS... -
Page 111: Assigning Sample Ids To A Position Manually
8. Select one of the two sample ID character sets if you want to place one of these in the cursor box. Note: See Defining the Sample ID Character Sets on page 4-14 fore more information. 9. Repeat these steps until the sample ID for the test is complete. ® 161150-849 - A 5-21 mini VIDAS... -
Page 112: Defining The Same Assay Type For The Next Position
3. Press the <Number Key> for the position where you want to place a reagent strip. 4. Select Assay in the Position screen. 5. Select Clear. 6. Select Clear this position's setup only or Clear entire section's setup. ® 161150-849 - A 5-22 mini VIDAS... -
Page 113: Loading Reagent Strips And Spr ® S
® placed in the SPR block and that the dot on top has a hole. ® ® The mini VIDAS analyzer cannot detect the type of SPR used nor the absence ® or presence of an SPR ® 6. Repeat these steps for other strips and SPR s to be loaded. -
Page 114: Starting A «Defined» Run
2. Press the <Number Key> for the user ID assigned to this section. The following message appears: Starting Section Please wait... The status of the section displays «Barcode». 3. Press to return to the Main Menu. ® 161150-849 - A 5-24 mini VIDAS... -
Page 115: Unloading Reagent Strips And Spr S
® IMPORTANT: When unloading the Reagent strips and SPR , carefully read the precautions described in Precautions For Use Of Reagents on page 2-11, section «At the End of the Run». ® 161150-849 - A 5-25 mini VIDAS... -
Page 116: Assigning A Dilution Factor
A dilution factor can be assigned or changed at any time before the completion of a run. IMPORTANT: You should perform sample dilution manually using the dilution factor memorized by ® the mini VIDAS analyzer. 1. Select Status Screen on the Main Menu. - Page 117 The Position screen appears with the new dilution factor displayed. 7. Press to return to the Section screen. 8. Repeat this procedure to assign dilution factors to additional positions in the section. 9. Press to return to the Main Menu. ® 161150-849 - A 5-27 mini VIDAS...
-
Page 118: Running Internal Quality Controls (For Clinic Use Only)
IMPORTANT: Since this function is optional, certain menus will not be displayed if you have not subscribed to this service through bioMérieux. ® Only a bioMérieux representative can configure the mini VIDAS software to run and send internal quality controls. ... - Page 119 11. When all the positions in a section are defined, press the key to return to the Section screen. 12. Start the section. Note: To transfer internal quality controls results, refer to Validating Internal Quality Controls Transfers (for Clinic Use Only) on page 6-11. ® 161150-849 - A 5-29 mini VIDAS...
-
Page 120: Viewing Stored Standards/Calibrators
5. Select Delete to delete the stored standard/calibrator shown. The following prompt appears: Standard will be deleted. Are you certain? 6. Select Yes to delete the stored standard/calibrator. 7. Press to return to the Master Lot Menu. ® 161150-849 - A 5-30 mini VIDAS... -
Page 121: Viewing Master Lot Data
4. Press any key to return to the Assay Code List. 5. Repeat this procedure to select another assay code for which you want to display Master Lot data. Press to return to the Main Menu. ® 161150-849 - A 5-31 mini VIDAS... -
Page 122: Stopping A Section
Select the Halt (retain setup) option to stop the section and retain the tests defined in the positions. Use this option when the tests will be run again. The Utility Menu appears again. 5. Press twice to return to the Main Menu. ® 161150-849 - A 5-32 mini VIDAS... -
Page 123: Results And Reports
Results and Reports The Assay Reports ® When the run for a section is completed, the mini VIDAS analyzer automatically prints an assay report. The report is printed on the internal printer or on the optional external printer, depending on how printers are configured. -
Page 124: The Assay Reports
Software and protocol version 2 — Reagent lot number 3 — Mean of S1 Relative Fluorescence Value 4 — Cut off 5 — Initial strip’s Relative Fluorescence Value 6 — Final Relative Fluorescence Value 7 — Interpretation ® 161150-849 - A mini VIDAS... - Page 125 The Assay Reports Results and Reports Figure 6-3: Example of a qualitative result report Note: For dual reagent strip, «Reference» is reported next to the position of the test strip. ® 161150-849 - A mini VIDAS...
-
Page 126: Quantitative Assays Results
The result is a concentration given in the chosen unit. Figure 6-4: Example of a quantitative result report 1 — Software and protocol version 2 — Reagent lot number 3 — Relative Fluorescence Value 4 — Result concentration ® 161150-849 - A mini VIDAS... -
Page 127: Assay Report Errors
Results and Reports Assay Report Errors ® The mini VIDAS assay report is designed to display error messages whenever a result does not conform to the internal requirements that are programmed for each assay. On the report, any values found to be outside control ranges are noted. -
Page 128: Reprinting An Assay Report
Reprinting an Assay Report Results and Reports Reprinting an Assay Report ® Note: Only those tests stored in the mini VIDAS analyzer memory are available for reprinting. If ® themini VIDAS analyzer is turned off, stored results are no longer available. -
Page 129: Editing Data Before Reprinting An Assay Report
5. Select Yes to view one or more positions in a section before reprinting results. 6. Press a digit, 1 to 6, on the keypad to recalculate the results of this section using a more recent standard. ® 161150-849 - A mini VIDAS... - Page 130 Note: After recalculation, you cannot retrieve the original standard/calibrator. 8. Press to edit the next section. When all sections have been printed, the screen returns to the Results Menu. 9. Press to return to the Main Menu. ® 161150-849 - A mini VIDAS...
-
Page 131: Validating Lis Results
Results and Reports Validating LIS Results ® The mini VIDAS software has a unidirectional interface which allows results to be uploaded to the Laboratory Information System (LIS). You can access results to be uploaded when the option «LIS auto validation» is not activated. -
Page 132: Canceling Uploads Of Results To The Lis
Main Menu. Note: A result can only be uploaded once (unless the section results are reprinted). ® CAUTION: If you turn OFF themini VIDAS analyzer, the memory will refresh and results will be lost. ® 161150-849 - A 6-10 mini VIDAS... -
Page 133: Validating Internal Quality Controls Transfers (For Clinic Use Only)
Results menu. Note: A result can only be uploaded once (unless the section results are reprinted). If results are reprinted, they can also be recalculated. Reprinting an Assay Report on page 6-6. ® 161150-849 - A 6-11 mini VIDAS... -
Page 134: Printing The Mini Vidas ® Assay List
Results and Reports ® Printing the mini VIDAS Assay List ® Use this procedure to print a list of the mini VIDAS assays that have Master Lot Data loaded ® on your mini VIDAS analyzer. The assay list includes the complete name of each assay and its assay code. -
Page 135: Miscellaneous Operations
This section contains the procedures needed to change these parameters from the values set by bioMérieux. ® Note: We suggest that you use the mini VIDAS analyzer for several days before changing any of the settings. Later, if you find that you need to change the settings, you can make the necessary adjustments. -
Page 136: Testing The Mini Vidas ® Analyzer
If the intensity decreases considerably or becomes irregular, call bioMérieuxTechnical Assistance or your local bioMérieux representative. ® Note: The intensity of the display does not affect the mini VIDAS analyzer's ability to perform operations. ® 161150-849 - A... -
Page 137: Testing The Keypad
Testing the mini VIDAS analyzer Miscellaneous Operations Testing the Keypad ® This test ensures that every key on the keypad is connected to the mini VIDAS analyzer. The test requires that you press every key on the keypad. ® The mini VIDAS analyzer responds with a symbol for each key on the display. -
Page 138: Testing The Printer
® Testing the mini VIDAS analyzer Miscellaneous Operations Testing the Printer Testing the printer is a matter of sending a string of known characters and ensuring that those characters are printed. There are two printer tests: one for an internal and one for an external printer. -
Page 139: Updating An Assay
® the VIDAS assay protocols. ® IMPORTANT: This function enables you to transfer assay data to the mini VIDAS analyzer when a new assay is used or when an existing assay is updated. ® IMPORTANT: The update is stored in the mini VIDAS analyzer for further use of the assays. -
Page 140: Reading Assay Update Card Bar Codes
The assay update card bar code screen is displayed: 1 — Assay Update: describes the status of the current reading. 2 — Reading instructions: follow these instructions as they appear during the update procedure. ® 161150-849 - A mini VIDAS... - Page 141 Continue until reading is successful. The reading screen is updated. 1 — Total number of bar codes to be read. 2 — Number of the code already read. The codes may not necessarily be read in numerical order. ® 161150-849 - A mini VIDAS...
- Page 142 11. Wait a few moments for the data to be saved. The Utility Menu is displayed. The update is complete. 12. Press to return to the Main Menu. An assay update report is printed. ® 161150-849 - A mini VIDAS...
-
Page 143: Displaying The Mini Vidas ® Software Version
® Displaying the mini VIDAS Software Version Miscellaneous Operations Bar code reading may fail if • The code was not correctly read by the reader. • The code is unreadable (incomplete, stained, or torn). • The code read does not belong to the series of codes for the current update. You should only read codes belonging to the same series. -
Page 144: Displaying The Assay Version
6. Press any key to return to the assay selection list. 7. Repeat this procedure to display additional assays. Press to return to the Main Menu. ® 161150-849 - A 7-10 mini VIDAS... -
Page 145: Section Counters
4. Select a section. A screen appears showing the 2 counters. ® 1 — [C1]: The number of job lists run in this section since the mini VIDAS analyzer was installed. 2 — [C2]: The number of job lists run in this section since the last reset performed by a bioMérieux representative. -
Page 146: Updating The Mini Vidas ® Software
® To update the mini VIDAS software: ® 1. Shut down the mini VIDAS analyzer (see “Shutting Down the System” on page 4-4). 2. Place the memory card in the slot on the back of the instrument, in the direction indicated by the arrow, with the label towards the outside. -
Page 147: Verifying The Memory Card Data
Verifying the Memory Card Data Use this procedure to verify the data on the memory card that is installed in the memory card ® slot on the back of the mini VIDAS analyzer. 1. Select Utility Menu in the Main Menu. -
Page 148: Maintenance
Maintenance ® Maintenance of the mini VIDAS analyzer comprises: • the preventive maintenance operations performed by bioMérieux technicians or a qualified person trained by bioMérieux, • the routine maintenance operations which should be performed by the user. Preventive Maintenance mini VIDAS®... -
Page 149: User Maintenance
Routine cleaning which should be performed on a periodic basis. • Cleaning of accidental spills (accidental contamination), which should be dealt with immediately. ® CAUTION: Turn the mini VIDAS analyzer power switch to OFF and then disconnect the power cord (see Starting the System on page 4-3).... -
Page 150: Cleaning The Spr Block (Monthly)
3. Tilt the safety latch located on the left side and then fully open the SPR block door. ® Note: Previous versions of the mini VIDAS analyzer have no safety latch. For these versions, you ® can directly open the SPR block door ®... - Page 151 ® IMPORTANT: The presence of fibers from the Dacron swab inside the SPR liners may interfere with ® the performance of the mini VIDAS analyzer. ® When cleaning the SPR liners, replace any swab if it becomes fluffy. ®...
- Page 152 Field Service Engineer. In the event of accidental spills or contamination, it is imperative that you contact bioMérieux or your bioMérieux representative. Handling of the seals may affect the performance of your instrument. ® 161150-849 - A mini VIDAS...
- Page 153 ® 8. Repeat this procedure for each SPR liner of each block. ® 9. If no other maintenance tasks have to be performed, start the mini VIDAS analyzer (see Starting the System on page 4-3). ®...
-
Page 154: Cleaning The Reagent Strip Trays (Every 6 Months Or If Needed)
3. Clean the strip slots with the cleaning and disinfection wipes. Note: Wipe all surfaces thoroughly with the wipe, ensure complete wetting and allow to take effect. ® 4. If no other maintenance tasks have to be performed, start the mini VIDAS analyzer (see Starting the System on page 4-3). -
Page 155: Cleaning The Plastic Trays (Every 6 Months Or If Needed)
4. Clean the plastic tray with cleaning and disinfection wipes. Note: Wipe all surfaces thoroughly with the wipe, ensure complete wetting and allow to take effect. ® 5. If no other maintenance tasks have to be performed, start the mini VIDAS analyzer (see Starting the System on page 4-3). -
Page 156: Cleaning The Strip Preparation Trays (Every 6 Months Or If Needed)
3. Clean the strip preparation tray with cleaning and disinfection wipes. Note: Wipe all surfaces thoroughly with the wipe, ensure complete wetting and allow to take effect. ® 4. If no other maintenance tasks have to be performed, start the mini VIDAS analyzer (see Starting the System on page 4-3). -
Page 157: Cleaning The Outer Covers Of The Instrument (Every 6 Months Or If Needed)
2. Wipe all surfaces with cleaning and disinfection wipes. Note: Wipe all surfaces thoroughly with the wipe, ensure complete wetting and allow to take effect. ® 3. If no other maintenance tasks have to be performed, start the mini VIDAS analyzer (see Starting the System on page 4-3). -
Page 158: Cleaning Optical Lenses (Monthly)
® ® IMPORTANT: The VIDAS Lens Cleaner is intended for cleaning the optical lenses of the mini VIDAS analyzers. • Turn the power switch to OFF before cleaning the optical lenses. ®... -
Page 159: Checking The Pipetting System (Monthly)
Checking the Pipetting System (Monthly) ® ® CAUTION: Quality Control VIDAS (QCV) must be run on all the mini VIDAS analyzer positions at least once a month or anytime that a pipetting problem is suspected. ® The Quality Control VIDAS (QCV) allows to check pipette mechanisms of the section pumps. -
Page 160: Calibration And Adjustments
Self-calibration ® To further verify the performance of the optical system, the mini VIDAS analyzer also uses the optical reference to detect instrument problems before they have an opportunity to impact the results of an assay. - Page 161 ® • If the result is outside of the internal adjustment range, the mini VIDAS analyzer automaticaily readjusts the optical system to bring the result back within the expected range....
-
Page 162: Pipetting System
Each tray and SPR block contains a highly accurate and stable temperature sensing device ® called a thermistor. The thermistors used in the mini VIDAS analyzer are 0.2°C accurate. Self diagnostics The software controlling the instrument runs an algorithm which measures the temperature at each thermistor every 60 seconds. -
Page 163: Master Curve Establishment And Calibration
® Recalibration serves to control for minor variations in assay signal from one mini VIDAS analyzer to another and is therefore specific for each instrument. On receipt of a new lot of reagents, the customer must enter the master curve data. It may be entered by a bar code scanner or manual entry of the codes. -
Page 164: Appendix - Maintenance Records
Bar code reader Every 6 months or if needed Cleaning the Bar Code Reader (Every 6 Months or if Needed) Optical lenses Monthly Cleaning Optical Lenses (Monthly) Pipetting device Monthly Checking the Pipetting System (Monthly) ® 161150-849 - A mini VIDAS... -
Page 165: Maintenance Check-List
Maintenance Check-List Appendix - Maintenance Records Maintenance Check-List YEAR: Month 10 11 12 Frequency 6M/N 6M/N 6M/N 6M/N ® 161150-849 - A mini VIDAS... - Page 166 (using VIDAS Lens Cleaner) Checking the Pipetting System ® (using VIDAS QCV) Frequency M = Monthly 6M = Every 6 months N = if needed Complete with your initials Keep the preventive maintenance charts. ® 161150-849 - A mini VIDAS...
-
Page 167: Appendix - Troubleshooting
• Error beep. ® You can set the volume of the beep the mini VIDAS analyzer emits when there is an error. There are configuration options to set an initial volume and a final volume. The initial volume is the volume used when the beep begins.... -
Page 168: Error Messages And Recovery Procedures
The display blinks. • The error message is printed. ® Start errors cause the mini VIDAS analyzer to stop the run in the section containing the error. The other section is not affected by any of this action. 1. Press to display the error message screen. - Page 169 Appendix - Troubleshooting 4. Select Cancel to abort the run. 5. Select Restart to restart the run. ® Note: If you select Cancel, the mini VIDAS analyzer returns to the state it was in before the run was started.
- Page 170 1. Stop and return to the section status Select Assay Load and Go run when the same strip screen to select the assay you want to can be used for different assays (eg.: run. ® ® VIDAS LYG and VIDAS LYGS). ® 161150-849 - A mini VIDAS...
-
Page 171: Manually Entering Bar Codes
When the bar code entry has been completed, 4. Press ® The mini VIDAS analyzer checks the bar code you entered. • If the bar code is valid, the display returns to the Error message screen. • If the bar code is not valid, the following message appears: Warning: Barcode still invalid... - Page 172 Restart Cancel 7. Select Cancel to abort the run. Select Restart to restart the run. ® Note: If you select Cancel, the mini VIDAS analyzer returns to the state it was in before the run was started. Any data you entered about the assays are retained.
-
Page 173: Other Error Messages
® mini VIDAS. They are saved unless THE mini VIDAS analyzer power is shut off. You can access stored error messages via the View Saved Errors function. -
Page 174: Error Messages
Other Error Messages Appendix - Troubleshooting Error Messages ® Listed below are all of the error messages programmed into the mini VIDAS analyzer. • If error messages other than the ones below appear, call bioMérieux Technical Assistance or your local bioMérieux representative. - Page 175 Cause Resolution ® 1. Make sure the protocol memory card is Assay data load The mini VIDAS analyzer cannot read in the memory card slot. the protocol memory card. failed 2. Reinsert the memory card to ensure proper contact. 3. Retry the last operation.
- Page 176 2. If the error recurs, call bioMérieux Technical Assistance or your local bioMérieux representative. This error would occur during the power- Unable to initialize ® 1. Shut down the mini VIDAS analyzer on startup sequence. Section (see Shutting Down the System on page 4-4.)
-
Page 177: Shut Down The Mini Vidas
Validating LIS Results on page 6-9). full queues This error would appear during the ® Boot EPROM obsolete 1. Shut down the mini VIDAS analyzer power-on startup sequence and then restart it (see Shutting Down the System on page 4-4... -
Page 178: Starting The System On Page
Other Error Messages Appendix - Troubleshooting Table B-2: Problem Resolution Error Message / Problem Cause Resolution ® Scan head motor 1. Shut down the mini VIDAS analyzer failure (see Shutting Down the System on page 4-4). 2. Check for any physical obstructions that could cause a jam. -
Page 179: Analyzer
Other Error Messages Appendix - Troubleshooting Table B-2: Problem Resolution Error Message / Problem Cause Resolution ® Optical hardware 1. Shut down the mini VIDAS analyzer failure (or excessive (see Shutting Down the System on auto-calibration page 4-4). drift) 2. Clean the optical lenses (see... - Page 180 Tray temperature out strip tray. of allowed range 2. If the temperature is low, make sure all ® doors on the mini VIDAS analyzer are closed. 3. Allow time for the temperature to equilibrate. 4. If the error recurs, call bioMérieux Technical Assistance or your local bioMérieux representative.
-
Page 181: Problems That May Occur With The Bar Code Reader
The reading distance is incorrect: 1. Slowly move the reader away from and/or towards the bar code until the optimal position for reading has been reached. Note: A beep indicates that reading has been performed. ® 161150-849 - A B-15 mini VIDAS... -
Page 182: Assay Report Errors
Correcting Assay Report Errors In all cases, the test should be repeated. ® If the error recurs and you suspect a problem in the mini VIDAS analyzer, call bioMérieux Technical Assistance. Assay Report Error Symbols The symbols in Table B-3 are used on assay reports to indicate error messages. -
Page 183: Error Messages On Assay Reports
The test result should not be taken into account, and it is recommended to repeat calibration for the test. Printer Errors ® If the internal printer is out of paper or does not respond, the mini VIDAS analyzer will keep retrying for 30 seconds and begin beeping. 1. Press to display the error message screen. -
Page 184: Viewing Saved Errors
The mini VIDAS analyzer stores the last ten error messages it creates. ® These messages remain in the mini VIDAS analyzer unless the power is turned off. Use the following procedure to access the stored error messages. 1. Select Utility Menu in the Main Menu. -
Page 185: Appendix - Installing External Hardware
2. Set the printer near the mini VIDAS analyzer within reach of the printer cable and an appropriate electrical outlet. ® 3. Locate the Printer Port on the rear of the mini VIDAS analyzer. Figure C-1: location of printer port ®... -
Page 186: External Printer
Installation 1. Connect the cable to the bar code reader. ® 2. Make sure that the mini VIDAS analyzer has been configured to use the correct bar code reader. 3. Select Barcode Wand in the Configuration Menu. - Page 187 Caution: Always shut down the mini VIDAS analyzer before connecting the external bar code reader. ® 7. Locate the diagnostic port on the rear of the mini VIDAS analyzer. Figure C-2: Location of diagnostic port 8. Connect the bar code reader cable to the diagnostic port.
-
Page 188: Appendix - Computer Interface Information
It contains everything to support a unidirectional computer interface. ® This interface only allows the mini VIDAS results to be transmitted (i.e., uploaded) to the Laboratory Information System (LIS) or other host computer system. -
Page 189: Configuration Information
• ! @ # $ % ^ & * ( ) - = + < > / ? [ ] \ | { } • | Send Text Message Used to send text message patern ® 161150-849 - A mini VIDAS... -
Page 190: Example Of A Mini Vidas ® Upload
Configuration Information Appendix - Computer interface information ® Example of a mini VIDAS Upload ® 161150-849 - A mini VIDAS... -
Page 191: Appendix - Technical Data And Specifications (Previous Versions Of Mini Vidas Analyzers
Appendix - Technical Data and Specifications ® (previous versions of mini VIDAS analyzers) ® Technical data and specifications are given for previous versions of the mini VIDAS analyzer (analyzer without transparent blue section covers). Dimensions Instrument packed Instrument unpacked Height (cm) -
Page 192: Electrical Specifications
® Electrical Specifications Appendix - Technical Data and Specifications (previous versions of mini VIDAS analyzers) Electrical Specifications The instrument includes an internal bar code reader with a 660 nm LED whose radiation is Class 1 according to IEC 60825-1. This class does not present a risk. -
Page 193: Environmental Conditions
® Environmental Conditions Appendix - Technical Data and Specifications (previous versions of mini VIDAS analyzers) Environmental Conditions Specification Value Type of Installation For indoor use only Installation category Pollution degree ® The mini VIDAS analyzer meets the environmental safety requirements defined in clause 1.4 of the standard IEC 61010-1. -
Page 194: Technical Features
® Technical features Appendix - Technical Data and Specifications (previous versions of mini VIDAS analyzers) Technical features Capacity • 12 test positions (2 sections with 6 positions in each section). • Up to 30 tests/hour depending on the type of assay used (see test duration in the package ®... -
Page 195: Optics
® Optics Appendix - Technical Data and Specifications (previous versions of mini VIDAS analyzers) Optics Specification Value Detector Photodiode fluorimeter Detection range 40 to 40 000 nmol of 4MU (4-Methyl Umbelliferone) Automatic checking Automatic checking every 12 hours of the optic system against a reference standard (named "solid... -
Page 196: Appendix - Glossary
These calculations can be different for each type of assay and can interpret the assay result. Assay code ® A two-, three-, or four-character designation for an assay used in the mini VIDAS analyzer. ® Assays are defined in the mini VIDAS analyzer, for example, using the assay code. - Page 197 A numerical value that represents the intensity of fluorescence detected by the optical scanner. Load and Go run ® An assay run in which reagent strips are placed into the mini VIDAS analyzer and run ® without any prior definition on the mini VIDAS analyzer.
- Page 198 A unit in the mini VIDAS analyzer that contains the fluorescent detector and the bar code reader. Section ® A microprocessor-controlled assay processing unit in the mini VIDAS analyzer. Each ® analyzer has two sections. Each section contains an SPR block with six corresponding ®...
- Page 199 Standard is used to calculate concentrations and to interpret samples or controls. Stored Standard ® The test result of a standard, stored as data in the mini VIDAS analyzer, and used to calculate results for test samples over a period of time.
- Page 200 Relative Fluorescent Value of the reference or of the standard, depending upon whether it is a dual or Single reagent strip, respectively. Threshold ® A numerical value stored in the mini VIDAS analyzer memory. It is used to translate the test value to qualitative results such as «Positive», «Negative», «Equivocal».
- Page 201 Revision History This section contains a summary of changes made to each released revision of this manual starting with part number 161150-849 - A. Change type categories: Not applicable (First publication) Correction Correction of documentation anomalies Technical change Addition, revision and/or removal of information related to the product Administrative Implementation of non-technical changes noticeable to the user Note: •...
Need help?
Do you have a question about the mini VIDAS and is the answer not in the manual?
Questions and answers
h pylori master lot
The specific H. pylori master lot for bioMérieux VIDAS is not provided in the given context.
This answer is automatically generated
cost of the machine mini vidas
The cost of the bioMerieux mini VIDAS machine ranges from $3,000 to $5,944, with an average price of $4,683.
This answer is automatically generated
Cost of machine miniVidas manufactured in 2020
Error 7919