
Related Manuals for Hilti DS TS20-E 1.6


Summary of Contents for Hilti DS TS20-E 1.6
- Page 1 DS TS20-E 1.6 Operating instructions Printed: 09.03.2015 | Doc-Nr: PUB / 5139344 / 000 / 01...
-
Page 2: Table Of Contents
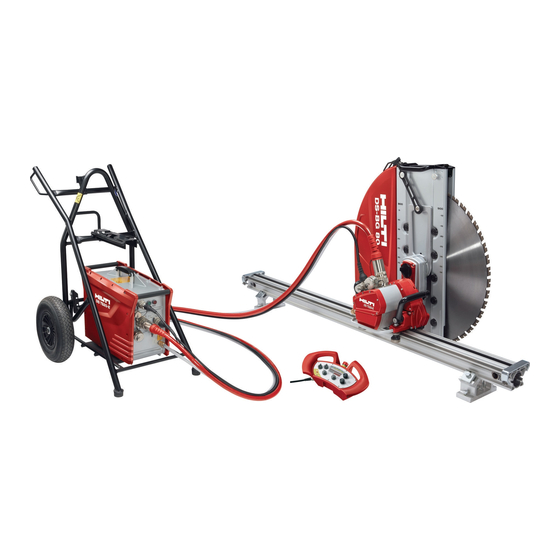
ORIGINAL OPERATING INSTRUCTIONS DS TS20-E 1.6 3×400 V electric wall saw Contents It is essential that the operating instructions are read before the machine is operated for the first time. 1. General information Always keep these operating instructions together with the machine. - Page 3 Parts and equipment Saw head Blade guard - center section Power unit Blade guard – side section Remote control unit Guide rail with end stop Power cable, control cable and water hose Accessory box with rail support and toolbox Transport trolley – saw head Transport trolley - accessories Printed: 09.03.2015 | Doc-Nr: PUB / 5139344 / 000 / 01...
-
Page 4: General Information
General information 1. General information /min Amps Volts Hertz Millimeters Revolutions Revolutions Rated per minute per minute no-load speed Safety notices and their meaning DANGER Draws attention to imminent danger that could lead to To avoid damage when temperatures below freez- serious bodily injury or fatality. -
Page 5: Description
1. The DS TS20-E is an electrically-powered, rail-guid- 8. Use only genuine Hilti accessories (available as options) ed wall saw designed for cutting lightly to heavily-rein- for angled or stepped cuts or for flush cutting. -
Page 6: Accessories
Accessories 3. Accessories Item no. Designation 284808 DS-R100-L rail Saw guidance 284809 DS-R200-L rail Saw guidance 284810 DS-R230-L rail Saw guidance 371703 DS-ES-L end stop Safety stop for saw head 207137 DS-CP-ML rail clamp Fastening rails 284814 DS-RF-L rail support Fastening rails 284816 DS-RFP-L rail support... -
Page 7: Technical Data
Technical data 4. Technical data Technical data for the DS TS20-E power unit* DS EB-TS20 3 × 400 V DS EB-TS20 3 × 200 V Rated voltage 380 to 480 V ~ 200 to 280 V ~ Voltage tolerance ± 10% Mains frequency 50 / 60 Hz Pin assignment... - Page 8 Technical data Technical data for the DS TS20-E remote control unit DS RC-TS20 remote control unit Cable length 10 m Voltage 24 V DC Protection class **** IP 65 Weight 2.2 kg Dimensions l × w × h 39 × 19 × 12.5 cm **** Rated values guaranteed at max.
-
Page 9: Safety Precautions
Safety precautions 5. Safety precautions k) Dress properly for the work. Do not wear loose cloth- ing or jewelry as it could be caught in moving parts. Contain long hair. l) Keep children away. Keep other persons away from WARNING the working area. -
Page 10: Printed: 09.03.2015 | Doc-Nr: Pub / 5139344 / 000 / 01
Hilti for wood dust and/or mineral dust 3. Check that the area is cordoned off, that supports are together with this tool. Ensure that the workplace is in place and warnings to third parties are displayed. -
Page 11: Printed: 09.03.2015 | Doc-Nr: Pub / 5139344 / 000 / 01
Damaged or faulty switches must be replaced at a high place or locked away out of reach of children. Hilti service center. Do not use the machine if it cannot be switched on and off correctly. j) Always disconnect the machine from the electric sup- ply when it is not in use (e.g. -
Page 12: Printed: 09.03.2015 | Doc-Nr: Pub / 5139344 / 000 / 01
Do not touch rotating parts. and must have been trained in their safe application by a Hilti specialist. Observe the permissible drive unit parameters, blade rotation speed and advance speed while sawing. -
Page 13: Preparations At The Workplace
Preparations at the workplace 6. Preparations at the workplace Safety instructions for transporting the equipment Planning the cutting sequence, marking the cutting line and fastening points Avoid lifting and carrying heavy objects. Use suitable 1. The parts to be cut out are usually marked by the client. lifting equipment and means of transport and share A rational cutting sequence can be followed when the heavy loads between several people. -
Page 14: Printed: 09.03.2015 | Doc-Nr: Pub / 5139344 / 000 / 01
Preparations at the workplace ■ Extension cables must be fully unrolled before the Electric power supply / fuse rating wall saw is put into operation. CAUTION Irrespective of whether using mains power or genera- tor power, always check that an earth/ground conduc- Cooling water supply tor and ground fault circuit breaker are present in the 1. -
Page 15: Setting Up The Wall Saw System
Setting up the wall saw system 7. Setting up the wall saw system Connecting the power unit NOTE Operating the main swith several times in quick succession will cause the electric supply to be temporarily inter- rupted. Wait for a few seconds before switching on again. 1. -
Page 16: Printed: 09.03.2015 | Doc-Nr: Pub / 5139344 / 000 / 01
Under certain conditions it may be necessary Fastening the rail supports to use an alternative fastening method. Please contact CAUTION Hilti Technical Service if you have any questions about ■ Failure to observe the spacing shown may cause the secure fastening. -
Page 17: Printed: 09.03.2015 | Doc-Nr: Pub / 5139344 / 000 / 01
3. Clean the holes (remove the drilling dust). 4. Insert and expand the anchors (e.g. Hilti HKD-D M12) using the setting tool. 5. Screw in the fastening screws (8.8 grade with collar nut, supplied in the accessory box) to their full depth by hand. -
Page 18: Printed: 09.03.2015 | Doc-Nr: Pub / 5139344 / 000 / 01
Setting up the wall saw system Parts Designation Rail Rail clamp Rail support Rail clamping plate Rail clamping screw Leveling screws Clamping plate for stepped cuts A [°] B [cm] C [cm] ∅ 700 mm ∅ 800 mm ∅ 900 mm ∅... -
Page 19: Printed: 09.03.2015 | Doc-Nr: Pub / 5139344 / 000 / 01
Setting up the wall saw system Extending the rail NOTE ■ When long cuts are to be made, tapered connectors and eccentric pins can be used to join individual rails togeth- er to form a rigid unit. 1. Clean the tapered connector and connector sleeves. 2. -
Page 20: Printed: 09.03.2015 | Doc-Nr: Pub / 5139344 / 000 / 01
Setting up the wall saw system Parts Designation Clamping lever Release button Guide roller Guiding surface Adjusting the blade guard 1. Release the clamping screw on the saw arm. 2. Pivot the blade guard holder into the desired position. 3. Tighten the clamping screw Parts Designation Blade guard holder... -
Page 21: Printed: 09.03.2015 | Doc-Nr: Pub / 5139344 / 000 / 01
Use the DS FCA flush-cutting flange and flush-cutting blade guard (available as accessories) for flush-cutting applications. ■ Use only the original Hilti screw (10.9 grade steel) as the central blade mounting screw. ■ Before operating the wall saw each time, always check the mounting flange and saw blade for damage, cracks or discoloration caused by overheating and clean the saw blade if it has been oiled or greased. -
Page 22: Printed: 09.03.2015 | Doc-Nr: Pub / 5139344 / 000 / 01
Setting up the wall saw system Fitting the blade guard NOTE ■ Should it prove impossible to use the blade guard due to specific circumstances at the working area, spe- cial measures must be taken, such as construction of a temporary enclosure (e.g. using forming boards), to protect the surrounding area from flying fragments etc. -
Page 23: Printed: 09.03.2015 | Doc-Nr: Pub / 5139344 / 000 / 01
Setting up the wall saw system 7.10 Adjusting the blade cooling water flow rate Set the water regulating valve to the desired flow rate. Printed: 09.03.2015 | Doc-Nr: PUB / 5139344 / 000 / 01... -
Page 24: Operation
Operation 8. Operation Checks before beginning sawing 1. On-site preparations must be completed (supports, water collection, etc.). 2. The power unit must be positioned outside the danger zones. The areas in front of and behind the object where sawing is to take place are danger zones and must be secured and cordoned off. No persons may remain in a danger zone. - Page 25 Lights when a phase is missing, voltage is too low or too high or out of synchronization. Service indicator Lights when servicing is due (end of service interval). Servicing should be carried out by Hilti. Theft protection Not active. Emergency of indicator Lights when the emergency stop has not been reset –...
- Page 26 Operation Operating hours counter After switching on, the following information is displayed: power unit firmware version (Exx), saw head firmware version, operating hours and total saw head operating hours. Power indicator The actual power input is displayed during operation of the saw (in %). Supply voltage During operation, turn starting switch to “Start”...
- Page 27 Operation 8. Once the cut has been completed or the maximum depth reached, use the plunge movement direction control to lift the saw blade out of the kerf while the blade is still rotating, bringing the saw and saw arm to the 90° position.
-
Page 28: Care And Maintenance
Operation / Care and maintenance Dismantling the saw system 1. Pivot the saw arm to the 90° position. Switch the machine off, disconnect the cables and fit the protective caps to the plugs and sockets. 2. Disconnect the water hose from the saw head and clean the blade guard, saw head and rail system. 3. -
Page 29: Maintenance
Care and maintenance Maintenance Parts Procedure Daily Weekly ● Rail supports Check the contact and clamping surfaces, clean if necessary. Check the threads for smoothness and ease of operation,clean and ● grease if necessary. ● Rails Check the contact and running surfaces, clean if necessary. ●... -
Page 30: Troubleshooting
Service intervals We recommend that the system is checked at a Hilti service center after every 200 operating hours. This will ensure that the equipment is ready for use when required and help avoid high subsequent costs. -
Page 31: Troubleshooting
– Return the power unit to Hilti Service Symbol 16 lights No fault Service interval has been – Return the saw head to Hilti for reached servicing Symbol 18 lights Machine cannot be switched Emergency stop reset button – Press the reset button / restart hasn’t been pressed... - Page 32 Er30 The machine has switched The slip clutch has been – Observe the application guidelines itself off activated as a result of how the – Return the saw head to Hilti saw is being used Service Display Er33 The machine has switched Saw used incorrectly - overload –...
-
Page 33: Disposal
■ The machine may be operated, serviced and repaired only by authorized personnel who have been trained by Hilti. This personnel must be informed of any special hazards that may be encountered. ■ Repairs to electrical components may be carried out only by trained electrical specialists. -
Page 34: Manufacturer's Warranty - Tools
Manufacturer's warranty – tools / EC declaration of conformity (original) 12. Manufacturer's warranty – tools 13. EC declaration of conformity (original) Hilti warrants that the tool supplied is free of defects in material and workmanship. This warranty is valid so Designation: Electric wall saw... - Page 35 Printed: 09.03.2015 | Doc-Nr: PUB / 5139344 / 000 / 01...
- Page 36 Hilti Corporation LI-9494 Schaan Tel.: +423 / 234 21 11 Fax: +423 / 234 29 65 www.hilti.com Hilti = registered trademark of Hilti Corp., Schaan en I 20150209 Printed: 09.03.2015 | Doc-Nr: PUB / 5139344 / 000 / 01...
Need help?
Do you have a question about the DS TS20-E 1.6 and is the answer not in the manual?
Questions and answers